Hunter 23781 Owner's Manual
Hunter 23781 Manual
 |
View all Hunter 23781 manuals
Add to My Manuals
Save this manual to your list of manuals |
Hunter 23781 manual content summary:
- Hunter 23781 | Owner's Manual - Page 1
For Your Records and Warranty Assistance For reference, also attach your receipt or a copy of your receipt to the manual. Model Name Model No. Date Purchased Where Purchased Type 2 Models Owner's Guide and Installation Manual English Español Form# 42609-01 20110112 ©2011 Hunter Fan Co. - Hunter 23781 | Owner's Manual - Page 2
Cleaning Your Ceiling Fan 15 9 • Troubleshooting 16 Cautions and Warnings • READ THIS ENTIRE MANUAL CAREFULLY BEFORE BEGINNING INSTALLATION. SAVE THESE INSTRUCTIONS. • Use only Hunter replacement parts. • To reduce the risk of personal injury, attach the fan directly to the support structure of - Hunter 23781 | Owner's Manual - Page 3
an approved connector. • Six inches of lead wires extend from outlet box. If your existing fan site is suitable, skip ahead to Section 2 • Installing the Ceiling Plate. Fan Support System Fan Support System Suitable Existing Fan Site Wiring Outlet Box 3 42609-01 • 01/12/11 • Hunter Fan Company - Hunter 23781 | Owner's Manual - Page 4
go to your fan manual and continue with Section 2 • Installing the Ceiling Plate. Step 5 CAUTION: All wiring must be in accordance with national and local electrical codes and ANSI/NFPA 70. If you are unfamiliar with wiring, use a qualified electrician. 4 42609-01 • 01/12/11 • Hunter Fan Company - Hunter 23781 | Owner's Manual - Page 5
you maximum installation flexibility and ease. You can install your Hunter fan in one of three ways, depending on ceiling height and your preference: Low Profile, Standard, or Angle mounting. The steps in this manual include instructions for all three Installer's Choice mounting methods. Considering - Hunter 23781 | Owner's Manual - Page 6
. Refer to the included Parts Guide. Check for any shipping damage to the motor or fan blades. If any parts are missing or damaged, contact your Hunter dealer or call Hunter Technical Support Department at 888-830-1326 (In Canada, call 1-866-268-1936). 6 42609-01 • 01/12/11 • Hunter Fan Company - Hunter 23781 | Owner's Manual - Page 7
the service panel. 2-1. Drill two pilot holes into the wood support structure Ceiling Peak For Angled Ceilings: Be sure to orient the ceiling plate so that the two tabs are pointing towards the ceiling peak. Ceiling Plate 3" Wood Screw Steps 2-3 - 2-6 7 42609-01 • 01/12/11 • Hunter Fan Company - Hunter 23781 | Owner's Manual - Page 8
instructions. 3-1. Unbundle the wires from the fan. Downrod For Standard or Angle mounting: 3-2. Insert the downrod through the canopy and canopy trim ring. Feed the wires from the fan • Hanging and Wiring the Fan. CAUTION: The adapter has a Hanging and Wiring the Fan. Canopy Trim Ring Canopy Step - Hunter 23781 | Owner's Manual - Page 9
from the ceiling to the white wire from the fan • The black wire from the ceiling to the black wire from the fan • The black/white wire from the fan to the wire for the wall switch 4-3. Push all wires and wire connectors into the outlet box. 9 42609-01 • 01/12/11 • Hunter Fan Company Wire Connector - Hunter 23781 | Owner's Manual - Page 10
canopy up with the screw holes aligned, partially install two canopy screws into the holes opposite the ceiling plate tabs. 5-4. Partially install a canopy screw between the slots in the canopy. When all the canopy trim ring. Canopy Screw 10 42609-01 • 01/12/11 • Hunter Fan Company - Hunter 23781 | Owner's Manual - Page 11
Blades Hunter fans use several styles of fan blade irons (brackets that hold the blade to the fan). 6-1. Your fan may include blade grommets. If your fan has mounting screw through the blade iron, and attach lightly to the fan. Insert the second blade mounting screw, then securely tighten both - Hunter 23781 | Owner's Manual - Page 12
: Use only the light fixture supplied with this fan model. Note: In compliance with US federal energy regulations, this ceiling fan contains a device that restricts its light output. not appear to be operating properly, see the troubleshooting section. 12 42609-01 • 01/12/11 • Hunter Fan Company - Hunter 23781 | Owner's Manual - Page 13
bulbs (40 Watt maximum each). Plug Connector Step 7-5 Lower Switch Housing Plug Connector Detail Light Bulb Shade Step 7-6 Steps 7-8 - 7-9 13 42609-01 • 01/12/11 • Hunter Fan Company Housing Assembly Screw - Hunter 23781 | Owner's Manual - Page 14
with three screws. Light Kit Nut Lower Switch Housing Screws Step 9 Plug Button Light Assembly Screws Cap Step 8 Step 5 14 42609-01 • 01/12/11 • Hunter Fan Company - Hunter 23781 | Owner's Manual - Page 15
chain has two settings: On and Off. 8-4. Ceiling fans work best by blowing air downward (counterclockwise blade fan off and let it come to a complete stop. Slide the reversing switch on the fan to the opposite position. Restart fan. Reversing Switch 15 42609-01 • 01/12/11 • Hunter Fan Company - Hunter 23781 | Owner's Manual - Page 16
CFL bulbs with dimmable light bulbs, or install the fan in a location without a dimming control. If you need parts or service assistance, please call 888‑830‑1326 or visit us at our Web site at http://www.hunterfan.com. Hunter Fan Company 7130 Goodlett Farms Pkwy. #400 Memphis, Tennessee 38016
-
 1
1 -
 2
2 -
 3
3 -
 4
4 -
 5
5 -
 6
6 -
 7
7 -
8
-
9
-
10
-
11
-
12
-
13
-
14
-
15
-
16
 |
 |

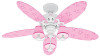
Type 2 Models
Type 2 Models
Type 2 Models
Form# 42609-01
20110112
©2011 Hunter Fan Co.
For Your Records and
Warranty Assistance
For reference, also attach your receipt or a copy
of your receipt to the manual.
__________________________________________
Model Name
__________________________________________
Model No.
__________________________________________
Date Purchased
__________________________________________
Where Purchased
English
Español
Owner’s Guide and Installation Manual