Husqvarna 128CD Owners Manual
Husqvarna 128CD Manual
 |
View all Husqvarna 128CD manuals
Add to My Manuals
Save this manual to your list of manuals |
Husqvarna 128CD manual content summary:
- Husqvarna 128CD | Owners Manual - Page 1
- Husqvarna 128CD | Owners Manual - Page 2
and trimmer head 13 FUEL HANDLING Fuel 15 Fueling 15 STARTING AND STOPPING Check before starting 16 Starting and stopping 16 MAINTENANCE Carburetor 18 Muffler 18 Spark plug 19 Two--piece shart 19 Air filter 19 Bevel gear 19 Maintenance schedule 20 Trimmer head line loading instructions - Husqvarna 128CD | Owners Manual - Page 3
. Visual check. Approved eye protection must always be used. Always wear approved protective gloves. Wear sturdy, non--slip boots. Only use non--metallic, flexible cutting attachments, i.e. trimmer heads with trimmer line. 115275126 Rev. 1 9/15/09 English--- 3 - Husqvarna 128CD | Owners Manual - Page 4
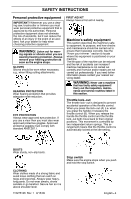
INSTRUCTIONS Personal protective equipment IMPORTANT! Whenever you use a clearing saw, brushcutter or trimmer e.g., when fitting cutting attachments. HEARING PROTECTION Wear AID KIT Always have a first aid kit nearby. inspection, maintenance and service routines listed in this section. Throttle - Husqvarna 128CD | Owners Manual - Page 5
serious personal injury. Use of incorrectly wound trimmer line or an incorrect cutting attachment increases the level of vibration. WARNING: may contain sparks which can start a fire. Never start the machine indoors or near combustible material! Cutting equipment A trimmer head is intended - Husqvarna 128CD | Owners Manual - Page 6
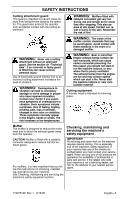
the return springs work properly. S Replace the guard if it has been exposed to impact or is cracked. S Always use the recommended guard for the cutting attachment you are using. See section on "Technical data". Muffler S See instructions under the section "Start". Start the machine and apply full - Husqvarna 128CD | Owners Manual - Page 7
the correct line diameter. WARNING: Always stop the en- gine before doing any work on the cutting attachment. This continues to rotate even after the throttle has been released. Ensure that the cutting attachment has stopped completely and disconnect the lead from the spark plug before you start to - Husqvarna 128CD | Owners Manual - Page 8
, maintenance and service instructions described in this manual. Some maintenance and service measures must be carried out by trained and qualified specialists. See instructions in the "Maintenance" section. S All covers and guards must be fitted before starting. Make sure the spark plug cap and - Husqvarna 128CD | Owners Manual - Page 9
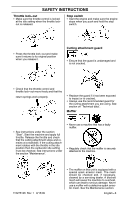
SAFETY INSTRUCTIONS S Check that the trimmer head and guard are correctly secured. S When adjusting the carburetor, make sure the lower end is supported and that no one is in the immediate vicinity. S Make sure the cutting head does not rotate when idling. S Make sure the handle and safety features - Husqvarna 128CD | Owners Manual - Page 10
SAFETY INSTRUCTIONS S CAUTION! Do not use the machine unless you are able to call cutting. Constant contact of this type can cause damage and wear to the trimmer head. S The trimmer line can easily remove grass and weeds up against walls, fences, trees and borders, however it can also damage - Husqvarna 128CD | Owners Manual - Page 11
INSTRUCTIONS Sweeping S The fan effect of the rotating line can be used for quick and easy clearing up. Hold the trimmer line trimmer line is rotating, as this can result in serious injury. Stop the engine and trimmer head . Never lean over the cutting attachment guard. Stones, rubbish, etc. - Husqvarna 128CD | Owners Manual - Page 12
head 2. Grease filler cap 3. Bevel gear 4. Cutting attachment guard 5. Upper shaft 6. Lower shaft 7. Loop handle 8. Throttle control 9. Stop switch 10.Throttle lock--out 11. Cylinder cover 12. Starter handle 13. Fuel tank 14. Choke control 15. Primer bulb 16. Air filter cover 17. Handle adjustment - Husqvarna 128CD | Owners Manual - Page 13
nut as shown in the diagram. S Tighten the wing nut. Assembling and dismantling the two--piece shaft Assembly: S Loosen the coupling by turning the knob. Fitting the trimmer guard and trimmer head (Model 128LD) S Position locking/release button (A) of attachment into guide recess (B) of coupling - Husqvarna 128CD | Owners Manual - Page 14
ASSEMBLY Fitting the trimmer guard and trimmer head (Model 128CD) S Fit the correct trimmer guard (A) for use with the trimmer head. Hook the trimmer guard/combination . S Screw the trimmer head (D) onto the shaft. D S To dismantle, follow the instructions in the reverse order. 115275126 Rev. 1 9/ - Husqvarna 128CD | Owners Manual - Page 15
. It is important to accurately measure the amount of oil to be mixed to ensure that the correct mixture is obtained. When mixing small amounts of fuel, even small inaccuracies can drastically affect the ratio of the mixture. S Always start by flling half the amount of the gasoline to be used. Then - Husqvarna 128CD | Owners Manual - Page 16
filled. S Inspect the unit before each use. Replace damaged parts. Check for fuel leaks. Make sure all fasteners are in place and secure. Make sure the cutting attachment is properly installed and securely fastened. Use only flexible, nonmetallic line recommended by the manufacturer. Never use, for - Husqvarna 128CD | Owners Manual - Page 17
Pull starter rope until engine runs. Move the blue engine choke lever to the opened position. Stopping Stop the engine by pushing and holding the stop switch in the STOP position until the engine stops. WARNING: When the engine is started with the choke in the closed position the cutting attachment - Husqvarna 128CD | Owners Manual - Page 18
your servicing dealer to adjust your carburetor. WARNING: The complete clutch, clutch cover, and shaft must be fitted before the machine is started, otherwise parts could come loose and cause personal injury. Function S The carburetor governs the engine's speed via the throttle control. Air and fuel - Husqvarna 128CD | Owners Manual - Page 19
S Carburetor malfunctions S Starting problems S Loss of engine power S Unnecessary wear to engine parts S Excessive fuel consumption The spark plug condition is influenced by: S Incorrect carburetor adjustment. S An incorrect fuel mixture (too much or in- correct type of oil). S A dirty air filter - Husqvarna 128CD | Owners Manual - Page 20
that the trimmer head is tight. Weekly maintenance S Check the starter and starter cord. S Clean the carburetor area. S Clean the outside of the spark plug. Re- move it and check the electrode gap. Adjust the gap to 0.024″ (0.6 mm), or replace the spark plug. Use resistor spark plug Champion RCJ - Husqvarna 128CD | Owners Manual - Page 21
Trimmer Head Line Loading Instructions 6m 20i 3m 10i 115275126 Rev. 1 9/15/09 English--- 21 - Husqvarna 128CD | Owners Manual - Page 22
) Approved accessories Type Cutting attachment / guard, part. no. Trimmer head TNG7 537 41 92-14 / 545 03 11-01 Model 128LD (M10 LH arbor shaft thread) Approved accessories Type Cutting attachment / guard, part. no. Trimmer head T25 537 33 83-06 / 545 03 09-01 Plastic blades Tricut 300 - Husqvarna 128CD | Owners Manual - Page 23
to comply with CARB and EPA regulations. 1 Year Warranty: All trimmers used for commercial, institutional, professional, or income producing purposes or use. SECTION 2: HUSQVARNA'S OBLIGATIONS UNDER THE WARRANTY Husqvarna will repair or replace defective components without charge for parts or labor - Husqvarna 128CD | Owners Manual - Page 24
Air Resources Board, Environment Canada and HUSQVARNA are part, the part will be repaired or replaced by HUSQVARNA. OWNER'S WARRANTY RESPONSIBILITIES: As the small off--road engine owner, you are responsible for the performance of the required maintenance listed in your operator's manual. HUSQVARNA - Husqvarna 128CD | Owners Manual - Page 25
EMISSION RELATED PARTS: Any HUSQVARNA approved replacement part used in the performance of any warran- ty maintenance or repair on emission related parts will be provided without charge to the owner if the part is under warranty. EMISSION CONTROL WARRANTY PARTS LIST: Carburetor, Air Filter (covered
-
 1
1 -
 2
2 -
 3
3 -
 4
4 -
 5
5 -
 6
6 -
 7
7 -
8
-
9
-
10
-
11
-
12
-
13
-
14
-
15
-
16
-
17
-
18
-
19
-
20
-
21
-
22
-
23
-
24
-
25
 |
 |