Husqvarna 336FR Owners Manual
Husqvarna 336FR Manual
 |
View all Husqvarna 336FR manuals
Add to My Manuals
Save this manual to your list of manuals |
Husqvarna 336FR manual content summary:
- Husqvarna 336FR | Owners Manual - Page 1
Operator's manual 135R 336FR 336RK Please read the operator's manual carefully and make sure you understand the instructions before using the machine. English - Husqvarna 336FR | Owners Manual - Page 2
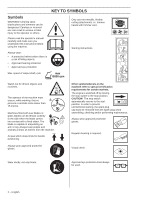
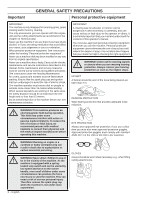
Symbols WARNING! Clearing saws, brushcutters and trimmers can be dangerous! Careless or incorrect use can result in serious or fatal injury to the operator or others. Please read the operator's manual carefully and make sure you understand the instructions before using the machine. Always wear: • A - Husqvarna 336FR | Owners Manual - Page 3
or replacement parts. ! WARNING! A clearing saw, brushcutter or trimmer can be dangerous if used incorrectly or carelessly, and can cause serious or fatal injury to the operator or others. It is extremely important that you read and understand the contents of this operator's manual. The - Husqvarna 336FR | Owners Manual - Page 4
using, service, maintenance etc) the life span and the second-hand value of the machine can be extended. If you ever lend or sell this machine, make sure that the borrower or buyer gets the operator′s manual, so they will also know how to properly maintain and use it. Thank you for using a Husqvarna - Husqvarna 336FR | Owners Manual - Page 5
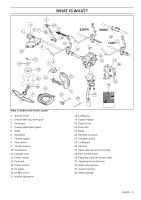
336FR 336RK 29 32 17 135R 17 5 10 27 18 20 16 22 21 21 24 4 30 31 4 25 11 12 14 16 13 26 15 23 What is what on the brush cutter? 1 Trimmer head adjustment 18 Locking nut 19 Support flange 20 Support cup 21 Drive disc 22 Blade 23 Operator's manual 24 Transport guard 25 Locking - Husqvarna 336FR | Owners Manual - Page 6
with medical implants to consult their physician and the medical implant manufacturer before operating this machine. IMPORTANT! A clearing saw, brushcutter or trimmer can be dangerous if used incorrectly or carelessly, and can cause serious or fatal injury to the operator or others. It is - Husqvarna 336FR | Owners Manual - Page 7
use a machine with ! faulty safety equipment. The machine's safety equipment must be checked and maintained as described in this section. If your machine fails any of these checks contact your service .This arrangement means that See instructions under the heading Start. Start the machine and - Husqvarna 336FR | Owners Manual - Page 8
Using incorrectly wound cord or a blunt or incorrect cutting attachment (wrong type or incorrectly filed, see instructions under the heading Filing the blade The risk increases at low temperatures. Quick release There instructions under the heading Adjusting the harness and brush cutter. 8 - English - Husqvarna 336FR | Owners Manual - Page 9
harnesses also have a quick release fitted to the support hook. Never use a machine that has a faulty muffler. Check that you follow the instructions on checking, maintaining and servicing your machine. ! WARNING! Mufflers fitted with catalytic converters get very hot during use and remain so for - Husqvarna 336FR | Owners Manual - Page 10
! Follow our recommendations. Also refer to the instructions on the blade packaging. Maintain the correct blade setting! Follow our instructions and use the recommended file gauge. A trimmer head is intended for trimming grass. General rules Only use cutting attachments with the guards we recommend - Husqvarna 336FR | Owners Manual - Page 11
thrust, and damage to the saw blade. Sharpening the saw blade • See the cutting attachment packaging for correct sharpening instructions. A correctly sharpened blade is essential for working efficiently and to avoid unnecessary wear to the blade and brush cutter. Check the cutting attachment for - Husqvarna 336FR | Owners Manual - Page 12
radially from the trimmer head and overcome the resistance of the grass being cleared. • The length of the cord is also important. A longer cord requires greater engine power than a shorter cord of the same diameter. • Make sure that the cutter on the trimmer guard is intact. This is used to cut the - Husqvarna 336FR | Owners Manual - Page 13
the attachment into the coupling until the attachment snaps into place. Before using the unit, tighten the knob securely. • Fit the mounting components as shown. • Put on the harness and hang the machine from the support hook. Now make a final adjustment so that the machine is in a - Husqvarna 336FR | Owners Manual - Page 14
guide saw blade or grass blade are to be used the machine must be equipped with the correct handlebar, blade guard and harness. Fitting the guard extension CAUTION! The guard extension shall always be fitted when using the trimmer head/plastic blades the blade (D), support cup (E) and support flange - Husqvarna 336FR | Owners Manual - Page 15
pin (C) in the hole to lock the shaft. • Place the blade (D) and support flange (F) on the output shaft. • Fit the nut (G). The nut must be trimmer guard/combination guard (A) intended for use with the trimmer head/plastic blades. CAUTION! Ensure that the guard extension is fitted. Hang the trimmer - Husqvarna 336FR | Owners Manual - Page 16
• Screw on the trimmer head/plastic blades (H) in the opposite brush cutter safely and this can result in injury to yourself or others. Never use a harness with a defective quick release. Correct height 1 Forestry clearing The machine should be supported in a harness when forestry clearing - Husqvarna 336FR | Owners Manual - Page 17
hook. The machine is correctly balanced when it freely hangs horizontally from the support hook. In this way the risk of hitting stones is reduced if you need to release the handlebar. 2 Grass clearing Let the blade balance at a comfortable cutting height, i.e. close to the ground. English - 17 - Husqvarna 336FR | Owners Manual - Page 18
part of your body that has come in contact with fuel. Use when performing all service measures. WARNING! use a good quality unleaded gasoline/oil mixture. Leaded gasoline will destroy the catalytic converter. Use low use oil intended for four-stroke engines. • Mixing ratio 1:50 (2%) with HUSQVARNA - Husqvarna 336FR | Owners Manual - Page 19
intended for fuel. • Always start by filling half the amount of the gasoline to be used. Then add the entire amount of oil. Mix (shake) the fuel mixture. Add the Contamination in the tank can cause operating problems. • Ensure that the fuel is well mixed by shaking the container before filling the - Husqvarna 336FR | Owners Manual - Page 20
bottom of the teeth while sharpening or that the blade has been used with dull teeth. Discard a blade if cracks are found. • Check that the support flange is not cracked due to fatigue or in the choke position. • Check that the trimmer head and trimmer guard are not damaged or cracked. Replace the - Husqvarna 336FR | Owners Manual - Page 21
start to rotate immediately. Hold the body of the machine on the ground using your left hand (CAUTION! Not with your foot!). Grip the starter handle when assembling, checking and/or performing maintenance. CAUTION! Do not put any part of your body in marked area. Contact can result in burns to the - Husqvarna 336FR | Owners Manual - Page 22
TECHNIQUES General working instructions IMPORTANT! This section describes the basic safety precautions for working with brush cutters and trimmers. If you encounter a situation where you are uncertain how to proceed you should ask an expert. Contact your dealer or your service workshop. Avoid all - Husqvarna 336FR | Owners Manual - Page 23
the ground. You should also orient the strip to take advantage of wind conditions, so that cleared stems fall in the cleared area of the stand. Forestry clearing using a saw blade • The risk of blade thrust increases with increasing stem size. You should therefore avoid cutting with the area of the - Husqvarna 336FR | Owners Manual - Page 24
be pulled backwards. Pull the blade backwards with a quick, firm movement. • Thin stems and brush are mown down. Work with a sawing movement, swinging sideways. • Try to cut several stems in a single sawing movement. • With groups of hardwood stems, first clear around the group. Start by cutting - Husqvarna 336FR | Owners Manual - Page 25
support cup rest lightly against the ground. It is used to protect the blade from hitting the ground. • Reduce the risk of material wrapping around the blade by following these instructions to the trimmer head. Sweeping • The fan effect of the rotating cord can be used for quick and easy clearing up. - Husqvarna 336FR | Owners Manual - Page 26
instructions under the heading "Personal protective equipment". • The setting of the carburetor attachment stops, contact your dealer/service workshop. Do not use the machine until it has been . Basic setting • The basic carburetor settings are adjusted during testing at the factory. The basic - Husqvarna 336FR | Owners Manual - Page 27
service workshop. Do not use the machine until it has been correctly adjusted or repaired. CAUTION! Never use temperature as low as possible the done with a wire brush. On mufflers without using the machine you should check that the bevel gear is filled three-quarters full with grease. Use HUSQVARNA - Husqvarna 336FR | Owners Manual - Page 28
must always be replaced. If the machine is used in dusty conditions the air filter should be soaked in oil. See instructions under the heading Oiling the air filter. Oiling the air filter The spark plug condition is influenced by: • Incorrect carburetor adjustment. • An incorrect fuel mixture (too much - Husqvarna 336FR | Owners Manual - Page 29
is correctly centred, is sharp, and is not cracked. An off-centre blade will cause vibration that could result in X damage to the machine. Check that the trimmer head is undamaged and not cracked. Replace the trimmer head if necessary. X Check that the locking nut of the cutting equipment is - Husqvarna 336FR | Owners Manual - Page 30
levels at handles, measured according to ANSI B175.3-1997, m/s2 Equipped with trimmer head (original), left/right 2,4/2,1 Equipped with grass blade (original), left/right 2,9/2,5 Equipped with saw blade (original), left/right - 336FR 2,11/34,6 1,50/38,0 1,20/30,5 2900 11500 8220 1,4/8400 Yes - Husqvarna 336FR | Owners Manual - Page 31
/grass cutter Grass 255-4 (Ø 255 4 teeth) Multi 275-4 (Ø 275 4 teeth) Multi 300-3 (Ø 300 3 teeth) Saw blade Scarlet 200-22 (Ø 200 22 teeth) Plastic blades Tricut Ø 300 mm (Separate blades have part number 531 01 77-15) T35, T35x (Ø 2.4 - 3.0 mm cord) S35 (Ø 2.4 - 3.0 mm cord) Trimmer head - Husqvarna 336FR | Owners Manual - Page 32
-related part on your equipment is defective, the part will be repaired or replaced by Husqvarna Forest & Garden. OWNER′S WARRANTY RESPONSIBILITIES • As the small off-road engine owner, you are responsible for performance of the required maintenance listed in your operator's manual. Husqvarna Forest - Husqvarna 336FR | Owners Manual - Page 33
provided through all Husqvarna Forest & Garden authorized servicing dealers. MAINTENANCE, REPLACEMENT AND REPAIR OF EMISSION-RELATED PARTS Any replacement part may be used in the performance of any warranty maintenance or repairs and must be provided without charge to the owner. Such use will not - Husqvarna 336FR | Owners Manual - Page 34
- Husqvarna 336FR | Owners Manual - Page 35
2,4-2,7 mm .095-.106" S35 1 4 2 5 3 8,5 m 28' 10 cm 4" 4,2 m 14' 6 7 8 "Clic" 10 11 15 cm 6" - Husqvarna 336FR | Owners Manual - Page 36
S35 1 3 2 2,4-2,7 mm .095-.106" 4,25 m 14' 4 4,25 m 14' 5 15 cm 6" A B 15 cm 6" - Husqvarna 336FR | Owners Manual - Page 37
2,4-2,7 mm .095-.106" T35, T35x 1 2 4 5 3 8,5 m 28' 10 cm 4" 4,3 m 14' 6 7 15 cm 6" 9 8 "Clic" - Husqvarna 336FR | Owners Manual - Page 38
2,7-3,3 mm .106-.13" T45, T45x 1 2 4 5 3 10 m 32' 10 cm 4" 4,3 m 14' 6 7 15 cm 6" 8 "Clic" 9 - Husqvarna 336FR | Owners Manual - Page 39
Auto 55 1 2 3 1.) 2.) >1,1 Kw - Husqvarna 336FR | Owners Manual - Page 40
Trimmy SII 1 3 4 2,4-3,3 mm .095"-.130" 2 7,0 m 23' ~ 3,5 m 11' 12 cm 5" 5 ~ 15 cm 6 6' 7 "Clic" 8 9 35-50 NM - Husqvarna 336FR | Owners Manual - Page 41
- Husqvarna 336FR | Owners Manual - Page 42
Alloy 1 2 ø 2,0 - 2,4 mm/ .080-.095" M10 ø 2,0 - 3,3 mm/ .080- .130" M12 3 4 5 550 mm/ 22" - Husqvarna 336FR | Owners Manual - Page 43
- Husqvarna 336FR | Owners Manual - Page 44
Original instructions 1155638-95 ´´®®zz++WW__yy¶¶55{{¨¨ 2012-11-29
-
 1
1 -
 2
2 -
 3
3 -
 4
4 -
 5
5 -
 6
6 -
 7
7 -
8
-
9
-
10
-
11
-
12
-
13
-
14
-
15
-
16
-
17
-
18
-
19
-
20
-
21
-
22
-
23
-
24
-
25
-
26
-
27
-
28
-
29
-
30
-
31
-
32
-
33
-
34
-
35
-
36
-
37
-
38
-
39
-
40
-
41
-
42
-
43
-
44
 |
 |

English
135R 336FR 336RK
Oper
ator’s manual
Please r
ead the operator’s manual carefully and make sure you understand the instructions before using the machine.