Husqvarna AR19 Operation Manual
Husqvarna AR19 Manual
 |
View all Husqvarna AR19 manuals
Add to My Manuals
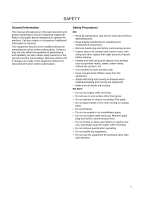
Save this manual to your list of manuals |
Husqvarna AR19 manual content summary:
- Husqvarna AR19 | Operation Manual - Page 1
Operator´s manual AR19 AR25 Please read these instructions carefully and make sure you understand them before using the machine. English - Husqvarna AR19 | Operation Manual - Page 2
prior notification. Note that no legal demands can be placed based on the information contained in these instructions. Use only original parts for repairs. The use of other parts voids the warranty. Do not modify or install non-standard equipment to the unit without consent from the manufacturer - Husqvarna AR19 | Operation Manual - Page 3
INTRODUCTION 4 Good Service 4 Serial Number 4 SAFETY 5 General Information 5 Safety Procedures 5 CONTROLS 6 Model AR19 6 Models AR25 7 ASSEMBLY 8 Model AR19 Handle 8 Model AR25 Handle 9 Clutch and Throttle Cables 10 Before Starting 10 OPERATION 11 Aeration Tips 11 Aerating 11 Rear - Husqvarna AR19 | Operation Manual - Page 4
a Husqvarna lawn care product. Through your confidence in us, you have chosen an exceptionally high quality product. This manual is a valuable document. It describes your new Husqvarna machine. Read the manual carefully before attempting to use the machine. Following the instructions (use, service - Husqvarna AR19 | Operation Manual - Page 5
anchors, etc. • Use machine for lawn aeration only. • Keep unsupervised children away from the equipment. • Adopt safe lifting and moving techniques when loading/unloading and moving the equipment. • Make sure all decals are in place. DO NOT: • Do not run engine while servicing. • Do not use on any - Husqvarna AR19 | Operation Manual - Page 6
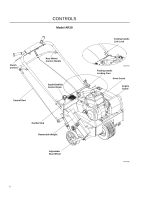
CONTROLS Model AR19 Clutch Control Control Rod Rear Wheel Control Handle Depth/Stability Control Knob Folding handle Link Lock 8064-003 Folding handle Locking Cam Drive Guard Engine Guard Handle Stop Removable Weight Adjustable Rear Wheel 8064-002 6 - Husqvarna AR19 | Operation Manual - Page 7
CONTROLS Models AR25 Rear Wheel Control Handle Clutch Control Throttle Cable Control Rod Depth/Stability Control Knob Removable Weight Adjustable Rear Wheel 8064-004 7 - Husqvarna AR19 | Operation Manual - Page 8
from crate. Model AR19 Handle 1. The aerator is shipped with the handle folded. Rotate handle into upright position and lock, using the cam lock wheel control handle with the fasteners located on the rear wheel control handle, using the back holes. (See illustration) Link Lock - Connect the top of - Husqvarna AR19 | Operation Manual - Page 9
ASSEMBLY Model AR25 Handle 3. The aerator is shipped with the handle detached. Mount the handle using two ½" wrenches. a. Slide handle onto to rear wheel control handle with fasteners located on rear wheel control handle using the upper hole on the control rod. 8060-034 Connect upper control rod - Husqvarna AR19 | Operation Manual - Page 10
guide hole in the handle bracket support bar located at rear of the deck. 7. Attach end of cable to the "S" hook located on the belt idler pulley. CAUTION! Be certain that the clutch cable is properly routed. 8. AR25 Honda the engine manufacturer's manual for instructions to adjust the governor - Husqvarna AR19 | Operation Manual - Page 11
screw driver into ground. The tool should drive in 2-3 inches with little effort. If unable to do so, watering the lawn a day before aerating is necessary. Using Removable Weights Soil conditions dictate whether extra machine weight is needed for effective coring action. The weights are provided to - Husqvarna AR19 | Operation Manual - Page 12
objects or surfaces (sidewalks, driveways, stepping stones, etc.) with tines down. Turning and Maneuvering Gradual maneuvering while aerating can be accomplished by carefully guiding the machine. It is recommended to adjust the engine's speed control to allow for a comfortable walking speed and - Husqvarna AR19 | Operation Manual - Page 13
knob to set the rear wheels for extra stability. This can be a great benefit when you do need to run the aerator across a slope. Additionally, using the depth control when aerating across a slope improves the consistency of the cores pulled from the uphill tines when compared to those pulled by the - Husqvarna AR19 | Operation Manual - Page 14
A19 The Husqvarna A19 Aerator has three convenient features to assist you in transporting the unit in your pickup truck, van and even in some car trunks- removable weights, a folding handle and convenient lifting handles on the sides of the machine. The features are provided for optional use and can - Husqvarna AR19 | Operation Manual - Page 15
will prolong the service of the machine. NOTE: Use care with power washers to avoid damage to warning decals, operator instruction labels, bearings, chains and engine. Limit direct spray on these items. Do not exceed 1000 psi water pressure for cleaning. Two Minute Rule Aerators may be tipped - Husqvarna AR19 | Operation Manual - Page 16
Manual for all engine service information. 16 3 1. Small pulley 2. Belt keeper 3. Large pulley Replace belt on small pulley first 8060-010 IMPORTANT INFORMATION Many parts, including the drive belt on your aerator, are made specifically for Husqvarna to give many hours of use. Replace all parts - Husqvarna AR19 | Operation Manual - Page 17
MAINTENANCE AND SERVICE Clutch Cable Removal and Replacement 1. Turn off engine and remove old extending past the cable screw. 2. Remove the old throttle cable and route the new cable through the guide hole at the rear of the housing. 3. Insert the new cable through the cable screw to the - Husqvarna AR19 | Operation Manual - Page 18
MAINTENANCE AND SERVICE Throttle Cable Model AR25 Adjustment 1. Start engine and allow it to reach operating temperature. 2. Adjust the throttle cable at the adjuster bracket by turning the - Husqvarna AR19 | Operation Manual - Page 19
MAINTENANCE AND SERVICE Chain Removal and Replacement 1. Turn off engine. 2. Remove the drive guard. point between the wheel sprocket and the rotor sprocket 4. Tighten lock nut. NOTE: Husqvarna recommends the replacement of sprockets when replacing drive chain. Inspect and align sprockets Chain - Husqvarna AR19 | Operation Manual - Page 20
SERVICE Tines Tine Wear After the Husqvarna Aerator has been used for sometime, the tines will wear. When this happens aerating performance diminishes. Inspect tines using . 4. Elevate approximately 4", block and chock rear wheels. 5. Manually cycle the drive chain for access to master link. 6. Turn - Husqvarna AR19 | Operation Manual - Page 21
AND SERVICE 12 in previous action. Instructions are for one side. Both are procedurally identical. Handle Model AR19, Cam Lock Inspection 1. The handle cam lock must lock shut under moderately heavy hand pressure. The handle frame should be tightly secured to the aerator - Husqvarna AR19 | Operation Manual - Page 22
. CAUTION! Secure handle to prevent aerator from tipping. 5. Remove the four wheel shaft bearing bolts (4 on the AR19 and 6 on the AR25). 6. screw, then insert pin punch into the hole next to the set screw and, using a hammer, with moderate striking, hit collar so that it rotates in the opposite - Husqvarna AR19 | Operation Manual - Page 23
SERVICE Rear Wheels Removal and Replacement Model AR19 1. Make sure unit is on level ground and engine is turned off. 2. Lower the rear wheel control handle to let the aerator bushing. Insert axle bolt through wheel and wheel lift frame. Use washer and lock nut, tighten firmly. 6. Grease wheel - Husqvarna AR19 | Operation Manual - Page 24
Drive Gear Reduction Wheels Bearings Rear Tires Front Tire Aeration Tines Aeration Width Hole Pattern Core Depth Holes per sq ft Standard Deviation Hand/Arm Noise Measured Value Guaranteed Value Operator Ear 24 AR19 / 968982102 Honda GX120K1HX2 4 hp* / 2.98kW Belt Tensioner V-Belt Permalube Chain - Husqvarna AR19 | Operation Manual - Page 25
Drive Gear Reduction Wheels Bearings Rear Tires Front Tire Aeration Tines Aeration Width Hole Pattern Core Depth Holes per sq ft /Arm Noise Measured Value Guaranteed Value Operator Ear TECHNICAL DATA AR25 / 968982105 Honda GX120K1HX2 4 hp* / 2.98kW Belt Tensioner V-Belt Permalube Chain 6:1 * - Husqvarna AR19 | Operation Manual - Page 26
TECHNICAL DATA Torque Specifications Hex Head Cap Screws The torque values shown should be used as a general guideline when specific torque values are not given. U.S. Standard Hardware Grade SAE Grade 5 SAE Grade 8 Flangelock Screw w/Flangelock Nut Shank Size (Diameter in - Husqvarna AR19 | Operation Manual - Page 27
is included as an addendum to the operator instructions. Aerator Machine complies with: 2006/42/EC 2004/106/EC 2000/14/EC Business Name & Address: Husqvarna Turf Care 401 North Commerce Beatrice, NE 68310 USA Notified Body: TUV SUD Industrie Service GmbH Westendstrasse 199 D-80686 Muenchen 27 - Husqvarna AR19 | Operation Manual - Page 28
Original instructions ´´®®zz++SSSS66¶¶66AA¨¨ 115 15 12-26 2010-04-10
-
 1
1 -
 2
2 -
 3
3 -
 4
4 -
 5
5 -
 6
6 -
 7
7 -
8
-
9
-
10
-
11
-
12
-
13
-
14
-
15
-
16
-
17
-
18
-
19
-
20
-
21
-
22
-
23
-
24
-
25
-
26
-
27
-
28
 |
 |

Operator´s manual
Please read these instructions carefully and make sure
you understand them before using the machine.
English
English
AR19
AR25