Husqvarna HVT52 Owners Manual
Husqvarna HVT52 Manual
 |
View all Husqvarna HVT52 manuals
Add to My Manuals
Save this manual to your list of manuals |
Husqvarna HVT52 manual content summary:
- Husqvarna HVT52 | Owners Manual - Page 1
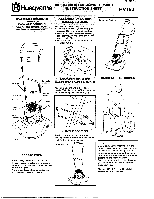
Husqvarna AIR CUSHION GASOLINE TRIMMER INSTRUCTION SHEET 5118385-01 HVT52 READ THESE INSTRUCTIONS CAREFULLY! KNOW YOUR CONTROLS. LEARNHOW TO STOP YOUR TRIM ER IN AN EMERGENCY ASSEMBLY OF LOWER HANDLE TO DECK With the trimmer on the ground: 1. Remove the bolts (1), washers (2) and lock nuts (3) - Husqvarna HVT52 | Owners Manual - Page 2
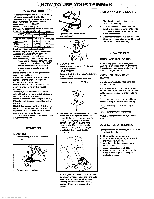
is in a safe operating condition. Use only genuine Husqvama parts and accessories specified for the product. 2. Only use Husqvarna replacement cutting line, do not use wire, string or rope etc. 3. Inspect the trimmer each time before use, especially the cutting fine and mounting cisc. 4. Do not - Husqvarna HVT52 | Owners Manual - Page 3
YOUR TRIMMER FUEL MIXTURE Tooperatetheengine, you wlneedthefollowing:- 1A clean, high quality 2 cycle oll. Tecumseh specially formulated oil is available at any Authorised Tecumseh Service Outlet. Order as part number 730227. Do not use multi-viscosity oils. Disregard mix ratio instructions on - Husqvarna HVT52 | Owners Manual - Page 4
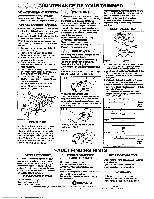
it. CARE For trouble-free trimming next season, make sure that your trimmer is serviced immeciately after the Renewing the Cutting Line Holding the line with thumb and forefinger and using other thumb as a guide, curve around and clean thoroughly between vanes. Husqvarna Check that the cutting disc
-
 1
1 -
 2
2 -
 3
3 -
 4
4
 |
 |

5118385-01
AIR
CUSHION
GASOLINE
TRIMMER
Husqvarna
INSTRUCTION
SHEET
HVT52
READ
THESE
INSTRUCTIONS
CAREFULLY!
KNOW
YOUR
CONTROLS.
LEARN
HOW
TO
STOP YOUR
TRIM
ER
IN
AN
EMERGENCY
Tie
Wraps
Lower
Handle
Debris
Guard
Spark
PiLeatsrad
Deck
Upper
Handle
Start/
Stop
Switch
R,
choke
Switch
0
PREPARATION
Sok
washer
and
Lock
nut
Air
Vent
Screw
Fuel
Tank
Air
Filter
Before
using
your
new
Husqvarna
Hover
Trimmer,
make
a
careful
note
of
the
details
on
the
serial
number
label,
which
can
be
found
on
the
rear
of
the
deck
Always
quote
these
details
to
your
dealer
when
enquiring
about
spares
and
service.
ASSEMBLY
OF
LOWER
HANDLE
TO
DECK
With
the
trimmer
on
the
ground:
1.
Remove
the
bolts
(1),
washers
(2)
and
lock
nuts
(3)
from
the
polythene
bag.
2.
Secure
the
lower
handle
(4)
by
placing
bolts
(1)
through
deck
brackets
(5)
and
lower
handle
(4).
3.
Place
washer
(2)
on
bolt
and
secure
with
lock
nut
(3).
ASSEMBLY
OF
UPPER
HANDLE
TO
LOWER
HANDLE
Assemble
upper
handle
(6)
to
lower
handle
(7)
by
fitting
bolts
(8)
and
washers
(9)
and
securing
with
lock
nuts
(10).
HANDLE
POSITION
The
handle
position
can
be
altered
by
moving
it
forward
for
the
park
position
or
back
for
the
trimming
position.
Park
Position
Trimming
Position
CARRYING
THE
TRIMMER
NOTE:
Before
carrying
the
machine
from
one
trimming
area
to
another,
close
fuel
tank
air
vent
screw,
close
fuel
tap,
and
let
engine
continue
to
run
until
it
stops
(in
order
to
empty
the
carburettor
bowl)
then
disconnect
the
spark
plug
lead.
Carry
the
trimmer
at
the
point
of
balance
(see
illustration)
with
the
cutting
head
away
from
you.
NEVER
CARRY
THE
TRIMMER
WHEN
IT
IS
RUNNING.