Husqvarna LGT2654 Owners Manual
Husqvarna LGT2654 Manual
 |
View all Husqvarna LGT2654 manuals
Add to My Manuals
Save this manual to your list of manuals |
Husqvarna LGT2654 manual content summary:
- Husqvarna LGT2654 | Owners Manual - Page 1
anulará la garantía del producto. the product warranty. 580 95 96-27 Operator's Manual Owner's Manual LGT2654 Please read the operator's manual carefully and make sure you understand the instructions before using the machine. Por favor lea cuidadosamente y comprenda estas intrucciones antes de usar - Husqvarna LGT2654 | Owners Manual - Page 2
's recommendation for wheel weights or counterweights. • Keep machine free of grass, leaves or other debris build-up which can touch hot exhaust / engine parts and burn. Do not allow the mower deck to plow leaves or other debris which can cause build-up to occur. Clean any oil or fuel spillage - Husqvarna LGT2654 | Owners Manual - Page 3
any adjustments or repairs with the engine running. • Check grass catcher components and the discharge chute frequently and replace with manufacturer's recommended parts, when necessary. • Mower blades are sharp. Wrap the blade or wear gloves, and use extra caution when servicing them. • Check brake - Husqvarna LGT2654 | Owners Manual - Page 4
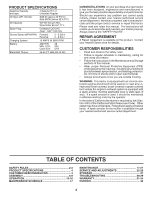
(MPH/KPH): Forward: Reverse: 0 - 5.2/8,4 0 - 2.9/4,7 Charging System: 15 AMPS @ 3600 RPM Battery: AMP/HR: MIN. CCA: Case Size: 28 230 U1R Blade Bolt Torque: 45-55 FT. LBS./62-75 Nm CONGRATULATIONS on your purchase of a new tractor. It has been designed, engineered and manufactured to give - Husqvarna LGT2654 | Owners Manual - Page 5
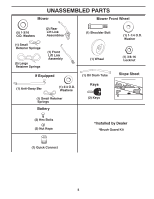
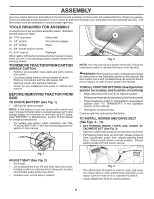
PARTS Mower Mower Front Wheel (5) 1-3/16 O.D. Washers (2) Rear Lift Link Assemblies (1) Small Retainer Springs (5) Large Retainer Springs (1) Front Lift Link Assembly If Equipped (1) Anti-Sway Bar (1) 3/4 O.D. Washers (1) Small Retainer Springs Battery (1) Shoulder Bolt (1) Wheel (1) Oil - Husqvarna LGT2654 | Owners Manual - Page 6
control in "transmission disengaged" position (See "TO TRANSPORT" in the Operation section of this manual). • Roll tractor forward off skid. Continue with the instructions that follow. TO INSTALL MOWER AND DRIVE BELT (See Figs. 3 - 14) 1. SET PARKING BRAKE LEVER AND LOWER ATTACHMENT LIFT (See - Husqvarna LGT2654 | Owners Manual - Page 7
6) • Turn steering wheel to the left as far as it will go and position mower on right side of tractor with deflector shield (Q) to the right. FRONT Q ENGINE TRANSAXLE 02965 BACK Fig. 6 Q. DEFLECTOR SHIELD 4. SLIDE MOWER UNDER TRACTOR (See Fig. 8) • Bring belt forward and check belt for proper - Husqvarna LGT2654 | Owners Manual - Page 8
BAR (S) LOCATION TRANSAXLE BRACKET (T) LOCATED BETWEEN REAR TIRES PLACE 90° END INTO HOLE 7. ATTACH REAR LIFT LINKS (C) (See Fig. 13) • Insert rod end of rear lift link (C) into hole (U) in tractor lift shaft suspension arm and pivot link down to mower. • Lift rear corner of mower and position - Husqvarna LGT2654 | Owners Manual - Page 9
slowly. • Raise attachment lift to highest position. • If necessary, adjust gauge wheels before operating mower as shown in the Operation section of this manual. MOWER DRIVE BELT INSTALLATION Follow procedure described in "TO REPLACE MOWER BLADE DRIVE BELT " in the "Service and Adjustments" section - Husqvarna LGT2654 | Owners Manual - Page 10
NEUTRAL HIGH LOW CHOKE FAST SLOW IGNITION SWITCH ENGINE OFF REVERSE OPERATION SYSTEM (ROS) ENGINE ON ENGINE START PARKING BRAKE MOWER HEIGHT MOWER LIFT LIGHTS ON FUEL BATTERY REVERSE FORWARD CRUISE CONTROL CLUTCH/BRAKE PEDAL 15 15 ATTACHMENT ATTACHMENT CLUTCH DISENGAGED - Husqvarna LGT2654 | Owners Manual - Page 11
/CHOKE CONTROL - Used for starting and controlling engine speed. (E) ATTACHMENT CLUTCH SWITCH - Used to engage the mower blades, or other attachments mounted to your tractor. (F) IGNITION SWITCH - Used for starting and stopping the engine. (G) REVERSE OPERATION SYSTEM (ROS) "ON" POSITION - Allows - Husqvarna LGT2654 | Owners Manual - Page 12
possibility, always stop engine when stopping tractor on grass areas. CAUTION: Always stop tractor completely, as described above, and set parking brake before leaving the operator's position. Fig. 17 STOPPING (See Fig. 18) MOWER BLADES • To stop mower blades, place attachment clutch control in - Husqvarna LGT2654 | Owners Manual - Page 13
position. Gauge wheels then keep the deck in proper position to help prevent scalping in most terrain conditions. NOTE: Adjust gauge wheels with tractor on a flat level surface. • Adjustmowertodesiredcuttingheight(See"TOADJUST MOWER CUTTING HEIGHT" in this section of manual). • With mower in desired - Husqvarna LGT2654 | Owners Manual - Page 14
key clockwise to engine "ON" position. TO TRANSPORT (See Fig. 16 and 25) When pushing or towing your tractor, be sure to disengage transmission by placing freewheel control in freewheeling position. Free wheel control is located at the rear drawbar of tractor. • Raise attachment lift to highest - Husqvarna LGT2654 | Owners Manual - Page 15
engine problems, the fuel system should be emptied before storage of 30 days or longer. Drain the gas tank, start the engine and let it run until the fuel lines and carburetor are empty. Use fresh fuel next season. See Storage Instructions for additional information. Never use engine or carburetor - Husqvarna LGT2654 | Owners Manual - Page 16
TIPS • Tire chains cannot be used when the mower housing is attached to tractor. • Mower should be properly leveled for best mowing performance. See "TO LEVEL MOWER HOUSING" in the Service and Adjustments section of this manual. • The left hand side of mower should be used for trimming. • Drive so - Husqvarna LGT2654 | Owners Manual - Page 17
Mower Blades T Lubrication Chart 0 Check Battery Level R Clean Battery and Terminals Clean Debris Off Steering Plate Check Transaxle Cooling Check Mower Levelness Check V-Belts Check Engine Oil Level Change Engine Oil (with oil filter) Change Engine Oil (without oil filter) E N Clean Air Filter - Husqvarna LGT2654 | Owners Manual - Page 18
presence and reverse operation systems are working properly. If your tractor does not function as described, repair the problem immediately. • The engine should not start unless the brake pedal is fully depressed, and the attachment clutch control is in the disengaged position. CHECK OPERATOR - Husqvarna LGT2654 | Owners Manual - Page 19
tube. Do not thread the cap onto the tube when taking reading. Keep oil at "FULL" line on dipstick. Tighten cap onto the tube securely when finished. ENGINE OIL FILTER Replace the engine oil filter every season or every other oil 19 change if the tractor is used more than 100 hours in one year. - Husqvarna LGT2654 | Owners Manual - Page 20
, DASH, FENDER AND MOWER NOT SHOWN Fig. 32 • Keep finished surfaces and wheels free of all gasoline, oil, etc. • Protect painted surfaces with automotive type wax. We do not recommend using a garden hose or pressure washer to clean your tractor unless the engine and transmission are covered to keep - Husqvarna LGT2654 | Owners Manual - Page 21
each use. 1. Drive the tractor to a level, clear spot on your lawn, near enough to a water spigot for your garden hose to reach. IMPORTANT: Make certain the tractor's discharge chute is directed AWAY from your house, garage, parked cars, etc. Remove bagger chute or mulch cover if attached. 2. Make - Husqvarna LGT2654 | Owners Manual - Page 22
. TO INSTALL MOWER Follow procedure described in "INSTALL MOWER AND DRIVE BELT" in the Assembly section of this manual. L K B M A F E H TO REPLACE MOWER BLADE DRIVE BELT (See Fig. 35) MOWER DRIVE BELT REMOVAL • Park tractor on a level surface. Engage parking brake. • Lower attachment lift lever - Husqvarna LGT2654 | Owners Manual - Page 23
is pointing straight forward. Measure distance (B) to the ground at front and rear tip of the blade. A B B Turn nut right to raise mower Turn nut left to lower mower Fig. 36 NOTE: Each full turn of adjustment nut will change mower height about 3/16". • Test your adjustment by mowing some uncut - Husqvarna LGT2654 | Owners Manual - Page 24
set front wheel toe-in or camber, contact a qualified service center. TO REMOVE WHEEL (See Fig. 41) • Block up axle securely. • Remove axle cover, retaining ring and washers to allow wheel removal (rear wheel contains a square key - Do not lose). • Repair tire and reassemble. • On rear wheels only - Husqvarna LGT2654 | Owners Manual - Page 25
has been preset at the factory and adjustment should not be necessary. • Loosen adjustment bolt in front of the right rear wheel, and lightly tighten. • Start engine and move motion control lever until tractor does not move forward or backward. • Hold motion control lever in that position and turn - Husqvarna LGT2654 | Owners Manual - Page 26
should not be necessary. If adjustment is necessary, see engine manual. TO ADJUST CARBURETOR Your carburetor is not adjustable. If your engine does not operate properly due to suspected carburetor problems, take your tractor to an authorized service center for repair and/or adjustment. 26 - Husqvarna LGT2654 | Owners Manual - Page 27
contact with battery terminals. • If battery is removed from tractor for storage, do not store battery directly on concrete or damp surfaces. ENGINE FUEL SYSTEM IMPORTANT: IT IS IMPORTANT TO PREVENT GUM DEPOSITS FROM FORMING IN ESSENTIAL FUEL SYSTEM PARTS SUCH AS CARBURETOR, FUEL FILTER, FUEL HOSE - Husqvarna LGT2654 | Owners Manual - Page 28
TROUBLESHOOTING POINTS PROBLEM Will not start CAUSE 1. Out of fuel. 2. Engine not "CHOKED" properly. 3. Engine flooded. 4. Bad spark plug. 5. Dirty air filter. 6. Dirty fuel filter. 7. Water in fuel. 8. Loose or damaged wiring. 9. Carburetor out of adjustment. 10. Engine valves out of adjustment. - Husqvarna LGT2654 | Owners Manual - Page 29
, trash under mower. 7. Clean underside of mower housing. 8. Mower drive belt worn. 8. Replace mower drive belt. 9. Blades improperly installed. 9. Reinstall blades sharp edge down. 10. Improper blades used. 10. Replace with blades listed in parts manual. 11. Clogged mower deck vent holes - Husqvarna LGT2654 | Owners Manual - Page 30
injury, operate your tractor up and down the face of slopes, never across the face. Do not mow slopes greater than 15 degrees. Make turns gradually to prevent tipping or loss of control. Exercise extreme caution when changing direction on slopes. 1. Fold this page along dotted line indicated above - Husqvarna LGT2654 | Owners Manual - Page 31
above listed manufacturers (for exceptions - see Exhibit A). (c) Expendable Parts. This Limited Warranty does not cover general maintenance parts and items ("Expendable Parts"), including without limitation spark plugs, bulbs, filters, lubricants, starter cords, belts, blades, and blade adapters - Husqvarna LGT2654 | Owners Manual - Page 32
initial operational problem or failure occurs. 9. Reinforced Stamped (Armor Protected) 10 Year Limited & Fabricated Limited Lifetime, Deck Warranties. These Limited Warranties are for the deck shell only mechanical components/parts such as belts, pulleys, spindle housings, bearings, blades, rods - Husqvarna LGT2654 | Owners Manual - Page 33
use, other than Rental Use) Riding Lawn Tractors: Frame, Chassis, Front Axle 5 Years No Warranty Engine* * * Transmission (if made by Husqvarna/Peerless) 3 Years No Warranty Transmission (if third party)** ** ** XLS Models only - stamped deck shell. Armor Protected Limited Warranty - Husqvarna LGT2654 | Owners Manual - Page 34
90 days Battery 1 Year 1 Year 1 Year Parts & Accessories (if purchased) Accessories (e.g., grass catcher, bumper guard accessories, etc. 1 Year No Warranty No Warranty Parts (e.g., belts, blades, etc.) 30 days No Warranty No Warranty Parts & Accessories (if replaced in Warranty Service - Husqvarna LGT2654 | Owners Manual - Page 35
05/01/2012 TH
-
 1
1 -
 2
2 -
 3
3 -
 4
4 -
 5
5 -
 6
6 -
 7
7 -
8
-
9
-
10
-
11
-
12
-
13
-
14
-
15
-
16
-
17
-
18
-
19
-
20
-
21
-
22
-
23
-
24
-
25
-
26
-
27
-
28
-
29
-
30
-
31
-
32
-
33
-
34
-
35
 |
 |

English
580 95 96-27
Operator’s Manual
Owner's Manual
LGT2654
Gasoline containing up to 10% ethanol (E10) is accept-
able for use in this machine.
The use of any gasoline ex-
ceeding 10% ethanol (E10) will void the product warranty.
Esta máquina puede utilizar gasolina con un contenido
de hasta el 10% de etanol (E10).
El uso de una gasolina
que supere el 10% de etanol (E10) anulará la garantía
del producto. the product warranty.
Please read the operator's manual carefully and make sure
you understand the instructions before using the machine.
Por favor lea cuidadosamente y comprenda
estas intrucciones antes de usar esta maquina.