Husqvarna PZ 60 Installation Instructions
Husqvarna PZ 60 Manual
 |
View all Husqvarna PZ 60 manuals
Add to My Manuals
Save this manual to your list of manuals |
Husqvarna PZ 60 manual content summary:
- Husqvarna PZ 60 | Installation Instructions - Page 1
INSTALLATION INSTRUCTIONS PZ 60 inch Side Discharge Deck Kit - 966555302 Tools Required • ½" socket or wrench (battery terminals, strut shaft). • ½" breaker bar with 2-3" extension (relieve tension on idler arms). Refer to Operators Manual when needed. WARNING! The deck lift system on the chassis - Husqvarna PZ 60 | Installation Instructions - Page 2
guide. 16. Double check belt routing to make sure it matches the routing decal, and that the belt does not have any twist. Correct if needed. 17. Adjust belt tension by turning the eyebolt until there is approximately 7/8" - 1" of threads showing outside the nut. 18. Belt tension will be set to 60 - Husqvarna PZ 60 | Installation Instructions - Page 3
be adjusted slightly higher in the rear. NOTE: To insure accuracy of leveling procedure, mower deck drive belt must be installed prior to leveling the deck. 20. Wear heavy gloves. Turn each outer blade tip to align the deck in a side-to-side manner. 21. Measure from the floor surface up to the - Husqvarna PZ 60 | Installation Instructions - Page 4
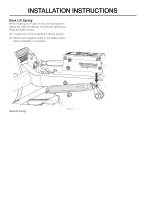
INSTRUCTIONS Deck Lift Spring When mowing 2" or lower, it may be necessary to adjust the deck lift springs. Access the springs by tilting the seat forward. 24. Loosen the nut and adjust the spring tension. 25. Reconnect negative cable to the battery when deck installation is complete. Deck - Husqvarna PZ 60 | Installation Instructions - Page 5
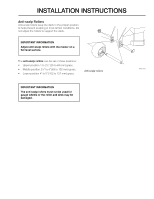
INSTALLATION INSTRUCTIONS Anti-scalp Rollers Anti-scalp rollers keep the deck in the proper position to help prevent scalping in most terrain conditions. Do not adjust the rollers to support the deck. IMPORTANT INFORMATION Adjust anti-scalp rollers with the mower on a flat level surface. The anti- - Husqvarna PZ 60 | Installation Instructions - Page 6
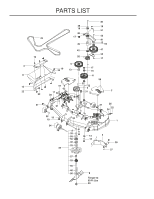
PARTS LIST 46 45 19 16 51 48 43 17 53 41 49 13 54 42 47 52 19 50 17 5 4 19 24 13 17 16 11 6 59 33 12 19 32 62 3 22 23 17 60 28 31 7 21 61 35 18 10 34 36 44 20 9 39 58 56 40 29 57 29 55 40 56 27 26 25 24 1 14 2 15 38 37 8 Torque to 90 Ft-Lbs 30 - Husqvarna PZ 60 | Installation Instructions - Page 7
GUIDE, BELT 53.. 539 128101....1..... BOLT 3/8-16 x 2½ CARRIAGE 54.. 539 107271....1..... BOLT 5/16-18 x 1 RD HD 55.. 525 836001....3..... SHAFT, SPINDLE 56.. 539 130643....6..... CUP, DEBRIS 57.. 539 130641....3..... SPACER 58.. 539 130637....3..... HUB 59.. 539 105746....2..... DECAL, NO STEP 60 - Husqvarna PZ 60 | Installation Instructions - Page 8
INSTALLATION INSTRUCTIONS HEX HEAD CAP SCREWS The torque values shown should be used as a 12 13 18 Shank Size (Diameter in inches, fine or coarse thread) 5/16 18 24 28 38 24 33 3/8 31 42 46 62 40 54 7/16 50 68 75 108 ½ 75 102 115 156 9/16 110 150 165 224 5/8 150
-
 1
1 -
 2
2 -
 3
3 -
 4
4 -
 5
5 -
 6
6 -
 7
7 -
8
 |
 |

P/N 575 661201R1
02/22/10
INSTALLATION INSTRUCTIONS
PZ 60 inch Side Discharge Deck Kit - 966555302
Tools Required
½" socket or wrench (battery terminals, strut
•
shaft).
½" breaker bar with 2-3" extension (relieve tension
•
on idler arms).
WARNING!
The deck lift system on the chassis
has springs that assist in lifting
the deck. Leave the deck lift in the
transport position when installing
the deck. Failure to follow these
instructions could result in injury.
Refer to Operators Manual when needed.
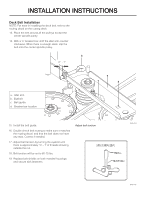
PZ Cutting Deck Installation
Disconnect negative cable from battery on the
1.
chassis.
If installing the deck on a diesel unit, remove the
2.
belt from the deck assembly and use the belt
included with the chassis.
Make sure the deck is latched in the transport
3.
position (furthest forward position).
Slide the deck under the chassis.
4.
Block the deck up with boards, pallet, or pallet
5.
jack, so the deck lift chains line up with the
brackets on the deck.
Using the
6.
7
/
16
clevis pins* and E-rings*, connect all
four chains to the deck.
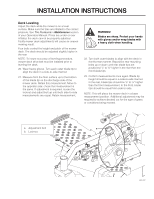
Line up the cast struts on the chassis with the
7.
u- brackets on the deck.
Cast strut
a.
Carriage bolt,
b.
5
/
16
-18 x 1
Strut pin
c.
Nut,
d.
5
/
16
-18, nyloc
Clevis pin,
e.
7
/
16
"
E-ring,
f.
7
/
16
"
Lift chain
g.
a
b
c
d
e
g
f
Slide the strut pins* through the deck brackets
8.
and cast struts on each side.
Secure the strut pins to the deck on each side
9.
with
5
/
16
" carriage bolts * and nuts *.
Remove the block from under the deck.
10.
Lower the deck to the 3" cutting height.
11.
Remove deck belt shields.
12.
*Supplied in the hardware bag included with the
chassis
8058-121