Husqvarna ST 230P Owners Manual
Husqvarna ST 230P Manual
 |
View all Husqvarna ST 230P manuals
Add to My Manuals
Save this manual to your list of manuals |
Husqvarna ST 230P manual content summary:
- Husqvarna ST 230P | Owners Manual - Page 1
's Manual ST 230P Gasoline containing up to 10% ethanol (E10) is acceptable for use in this machine. The use of any gasoline exceeding 10% ethanol (E10) will void the product warranty. 115 68 21-27 Rev. 3 Please read the owner's manual carefully and make sure you understand the instructions - Husqvarna ST 230P | Owners Manual - Page 2
the snow thrower. 4. If the unit should start to vibrate abnormally, stop the engine (motor) and check immediately for the cause. Vibration is generally a warning of trouble. 5. Stop the engine (motor) whenever you leave the operating position, before unclogging the collector/impeller housing - Husqvarna ST 230P | Owners Manual - Page 3
refer to operator's manual for important details if the snow thrower is to be stored for an extended period. 4. Maintain or replace safety and instruction labels, as necessary. 5. Run the machine a few minutes after throwing snow to prevent freeze-up of the collector/impeller. CONGRATULATIONS on - Husqvarna ST 230P | Owners Manual - Page 4
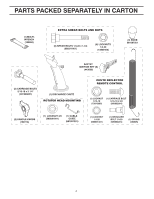
PARTS PACKED SEPARATELY IN CARTON (1) MULTIWRENCH (180684) (6) SHEAR BOLTS 1/4-20 x 1-3/4 (585511801) (6) LOCKNUTS 1/4-20 ( x 2 1/4" (587359001) (2) HANDLE KNOBS (189713) (1) LOCKNUT 3/8 (585691001) (1) CABLE GUIDE (581897301) (1) LOCKNUT 5/16-18 (73970500) (1) CARRIAGE BOLT 5/16-18 x 5/8 ( - Husqvarna ST 230P | Owners Manual - Page 5
Read these instructions and this manual in its entirety before you attempt to assemble or operate your new snow thrower. Reading the entire manual will familiarize you with the unit, which will assist you in assembly, operation and maintenance of the product. Your new snow thrower has been - Husqvarna ST 230P | Owners Manual - Page 6
parts bag may be used to install the chute rotator head. 1. Place discharge chute assembly on top of chute base with discharge opening toward front of snow Install locknut and cable guide on threaded stud and tighten securely. CHUTE ROTATOR HEAD LOCKNUT CABLE GUIDE INSTALL CHUTE DEFLECTOR REMOTE - Husqvarna ST 230P | Owners Manual - Page 7
OPERATION KNOW YOUR SNOW THROWER READ THIS OWNER'S MANUAL AND ALL SAFETY RULES BEFORE OPERATING YOUR SNOW THROWER. Compare the illustrations with your snow thrower to familiarize yourself with the location of various controls and adjustments. Save this manual for future reference. These symbols may - Husqvarna ST 230P | Owners Manual - Page 8
fuel flow to the engine. Traction drive control lever - used to engage powerpropelled forward or reverse motion of snow thrower. Auger control lever - used to engage auger motion (throw snow). Discharge chute control lever - used to change the direction the snow is thrown. Deflector remote control - Husqvarna ST 230P | Owners Manual - Page 9
, shut-off engine and wait for all moving parts to stop. Use the clean-out tool, NOT YOUR HANDS, to unclog the chute and/or auger. The DIRECTION in which snow is to be thrown is controlled by the discharge chute control lever. • To change the discharge chute position, pull backward on discharge - Husqvarna ST 230P | Owners Manual - Page 10
snow. Use the clean-out tool to dislodge this blockage. When cleaning, repairing, or inspecting, make certain all controls are disengaged and the auger/impeller and all moving parts interrupting the snow throwing process. TRACTION DRIVE CONTROL LEVER DRIVE SPEED CONTROL LEVER AUGER CONTROL LEVER - Husqvarna ST 230P | Owners Manual - Page 11
to the edge of the housing, it can be reversed, providing additional service before requiring replacement. Replace a damaged or worn scraper bar. BEFORE STARTING THE ENGINE CHECK ENGINE OIL LEVEL (See Fig. 17) The engine on your snow thrower has been shipped from the factory already filled with - Husqvarna ST 230P | Owners Manual - Page 12
the above steps or use the electric starter. SNOW THROWING TIPS • Go slower in deep, freezing or heavy wet snow. Use the drive speed control, NOT the ON / OFF current snow conditions. See "TO ADJUST SKID PLATES" in this section of this manual. • For extremely heavy snow, reduce the width of snow - Husqvarna ST 230P | Owners Manual - Page 13
as instructed in this manual. Some adjustments will need to be made periodically to properly maintain your snow thrower. All adjustments in the Service and Adjustments section of this manual should be checked at least once each season. • Once a year, you should replace the spark plug and check belts - Husqvarna ST 230P | Owners Manual - Page 14
wear after every 50 hours of operation and replace if necessary. The belts are not adjustable. Replace belts if they begin to slip from wear. (See "TO REMOVE BELT COVER" in the Service and Adjustments section of this manual). The belts on your snow thrower are of special construction and should be - Husqvarna ST 230P | Owners Manual - Page 15
should be replaced. WARNING: To avoid serious injury, never operate your snow thrower with the deflector removed or damaged. • To change direction and/or distance snow is discharged, see "TO CONTROL SNOW DISCHARGE" in the Operation section of this manual. SHEAR BOLTS (See Fig. 18) AUGER SHEAR BOLTS - Husqvarna ST 230P | Owners Manual - Page 16
to slip from wear, they should be replaced. It is recommended that the belt(s) be replaced by a service center/department. NOTE: It is recommended that both the auger and traction drive belt be replaced at the same time. The V-belts on your snow thrower are of special construction and should be - Husqvarna ST 230P | Owners Manual - Page 17
SERVICE AND ADJUSTMENTS DRIVE BELT REPLACEMENT (See Fig. 22) TO REMOVE DRIVE BELT 1. Remove auger belt. See "TO REMOVE AUGER BELT" in this section. 2. Remove tensioner spring attached to drive belt tensioner arm. 3. Remove return spring holding the swing plate in place. 4. Remove arm bolt and drive - Husqvarna ST 230P | Owners Manual - Page 18
control cable tension. The auger cable is set at the factory. Any adjustment by the consumer may create an unsafe machine condition. If you feel the cable needs to be adjustment, please contact an authorized service center/department. DRIVE ENGAGEMENT CABLE CHUTE ROTATOR CABLE ADJUSTER JAM NUT - Husqvarna ST 230P | Owners Manual - Page 19
, etc. Store in a clean, dry area. 1. Clean entire snow thrower (See "CLEANING" in the Maintenance section of this manual). 2. Inspect and replace belts, if necessary (See "TO REPLACE BELTS" in the Service and Adjustments section of this manual). 3. Lubricate as shown in the Maintenance section of - Husqvarna ST 230P | Owners Manual - Page 20
of this manual. Loss of traction drive / slowing of drive speed 1. Drive belt is worn. 2. Drive belt is off of pulley. 3. Friction drive wheel is worn. 1. Check / replace drive belt. 2. Check / reinstall drive belt. 3. Contact an authorized Sears service center/department. Loss of snow discharge - Husqvarna ST 230P | Owners Manual - Page 21
at its discretion, any defective product or part covered by the Limited Warranty, free of charge at any authorized Husqvarna Servicing Dealer/Center using original OEM Husqvarna replacement parts, subject to the limitations and exclusions described below. Husqvarna does not offer an over-the-counter - Husqvarna ST 230P | Owners Manual - Page 22
Proof of purchase (including date, product model and, if applicable, engine serial number) to an authorized Husqvarna Servicing Dealer for warranty service under this Limited Warranty. Proof of purchase rests solely with you. Husqvarna encourages you to register your product online at www.usa - Husqvarna ST 230P | Owners Manual - Page 23
Warranty Engine* * * Transmission (if made by Husqvarna/Peerless) 3 Years No Warranty Warranty No Warranty No Warranty * 1 Year ** 2 Years ** No Warranty Fabricated Deck shell. Limited Lifetime Warranty Battery Other Non-Expendable Components Snow Throwers, Tillers, LE475 Edger Engine* Auger - Husqvarna ST 230P | Owners Manual - Page 24
guard accessories, etc. 1 Year No Warranty No Warranty Parts (e.g., belts, blades, etc.) 90 days No Warranty No Warranty Parts & Accessories (if replaced in Warranty Service) Replacement parts and/or accessories provided under this Limited Warranty are warranted only for the BALANCE of - Husqvarna ST 230P | Owners Manual - Page 25
SERVICE NOTES 25 - Husqvarna ST 230P | Owners Manual - Page 26
SERVICE NOTES 26 - Husqvarna ST 230P | Owners Manual - Page 27
SERVICE NOTES 27 - Husqvarna ST 230P | Owners Manual - Page 28
08/21/2014 BD/TH
-
 1
1 -
 2
2 -
 3
3 -
 4
4 -
 5
5 -
 6
6 -
 7
7 -
8
-
9
-
10
-
11
-
12
-
13
-
14
-
15
-
16
-
17
-
18
-
19
-
20
-
21
-
22
-
23
-
24
-
25
-
26
-
27
-
28
 |
 |

English
115 68 21-27
Rev. 3
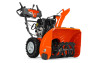
Operator’s Manual
ST 230P
Gasoline containing up to 10% ethanol (E10) is acceptable for use in this machine.
The use of any gasoline exceeding 10% ethanol (E10) will void the product warranty.
Please read the owner's manual carefully and make sure you
understand the instructions before using the machine.