IBM 84885BU User Manual - Page 69
Replacing, hot-swap, power, supply
 |
View all IBM 84885BU manuals
Add to My Manuals
Save this manual to your list of manuals |
Page 69 highlights
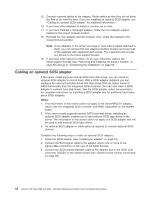
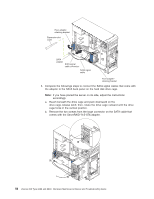
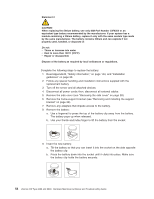
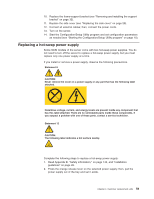
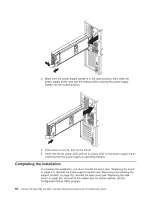
10. Replace the frame-support bracket (see "Removing and installing the support bracket" on page 32). 11. Replace the side cover (see "Replacing the side cover" on page 29). 12. Connect all external cables; then, connect the power cords. 13. Turn on the server. 14. Start the Configuration/Setup Utility program and set configuration parameters as needed (see "Starting the Configuration/Setup Utility program" on page 10). Replacing a hot-swap power supply Some SCSI models of the server come with two hot-swap power supplies. You do not need to turn off the server to replace a hot-swap power supply, but you must replace only one power supply at a time. If you install or remove a power supply, observe the following precautions. Statement 8 CAUTION: Never remove the cover on a power supply or any part that has the following label attached. Hazardous voltage, current, and energy levels are present inside any component that has this label attached. There are no serviceable parts inside these components. If you suspect a problem with one of these parts, contact a service technician. Statement 12 CAUTION: The following label indicates a hot surface nearby. Complete the following steps to replace a hot-swap power supply: 1. Read Appendix B, "Safety information," on page 143, and "Installation guidelines" on page 25. 2. Press the orange release lever on the selected power supply; then, pull the power supply out of the bay and set it aside. Chapter 4. Customer replacement units 59
-
 1
1 -
2
-
3
-
4
-
5
-
6
-
7
-
8
-
9
-
10
-
11
-
12
-
13
-
14
-
15
-
16
-
17
-
18
-
19
-
20
-
21
-
22
-
23
-
24
-
25
-
26
-
27
-
28
-
29
-
30
-
31
-
32
-
33
-
34
-
35
-
36
-
37
-
38
-
39
-
40
-
41
-
42
-
43
-
44
-
45
-
46
-
47
-
48
-
49
-
50
-
51
-
52
-
53
-
54
-
55
-
56
-
57
-
58
-
59
-
60
-
61
-
62
-
63
-
 64
64 -
 65
65 -
 66
66 -
 67
67 -
 68
68 -
 69
69 -
 70
70 -
 71
71 -
 72
72 -
 73
73 -
 74
74 -
75
-
76
-
77
-
78
-
79
-
80
-
81
-
82
-
83
-
84
-
85
-
86
-
87
-
88
-
89
-
90
-
91
-
92
-
93
-
94
-
95
-
96
-
97
-
98
-
99
-
100
-
101
-
102
-
103
-
104
-
105
-
106
-
107
-
108
-
109
-
110
-
111
-
112
-
113
-
114
-
115
-
116
-
117
-
118
-
119
-
120
-
121
-
122
-
123
-
124
-
125
-
126
-
127
-
128
-
129
-
130
-
131
-
132
-
133
-
134
-
135
-
136
-
137
-
138
-
139
-
140
-
141
-
142
-
143
-
144
-
145
-
146
-
147
-
148
-
149
-
150
-
151
-
152
-
153
-
154
-
155
-
156
-
157
-
158
-
159
-
160
-
161
-
162
-
163
-
164
-
165
-
166
-
167
-
168
-
169
-
170
-
171
-
172
-
173
-
174
-
175
-
176
-
177
-
178
-
179
-
180
-
181
-
182
-
183
-
184
-
185
-
186
-
187
-
188
-
189
-
190
-
191
-
192
-
193
-
194
-
195
-
196
-
197
-
198
-
199
-
200
 |
 |