Icom D-STAR Instruction Manual
Icom D-STAR Manual
 |
View all Icom D-STAR manuals
Add to My Manuals
Save this manual to your list of manuals |
Icom D-STAR manual content summary:
- Icom D-STAR | Instruction Manual - Page 1
VHF DIGITAL VOICE REPEATER id- rp2000v Instruction Manual This device complies with Part 15 of the FCC rules. Operation is subject to the following two conditions: (1) This device may not cause harmful interference, - Icom D-STAR | Instruction Manual - Page 2
peater. SAVE THIS INSTRUCTION MANUAL. This manual contains important safety and operating instructions for the ID-RP2000V. Refer to the ID-RP2 instruction manual, supplied with the ID-RP2C, about the Digital Smart Technologies for Amateur Radio (D-STAR) system repeater instruction, installation and - Icom D-STAR | Instruction Manual - Page 3
27-29 ■ Installation 27 ■ Un-installation 29 6 REPEATER SETTINGS 30 ■ Frequency setting for ID-RP2000V 30 7 MAINTENANCE 31 ■ Troubleshooting 31 ■ About cleaning 31 ■ Fuse replacement 31 8 SPECIFICATIONS AND SYSTEM UNITS 32 ■ Specifications 32 ■ System units 32 9 ABOUT CE 33 SUPPLIED - Icom D-STAR | Instruction Manual - Page 4
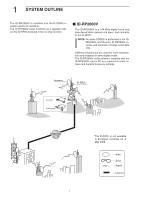
. The ID-RP2000V utility software, supplied with the ID-RP2000V, and a PC are required for both receive and transmit frequency settings. Antenna ID-RP2L* ID-RP2C POWER 10 BESE-T SERVICE 1 SERVICE 2 ASSIST 1 ASSIST 2 POWER SERVICE T SERVICE R ID-RP2000V Repeater CIDo-ntRroPll2eV r Internet - Icom D-STAR | Instruction Manual - Page 5
cable (A-B type; purchase separately) to set the transmit frequency. t SERVICE CONNECTOR R [SERVICE R] (p. 30) Connects a PC via a USB cable (A-B type; purchase separately) to set the receive frequency. ■ Rear panel q to a ground to prevent electrical shocks, TVI, BCI and other problems. 2 - Icom D-STAR | Instruction Manual - Page 6
any liquids. NEVER connect the repeater to a power source using reverse polarity. This will damage the repeater. And turn the repeater power OFF when connecting a the DC power supply that is used with the ID-RP2000V system meets the followings: Output voltage : 13.8 V DC ±15% Current capacity : - Icom D-STAR | Instruction Manual - Page 7
CONNECTIONS AND INSTALLATIONS ■ When install into system rack The ID-RP2000V is designed to install prevent electrical shock, television interference (TVI), broadcast interference (BCI) and other problems, ground the transceiver through the GROUND terminal on the rear panel. For the best results, - Icom D-STAR | Instruction Manual - Page 8
3 CONNECTIONS AND INSTALLATIONS ■ System connections 144 MHz band antenna (purchase separately) to AH-106/107* ID-RP2L* (Assist 1) ID-RP2L* (Assist 2) to AH-106/107* [A] [B] ID-RP2C Duplexer (purchase - Icom D-STAR | Instruction Manual - Page 9
this instruction, describes with the installation of the ID-RP2000V [SERVICE T] connector for example. NOTE: The repeater RP2000V [SERVICE T] connector using with a USB cable (A-B type; purchase separately). r "Found New Hardware ID-RP2000V SERVICE T" appears as at left. t The "Found New Hardware - Icom D-STAR | Instruction Manual - Page 10
Microsoft® Windows® XP (Service Pack 2)- continued y When the dialog box as at left is displayed, select "Install the software automatically (Recommended)," then click left does not appear, select "Install from a list or specific location (Advanced)" in step y, then select the driver folder in the CD. - Icom D-STAR | Instruction Manual - Page 11
starts installing the USB driver. !0 After the installation is completed, click [Finish]. Click !1 After clicking [Finish], "Found New Hardware USB Serial Port" appears as at left. !2 The "Found New Hardware Wizard" will come up as at left. Select "No, not this time" then click [Next>]. Select - Icom D-STAR | Instruction Manual - Page 12
4 DRIVER INSTALLATIONS ■ Microsoft® Windows® XP (Service Pack 2)- continued !3 Select "Install the software automatically (Recommended)," then click [Next>]. Select at left does not appear, select "Install from a list or specific location (Advanced)" in step !3, then select the driver folder in the CD. - Icom D-STAR | Instruction Manual - Page 13
DRIVER INSTALLATIONS !6 Windows starts installing the USB driver. !7 After the installation is completed, click [Finish]. Click !8 After clicking [Finish], "Found New Hardware Your new hardware is installed and ready to use" appears as at left. !9 Eject the CD. • Rebooting the PC is recommended. 10 - Icom D-STAR | Instruction Manual - Page 14
the ID-RP2000V, into the CD drive. e Connect the PC and ID-RP2000V [SERVICE T] connector using with a USB cable (A-B type; purchase separately). r "Found New Hardware ID-RP2000V SERVICE T" appears as at left. t The "Found New Hardware Wizard" will come up as at left. Click [Next->]. Click y When - Icom D-STAR | Instruction Manual - Page 15
box appears as at left appears. Click [Next >] to start the installation. Click o After the installation is completed, click [Finish]. Click !0 After clicking [Finish], "Found New Hardware USB Serial Port" appears as at left. ☞ Continue to the next page. 12 - Icom D-STAR | Instruction Manual - Page 16
4 DRIVER INSTALLATIONS ■ Microsoft® Windows® 2000- continued !1 The "Found New Hardware Wizard" will come up as at left. Click [Next->]. Click !2 Select "Search for a suitable driver for my device (recommended)," then click [Next->]. Select Click !3 - Icom D-STAR | Instruction Manual - Page 17
4 DRIVER INSTALLATIONS !4 When the appropriate driver is found, the dialog box appears as at left appears. Click [Next >] to start the installation. Click !5 After the installation is completed, click [Finish]. !6 Eject the CD. • Rebooting the PC is recommended. Click 14 - Icom D-STAR | Instruction Manual - Page 18
. w Insert the CD supplied with the ID-RP2000V, into the CD drive. e Connect the PC and ID-RP2000V [SERVICE T] connector using with a USB cable (A-B type; purchase separately). r The "Add New Hardware Wizard" will come up as at left. Click [Next>]. Click Select t When the dialog box as at left - Icom D-STAR | Instruction Manual - Page 19
Select Click Confirm Click 4 DRIVER INSTALLATIONS u Double-click the "Driver" folder then select "WinME98" folder in the CD. Click [OK]. i Confirm the driver folder in the CD is selected, then click [Next >]. o When the driver is found, the screen as at left appears. Click [Next >] to start the - Icom D-STAR | Instruction Manual - Page 20
4 DRIVER INSTALLATION ■ Microsoft® Windows® 98SE/Me- continued !0 After the installation is completed, click [Finish]. Click !1 After clicking [Finish], "New Hardware Found ICOM ID-RP2000V SERVICE T" appears as at left. !2 Eject the CD. • Rebooting the PC is recommended. 17 - Icom D-STAR | Instruction Manual - Page 21
into the CD drive. e Connect the PC and ID-RP2000V [SERVICE T] connector using with a USB cable (A-B type; purchase separately). r "Found New Hardware" appears as at left. Click "Locate and install driver software (recommended)". t In case "User Account Control" dialog box appears as at left, click - Icom D-STAR | Instruction Manual - Page 22
4 DRIVER INSTALLATION ■ Microsoft® Windows Vista™- continued Click u The dialog box as at left is displayed. Click "Install this driver software anyway" to start the installation. i The wizard starts searching for the driver and shows the dialog as at left during search. o After the installation - Icom D-STAR | Instruction Manual - Page 23
4 DRIVER INSTALLATIONS !0 When the "Found New Hardware -USB Serial Port" appears as at left, click [Next]. Click !1 The dialog box as at left is displayed. Click "Install this driver software anyway" to start the installation. Click !2 The wizard starts searching for the driver and shows the dialog - Icom D-STAR | Instruction Manual - Page 24
4 DRIVER INSTALLATION ■ Microsoft® Windows Vista™- continued !3 After the installation is completed, click [Close]. !4 Eject the CD. • Rebooting the PC is recommended. Click 21 - Icom D-STAR | Instruction Manual - Page 25
. Un-install the USB driver then reinstall the driver again in such cases. NOTE: "✱" is the COM port number, that is used for the communication setting with the utility software. "ICOM ID-RP2000V SERVICE T (COM✱) (COM✱)" 22 - Icom D-STAR | Instruction Manual - Page 26
ID-RP2000V [SERVICE T] connector through a USB cable (A-B type; purchase separately). e Right click "My Computer" then select "Properties." r "System Properties" screen setting with the utility software. "ICOM ID-RP2000V SERVICE T (COM✱) (COM - Icom D-STAR | Instruction Manual - Page 27
, and COM port number. (In this example, the USB serial port number is "4.") NOTE: "✱" is the COM port number, that is used for the communication setting with the utility software. "ICOM ID-RP2000V SERVICE T (COM✱) (COM✱)" 24 - Icom D-STAR | Instruction Manual - Page 28
-installation with the following instructions. Un-install the USB drivers as follows. In this section, describes the un-installation instruction with Windows XP for • When the dialog box as at left is displayed, make sure no equipment is connected to the USB port, then click [Continue]. • When the - Icom D-STAR | Instruction Manual - Page 29
t Click to add the check mark, "✔," into "Delete the driver software for this device." then click [OK]. y Right click the "ICOM ID-RP2000V SERVICE✱" , then select "Uninstall". u Click to add the check mark, "✔," into "Delete the driver software for this device." then click [OK]. NOTE: Un-install the - Icom D-STAR | Instruction Manual - Page 30
5 UTILITY INSTALLATION ■ Installation Double click Double click The utility is used for the setting of call sign and operating frequencies. q Start up Windows. • Quit all other applications if running. w Insert the CD, supplied with the ID-RP2000V, into the - Icom D-STAR | Instruction Manual - Page 31
Click 5 UTILITY INSTALLATION o "Choose Destination Location" screen appears. • When installing the utility into the displayed location, click [Next>]. • When installing into a different location, click [Browse...], select the desired location and then click [Next>]. !0 Starts the utility - Icom D-STAR | Instruction Manual - Page 32
software using with the standard application of the OS, "Add and Remove Programs," as follows. q Open "Control Panel." • "Control Panel" is located in "Setting " in menu for Windows® 98SE/Me/2000 or Windows Vista™. w Click "Add or Remove Programs." Click Select Click e Select "Icom - Icom D-STAR | Instruction Manual - Page 33
ON. • Connect an USB cable to [SERVICE R] when setting receive frequency. • Connect an USB cable to [SERVICE T] when setting transmit frequency. e Start up the ID-RP2000V utility. Double click the "ID-RP2000V" icon on the desktop or select the "ID-RP2000V" in "Program" in "Start" menu. r The screen - Icom D-STAR | Instruction Manual - Page 34
or coaxial cable has problems. only strong signals are operatable. • Check, and if necessary, replace the coaxial pgs. cable or solder the antenna connector again. 3, 5 Does not function even • The repeater controller, ID-RP2C, setting • Read the instruction manual of the ID-RP2 - a signal - Icom D-STAR | Instruction Manual - Page 35
DC) • Modulation system • Occupied bandwidth • Spurious emissions D Receiver • Receive system • Intermediate System units ID-RP2D* ID-RP2V* ID-RP2L* ID-RP4000V AH-106* AH-107* AH-108* 1.2 GHZ DATA REPEATER 1.2 GHZ DIGITAL VOICE REPEATER 10 GHZ MICROWAVE LINK REPEATER UHF DIGITAL VOICE REPEATER - Icom D-STAR | Instruction Manual - Page 36
Icom Radio and Telecommunication Terminal Directive 1999/5/EC. List equipment operates in non-harmonised frequency bands and/or may be subject to licensing conditions in the country of use. Be sure to check that you have the correct version of this radio or the correct programming of this radio - Icom D-STAR | Instruction Manual - Page 37
- Icom D-STAR | Instruction Manual - Page 38
- Icom D-STAR | Instruction Manual - Page 39
- Icom D-STAR | Instruction Manual - Page 40
■ LU ■ MT ■ NL ■ PL ■ PT ■ SK ■ SI ■ ES ■ SE ■ GB ■ IS ■ LI ■ NO ■ CH ■ BG ■ RO ■ TR ■ HR A-6491H-1EX-w Printed in Japan © 2006-2008 Icom Inc. 1-1-32 Kamiminami, Hirano-ku, Osaka 547-0003, Japan
-
 1
1 -
 2
2 -
 3
3 -
 4
4 -
 5
5 -
 6
6 -
 7
7 -
8
-
9
-
10
-
11
-
12
-
13
-
14
-
15
-
16
-
17
-
18
-
19
-
20
-
21
-
22
-
23
-
24
-
25
-
26
-
27
-
28
-
29
-
30
-
31
-
32
-
33
-
34
-
35
-
36
-
37
-
38
-
39
-
40
 |
 |

VHF DIGITAL VOICE REPEATER
id-rp2000v
Instruction Manual
This device complies with Part 15 of the FCC rules. Operation
is subject to the following two conditions: (1) This device may
not cause harmful interference, and (2) this device must accept
any interference received, including interference that may cause
undesired operation.