Image Fitness 15.0r Treadmill English Manual
Image Fitness 15.0r Treadmill Manual
 |
View all Image Fitness 15.0r Treadmill manuals
Add to My Manuals
Save this manual to your list of manuals |
Image Fitness 15.0r Treadmill manual content summary:
- Image Fitness 15.0r Treadmill | English Manual - Page 1
questions, or if parts are damaged or missing, PLEASE CONTACT OUR CUSTOMER SERVICE DEPARTMENT DIRECTLY. CALL TOLL-FREE: 1-800-753-4645 Mon.-Fri., 6 a.m.-6 p.m. MST ON THE WEB: www.iconservice.com USER'S MANUAL CAUTION Read all precautions and instructions in this manual before using this equipment - Image Fitness 15.0r Treadmill | English Manual - Page 2
10 HOW TO FOLD AND MOVE THE TREADMILL 16 TROUBLESHOOTING 17 CONDITIONING GUIDELINES 19 ORDERING REPLACEMENT PARTS Back Cover LIMITED WARRANTY Back Cover Note: An EXPLODED DRAWING and a PART LIST are attached in the center of this manual. IMAGE is a registered trademark of ICON IP, Inc - Image Fitness 15.0r Treadmill | English Manual - Page 3
move the walking belt while the power is turned off. Do not operate the treadmill if the power cord or plug is damaged, or if the treadmill is not working properly. (See TROUBLESHOOTING on page 17 if the treadmill is not working properly.) 14. Read, understand, and test the emergency stop procedure - Image Fitness 15.0r Treadmill | English Manual - Page 4
through the use of this product. SAVE THESE INSTRUCTIONS The decals shown here have been placed on the treadmill. If a decal is missing, or if it is not legible, call the toll-free telephone number on the front cover of this manual and order a free replacement decal. Note: The decals are not shown - Image Fitness 15.0r Treadmill | English Manual - Page 5
for any service needed under warranty, you must register the treadmill at www.iconservice.com/registration. Before reading further, please review the drawing below and familiarize yourself with the labeled parts. Accessory Tray Fan Console Handrail Storage Latch Walking Belt Foot Rail Key/Clip - Image Fitness 15.0r Treadmill | English Manual - Page 6
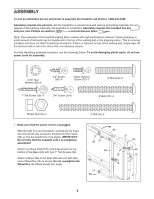
of the packing materials until assembly is completed. Assembly requires the included hex key and your own Phillips screwdriver and needlenose pliers . Note: The underside of the treadmill walking belt is coated with high-performance lubricant. During shipping, a small amount of lubricant may - Image Fitness 15.0r Treadmill | English Manual - Page 7
Right Upright; be careful not to damage the Upright Wire. Do not tighten the Bolts yet. With the help of a second person, carefully tip the treadmill onto its other side. Attach the other Wheel (not shown) as described in step 1, and then attach the Left Upright (61) as described above. Make - Image Fitness 15.0r Treadmill | English Manual - Page 8
4. Hold the Console Base (47) near the Left Handrail (71). Attach the end of the ground wire on the Console Base to the indicated small hole in the Left Handrail with the Silver Ground Screw (75). 4 Ground Wire 47 Small Hole 75 71 5. Touch the Right Handrail (72) to discharge any static. Slide the - Image Fitness 15.0r Treadmill | English Manual - Page 9
the Screws. 61 29 44 2 10. Make sure that all parts are properly tightened before you use the treadmill. Note: Extra hardware may be included. Keep the included hex key in a secure place. The hex key is used to adjust the walking belt (see page 18). To protect the floor or carpet, place - Image Fitness 15.0r Treadmill | English Manual - Page 10
treadmill (see drawing 1 at the right). To purchase a surge suppressor, see your local IMAGE dealer or call the toll-free telephone number on the front cover of this manual and order part . The surge suppressor must be electrically rated for 120 volts AC and 15 amps. There must be a monitoring light - Image Fitness 15.0r Treadmill | English Manual - Page 11
or to increase the speed of the walking belt. Preset Programs The console also features four preset programs. Each program automatically controls the speed and incline of the treadmill as it guides you through an effective workout. To use the manual mode of the console, follow the steps beginning - Image Fitness 15.0r Treadmill | English Manual - Page 12
users may also find it helpful to reduce the incline of the treadmill or to increase the speed of the walking belt. IMPORTANT: Always walk at a speed that is comfortable for you. The right display- This display will show the elapsed time, the distance that you have walked or run during your workout - Image Fitness 15.0r Treadmill | English Manual - Page 13
an appropriate starting goal, walk on the treadmill with the manual mode selected (see page 12), and note the number of steps that you walk during your workout. Then, round that number up to the nearest 500 steps. This can be a starting goal. As your fitness level improves, you can increase the goal - Image Fitness 15.0r Treadmill | English Manual - Page 14
. The walking belt will begin to move at 2 mph. To end the program, press the Stop button, remove the key, and then reinsert the key. 4 Follow your progress with the displays. See step 5 on page 12. 5 Measure your heart rate if desired. See step 6 on page 13. 6 Turn on the workout fan if desired - Image Fitness 15.0r Treadmill | English Manual - Page 15
belt will begin to move at 1 mph. When the next period of the program begins, the treadmill key, and then reinsert the key. 4 Follow your progress with the displays. See step 5 on page 12. 5 Measure your heart rate if desired. See step 6 on page 13. 6 Turn on the workout all users of the treadmill. - Image Fitness 15.0r Treadmill | English Manual - Page 16
damaged. Next, unplug the power cord. CAUTION: You must be able to safely lift 45 pounds (20 kg) to raise, lower, or move the treadmill. 1. Hold the treadmill with your hands in the locations shown by the arrow at the right. Raise the frame about halfway to the vertical position. To decrease - Image Fitness 15.0r Treadmill | English Manual - Page 17
it, wait for five minutes, and then plug it back in. c. Remove the key from the console. Reinsert the key into the console. d. If the treadmill still does not run, please see the front cover of this manual. PROBLEM: The displays of the console do not function properly SOLUTION: a. Remove the - Image Fitness 15.0r Treadmill | English Manual - Page 18
in the power cord, insert the key, and run the treadmill for a few minutes. Repeat until the walking belt is properly tightened. b 2"-3" Rear Roller Bolts c. If the walking belt still slows when walked on, please see the front cover of this manual. PROBLEM: The walking belt is off-center or slips - Image Fitness 15.0r Treadmill | English Manual - Page 19
. For aerobic exercise, adjust the speed or incline of the treadmill until your heart rate is near the highest number in your training zone. WORKOUT GUIDELINES Each workout should include the following three parts: A Warm-up-Start each workout with 5 to 10 minutes of stretching and light exercise - Image Fitness 15.0r Treadmill | English Manual - Page 20
PART LIST-Model No. IMTL39105.3 R0506A To locate the parts listed below, see the EXPLODED DRAWING. Key No. Qty. Description 1 1 Hood 2 21 3/4" Screw 3 1 Motor Belt 4 2 Motor Tension Bolt 5 2 4" Bolt 6 1 Motor Star Washer 7 1 Flywheel 8 1 Drive Motor 9 1 Right Upright 10 1 Reed Switch 11 1 Latch - Image Fitness 15.0r Treadmill | English Manual - Page 21
Model No. IMTL39105.3 R0506A 1 16 49 63 49 30 24 11 49 15 26 90 88 101 38 92 58 93 31 38 92 101 94 58 43 34 67 22 22 22 2 74 10 12 49 13 49 45 14 15 24 82 83 49 16 49 49 15 80 13 53 23 54 78 51 73 46 41 35 13 14 62 15 65 87 45 83 63 24 82 58 49 102 57 39 103 - Image Fitness 15.0r Treadmill | English Manual - Page 22
HOW TO ORDER REPLACEMENT PARTS To order replacement parts, please see the front cover of this manual. To help us assist you, be prepared to give the following information: • the MODEL NUMBER of the product (IMTL39105.3) • the NAME of the product (IMAGE 15.0 R treadmill) • the SERIAL NUMBER of the
-
 1
1 -
 2
2 -
 3
3 -
 4
4 -
 5
5 -
 6
6 -
 7
7 -
8
-
9
-
10
-
11
-
12
-
13
-
14
-
15
-
16
-
17
-
18
-
19
-
20
-
21
-
22
 |
 |

Model No. IMTL39105.3
Serial No.
CAUTION
Read all precautions and instruc-
tions in this manual before using
this equipment. Save this manual
for future reference.
USER'S MANUAL
QUESTIONS?
As a manufacturer, we are com-
mitted to providing complete
customer satisfaction. If you
have questions, or if parts are
damaged or missing, PLEASE
CONTACT OUR CUSTOMER
SERVICE DEPARTMENT
DIRECTLY.
CALL TOLL-FREE:
1-800-753-4645
Mon.–Fri., 6 a.m.–6 p.m. MST
ON THE WEB:
www.iconservice.com
Visit our website at
www.imagefitness.com
new products, prizes,
fitness tips, and much more!
Serial Number
Decal