Image Fitness 19.0 R Treadmill English Manual
Image Fitness 19.0 R Treadmill Manual
 |
View all Image Fitness 19.0 R Treadmill manuals
Add to My Manuals
Save this manual to your list of manuals |
Image Fitness 19.0 R Treadmill manual content summary:
- Image Fitness 19.0 R Treadmill | English Manual - Page 1
questions, or if parts are damaged or missing, PLEASE CONTACT OUR CUSTOMER SERVICE DEPARTMENT DIRECTLY. CALL TOLL-FREE: 1-800-753-4645 Mon.-Fri., 6 a.m.-6 p.m. MST ON THE WEB: www.iconservice.com USER'S MANUAL CAUTION Read all precautions and instructions in this manual before using this equipment - Image Fitness 19.0 R Treadmill | English Manual - Page 2
ADJUSTMENT 11 HOW TO FOLD AND MOVE THE TREADMILL 20 TROUBLESHOOTING 22 CONDITIONING GUIDELINES 25 PART LIST 27 ORDERING REPLACEMENT PARTS Back Cover LIMITED WARRANTY Back Cover Note: An EXPLODED DRAWING is attached in the center of this manual. IMAGE is a registered trademark of ICON IP, Inc - Image Fitness 19.0 R Treadmill | English Manual - Page 3
surfaces. 14. Never move the walking belt while the power is turned off. Do not operate the treadmill if the power cord or plug is damaged, or if the treadmill is not working properly. (See TROUBLESHOOTING on page 22 if the treadmill is not working properly.) 15. Read, understand, and test the - Image Fitness 19.0 R Treadmill | English Manual - Page 4
procedures described in this manual. Never remove the motor hood un- less instructed to do so by an authorized ser- vice representative. Servicing other than the procedures in this manual should be performed by an authorized service representative only. 25. This treadmill is intended for in - Image Fitness 19.0 R Treadmill | English Manual - Page 5
cover of this manual for the location). To avoid a registration fee for any service needed under warranty, you must register the treadmill at www.iconservice.com/registration. Before reading further, please review the drawing below and familiarize yourself with the labeled parts. Console Handrail - Image Fitness 19.0 R Treadmill | English Manual - Page 6
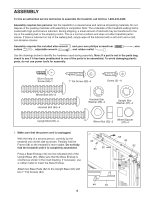
service technician to assemble the treadmill, call toll-free 1-800-445-2480. Assembly requires two persons. Set the treadmill in a cleared area and remove all packing materials. Do not dispose of the packing materials until assembly is completed. Note: The underside of the treadmill walking belt - Image Fitness 19.0 R Treadmill | English Manual - Page 7
; be careful not to damage the Upright Wire Harness. Do not tighten the Upright Bolts yet. With the help of a second person, carefully tip the treadmill onto its other side. Attach the other Base Endcap (44) and two Base Pads (82) as described in step 1. Next, attach the other Wheel (80 - Image Fitness 19.0 R Treadmill | English Manual - Page 8
5. While a second person holds the console assembly near the Handrail (20) as shown, attach the ground wire to the 5 indicated hole in the Handrail with a Silver Ground Screw (94). Ground Wire 94 Hole 20 Console Assembly 6. While a second person continues to hold the console assembly, look - Image Fitness 19.0 R Treadmill | English Manual - Page 9
incline level (see page 13). 10 Knob 3 73 3 Large Hole 13 Spring Collar Pin 11. Make sure that all parts are properly tightened before you use the treadmill. If there are sheets of clear plastic on the treadmill decals, remove the plastic. To protect the floor or carpet, place a mat under the - Image Fitness 19.0 R Treadmill | English Manual - Page 10
your chest. CHEST PULSE SENSOR TROUBLESHOOTING The instructions on the following pages explain how on the treadmill, position yourself near the center of the walking belt. For the console to display heart rate readings, problem, try relocating the treadmill. • The CR2032 battery may need to be - Image Fitness 19.0 R Treadmill | English Manual - Page 11
treadmill (see drawing 1 at the right). To purchase a surge suppressor, see your local IMAGE dealer or call the toll-free telephone number on the front cover of this manual and order part . The surge suppressor must be electrically rated for 120 volts AC and 15 amps. There must be a monitoring light - Image Fitness 19.0 R Treadmill | English Manual - Page 12
may also find it helpful to reduce the incline of the treadmill or to increase the speed of the walking belt. To use the manual mode of the console, follow the steps beginning on page 13. To use a trainer program, see page 15. To use a cardio control program, see page 16. To use the - Image Fitness 19.0 R Treadmill | English Manual - Page 13
an emergency situation, the key can be pulled from the console, causing the walking belt to slow to a stop. Test the clip by carefully taking a few steps a moment for the treadmill to reach the selected incline setting. 5 Follow your progress with the display. When the manual mode is selected, - Image Fitness 19.0 R Treadmill | English Manual - Page 14
belt, and your pace (in minutes per mile). The right side of the display will also show your heart rate all instructions in rate will be shown. For the most accurate heart rate reading, continue to hold the contacts for about 15 19 and turn off the demo mode. When you are finished using the treadmill - Image Fitness 19.0 R Treadmill | English Manual - Page 15
pressed, the treadmill will automatically adjust incline of the treadmill is about to and the treadmill will automatically belt will then slow you can manually override the , the treadmill will automatically belt will begin to move at 1 mph. When the next segment of the program begins, the treadmill - Image Fitness 19.0 R Treadmill | English Manual - Page 16
Cardio control program 7 will automatically adjust the speed and incline of the treadmill to keep your heart rate within a preset range during your workout. Cardio control program 8 will keep your heart rate near a target heart rate setting that you select. CAUTION: If you have heart prob- lems, or - Image Fitness 19.0 R Treadmill | English Manual - Page 17
automatically increase or decrease to bring your heart rate closer to the target heart rate setting. If the speed of the walking belt reaches 7.5 mph and your heart rate is still too far below the target heart rate setting, the incline of the treadmill will also increase. If the speed or incline - Image Fitness 19.0 R Treadmill | English Manual - Page 18
appear in the display. Depending on your fitness level, you may desire to walk appropriate starting goal, walk on the treadmill with the manual mode selected (see page 13), and belt will begin to move at 2 mph. 4 Follow your progress with the display. See step 5 on page 13. 5 Measure your heart rate - Image Fitness 19.0 R Treadmill | English Manual - Page 19
show the total number of miles or kilometers that the walking belt has moved. The lower part of the display will show the total number of hours that the treadmill has been operated. In addition, an "E" for English miles disappears. To exit the information mode, remove the key from the console. 19 - Image Fitness 19.0 R Treadmill | English Manual - Page 20
able to safely lift 45 pounds (20 kg) to raise, lower, or move the treadmill. 1. Hold the metal frame firmly in the location shown by the arrow at the position. 2. Move your right hand to the position shown and hold the treadmill firmly. Using your left hand, pull the latch knob to the left and - Image Fitness 19.0 R Treadmill | English Manual - Page 21
USE 1. Hold the upper end of the treadmill with your right hand. Pull the latch knob to the left and hold it. Pivot the frame down until the catch is past the latch - Image Fitness 19.0 R Treadmill | English Manual - Page 22
TROUBLESHOOTING Most treadmill problems can be solved by following the steps below. Find the symptom that applies, and follow the steps listed. If further assistance is needed, please see the front cover of this manual. PROBLEM: The power does not turn on SOLUTION: a. Make sure that the power - Image Fitness 19.0 R Treadmill | English Manual - Page 23
cord, insert the key, and run the treadmill for a few minutes. Repeat until the walking belt is properly tightened. b 2"-3" Rear Roller Bolts c. If the walking belt still slows when walked on, please see the front cover of this manual. PROBLEM: The walking belt is off-center or slips when walked - Image Fitness 19.0 R Treadmill | English Manual - Page 24
PROBLEM: The chest pulse sensor does not function properly SOLUTION: a. If the chest pulse sensor does not function properly, see CHEST PULSE SENSOR TROUBLESHOOTING on page 10. b. If the chest pulse sensor still does not function properly, the battery should be changed. To replace the battery, - Image Fitness 19.0 R Treadmill | English Manual - Page 25
rate as a guide. The chart below shows recommended heart rates for fat burning and aerobic exercise. is to burn fat, adjust the speed and incline of the treadmill until your heart rate of your muscles and will help prevent postexercise problems. EXERCISE FREQUENCY To maintain or improve your - Image Fitness 19.0 R Treadmill | English Manual - Page 26
opposite foot toward 2 you and rest it against the inner thigh of your extended leg. Reach toward your toes as far as possible. Hold for 15 counts, then relax. Repeat 3 times for each leg. Stretches: Hamstrings, lower back and groin. 3. Calf/Achilles Stretch With one leg in front of the other - Image Fitness 19.0 R Treadmill | English Manual - Page 27
Screw 12 2 Belt Guide 13 1 Left Upright 14 1 Right Upright 15 2 Frame Pivot Bolt 16 1 Left Foot Rail 17 1 Right Foot Rail 18 1 Motor Pivot Bolt 19 1 Motor Bracket 20 1 Handrail 21 1 Latch Pin Assembly 22 2 Motor Washer 23 1 Motor Star Washer 24 2 Motor Bolt 25 4 Motor Tension Bolt 26 1 Motor Belt 27 - Image Fitness 19.0 R Treadmill | English Manual - Page 28
.1 R0406A 30 23 30 24 26 27 19 3 98 1 25 22 5 28 42 36 33 33 3 98 6 5 16 5 5 5 3 4 12 11 15 10 32 32 46 47 22 25 18 10 62 32 66 45 43 28 69 9 2 70 90 53 8 52 3 55 48 49 2 51 8 53 9 70 90 5 54 33 57 3 58 5 17 15 11 1 12 5 - Image Fitness 19.0 R Treadmill | English Manual - Page 29
EXPLODED DRAWING-Model No. IMTL59105.1 R0406A 64 89 64 89 3 29 3 20 79 3 64 3 3 3 89 50 29 77 3 64 73 89 21 13 29 3 50 97 14 32 81 80 84 87 68 25 44 82 83 56 82 67 86 83 65 88 72 87 82 83 87 82 83 44 82 83 33 32 32 97 25 80 97 81 82 83 68 67 65 95 94 3 93 - Image Fitness 19.0 R Treadmill | English Manual - Page 30
of the product (IMAGE 19.0 R treadmill) • the SERIAL NUMBER of the product (see the front cover of this manual) • the KEY NUMBER and DESCRIPTION of the part(s) (see the EXPLODED DRAWING in the center of this manual and the PART LIST on page 27) LIMITED WARRANTY ICON Health & Fitness, Inc. (ICON
-
 1
1 -
 2
2 -
 3
3 -
 4
4 -
 5
5 -
 6
6 -
 7
7 -
8
-
9
-
10
-
11
-
12
-
13
-
14
-
15
-
16
-
17
-
18
-
19
-
20
-
21
-
22
-
23
-
24
-
25
-
26
-
27
-
28
-
29
-
30
 |
 |

Serial Number Decal
Model No.
IMTL59105.1
Serial No.
CAUTION
Read all precautions and instruc-
tions in this manual before using
this equipment. Save this manual
for future reference.
USER'S MANUAL
QUESTIONS?
As a manufacturer, we are com-
mitted to providing complete
customer satisfaction. If you
have questions, or if parts are
damaged or missing, PLEASE
CONTACT OUR CUSTOMER
SERVICE DEPARTMENT
DIRECTLY.
CALL TOLL-FREE:
1-800-753-4645
Mon.–Fri., 6 a.m.–6 p.m. MST
ON THE WEB:
www.iconservice.com
Visit our website at
www.imagefitness.com
new products, prizes,
fitness tips, and much more!