Image Fitness E3000 Treadmill English Manual
Image Fitness E3000 Treadmill Manual
 |
View all Image Fitness E3000 Treadmill manuals
Add to My Manuals
Save this manual to your list of manuals |
Image Fitness E3000 Treadmill manual content summary:
- Image Fitness E3000 Treadmill | English Manual - Page 1
Mon.-Fri., 6 a.m.-6 p.m. MST ON THE WEB: www.iconservice.com CAUTION Read all precautions and instructions in this manual before using this equipment. Save this manual for future reference. USER'S MANUAL Visit our website at www.imagefitness.com new products, prizes, fitness tips, and much more! - Image Fitness E3000 Treadmill | English Manual - Page 2
ASSEMBLY 6 HOW TO MOVE THE TREADMILL 9 OPERATION AND ADJUSTMENT 10 TROUBLESHOOTING 27 CONDITIONING GUIDELINES 29 PART LIST 30 ORDERING REPLACEMENT PARTS 31 LIMITED WARRANTY Back Cover Note: An EXPLODED DRAWING is attached in the center of this manual. IMAGE is a registered trademark of ICON - Image Fitness E3000 Treadmill | English Manual - Page 3
treadmill if the power cord or plug is damaged, or if the treadmill is not working properly. (See TROUBLESHOOTING on page 27 if the treadmill is not working properly.) 5. Do not operate the treadmill local IMAGE dealer or call the toll-free telephone number on the front cover of this manual and - Image Fitness E3000 Treadmill | English Manual - Page 4
procedures de- scribed in this manual. Never remove the motor hood unless instructed to do so by an authorized service representative. Servicing other than the procedures in this manual should be performed by an authorized service representative only. 28. The treadmill is intended for in-home - Image Fitness E3000 Treadmill | English Manual - Page 5
on a decal attached to the treadmill (see the front cover of this manual for the location). To avoid a registration fee for any service needed under warranty, you must register the treadmill at www.iconservice.com/registration. Before reading further, please review the drawing below and familiarize - Image Fitness E3000 Treadmill | English Manual - Page 6
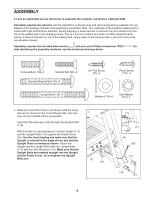
ASSEMBLY To hire an authorized service technician to assemble the treadmill, call toll-free 1-800-445-2480. Assembly requires two persons. Set the treadmill in a cleared area and remove all packing materials. Do not dispose of the packing materials until assembly is completed. Note: The underside - Image Fitness E3000 Treadmill | English Manual - Page 7
2. Have a second person hold the console assembly near the Upright (111). Insert the wire harness extending from the console assembly through the hole in the top of the Upright. Attach the console assembly to the Upright with four Console Bolts (110) and two Star Washers (114). Firmly tighten the - Image Fitness E3000 Treadmill | English Manual - Page 8
Right Handrail and into the console assem- bly. Do not tighten the Handrail Bolts yet. Attach the Left Handrail to the left side of the treadmill in the same way. Then, slide the Upper Handrail (93) onto the Right and Left Handrails. Next, slide a Handrail Bracket (32) onto the lower end - Image Fitness E3000 Treadmill | English Manual - Page 9
121) with the 3/4" Screw (95). Discard the other wires included with the receiver. Small 98 Screws Small Cylinder 121 A 95 Wire HOW TO MOVE THE TREADMILL 1. Unplug the power cord. 2. Hold the treadmill with your hands in the location shown by the arrow at the right, and raise the end of the - Image Fitness E3000 Treadmill | English Manual - Page 10
-if it will not fit the outlet, have a proper outlet installed by a qualified electrician. Your treadmill, like any other type treadmill (see drawing 1 at the right). To purchase a surge suppressor, see your local IMAGE dealer or call the toll-free telephone number on the front cover of this manual - Image Fitness E3000 Treadmill | English Manual - Page 11
trainer guides you through every step of your workout; highenergy music provides added motivation. To purchase and download iFIT.com MP3 programs, go to www.iFIT.com. To purchase iFIT.com CDs or videocassettes, call the toll-free telephone number on the front cover of this manual. With the treadmill - Image Fitness E3000 Treadmill | English Manual - Page 12
to the reset position. Reset Position Stand on the foot rails of the treadmill. Find the clip attached to the key (see the drawing on page automatically be reselected. If the Save button has not yet been pressed, the manual mode will be selected. Important: In an emergency situation, the key can - Image Fitness E3000 Treadmill | English Manual - Page 13
7 Follow your progress with the display. When the manual mode or the iFIT.com mode is selected, the display will show the incline level of the treadmill and the approximate number of grams of carbs then reinsert it. Note: For simplicity, all instructions in this section refer to miles. The - Image Fitness E3000 Treadmill | English Manual - Page 14
minutes. 10 When you are finished exercising, remove the key. Step onto the foot rails, press the Stop button, and adjust the incline of the treadmill to the lowest setting. Next, remove the key from the console and put it in a secure place. Note: If the display remains lit after the - Image Fitness E3000 Treadmill | English Manual - Page 15
move one column to the left. The speed setting for the second segment will then be shown in the flashing Current Segment column and the treadmill will automatically adjust to the speed and incline settings for the second segment. Note: If all seven of the indicators in the Current Segment column - Image Fitness E3000 Treadmill | English Manual - Page 16
at 1 mph. When the next segment of the program begins, the treadmill will automatically adjust to the speed and incline settings for the next segment. 6 the console. When the program ends, make sure that the incline of the treadmill is at the lowest setting. Next, remove the key from the console and - Image Fitness E3000 Treadmill | English Manual - Page 17
in the matrix.) To pro- gram a speed setting and an incline setting for the first segment, simply adjust the speed and incline of the treadmill as desired by pressing the Speed and Incline buttons. Every few times a Speed but- ton is pressed, an additional indicator will appear or disappear - Image Fitness E3000 Treadmill | English Manual - Page 18
move one column to the left. The speed setting for the second segment will then be shown in the flashing Current Segment column and the treadmill will automatically adjust to the speed and incline settings for the second segment. The program will continue in this way until the speed setting for - Image Fitness E3000 Treadmill | English Manual - Page 19
, press the Save button. 6 Press the Start button or the Speed increase button to start the program. A moment after the button is pressed, the treadmill will automatically adjust to the first speed and incline settings of the program. Hold the handrails and begin walking. Each heart rate program is - Image Fitness E3000 Treadmill | English Manual - Page 20
"PLS" will flash in the Heart Rate zone of the display and the speed and incline of the treadmill may automatically decrease until your pulse is detected. If this occurs, see the instructions included with the optional chest pulse sensor. To stop the program at any time, press the Stop button - Image Fitness E3000 Treadmill | English Manual - Page 21
, or computer. See pages 21 and 22 for connecting instructions. To use iFIT.com programs directly from our Web site, the treadmill must be connected to your computer. See page 22 for connecting instructions. To use iFIT.com video programs, the treadmill must be connected to your VCR. See page 23 for - Image Fitness E3000 Treadmill | English Manual - Page 22
HOW TO CONNECT YOUR HOME STEREO Note: If your stereo has an unused LINE OUT jack, see instruction A below. If the LINE OUT jack is being used, see instruction B. A. Plug one end of a long 1/8" to RCA stereo audio cable (available at electronics stores) into the input jack on the console. Plug the - Image Fitness E3000 Treadmill | English Manual - Page 23
button is pressed, your personal trainer will begin guiding you through your workout. Simply follow your personal trainer's instructions. Note: If the time is flashing in the display, press the Start button or the Speed increase button on the console. The treadmill will not respond to an MP3, CD, or - Image Fitness E3000 Treadmill | English Manual - Page 24
If the speed or incline settings are too high or too low, you can manually override the settings at any time by pressing the Speed or Incline buttons on to step 1 on page 23. Note: If the speed and/or incline of the treadmill does not change when a "chirp" is heard: • Make sure that the letters " - Image Fitness E3000 Treadmill | English Manual - Page 25
an internet connection and an internet service provider. A list of specific system speed and/or incline of the treadmill is about to change. CAUTION: or too low, you can manually override the settings at any time on-line instructions for using a program. 7 Follow the on-line instructions to start the - Image Fitness E3000 Treadmill | English Manual - Page 26
pulse sensor, call the toll-free telephone number on the front cover of this manual. IMPORTANT: If a "d" appears in the Heart Rate zone of the display, in the "demo" mode. This mode is intended to be used only when a treadmill is displayed in a store. When the console is in the demo mode, the - Image Fitness E3000 Treadmill | English Manual - Page 27
TROUBLESHOOTING Most treadmill problems can be solved by following the steps below. Find the symptom that applies, and follow the steps listed. If further assistance is needed, see the front cover of this manual. PROBLEM: The power does not turn on SOLUTION: a. Make sure that the power cord is - Image Fitness E3000 Treadmill | English Manual - Page 28
in the power cord, insert the key, and run the treadmill for a few minutes. Repeat until the walking belt is properly tightened. b 3"-4" Rear Roller Bolts c. If the walking belt still slows when walked on, see the front cover of this manual. PROBLEM: The walking belt is off-center or slips when - Image Fitness E3000 Treadmill | English Manual - Page 29
found by using your heart rate as a guide. The chart below shows recommended heart rates for exercise, adjust the speed and incline of the treadmill until your heart rate is near the highest number muscles and will help prevent post-exercise problems. EXERCISE FREQUENCY To maintain or improve your - Image Fitness E3000 Treadmill | English Manual - Page 30
Model No. IMTL13905.0 R1005A To locate the parts listed below, see the EXPLODED DRAWING attached in the center of this manual. Key No. Qty. 1 2 2 1 3 8 4 60 5 1 6 4 7 4 8 4 9 Platform Handrail Bracket Bolt Handrail Bracket Belt Guide Isolator Bolt Front Platform Bolt Front Right - Image Fitness E3000 Treadmill | English Manual - Page 31
Roller Static Decal Caution Decal Remote Control 5/32" Allen Wrench Allen Wrench Book Holder Front Isolator 6" Blue Wire, 2F 4" Blue Wire, M/F 8" Green Wire, F/Ring User's Manual #These parts are not illustrated Specifications are subject to change without notice. 31 - Image Fitness E3000 Treadmill | English Manual - Page 32
EXPLODED DRAWING-Model No. IMTL13905.0 R1005A 3 15 16 17 18 59 4 19 21 22 20 135 136 4 1 3 5 3 3 2 9 14 4 26 25 11 31 32 33 13 116 12 6 54 4 30 29 55 27 28 54 4 55 54 55 3 3 87 24 55 26 23 21 19 20 88 59 4 24 23 4 49 58 50 45 46 48 47 128 41 44 43 4 41 38 42 - Image Fitness E3000 Treadmill | English Manual - Page 33
EXPLODED DRAWING-Model No. IMTL13905.0 R1005A 95 94 95 95 95 95 132 91 90 92 95 53 95 134 109 101 8 89 98 99 125 96 100 96 95 96 96 96 95 95 95 108 107 114 110 114 110 117 101 109 95 95 97 97 109 96 101 110 96 137 112 95 102 102 130 96 105 126 95 111 10 113 114 4 - Image Fitness E3000 Treadmill | English Manual - Page 34
give the following information: • the MODEL NUMBER of the product (IMTL13905.0) • the NAME of the product (IMAGE ADVANCED 2600 treadmill) • the SERIAL NUMBER of the product (see the front cover of this manual) • the KEY NUMBER AND DESCRIPTION OF THE PART(S) (see the EXPLODED DRAWING in the center of
-
 1
1 -
 2
2 -
 3
3 -
 4
4 -
 5
5 -
 6
6 -
 7
7 -
8
-
9
-
10
-
11
-
12
-
13
-
14
-
15
-
16
-
17
-
18
-
19
-
20
-
21
-
22
-
23
-
24
-
25
-
26
-
27
-
28
-
29
-
30
-
31
-
32
-
33
-
34
 |
 |

USER'S MANUAL
CAUTION
Read all precautions and instruc-
tions in this manual before using
this equipment. Save this manual
for future reference.
Serial Number Decal
Model No. IMTL13905.0
Serial No.
Find the serial number in the location
shown below. Write the serial number
in the space above for reference.
Visit our website at
www.imagefitness.com
new products, prizes,
fitness tips, and much more!
QUESTIONS?
As a manufacturer, we are com-
mitted to providing complete
customer satisfaction. If you
have questions, or if parts are
damaged or missing, PLEASE
CONTACT OUR CUSTOMER
SERVICE DEPARTMENT DI-
RECTLY.
CALL TOLL-FREE:
1-800-753-4645
Mon.–Fri., 6 a.m.–6 p.m. MST
ON THE WEB:
www.iconservice.com