Insignia NS-13SGAM User Manual (English)
Insignia NS-13SGAM Manual
 |
View all Insignia NS-13SGAM manuals
Add to My Manuals
Save this manual to your list of manuals |
Insignia NS-13SGAM manual content summary:
- Insignia NS-13SGAM | User Manual (English) - Page 1
47" Espresso Gaming TV Stand NS-13SGAM USER GUIDE SAFETY INFORMATION AND SPECIFICATIONS....2 PACKAGE CONTENTS: PARTS 3 PACKAGE CONTENTS: HARDWARE 5 ASSEMBLY INSTRUCTIONS 6 CARE AND MAINTENANCE 24 Before using your new product, please read these instructions to prevent any damage. - Insignia NS-13SGAM | User Manual (English) - Page 2
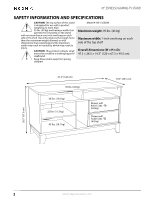
TV STAND SAFETY INFORMATION AND SPECIFICATIONS CAUTION: The top surface of this stand is designed for use with a product weighing no more than 95 lbs. (43 kg) and having a width that permits it to sit evenly on the stand items away from young children! Model #: NS-13SGAM Maximum weight: 95 lbs. ( - Insignia NS-13SGAM | User Manual (English) - Page 3
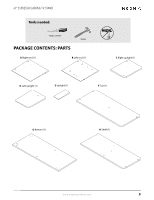
47" ESPRESSO GAMING TV STAND Tools needed: Phillips screwdriver Hammer PACKAGE CONTENTS: PARTS A Right end (1) B Left end (1) C Right upright (1) D Left upright (1) E Upright (1) F Top (1) G Bottom (1) H Shelf (1) www.insigniaproducts.com 3 - Insignia NS-13SGAM | User Manual (English) - Page 4
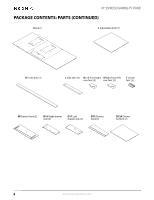
47" ESPRESSO GAMING TV STAND PACKAGE CONTENTS: PARTS (CONTINUED) I Back (1) J Adjustable shelf (1) K Front skirt (1) L Side skirt (2) R Left front/right S Right front/left rear foot (2) rear foot (2) T Center foot (2) M Drawer front (2) - Insignia NS-13SGAM | User Manual (English) - Page 5
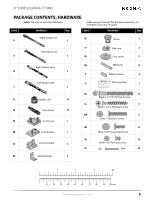
PACKAGE CONTENTS: HARDWARE Note: You may receive extra hardware. Make sure you have all the hardware necessary to assemble your new TV stand: Label Hardware Qty. Label Hardware Qty. Right drawer rail EE U 2 Knob 2 Left drawer rail FF Side cam 4 V 2 GG Cam cover 4 HH Right - Insignia NS-13SGAM | User Manual (English) - Page 6
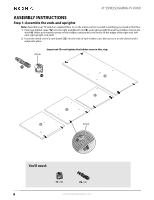
47" ESPRESSO GAMING TV STAND ASSEMBLY INSTRUCTIONS Step 1: Assemble the ends and uprights Note: Assemble your TV stand on carpeted floor or on the empty carton to avoid scratching your stand or the floor. 1 Push two hidden cams (Y2) into the right end (A), left end (B), and right upright (C) and - Insignia NS-13SGAM | User Manual (English) - Page 7
47" ESPRESSO GAMING TV STAND Step 2: Attaching the drawer rails • Fasten the two right drawer rails (U) to the right end (A) and the two left drawer rails (V) to the right upright (C) - Insignia NS-13SGAM | User Manual (English) - Page 8
47" ESPRESSO GAMING TV STAND Tip: How to tighten hidden cams In the remaining steps, use these illustrations for instructions on tightening hidden cams. Warning: Risk of damage or injury. Hidden cams must be completely tightened. Hidden cams that are not completely tightened will loosen, - Insignia NS-13SGAM | User Manual (English) - Page 9
47" ESPRESSO GAMING TV STAND Step 3: Attach the top to the left end 1 Identify the rounded edge on the left end (B) and the top (F) and the finished edge on the - Insignia NS-13SGAM | User Manual (English) - Page 10
47" ESPRESSO GAMING TV STAND Step 4: Attach the shelf 1 Make sure that the side of the shelf (H) with the hidden cams faces up, and the finished edge faces the same - Insignia NS-13SGAM | User Manual (English) - Page 11
47" ESPRESSO GAMING TV STAND Step 5: Install the uprights 1 Make sure that the finished edge on the right upright (C) and on the left upright (D) faces the same direction as the - Insignia NS-13SGAM | User Manual (English) - Page 12
6: Install the right end 1 Make sure that the side of right end (A) that has the rails attached faces the center of your TV stand. 2 Insert the cam dowels on the edge of the right end (A) into the holes on the top (F), and insert the cam dowels on the edge - Insignia NS-13SGAM | User Manual (English) - Page 13
47" ESPRESSO GAMING TV STAND Step 7: Install the bottom 1 Make sure that the rounded edge on the bottom (G) faces forward. 2 Fasten the bottom (G) to the ends (A and B) and uprights (C and D) - Insignia NS-13SGAM | User Manual (English) - Page 14
47" ESPRESSO GAMING TV STAND Step 8: Install the corner brackets 1 Fasten four corner brackets (CC) to the feet (R and S) using two black 9/16" large head screws (NN) per bracket. 2 Make - Insignia NS-13SGAM | User Manual (English) - Page 15
47" ESPRESSO GAMING TV STAND Step 9: Install the skirts 1 Insert a metal pin (HH) into each end of the front skirt (K). 2 Align the front skirt (K) to the front edge of the - Insignia NS-13SGAM | User Manual (English) - Page 16
47" ESPRESSO GAMING TV STAND Step 10: Install the skirt brackets and the foot 1 Fasten three metal brackets (DD) to the bottom (G) and front skirt (K) using two black 9/16" large - Insignia NS-13SGAM | User Manual (English) - Page 17
and shelf. Note: Perforations have been provided for access through the back. Carefully cut out the holes needed. Do not stand your TV stand upright without the back attached. Your stand might collapse. These holes must line up over the uprights and shelf. PP You'll need: PP (48) Hammer www - Insignia NS-13SGAM | User Manual (English) - Page 18
47" ESPRESSO GAMING TV STAND Step 12: Assemble the drawer 1 Insert the tab on the right drawer side (D16) at an angle into the slot on the right side of a - Insignia NS-13SGAM | User Manual (English) - Page 19
47" ESPRESSO GAMING TV STAND Step 13: Assemble the drawer (continued) 1 Fasten a drawer back (D73) to the drawer sides (D16 and D17) using four black 1-9/16" flat head screws (LL). - Insignia NS-13SGAM | User Manual (English) - Page 20
47" ESPRESSO GAMING TV STAND Step 14: Attach the drawer slides 1 Insert a slide cam (FF) into the drawer sides (D16 and D17). 2 Fasten the drawer slides (W and X) to the drawer - Insignia NS-13SGAM | User Manual (English) - Page 21
47" ESPRESSO GAMING TV STAND Step 15: Attach the drawer knob 1 From the front of the drawer, align the knob (EE) over the hole in the drawer front (M), then fasten a - Insignia NS-13SGAM | User Manual (English) - Page 22
pins. 3 Tip the front of a drawer down and drop the rollers on the drawer behind the rollers on your TV stand. Lift the front of the drawer up and slide it into your TV stand. Repeat for the other drawer. 4 Push a cam cover (GG) onto each visible hidden cam. 5 Apply the warning label (JJ - Insignia NS-13SGAM | User Manual (English) - Page 23
47" ESPRESSO GAMING TV STAND Step 17: Adjust the drawers Note: Adjusting the drawers helps the drawer fronts line up better when the drawers are closed. 1 Loosen the #3 screws in - Insignia NS-13SGAM | User Manual (English) - Page 24
to support a television. • Never use a TV that exceeds the weight ratings or size guidelines specified for the stand. • Overloaded shelves • Risk of injury. • Top-heavy furniture can tip over. • Overloaded shelves can break. • Never exceed the weight limits shown in the instructions. • Work - Insignia NS-13SGAM | User Manual (English) - Page 25
TV STAND ONE-YEAR LIMITED WARRANTY - INSIGNIA Definitions: The Distributor* of Insignia branded products warrants to you, the original purchaser of this new Insignia packaging. To obtain warranty service, in the United States does not cover: • Customer instruction/education • Installation • Set up - Insignia NS-13SGAM | User Manual (English) - Page 26
1. This certificate applies to the Insignia Product identified by this instruction booklet. 2. This certificate applies to the compliance of this product with the CPSC Ban on Lead-Containing Paint (16 CFR 1303). 3. This product was manufactured for: Insignia 4. Date of Manufacture Lot number
-
 1
1 -
 2
2 -
 3
3 -
 4
4 -
 5
5 -
 6
6 -
 7
7 -
8
-
9
-
10
-
11
-
12
-
13
-
14
-
15
-
16
-
17
-
18
-
19
-
20
-
21
-
22
-
23
-
24
-
25
-
26
 |
 |
SAFETY INFORMATION AND SPECIFICATIONS
....
2
PACKAGE CONTENTS: PARTS
.....................................
3
PACKAGE CONTENTS: HARDWARE
..........................
5
ASSEMBLY INSTRUCTIONS
.........................................
6
CARE AND MAINTENANCE
......................................
24
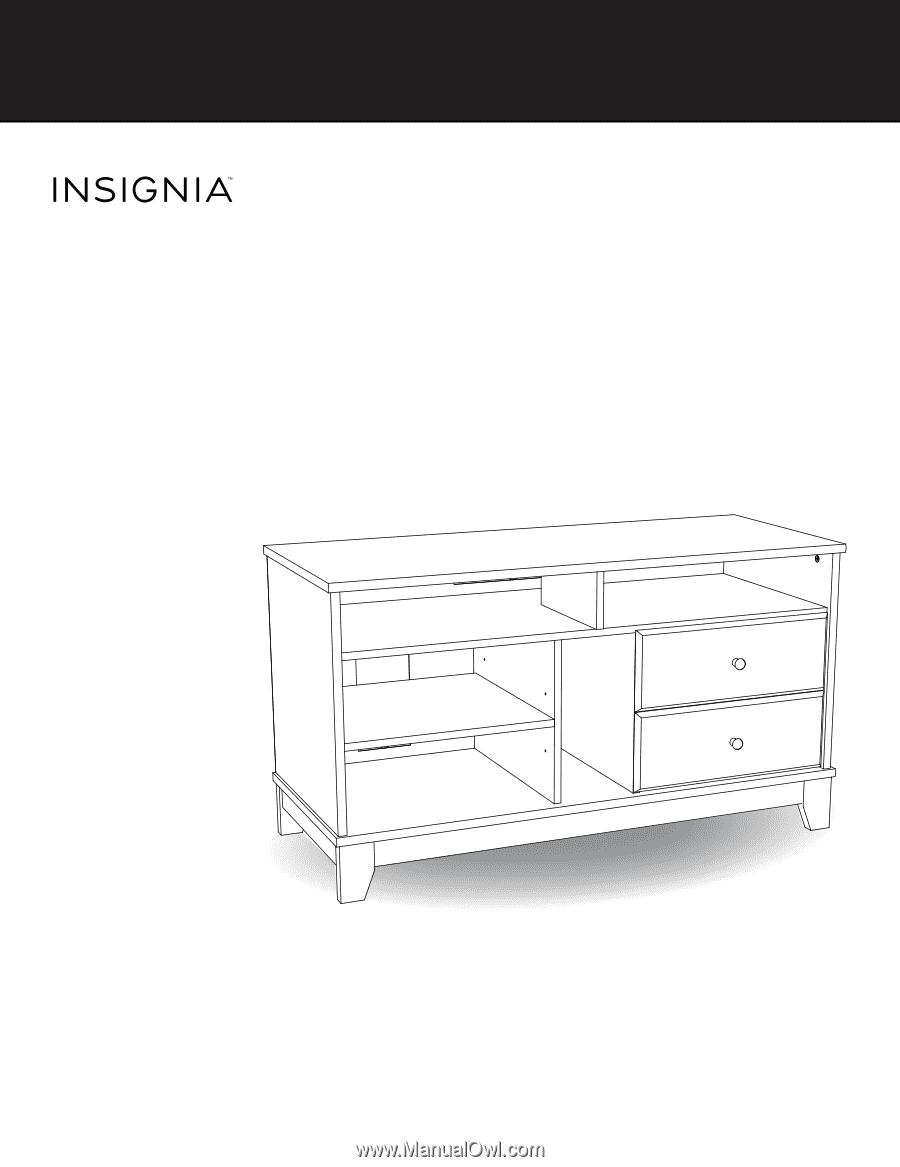
47” Espresso
Gaming TV Stand
NS-13SGAM
Before using your new product, please read these instructions to prevent any damage.
USER GUIDE