Insignia NS-32LB451A11 Quick Setup Guide (English)
Insignia NS-32LB451A11 Manual
 |
View all Insignia NS-32LB451A11 manuals
Add to My Manuals
Save this manual to your list of manuals |
Insignia NS-32LB451A11 manual content summary:
- Insignia NS-32LB451A11 | Quick Setup Guide (English) - Page 1
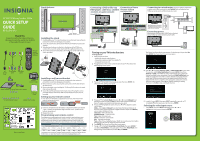
Front features 32" LCD TV/Blu-ray Combo, 1080p QUICK SETUP GUIDE NS-32LB451A11 Thank You for purchasing this ne Insignia television. We hope you enjoy the quality and reliability of this product for years to come. EJECT/CLOSE DISK BLU-RAY POPUP MENU LIST HOME/SETUP Remote control and 2 - Insignia NS-32LB451A11 | Quick Setup Guide (English) - Page 2
32" LCD TV/Blu-ray Combo, 1080p I QUICK SETUP GUIDE I NS-32LB451A11 Navigating menus with your remote control Press to open the on-screen menu Press to select menus, to adjust selected items, or to move the on-screen cursor left or right. Press to select menu items. Press to con rm a selection
-
 1
1 -
 2
2
 |
 |

32" LCD TV/Blu-ray Combo, 1080p
QUICK SETUP
GUIDE
NS-32LB451A11
Thank You
for purchasing this fine Insignia television.
We hope you enjoy the quality and reliability
of this product for years to come.
_______________________________
Universal remote control TV codes
(for all Insignia TVs manufactured after Jan. 1, 2007)
Philips
PHDVD5, PH5DSS,
PMDVR8, PDVR8
115
DirectTV
RC23
10463
RCA
RCU807
135
One for All
URC-6690
0464
Sony
RM-VL600
8043
Comcast
M1057
0463
Dish Network
VIP508, VIP622
720
Motorola
DRC800
0463
TIVO
Series 3, HD
0091
Universal remote control makers and models
Set-top box makers and models
Remote
control
and 2 AA
batteries
Remote
control holder
Component
cable
Stand Column, TV stand, Cover, and 4 screws
Quick Setup Guide
AC
power
cord
Cleaning
cloth
8 stand column screws
2 stand cover screws
DISK
EJECT/CLOSE
BLU-RAY
POPUP MENU
HOME/SETUP
SEARCH
CLEAR
ANGLE
REPE
AT
SUBTITLE
LIST
DYN
VOL
NS-RC07A-11
L/R Audio
cable
CLEAR
Turning on your TV for the first time
To set up your TV:
1
Make sure that you have:
• Installed the remote control batteries.
• Connected an antenna, cable TV, or satellite TV.
• Connected the power cord.
2
Press
(power)
on the remote control
to turn on your TV. The
Choose Your
Menu
language
screen opens.
3
Press
▲
or
▼
to highlight the language you want, then press
ENTER
. The
Choose your Time Setting
screen opens.
4
Press
▲
or
▼
to highlight
Mode
, then press
◄
or
►
to select
Manual
(to set
the date and time manually) or
Auto
(to set the date and time automatically
from a TV signal source based on the time zone your select).
5
Press
▲
or
▼
to highlight an option, then press
◄
or
►
to adjust the option.
You can select:
Mode
—Select
Auto
or
Manual
. If you select Auto, the date and time are set
based on a time signal received from a digital TV channel. If you select
Manual
,
you can adjust the date and time.
Time Zone
—Select the time zone.
Daylight Savings
—Select On or Off.
Year
—Select the current year.
Month
—Select the current month.
Day
—Select the current day.
Time
—When Time is highlighted, press
◄
or
►
to move the cursor from field to
field, then press
▲
or
▼
to change the value in the field.
6
Press
ENTER
. The
Choose Your Picture Mode
screen opens.
7
Press
▲
or
▼
to highlight
Home Mode
or
Retail Mode
, then press
ENTER
. If
you selected
Retail Mode
, a message appears “If you select
Retail Mode
, then
Energy Savings is not realized.” If you select
No
, press
ENTER
.
PREV
NEXT
STOP
PLAY/
PAUSE
OPEN/
CLOSE
DISC IN
The
Choose Your Picture Mode
screen reopens. Go back to step 6. If you select
Yes
,
press
ENTER
. The
Choose Your TV Source
screen opens.
8
Press
▲
or
▼
to highlight
Antenna
,
Cable
, or
Cable/Satellite Box
(if your cable
TV uses a box, select
Cable/Satellite Box
), then press
ENTER
. If you chose
Antenna
or
Cable
, your TV/Blu-ray combo automatically starts scanning for
channels available in your viewing area. If you chose
Cable/Satellite box
, your
TV/Blu-ray combo does not need to scan for channels. During auto channel
search, your TV/Blu-ray combo searches for digital channels first. When the
digital channel search is complete, a message appears asking if you want to
search for analog channels. Select
Yes
to continue searching for analog
channels, or select
No
to stop searching for channels.
9
To watch TV, press
INPUT
, then press
INPUT
repeatedly or press
▲
or
▼
to highlight
TV
in the input source list, then press
ENTER
.
Selecting the video input source
•
Press
INPUT
, then press
INPUT
repeatedly or press
▲
or
▼
to
highlight the video source, then press
ENTER
.
Front features
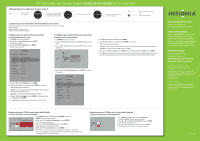
Installing the stand
1
Carefully place your TV screen face-down on a cushioned, clean surface to
protect the screen from damages and scratches.
2
Secure the stand to the stand column with the provided four screws and
washers.
3
Slide the stand column into the slot in the bottom of the TV/Blu-ray
combo, then secure the stand column with the eight provided screws.
4
Secure the stand cover (included) to the TV/Blu-ray combo with the two
screws provided.
Installing a wall-mount bracket
1
Carefully place your TV
face-down on a cushioned, clean surface to
protect the screen from damages and scratches.
2
Remove the two screws securing the stand cover to the TV, then remove
the stand cover.
3
Remove the eight screws holding the
TV/Blu-ray DVD combo to its stand,
then remove the stand.
4
Secure the wall-mount bracket to the back of your TV using the screws
provided with the wall mount. Wall-mount bracket and screws are not
provided.
Setting up your remote control
1
Press down on the battery compartment cover lock, then remove the
battery compartment cover.
2
Insert two AA batteries into the battery compartment. Make sure that the
+ and – symbols on the batteries align with the + and – symbols in the
battery compartment.
3
Replace the cover.
Programming your remote control
To program your existing universal remote control to work with your new
Insignia TV, see the table below for common codes. If you have problems
programming your remote or need a different remote control code, visit
www.insigniaproducts.com for the latest remote control code information.
To program your universal Insignia remote control to work with other devices
in the home, see your
User Guide
or visit www.insigniaproducts.com.
Connecting a DVD or Blu-ray
DVD player, cable box, satellite
receiver, or game console
Using HDMI (best)
Connecting a Home
Theater System
Using digital audio
Connecting to a wired router
Connect an Ethernet cable (CAT5
or better with an RJ45 connector) to the
ETHERNET
jack on theback of your
TV/Blu-ray combo and to an Ethernet jack on a router.
Connecting power
Plug the power cord into the AC INPUT jack on the back
of your TV/Blu-ray combo and into a power outlet.
Note:
When plugging or unplugging the
cable, hold the connector on the end of
the cable. When unplugging, do not pull
on the cable. Press down the lock tab and
pull the connector out of the jack.
ETHERNET PORT
HDMI3
INPUT
(BD Live storage only)
Remote
control sensor
Power
indicator