Insignia NS-HF2003 User Guide
Insignia NS-HF2003 Manual
 |
View all Insignia NS-HF2003 manuals
Add to My Manuals
Save this manual to your list of manuals |
Insignia NS-HF2003 manual content summary:
- Insignia NS-HF2003 | User Guide - Page 1
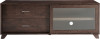
ASSEMBLY GUIDE 60" Espresso TV Stand NS-HF2003 Before using your new product, please read these instructions to prevent any damage. - Insignia NS-HF2003 | User Guide - Page 2
Stand hardware 5 Anti-tip safety kit 5 Pre-assembled hardware 5 Installation tips 6 Installing dowels 6 Installing cam locks and cam screws 6 Assembly instructions 7 STEP 1 - Install the dowels and cam screws 7 STEP 2 - Assemble the left side and middle panels 9 STEP 3 - Attach the right - Insignia NS-HF2003 | User Guide - Page 3
reliable and trouble-free performance. IMPORTANT SAFETY INSTRUCTIONS WARNING: Failure to follow these installation instructions or any a choking hazard if swallowed. Keep these items away from young children! SAVE THESE INSTRUCTIONS Features • Supports TVs up to 65" (165.1 cm) and 120 lbs. (54.4 kg - Insignia NS-HF2003 | User Guide - Page 4
(1) 11 Front trim (1) 15 Right drawer panel (2) 12 Adjustable shelf (1) 13 Back drawer panel (2) 14 Left drawer panel (2) 16 Bottom drawer panel (2) 17 Bottom drawer support (2) 18 Front drawer panel (2) 19 Door (1) Top 4 www.insigniaproducts.com - Insignia NS-HF2003 | User Guide - Page 5
Stand hardware Note: You may not use all the included hardware. LABEL HARDWARE QTY. A Glue 1 B 16 Large wood dowel (WD830) C Cam screw (CSST8833BL) 21 D Large cam lock (CL1512BL) 11 NS-HF2003 LABEL I HARDWARE QTY. 16 Wood screw 4 × 32 × 8 mm (FHWS4328BL) J 8 Allen bolt 6 × 50 - Insignia NS-HF2003 | User Guide - Page 6
60" Espresso TV Stand Installation tips Installing dowels CAUTION: Make sure that you use glue with the dowels. The glue helps stabilize your TV stand and keeps it from coming apart. 1 Put a drop of glue (A) in the dowel hole, then insert about 2/3 of the dowel (B or E) into the hole. You can tap - Insignia NS-HF2003 | User Guide - Page 7
Assembly instructions WARNING: You need two people to assemble your TV stand. STEP 1 - Install the dowels and cam screws. You'll need NS-HF2003 A Glue (1) B Large wood - Insignia NS-HF2003 | User Guide - Page 8
Middle panel (7) Right side panel (8) Front trim (11) and adjustable shelf (12) 60" Espresso TV Stand Left drawer panel (14), right drawer panel (15), bottom drawer support (17), and front drawer panel (18) Note: You need to insert dowels into two of each part shown. 8 www.insigniaproducts.com - Insignia NS-HF2003 | User Guide - Page 9
STEP 2 - Assemble the left side and middle panels. You'll need NS-HF2003 4 Upper crossbar (1) 5 Middle crossbar (1) 6 Left side panel (1) 7 Middle panel (1) A Glue (1) D Large cam lock (2) G Wood screw 3.5 × 12 × 6 mm (1) Phillips screwdriver Flat blade screwdriver 1 Insert two large cam - Insignia NS-HF2003 | User Guide - Page 10
STEP 3 - Attach the right side and bottom panels. You'll need 60" Espresso TV Stand 2 Bottom panel (1) 8 Right side panel (1) A Glue (1) G Wood screw 3.5 × 12 × 6 mm (1) H Wood screw 4 × 50 × 8 mm (6) Phillips screwdriver Flat blade screwdriver 1 Secure the upper crossbar (4) to the right - Insignia NS-HF2003 | User Guide - Page 11
STEP 4 - Attach the feet. You'll need NS-HF2003 9 Side foot (4) 10 Middle foot (1) J Allen bolt 6 × 50 × 10 mm (8) K Allen wrench (1) 1 Carefully turn your stand on its side with the bottom panel (2) facing you. 2 Screw the middle foot (10) into the hole in the center of the bottom panel. 3 - Insignia NS-HF2003 | User Guide - Page 12
STEP 5 - Attach the top panel. You'll need 60" Espresso TV Stand Front 1 Top panel (1) A Glue (1) D Large cam lock (6) I Wood screw 4 × 32 × 8 mm (4) Flat blade screwdriver Phillips screwdriver 1 Carefully turn your stand upright. 2 Insert six large cam locks (D) into the cam lock holes in - Insignia NS-HF2003 | User Guide - Page 13
STEP 6 - Attach the back panel. You'll need NS-HF2003 3 Back panel (1) Phillips screwdriver L Wood screw 3 × 16 × 8 mm (23) M Wire management strip (2) WC Mounting tabs (2) Note: WC is part of the Anti-Tip Safety Kit 1 Align the screws on the back panel (3) with the screw holes on the back of - Insignia NS-HF2003 | User Guide - Page 14
STEP 7 - Attach the trim to the shelf. You'll need Top 60" Espresso TV Stand 11 Front trim (1) 12 Adjustable shelf (1) A Glue (1) D Large cam lock (3) Flat blade screwdriver 1 With the adjustable shelf (12) face down, insert three cam locks (D). Make sure that the openings on the cam locks - Insignia NS-HF2003 | User Guide - Page 15
drawer panel (2) 14 Left drawer panel 15 Right drawer panel (2) (2) 17 Bottom drawer support (2) NS-HF2003 A Glue (1) 1 Place the drawer front (18) face down. panels and front panel together. 4 Align the dowel on the bottom drawer support (17) with the cam hole in the back edge of the front - Insignia NS-HF2003 | User Guide - Page 16
2 Repeat this step on the other drawer. 60" Espresso TV Stand 16 www.insigniaproducts.com - Insignia NS-HF2003 | User Guide - Page 17
screwdriver 1 Align the back drawer panel (13) with the drawer side panels (14 and 15) and bottom drawer support (17). 2 Secure the back drawer panel to the side panels and drawer support using six 4 × 32 × 8 mm screws (I). 3 Insert small cam locks (F) into the cam lock holes on the side panels - Insignia NS-HF2003 | User Guide - Page 18
60" Espresso TV Stand STEP 9 - Insert the drawers and shelf. Inserting the drawers 1 Slide the ball bearing plates on the left and right drawer side panels to the front of your stand. Ball bearing plates Front 2 Align the rails on the drawers with the ball bearing plates, then slide the drawers into - Insignia NS-HF2003 | User Guide - Page 19
Inserting the shelf You'll need NS-HF2003 12 Adjustable shelf (1) P Shelf pin (4) 1 Select the level where you want the shelf to sit. You can select from three positions. 2 Insert the four shelf pins (P) into the holes inside your stand. Make sure that the pins are on the same level. 3 With the - Insignia NS-HF2003 | User Guide - Page 20
STEP 10 - Attach the door. You'll need 19 Door (1) 60" Espresso TV Stand Phillips screwdriver The following parts are pre-installed. ZA Roller ZB Latch 1 Put the pre-assembled rollers (ZA) on the bottom of the door (19) into the groove on the bottom panel (2). 2 Make sure that the latches (ZB) - Insignia NS-HF2003 | User Guide - Page 21
Anti-tip safety strap installation instructions Note: We recommend that you install the anti-tip strap as a safety precaution. You'll need WA Wood screw 4 × 32 × 8 mm (2) WB Plastic socket (2) WC - Insignia NS-HF2003 | User Guide - Page 22
the property of Insignia and are not returned to you. If service of Products or parts are required after the Warranty Period expires, • Food loss/spoilage due to failure of refrigerator or freezer • Customer instruction/education • Installation • Set up adjustments • Cosmetic damage • Damage due - Insignia NS-HF2003 | User Guide - Page 23
For product inquiries, please contact us with the information below: 1-877-467-4289 www.insigniaproducts.com INSIGNIA is a trademark of Best Buy and its affiliated companies. Distributed by Best Buy Purchasing, LLC 7601 Penn Ave South, Richfield, MN 55423 U.S.A. ©2019 Best Buy. All rights reserved.
-
 1
1 -
 2
2 -
 3
3 -
 4
4 -
 5
5 -
 6
6 -
 7
7 -
8
-
9
-
10
-
11
-
12
-
13
-
14
-
15
-
16
-
17
-
18
-
19
-
20
-
21
-
22
-
23
 |
 |

Before using your new product, please read these instructions to prevent any damage.
ASSEMBLY GUIDE
60" Espresso TV Stand
NS-HF2003