Insignia NS-MWR07M2 User Guide
Insignia NS-MWR07M2 Manual
 |
View all Insignia NS-MWR07M2 manuals
Add to My Manuals
Save this manual to your list of manuals |
Insignia NS-MWR07M2 manual content summary:
- Insignia NS-MWR07M2 | User Guide - Page 1
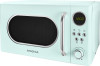
USER GUIDE .7 Cu. Ft. Retro Microwave Oven NS-MWR07R2 / NS-MWR07M2 Before using your new product, please read these instructions to prevent any damage. - Insignia NS-MWR07M2 | User Guide - Page 2
Contents SAFETY INFORMATION 3 GROUNDING INSTRUCTIONS 5 RADIO INTERFERENCE 5 Cookware and cooking materials 6 Materials you can -lock 17 Turning off the buzzer 17 Resetting the turntable 17 Troubleshooting 18 Maintaining your microwave 19 Obtaining replacement parts 19 Specifications 20 ONE - Insignia NS-MWR07M2 | User Guide - Page 3
or loosened) (c) DOOR SEALS and SEALING SURFACES 4 The oven should not be adjusted or repaired by anyone except properly qualified service personnel. IMPORTANT SAFETY INSTRUCTIONS WARNING: To reduce the risk of burns, electric shock, fire, injury to persons, or exposure to excessive microwave oven - Insignia NS-MWR07M2 | User Guide - Page 4
oven only for its intended purpose, as described in this manual. Do not use corrosive chemicals or vapors in this 10 This oven should be serviced only by qualified service technicians. Contact the nearest authorized service facility for examination, repair, INSTRUCTIONS 4 www.insigniaproducts.com - Insignia NS-MWR07M2 | User Guide - Page 5
. WARNING: Do not insert your fingers into any gaps or holes. It may cause injuries. Consult a qualified electrician or serviceman if the grounding instructions are not completely understood or if doubt exists as to whether the oven is properly grounded. If it is necessary to use an extension cord - Insignia NS-MWR07M2 | User Guide - Page 6
on page 6 and Materials to be avoided on page 7 tables as a guide, then test before using. There may be certain non-metallic utensils that are Do not use cracked or chipped dishes. Oven cooking bags Follow the manufacturer's instructions. Do not close with a metal tie. Make slits to let steam - Insignia NS-MWR07M2 | User Guide - Page 7
out when used in your microwave and may split or crack. Package contents • .7 Cu. Ft. Retro Microwave Oven • Glass tray • Turntable ring assembly • User Guide Features • Cook or reheat meat, vegetables, pasta and more using a 700 W output at the touch of a button • Cherry red or mint green color - Insignia NS-MWR07M2 | User Guide - Page 8
Components # ITEM DESCRIPTION 1 Control panel Use to set cooking times and enter other information as needed. 2 Glass tray Lets food cook evenly. 3 Door assembly Protects you from exposure to excessive microwave energy. 4 Turntable ring assembly 5 Observation window Lets the turntable - Insignia NS-MWR07M2 | User Guide - Page 9
Control panel .7 Cu. Ft. Retro Microwave Oven # ITEM DESCRIPTION 1 Display In standby mode, displays the time. In cooking mode, displays cooking time, weight, and other information. Press once, then enter the weight of the item you want to defrost. The cooking time is set automatically. See - Insignia NS-MWR07M2 | User Guide - Page 10
# ITEM DESCRIPTION Press to stop the cooking process. Press again to clear the cooking 4 (stop/clear) operation. In standby mode, press and hold for three seconds or more to set the child lock. See Using the child-lock on page 17. 5 Turn to adjust settings. (adjustment) knob 6 (kitchen - Insignia NS-MWR07M2 | User Guide - Page 11
.7 Cu. Ft. Retro Microwave Oven 4 Place your microwave on a level surface that provides enough open space for the air vents. 12 in. (30 cm) 3 in. (7.5 cm) Open 3 in. (7.5 cm) Notes: • A minimum clearance of 3 in. (7.5 cm) is required between your microwave and any adjacent walls. One side must be - Insignia NS-MWR07M2 | User Guide - Page 12
food and containers of food on the glass tray for cooking. • If the glass tray or turntable ring cracks or breaks, contact your nearest authorized service center. 1 Place the turntable ring assembly in the round depression in the bottom of your microwave so that it turns freely. 2 Place the glass - Insignia NS-MWR07M2 | User Guide - Page 13
.7 Cu. Ft. Retro Microwave Oven Using your microwave Setting the clock Note: If the clock isn't set, it won't function when powered. During the process of setting up the clock, if you press (stop/clear) or make no changes within in one minute, the oven exits the setting. 1 Plug the power cord into - Insignia NS-MWR07M2 | User Guide - Page 14
4 Turn to adjust the cooking time between 0:05 and 95:00. When you turn the knob to set the cooking time, each click of the knob add a specific amount of time. When you start turning the knob, each click adds 5 seconds. When you reach one minute on the timer, each click adds 10 seconds. After the - Insignia NS-MWR07M2 | User Guide - Page 15
.7 Cu. Ft. Retro Microwave Oven Auto menus MENU AMOUNT A1 Popcorn 1.75 oz. 3.0 oz. 3.5 oz. A2 Beverage 1cup (120 ml/cup) 2 cups 3 cups A3 Fresh vegetable 4 oz. 8 oz. 16 oz. A4 Meat 9 oz. 12 oz. 16 oz. A5 Pizza 4 oz. 8 oz. 14 oz. A6 Potato 1 (about 8 oz.) 2 3 A7 Pasta 1.75 oz. (with - Insignia NS-MWR07M2 | User Guide - Page 16
Popping popcorn in your microwave 1 When selecting 3.0 or 3.5 oz. of popcorn, we suggest that you fold down a triangle on each corner of the bag before cooking, as shown. 2 When the popcorn bag expands and no longer rotates properly, press (stop/clear) once, open the oven door, then adjust the bag - Insignia NS-MWR07M2 | User Guide - Page 17
.7 Cu. Ft. Retro Microwave Oven 6 Turn the adjustment knob to set the cooking time to seven minutes. 7 Press (start/+30sec.) to start cooking. Using the energy saving (Eco) mode Energy saving (Eco) mode turns off the LED display to save power. • In standby mode, press (stop/clear) for less than - Insignia NS-MWR07M2 | User Guide - Page 18
Troubleshooting If you have a problem with your microwave, review the following chart for a possible solution. If your microwave still doesn't work correctly, contact the nearest authorized service center. PROBLEM The wrong operation is set. Check the instructions and try again. You're using - Insignia NS-MWR07M2 | User Guide - Page 19
.7 Cu. Ft. Retro Microwave Oven PROBLEM POSSIBLE CAUSE POSSIBLE SOLUTION Sensor cooked The cover or lid on the food isn't foods air vents. • Clean the interior with a damp cloth or sponge. Obtaining replacement parts Call Insignia Customer Service at 1-877-467-4289. www.insigniaproducts.com 19 - Insignia NS-MWR07M2 | User Guide - Page 20
Specifications Rated voltage 120 V~60 Hz Rated input power (microwave) 1,050 W Rated output power (microwave) 700 W Oven capacity .7 cu. ft. Turntable diameter 10.3 in. (25.5 cm) External dimensions (H×W×D) 10.2 × 17.3 × 14.1 in. (25.9 × 44 × 35.9 cm) Internal dimensions (H×W×D) 8.1 × 12 × - Insignia NS-MWR07M2 | User Guide - Page 21
or rebuilt comparable products or parts. Products and parts replaced under this warranty become the property of Insignia and are not returned to you. If service of Products or parts are required after the Warranty Period expires, you must pay all labor and parts charges. This warranty lasts as long - Insignia NS-MWR07M2 | User Guide - Page 22
the warranty not cover? This warranty does not cover: • Customer instruction/education • Installation • Set up adjustments • Cosmetic damage • Damage or power supply • Attempted repair by any person not authorized by Insignia to service the Product • Products sold "as is" or "with all faults" • - Insignia NS-MWR07M2 | User Guide - Page 23
www.insigniaproducts.com 1-877-467-4289 (U.S. and Canada) or 01-800-926-3000 (Mexico) INSIGNIA is a trademark of Best Buy and its affiliated companies. Distributed by Best Buy Purchasing, LLC 7601 Penn Ave South, Richfield, MN 55423 U.S.A. ©2021 Best Buy. All rights reserved. V3 ENGLISH 21-0526
-
 1
1 -
 2
2 -
 3
3 -
 4
4 -
 5
5 -
 6
6 -
 7
7 -
8
-
9
-
10
-
11
-
12
-
13
-
14
-
15
-
16
-
17
-
18
-
19
-
20
-
21
-
22
-
23
 |
 |

Before using your new product, please read these instructions to prevent any damage.
USER GUIDE
.7 Cu. Ft.
Retro Microwave Oven
NS-MWR07R2 / NS-MWR07M2