Insignia NS-TVMFP12 User Manual (English)
Insignia NS-TVMFP12 Manual
 |
View all Insignia NS-TVMFP12 manuals
Add to My Manuals
Save this manual to your list of manuals |
Insignia NS-TVMFP12 manual content summary:
- Insignia NS-TVMFP12 | User Manual (English) - Page 1
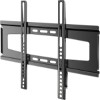
GUIDE NS-TVMFP12/NS-TVMFP12-C Fixed-Position Wall Mount for TVs 19-39 in. For either wood-stud or concrete wall installations Safety information and specifications . . .2 Tools needed 3 Package contents 3 Installation instructions 5 Before using your new product, please read these instructions - Insignia NS-TVMFP12 | User Manual (English) - Page 2
15.5 in. (32 × 39.4 cm) IMPORTANT SAFETY INSTRUCTIONS - SAVE THESE INSTRUCTIONS CAUTION: Do not use this product for any purpose not explicitly specified by Insignia. Wall-mount weight: 3 lbs. We're here for you www.insigniaproducts.com For customer service, call: 877-467-4289 (U.S./Canada markets - Insignia NS-TVMFP12 | User Manual (English) - Page 3
NS-TVMFP12/NS-TVMFP12-C 3 Tools needed You will need the following tools to assemble your new TV wall mount: ardware Level Drill Edge-to-edge stud finder Phillips screwdriver Socket wrench with 1/2 in. (13 mm) socket or adjustable wrench 7/32 in. (5.5 mm) wood drill bit (for wood stud wall) OR - Insignia NS-TVMFP12 | User Manual (English) - Page 4
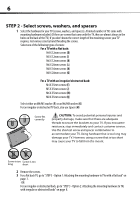
4 TV Hardware Bag Label D E F G Hardware Qty. M4 × 12 mm 4 screw M4 × 35 mm 4 screw M4/M5 washer 4 M6/M8 washer 4 Label M N O Hardware Qty. M6 × 35 mm screw 4 M8 × 16 mm screw 4 M8 × 20mm screw 4 H Spacers 4 Q 4 M8 × 35 mm screw I M5 × 12 mm screw 4 R Lag bolt washer - Insignia NS-TVMFP12 | User Manual (English) - Page 5
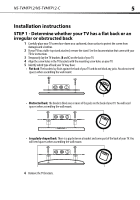
NS-TVMFP12/NS-TVMFP12-C 5 Installation instructions STEP 1 - Determine whether your TV has a flat back or an your TV and do not block any jacks. You do not need spacers when assembling the wall mount. • Obstructed back: The brackets block one or more of the jacks on the back of your TV - Insignia NS-TVMFP12 | User Manual (English) - Page 6
back of the TV.) If you don't know the correct length of the mounting screws your TV requires, test various sizes by hand threading the screws. your TV. If you encounter resistance, stop immediately and contact customer service. Use the shortest screw and spacer combination to accommodate your TV - Insignia NS-TVMFP12 | User Manual (English) - Page 7
NS-TVMFP12/NS-TVMFP12-C 7 STEP 3 - Option 1: Attaching the mounting hardware to TVs with a flat back 1 Align the left and right TV brackets (B and C) with the screw holes on the back of the TV. Make - Insignia NS-TVMFP12 | User Manual (English) - Page 8
8 STEP 3 - Option 2: Attaching the mounting hardware to TVs with irregular or obstructed backs 1 Align the left and right TV brackets (B and C) with the screw holes on the back of the - Insignia NS-TVMFP12 | User Manual (English) - Page 9
NS-TVMFP12/NS-TVMFP12-C 9 STEP 4 - Determine wall-mount location Notes: • For more detailed information on determining where distance from the floor to where you want the bottom of the TV to be placed on the wall. Keep in mind that the bottom of the TV should be placed above any furniture (such as - Insignia NS-TVMFP12 | User Manual (English) - Page 10
determined in the previous step (or by using the HeightFinder mentioned on the template), make sure that it is level, then tape it to the wall. 3 Drill pilot holes through the template to a depth of 3 in. (75 mm) using a 7/32 in. (5.5 mm) diameter drill bit, then remove the template. 4 Align the - Insignia NS-TVMFP12 | User Manual (English) - Page 11
NS-TVMFP12/NS-TVMFP12-C 11 STEP 5 - Option 2: Installing on a solid concrete or concrete block wall* CAUTION: To prevent property damage or personal injury, never drill into mortar between blocks. Mount wall plate directly onto the concrete surface. 1 Align the wall plate template (P) at the - Insignia NS-TVMFP12 | User Manual (English) - Page 12
12 STEP 6 - Mounting the TV to the wall plate 1 Holding the TV with the top of the screen tilted toward the wall, slide the upper notches of the right and left TV brackets (B and C) over the upper lip of the wall plate (A). 2 Push the bottom of the TV toward the wall until the latch mechanism - Insignia NS-TVMFP12 | User Manual (English) - Page 13
NS-TVMFP12/NS-TVMFP12-C 13 Removing the TV from the wall plate 1 Grasp the TV by the bottom edge, then pull down on the locking cords and pull the bottom of the TV out from the wall. 2 Release the locking cords and lift the top of the TV from the wall bracket. HEAVY! You will need assistance with - Insignia NS-TVMFP12 | User Manual (English) - Page 14
14 - Insignia NS-TVMFP12 | User Manual (English) - Page 15
NS-TVMFP12/NS-TVMFP12-C 15 One-year limited warranty - Insignia Definitions: The Distributor* of Insignia branded products warrants to you, the original purchaser of this new Insignia . To obtain warranty service, in the United States not cover: • Customer instruction/education • Installation • Set - Insignia NS-TVMFP12 | User Manual (English) - Page 16
due to incorrect operation or maintenance • Connection to an incorrect voltage or power supply • Attempted repair by any person not authorized by Insignia to service the Product • Products sold "as is" or "with all faults" • Consumables, including but not limited to batteries (i.e. AA, AAA, C etc - Insignia NS-TVMFP12 | User Manual (English) - Page 17
www.insigniaproducts.com 1-877-467-4289 (U.S. and Canada) or 01-800-926-3000 (Mexico) INSIGNIA is a trademark of Best Buy and its affiliated companies. Registered in some countries. Distributed by Best Buy Purchasing, LLC 7601 Penn Ave South, Richfield, MN
-
 1
1 -
 2
2 -
 3
3 -
 4
4 -
 5
5 -
 6
6 -
 7
7 -
8
-
9
-
10
-
11
-
12
-
13
-
14
-
15
-
16
-
17
 |
 |

NS-TVMFP12/NS-TVMFP12-C
Fixed-Position Wall Mount for TVs 19-39 in.
Safety information and specifications . . .2
Tools needed. . . . . . . . . . . . . . . . . . . . . . . . . . .3
Package contents . . . . . . . . . . . . . . . . . . . . . .3
Installation instructions. . . . . . . . . . . . . . . . .5
For either wood-stud or
concrete wall installations
Before using your new product, please read these instructions to prevent any damage.
INSTALLATION GUIDE