Intel D915GEV User Manual - Page 68
Emergency Recovery Token Security Password created with the Infineon Security Platform
 |
UPC - 735858177559
View all Intel D915GEV manuals
Add to My Manuals
Save this manual to your list of manuals |
Page 68 highlights
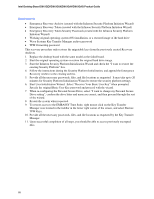
Intel Desktop Board D915GEV/D915GUX/D915GAV/D915GAG Product Guide Requirements • Emergency Recovery Archive (created with the Infineon Security Platform Initiation Wizard) • Emergency Recovery Token (created with the Infineon Security Platform Initiation Wizard) • Emergency Recovery Token Security Password (created with the Infineon Security Platform Initiation Wizard) • Working original operating system (OS) installation, or a restored image of the hard drive • Wave Systems Key Transfer Manager archive password • TPM Ownership password This recovery procedure only restores the migratable keys from the previously created Recovery Archives. 1. Replace the desktop board with the same model as the failed board. 2. Start the original operating system or restore the original hard drive image. 3. Start the Infineon Security Platform Initialization Wizard and check the "I want to restore the existing Security Platform" box. 4. Follow the instructions during the Security Platform Initialization, and append the Emergency Recovery Archive to the existing archive. 5. Provide all the necessary passwords, files, and file locations as requested. It may take up to 20 minutes for Security Platform Initialization Wizard to restore the security platform settings. 6. Start User Initialization Wizard. Select "Recover Your Basic User Key" when prompted. Specify the original Basic User Key password and proceed with the wizard. 7. When re-configuring the Personal Secure Drive, select "I want to change my Personal Secure Drive setting", confirm the drive letter and name are correct, and then proceed through the rest of the wizard. 8. Restart the system when requested. 9. To restore access to the EMBASSY Trust Suite, right mouse click on the Key Transfer Manager icon located in the taskbar in the lower right corner of the screen, and select Restore TPM Keys. 10. Provide all the necessary passwords, files, and file locations as requested by the Key Transfer Manager. 11. Upon successful completion of all steps, you should be able to access previously encrypted files. 68
-
 1
1 -
2
-
3
-
4
-
5
-
6
-
7
-
8
-
9
-
10
-
11
-
12
-
13
-
14
-
15
-
16
-
17
-
18
-
19
-
20
-
21
-
22
-
23
-
24
-
25
-
26
-
27
-
28
-
29
-
30
-
31
-
32
-
33
-
34
-
35
-
36
-
37
-
38
-
39
-
40
-
41
-
42
-
43
-
44
-
45
-
46
-
47
-
48
-
49
-
50
-
51
-
52
-
53
-
54
-
55
-
56
-
57
-
58
-
59
-
60
-
61
-
62
-
 63
63 -
 64
64 -
 65
65 -
 66
66 -
 67
67 -
 68
68 -
 69
69 -
 70
70 -
 71
71 -
 72
72 -
 73
73 -
74
-
75
-
76
-
77
-
78
-
79
-
80
 |
 |