JVC AR390 Instructions
JVC AR390 - Radio / CD Manual
 |
View all JVC AR390 manuals
Add to My Manuals
Save this manual to your list of manuals |
JVC AR390 manual content summary:
- JVC AR390 | Instructions - Page 1
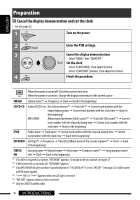
RECEIVER RECEPTOR CON CD RÉCEPTEUR CD KD-AR390/KD-G340 KD-AR390/KD-G340 KD-AR390/KD-G340 For canceling the display demonstration, see page 4. Para cancelar la demostración en pantalla, consulte la página 4. Pour annuler la démonstration des affichages, référez-vous à la page 4. For installation - JVC AR390 | Instructions - Page 2
or an experienced radio/TV technician for help. Caution: Changes or modifications not approved by JVC could void the user's authority to operate the equipment. IMPORTANT FOR LASER PRODUCTS 1. CLASS 1 LASER PRODUCT 2. CAUTION: Do not open the top cover. There are no user serviceable parts inside the - JVC AR390 | Instructions - Page 3
19 SETTINGS Selecting a preset sound mode 20 General settings-PSM 22 Bluetooth settings 24 Title assignment 25 REFERENCES More about this unit 25 Troubleshooting 29 Maintenance 33 Specifications 34 The control panel illustrations used for explanation in this manual is of KD-AR390. 3 - JVC AR390 | Instructions - Page 4
25. *2 If the current disc is an audio CD, "NO NAME" appears. *3 If an MP3/WMA file does not have Tag information or "TAG DISPLAY" is set to "TAG OFF" (see page 23), folder name and file name appear. *4 "****-FM" or "****" appears when no Call Sign is received. *5 "NO TEXT" appears when no text is - JVC AR390 | Instructions - Page 5
8 Select the sound mode. 9 Change the display information. p Detach the panel. q Select the source. FM/AM*1 = SIRIUS*2/XM*2 = CD*2 = CD-CH*2/IPOD*2 (or EXT IN) = BT-PHONE*2 = BT-AUDIO*2 = AUX IN = (back to the beginning) w • FM/AM/HD RADIO/SIRIUS/XM: Search for station/channel. • CD/CD-CH: Select - JVC AR390 | Instructions - Page 6
4 Bluetooth indicator 5 Playback source indicators-CH (CD changer), DISC 6 Sound mode (iEQ: intelligent equalizer) indicators -CLASSIC, HIP HOP, JAZZ, ROCK, POPS, USER 7 Playback mode / item indicators- RND (random), (disc), (folder), RPT (repeat) 8 Tuner reception indicators-ST (stereo), MO - JVC AR390 | Instructions - Page 7
held. • Reverse skip/forward skip for Bluetooth audio. * 5 U : Returns to the previous menu. D ∞ : Confirms the selection. Warning (to prevent accidents and damage): • Do not install any battery other than CR2025 or its equivalent. • Do not leave the remote controller in a place (such as dashboards - JVC AR390 | Instructions - Page 8
ENGLISH Listening to the radio 1 Select "FM/AM." 2 Select the bands. 3 Search for a station to listen-Auto Search. Manual Search: Hold either one of the buttons until "M" flashes on the display, then press it repeatedly. • When receiving an FM stereo broadcast with sufficient signal - JVC AR390 | Instructions - Page 9
It is required that folders be assigned with 2-digit numbers at the beginning of their folder names-01, 02, 03, and so on. After pressing M MODE, press the following buttons to... Skip 10 tracks MP3/WMA: Within the same folder TRACK RPT: Repeat current track FOLDER RPT: MP3: Repeat current folder - JVC AR390 | Instructions - Page 10
the Bluetooth Adapter (KS-BTA200) (separately purchased) to the CD changer jack on the rear of this unit. • Refer also to the instructions supplied with the Bluetooth adapter and the Bluetooth device and 2 until you finish entering a PIN code. 4 Confirm the entry. "OPEN.." flashes on the display. 10 - JVC AR390 | Instructions - Page 11
. You can set the unit to connect the Bluetooth device automatically when the unit is turned on. (See "AUTO CNNCT" on page 24.) 2 Select a device you want to connect. 3 • For available devices... Enter the specific PIN code of the device to the unit. Refer to the instructions supplied with the - JVC AR390 | Instructions - Page 12
phone is compatible with text message (notified through JVC Bluetooth adapter) and "MSG INFO" (message info) is set to "AUTO" (see page 24), the unit rings to inform you of the message arrival. • "RCV MESSAGE" (receiving message) appears on the display. Making a call You can make a call using the - JVC AR390 | Instructions - Page 13
. • If your cellular phone does not support the voice recognition system, "ERROR" appears on the display. Select "BT-AUDIO." If playback does not start automatically, operate the Bluetooth audio player to start playback. • Operate the Bluetooth audio player to pause playback (if playback does not - JVC AR390 | Instructions - Page 14
. This service is called multicasting. • To find HD Radio stations in your area, visit www.hdradio.com . Searching for HD Radio stations only 1 2 Changing HD Radio reception mode While receiving an HD Radio broadcast, the unit tunes to digital or analog audio automatically - JVC AR390 | Instructions - Page 15
the external input setting, see page 23. 1 Select "CD-CH." 2 Select a disc to start playing. [Press] For selecting disc number 1 - 6. [Hold] For selecting disc number 7 - 12. [Press] Select track [Hold] Reverse/fast-forward track MP3: Select folders After pressing M MODE, press the following - JVC AR390 | Instructions - Page 16
following (separately purchased) to the CD changer jack on the rear of this unit. • JVC SIRIUS Satellite radio interface, KS-SRA100, for listening to the SIRIUS Satellite radio. • JVC Smart Digital Adapter, XMDJVC100, for listening to the XM Satellite radio. GCI (Global Control Information) update - JVC AR390 | Instructions - Page 17
for each band. Ex.: Storing channels into preset number 4 1 Tune in to a channel you want. 2 ROCK Checking the XM Satellite radio ID While selecting "XM1," "XM2," or "XM3," select "Channel 0." The display alternately shows "RADIO ID" and the 8-digit (alphanumeric) ID number. To cancel the ID number - JVC AR390 | Instructions - Page 18
adapter for iPod, KS-PD100 (separately purchased) to the CD changer jack on the rear of the unit. Preparation: Make sure "CHANGER" is selected for the external input setting tracks [Hold] Reverse/fast-forward track After pressing M MODE, press the following buttons to... ONE RPT: Functions the - JVC AR390 | Instructions - Page 19
component to: • CD changer jack on the rear of this unit using the following adapters: - Line Input Adapter, KS-U57 (separately purchsed) - AUX Input Adapter, KS-U58 ( component to the AUX input jack 3.5 mm (3/16") stereo mini plug (not supplied) Portable audio player, etc. EXTERNAL DEVICES 19 - JVC AR390 | Instructions - Page 20
suitable to the music genre (iEQ: intelligent equalizer). Preset value setting for each sound mode Sound mode BASS (bass) Freq. Level Q Preset value MID (mid-range) TRE (treble) Freq. Level Q Freq. Level Q LOUD (loudness) USER 60 Hz 00 Q1.0 1.0 kHz 00 Q1.25 7.5 kHz 00 Q1.25 ROCK 100 Hz - JVC AR390 | Instructions - Page 21
make will be stored for the currently selected sound mode (iEQ) including "USER." 1 2 FADER *1 Adjust the front and set the fader level to "00." *2 This adjustment will not affect the subwoofer output. *3 Loudness setting will be applied to all sound modes. *4 Displayed only when "L/O MODE" is set - JVC AR390 | Instructions - Page 22
Setting Mode) items listed in the table below and on page 23. 1 Enter the PSM settings. 3 Adjust the PSM item selected. 2 Select a PSM item. 4 Repeat steps 2 and 3 to adjust other PSM items if necessary. 5 Finish the procedure. Indications DEMO Display demonstration CLOCK DISP*1 Clock display - JVC AR390 | Instructions - Page 23
the display. *6 Not applicable to HD Radio text scrolling. *7 Displayed only when "L/O MODE" is set to "SUB.W." *8 Displayed only when one of the following sources is selected-FM, AM, CD, Bluetooth, AUX IN. *9 Not required for HD Radio broadcast/SIRIUS/XM tuners and Bluetooth adapter. SETTINGS 23 - JVC AR390 | Instructions - Page 24
of a message by ringing and displaying "RCV MESSAGE" (receiving message). MANUAL: The unit does not inform you of the arrival of a message. MIC SET (microphone setting) Only for the device being connected for "BT-PHONE." Adjust microphone volume connected to the Bluetooth adapter, [LEVEL 01/02/03 - JVC AR390 | Instructions - Page 25
) for each title. • When HD Radio tuner box is connected, this feature will stops. Next time you select "CD" as the playback source, playback the stations are stored anew. - Received stations are preset in No. tuned in. • When storing a station manually, the previously preset station is erased when - JVC AR390 | Instructions - Page 26
, and CD-Rs (Recordable)/CD-RWs (Rewritable) in audio CD (CD-DA), MP3 and WMA formats. • When a disc is inserted upside down, "PLEASE" and "EJECT" appear alternately on the display. Press 0 to eject the disc. • MP3 and WMA "tracks" (words "file" and "track" are used interchangeably) are recorded - JVC AR390 | Instructions - Page 27
based upon Windows Media® Audio. - WMA files copy- car in a safe place. • Some Bluetooth devices may not be connected to this unit depending on the Bluetooth radio • You can also connect the JVC SIRIUS radio PnP (Plug and Play), using the JVC SIRIUS radio adapter, KS-U100K (not supplied) to the CD - JVC AR390 | Instructions - Page 28
word mark and logos are owned by the Bluetooth SIG, Inc. and any use of such marks by Victor Company of Japan, Limited (JVC) is under license. Other trademarks and trade names are those of their respective owners. • HD Radio™ and the HD Radio Ready logo are proprietary trademarks of iBiquity Digital - JVC AR390 | Instructions - Page 29
Store stations manually. • Static noise while listening to the radio. Connect the antenna firmly. • Disc cannot be played back. Insert the disc correctly. • CD-R/CD-RW cannot be played back. • Tracks on the CD-R/CD-RW cannot be skipped. • Insert a finalized CD-R/CD-RW. • Finalize the CD-R/CD-RW - JVC AR390 | Instructions - Page 30
the unit and the Bluetooth cellular phone. • Move the car to a place where audio device cannot be controlled. Check whether the connected audio device supports AVRCP (Audio Video Remote Control Profile). * For Bluetooth operations, refer also to the instructions supplied with the Bluetooth Adapter - JVC AR390 | Instructions - Page 31
HD Radio reception CD changer Symptoms Remedies/Causes • Sound quality changes when receiving HD Radio stations. Fix the reception mode either to "DIGITAL" or "ANALOG" (see page 14). • No sound can be heard. • "ANALOG" is selected when receiving all digital broadcast of HD Radio station - JVC AR390 | Instructions - Page 32
to the previous channel. • "LOADING" appears on the display while The unit is loading the channel information and audio. listening to the XM Satellite radio. Text information are temporarily unavailable. • "RESET 8" appears on the display. • Satellite radio does not work at all. Reconnect this - JVC AR390 | Instructions - Page 33
following cases: • After starting the heater in the car. • If it becomes very humid inside the car. Should this occur, the unit may malfunction. In this or ball-point pen, etc. Do not use the following discs: Single CD -8 cm (3-3/16") disc Warped disc Sticker and sticker residue Stick-on label - JVC AR390 | Instructions - Page 34
load (full scale) KD-G340: 2.5 V/20 kΩ load (full scale) Output Impedance: 1 kΩ Other Terminal: AUX (auxiliary) input jack, CD changer jack, Steering wheel remote input (only for KD-AR390), Antenna TUNER SECTION Frequency Range: FM Tuner AM Tuner 34 FM: with channel interval set to 100 kHz 87 - JVC AR390 | Instructions - Page 35
Installation Size: Panel Size: Mass: Design and specifications are subject to change without notice. Compact disc player Non-contact optical pickup (semiconductor laser) 2 channels (stereo accessories) If a kit is necessary for your car, consult your telephone directory for the nearest car audio - JVC AR390 | Instructions - Page 36
situada en un circuito distinto del aparato receptor. - Consulte a su distribuidor o a un técnico experto en radio/televisión. Precaución: Los cambios o modificaciones no aprobados por JVC pueden anular la autoridad del usuario para operar el equipo. IMPORTANTE PARA PRODUCTOS LÁSER 1. PRODUCTO LÁSER - JVC AR390 | Instructions - Page 37
discos 9 DISPOSITIVOS EXTERNOS Uso de dispositivos Bluetooth 10 • Usar el teléfono celular Bluetooth 12 • Uso del reproductor de audio Bluetooth ..... 13 Para escuchar una transmisión de HD Radio 14 Escuchando el cambiador de CD 15 Para escuchar la radio satelital 16 Para escuchar el iPod 18 - JVC AR390 | Instructions - Page 38
DEMO" y, a continuación, "DEMO OFF". Ponga el reloj en hora Seleccione "CLOCK HOUR" y, seguidamente ajuste la hora. Seleccione "CLOCK (vuelta al comienzo) HD RADIO Distintivo de llamada*4 = CD de audio, aparecerá "NO NAME". *3 Si un archivo MP3/WMA no posee información de etiqueta o "TAG DISPLAY - JVC AR390 | Instructions - Page 39
emisora preajustada. • HD RADIO: Seleccionar un capítulo. • SIRIUS/XM: Seleccione una categoría. • CD/CD-CH: Seleccionar la carpeta. • IPOD: Ingresa al menú principal/pausa la reproducción/confirma la selección • BT-PHONE/BT-AUDIO: Ingresa/cancela el menú Bluetooth 2 Expulsa el disco. 3 • Encienda - JVC AR390 | Instructions - Page 40
Bluetooth 5 Indicadores de la fuente de reproducción-CH (cambiador de CD USER 7 Indicadores del modo de reproducción/ítem-RND (aleatoria), (disco), (carpeta), RPT (repetición) 8 Indicadores de recepción del sintonizador-ST (estéreo), MO (monaural) 9 Indicador HOLD p Indicador HD (HD Radio KD-AR390 est - JVC AR390 | Instructions - Page 41
de CD compatible con MP3: - Cambia el disco si lo pulsa brevemente. - Cambia la carpeta si lo pulsa y mantiene pulsado. • Mientras escucha la radio satelital Bluetooth audio. * 5 U : Vuelve al menú anterior. D ∞ : Confirma la selección. Advertencia (para evitar accidentes y daños): • No instale - JVC AR390 | Instructions - Page 42
radio 1 Selecciona "FM/AM". 2 Selecciona las bandas. 3 Efectúa la búsqueda de una emisora-Búsqueda automática. Búsqueda manual preajustar hasta seis emisoras para cada banda. 1 Mientras escucha una emisora... Preajuste manual Ej.: Para guardar una emisora FM que transmite en 92,50MHz en el nú - JVC AR390 | Instructions - Page 43
Es necesario haber asignado a las carpetas un número de 2 dígitos que preceda a sus respectivos nombres- 01, 02, 03, y así sucesivamente. Tras pulsar M MODE , pulse los siguientes botones para... Saltar 10 pistas MP3/WMA: Dentro de la misma carpeta TRACK RPT: Repetir la pista actual FOLDER RPT: MP3 - JVC AR390 | Instructions - Page 44
cambiador de CD en la parte trasera de esta unidad. • Consulte también las instrucciones suministradas con el adaptador Bluetooth y el dispositivo Bluetooth. • Opere el dispositivo para activar su función Bluetooth. 1 Seleccione "BT-PHONE" o "BT-AUDIO". 2 Seleccione "NEW DEVICE". 3 Seleccione - JVC AR390 | Instructions - Page 45
un dispositivo registrado 1 Seleccione "BT-PHONE" o "BT-AUDIO". 2 Seleccione el dispositivo registrado que desee conectar / desconectar PIN, consulte las instrucciones suministradas con el dispositivo. Utilice el dispositivo Bluetooth que se ha conectado. Ahora la conexión ha quedado establecida y - JVC AR390 | Instructions - Page 46
compatible con mensajes de texto (que se notifica a través del adaptador Bluetooth JVC), y "MSG INFO" (información sobre mensaje) está ajustado a "AUTO Historial de llamadas: 1 Seleccione un historial de llamadas (REDIAL*, RECEIVED*, MISSED*). 2 A continuación, seleccione un nombre (si está - JVC AR390 | Instructions - Page 47
AUDIO". Si la reproducción no comienza automáticamente, opere el reproductor de audio Bluetooth para comenzar la reproducción. • Opere el reproductor de audio Bluetooth o "RECEIVED*", según Bluetooth: Si desea obtener más información sobre Bluetooth, visite el sitio web de JVC. 3 DISPOSITIVOS - JVC AR390 | Instructions - Page 48
Radio, KT-HD300 (de venta por separado) al jack del cambiador de CD en la parte posterior de la unidad. ¿Qué es la tecnología HD Radio? La tecnología HD Radio Para sintonizar audio digital solamente ANALOG: Para sintonizar de audio analógico solamente AUTO: [Inicial] Cambia entre audio digital y - JVC AR390 | Instructions - Page 49
Escuchando el cambiador de CD Se recomienda usar un cambiador de CD compatible con MP3 JVC (de venta por separado) con este receptor. Puede conectar un cambiador de CD al jack del cambiador de CD en la parte trasera de la unidad. • Solamente se podrán reproducir discos CD (incluyendo CD Text) y MP3 - JVC AR390 | Instructions - Page 50
CD de la parte trasera de esta unidad. • Interfaz de radio satelital SIRIUS de JVC, KS-SRA100, para escuchar la radio satelital SIRIUS. • Adaptador digital inteligente de JVC, XMDJVC100, para escuchar la radio Consulte el número de identificación de la radio satelital XM que aparece en la etiqueta de - JVC AR390 | Instructions - Page 51
Sintonice el canal que desee. Para consultar el número de identificación de la radio satelital XM Mientras selecciona "XM1", "XM2" o "XM3", seleccione "Channel 0". 2 La pantalla muestra alternativamente "RADIO ID" y el número de identificación de 8 caracteres alfanuméricos. ROCK Para cancelar - JVC AR390 | Instructions - Page 52
KS-PD100 (de venta por separado) al jack del cambiador de CD en la parte posterior de la unidad. Preparativos: Asegúrese de que se ha ] Selecciona las pistas [Sostener] Retroceso/avance rápido de pista Tras pulsar M MODE , pulse los siguientes botones para... ONE RPT: Funciona de igual manera que - JVC AR390 | Instructions - Page 53
otros componentes externos Podrá conectar un componente externo a: • Jack del cambiador de CD de la parte trasera de esta unidad utilizando los siguientes adaptadores: - Adaptador de entrada de de 3,5 mm (3/16 pulgada) (no suministrado) Reproductor de audio portátil, etc. DISPOSITIVOS EXTERNOS 19 - JVC AR390 | Instructions - Page 54
para cada modo de sonido Modo de sonido BASS (graves) Frec. Nivel Q Valor preajustado MID (rango medio) TRE (agudos) Frec. Nivel Q Frec. Nivel Q LOUD (sonoridad) USER 60 Hz 00 Q1.0 1.0 kHz 00 Q1.25 7.5 kHz 00 Q1.25 ROCK 100 Hz +03 Q1.0 1.0 kHz 00 Q1.25 10.0 kHz +02 Q1 - JVC AR390 | Instructions - Page 55
Agudos 5 Repita los pasos 3 y 4 para ajustar otras carácterísticas de sonido. Los ajustes realizados se guardarán de sonido seleccionado actualmente (iEQ), incluyendo "USER". 1 2 FADER *1 Ajusta el balance de sonido. *4 Se visualiza sólo cuando "L/O MODE" se ajusta a "SUB.W" (consulte la página - JVC AR390 | Instructions - Page 56
DEMO Demostración en pantalla CLOCK DISP*1 Indicación del reloj Opción ( : Inicial) • DEMO ON • DEMO OFF • CLOCK ON • CLOCK OFF CLOCK HOUR Ajuste de la hora CLOCK MIN Ajuste de los minutos CLOCK los datos de reloj suministrados mediante el canal de radio satelital. : Se cancela. : Para el ajuste - JVC AR390 | Instructions - Page 57
de CD JVC [15] o un iPod Apple [18]. : Para conectar un reproductor de audio portátil al jack del cambiador de CD, [19]. TAG DISPLAY Radio. *7 Se visualiza sólo cuando "L/O MODE" se ajusta a "SUB.W". *8 Se visualiza sólo cuando se selecciona una de las siguientes fuentes-FM, AM, CD, Bluetooth - JVC AR390 | Instructions - Page 58
sus preferencias. 1 Seleccione "BT-PHONE" o "BT-AUDIO". 2 Acceda al menú Bluetooth. 3 Seleccione "SETTINGS". 4 Seleccione una opción de ajuste. Menú de "RCV MESSAGE" (recepción de mensaje). MANUAL: La unidad no le informa la llegada de un mensaje. MIC SET (ajuste del micrófono) Sólo para - JVC AR390 | Instructions - Page 59
FM y AM), con un máximo de 8 carácteres para cada título. • Cuando el sintonizador de HD Radio esté conectado, esta característica se deshabilitará. un disco, se detiene la reproducción. La próxima vez que seleccione "CD" como fuente de reproducción, la reproducción comenzará desde el lugar en el - JVC AR390 | Instructions - Page 60
lado no DVD de un DualDisc en este producto. General • Este receptor ha sido diseñado para reproducir discos CDs/CD Texts, y CD-Rs (Grabables)/CD-RWs (Reescribibles) en formato de audio CD (CD-DA), MP3 y WMA. • Cuando se inserta un disco al revés, "PLEASE" y "EJECT" aparecerán alternativamente en la - JVC AR390 | Instructions - Page 61
en Windows Media® Audio. - Archivos formateados WMA usar la función Bluetooth. Si el mensaje Radio satelital • También puede conectar la radio SIRIUS PnP (Plug and Play) de JVC con el adaptador de radio SIRIUS KS-U100K de JVC (no suministrado) a la toma del cambiador de CD, situada en la parte - JVC AR390 | Instructions - Page 62
sitio web de JVC: - JVC AR390 | Instructions - Page 63
no funciona. Almacene manualmente las emisoras. • Ruidos estáticos mientras se escucha la radio. • No se puede reproducir el disco. • No se puede reproducir el CD-R/CD-RW. • No se pueden saltar las pistas del CD-R/ CD-RW. • No es posible reproducir ni expulsar el disco. • Algunas veces el sonido - JVC AR390 | Instructions - Page 64
(mayúsculas), números, y un número limitado de símbolos. La unidad sólo se puede conectar con un teléfono celular Bluetooth y un dispositivo de audio Bluetooth por vez. Mientras se está conectando un dispositivo, esta unidad no puede ser detectada por otro dispositivo. Desconecte el dispositivo - JVC AR390 | Instructions - Page 65
Conecte correctamente este receptor y el cambiador de CD y pulse el botón de reinicialización del cambiador de CD. Pulse el botón de reinicialización del cambiador de CD. Reinicialice el receptor (consulte la página 3). Se inicia la suscripción a la radio satelital SIRIUS (consulte la página 16). El - JVC AR390 | Instructions - Page 66
canal o continúe escuchando el canal anterior. • La señal "LOADING" aparece en la pantalla El receptor está cargando la información del canal y mientras escucha la radio satelital XM. el audio. La información de texto no está disponible temporalmente. • Aparece "RESET 8" en la pantalla. • La - JVC AR390 | Instructions - Page 67
el disco. Para eliminar estos puntos ásperos, frote los bordes con un lápiz o bolígrafo, etc. No utilice los siguientes discos: CD simple-disco de 8 cm (3-3/16 pulgada) Disco alabeado Pegatinas y restos de pegatina Rótulo autoadhesivo Forma irregular C-thru Disc (disco semitransparente - JVC AR390 | Instructions - Page 68
ÑOL SECCIÓN DEL AMPLIFICADOR DE AUDIO Salida de potencia: Relación se Graves: Rango medio: Agudos: Q (Ancho de banda): KD-AR390: KD-G340: KD-AR390: KD-G340: 4 Ω (tolerancia de 4 Ω a 8 Ω) ±12 para el cambiador de CD, Entrada remota en el volante de dirección (sólo para KD-AR390), Antena SECCIÓN - JVC AR390 | Instructions - Page 69
CD Tipo: Sistema de detección de señal: Número de canales: Respuesta de frecuencias: Gama dinámica: Relación señal a ruido: Lloro y trémolo: Formato de decodificación MP3: (MPEG1/2 Audio Layer 3) Formato de decodificación WMA (Windows Media® Audio en car audio más cercana. REFERENCIAS 35 - JVC AR390 | Instructions - Page 70
JVC. Veuillez lire attentivement toutes les instructions avant d'utiliser l'appareil afin de bien comprendre son fonctionnement et d'obtenir les meilleures performances possibles. FRANÇAIS Précautions: Tout changement ou modification non approuvé par JVC pas trop le volume car cela bloquerait les - JVC AR390 | Instructions - Page 71
d'un téléphone portable Bluetooth 12 • Utilisation d'un lecteur audio Bluetooth ..... 13 Écoute d'une émission HD Radio 14 Écoute du changeur de CD 15 Écoute de la radio satellite 16 Écoute de iPod 18 Écoute d'un autre appareil extérieur 19 RÉGLAGES Sélection d'un mode sonore prérégl 20 - JVC AR390 | Instructions - Page 72
DEMO", puis "DEMO OFF". Réglez l'horloge Choisissez "CLOCK HOUR", puis ajustez les heures. Choisissez "CLOCK l'horloge = (retour au début) HD RADIO Signe d'appel*4 = Fréquence = Titre/artiste CD audio, "NO NAME" apparaît. *3 Si un fichier MP3/WMA n'a pas de balise d'information ou si "TAG DISPLAY - JVC AR390 | Instructions - Page 73
pressée]. t Accès au mode de fonction. y Met en service le mode monaural pendant le mode de fonction. u Prérégle les stations automatiquement sur les touches numériques pendant le mode de fonction. i • FM/AM/HD RADIO/SIRIUS/XM: Sélection d'une station/canal préréglé • CD/CD-CH: Choisissez un dossier - JVC AR390 | Instructions - Page 74
Bluetooth 5 Indicateurs de source de lecture-CH (changeur de CD), DISC 6 Indicateurs de mode sonore (iEQ: égaliseur intelligent)-CLASSIC, HIP HOP, JAZZ, ROCK, POPS, USER 7 Indicateurs de mode Le KD-AR390 est muni d'une fonction de télécommande de volant. • Référez-vous au Manuel d'installation/ - JVC AR390 | Instructions - Page 75
Change le dossier du support MP3/WMA. • Lors de la lecture d'un disque MP3 sur un changeur de CD compatible MP3: - Change . • Lors de l'écoute d'un iPod (en mode de sélection de menu): - Appuyez brièvement Saut vers l'arrière/saut vers l'avant pour Audio Bluetooth. * 5 U : Retourne au menu précédent - JVC AR390 | Instructions - Page 76
FRANÇAIS Écoute de la radio 1 Choisissez "FM/AM". 2 Sélection de la bande. 3 Recherchez la station que vous souhaitez écouter- mémorisées automatiquement dans la bande FM choisie. • Si un tuner HD Radio est connecté, vous pouvez aussi rechercher et mémoriser les stations AM automatiquement. 8 - JVC AR390 | Instructions - Page 77
7 à 12. *2 Il faut qu'un numéro de 2-chiffres soit affecté au début du nom des dossiers-01, 02, 03, etc. Après avoir appuyé sur M MODE, appuyez sur les touches suivantes pour... Sauter 10 plages MP3/WMA: À l'intérieur du même dossier TRACK RPT: Répéter la plage actuelle FOLDER RPT: MP3 - JVC AR390 | Instructions - Page 78
(KS-BTA200) (vendu séparément) à la prise de changeur de CD à l'arrière de cet appareil. • Référez-vous aussi aux instructions fournies avec l'adaptateur Bluetooth et le périphérique Bluetooth. • Référez-vous à la liste (comprise dans la boîte) pour vérifier les pays où vous pouvez utiliser - JVC AR390 | Instructions - Page 79
que vous le déconnectez. Utilisez "CONNECT" (ou mettez en service "AUTO CNNCT") pour connecter le même périphérique la Choisissez "BT-PHONE" ou "BT-AUDIO". 2 Choisissez un appareil enregistré instructions fournies avec le périphérique pour vérifier le code PIN. Utilisez le périphérique Bluetooth - JVC AR390 | Instructions - Page 80
AUTO ANSWER" (réponse automatique) est hors service, appuyez sur n'importe quelle touche (sauf 1 Choisissez un historique des appels (REDIAL*, RECEIVED*, MISSED*). 2 Puis choisissez un nom (s'il avec les messages textuels (notifiés par l'adaptateur Bluetooth JVC) et que "MSG-INFO" (info messages) - JVC AR390 | Instructions - Page 81
*", "MISSED*", "REDIAL*" ou "RECEIVED*", le réglage que vous souhaitez utiliser. Puis choisissez un numéro de téléphone. Informations sur le système Bluetooth: Si vous souhaitez recevoir plus d'informations sur le système Bluetooth, consultez le site web de JVC. * Apparaît uniquement quand votre - JVC AR390 | Instructions - Page 82
Ce service est appelé multiplex. • Pour en savoir plus sur les stations HD Radio dans votre région, consultez le site www.hdradio.com . Référez-vous aussi à la page 8 pour les opérations de base de la radio. Recherche de station HD Radio uniquement 1 2 Changement du mode de - JVC AR390 | Instructions - Page 83
CD JVC compatible MP3 (vendu séparément) avec votre autoradio. Vous pouvez connecter un changeur de CD à la prise de changeur de CD à l'arrière de l'appareil. • Vous pouvez uniquement reproduire les CD ordinaire (y compris les CD Après avoir appuyé sur M MODE, appuyez sur les touches suivantes pour - JVC AR390 | Instructions - Page 84
(vendu séparément) à la prise du changeur de CD à l'arrière de l'appareil. • Interface de radio satellite SIRIUS JVC, KS-SRA100, pour écouter la radio satellite SIRIUS. • Adaptateur JVC Smart Digital, XMDJVC100, pour écouter la radio satellite XM. Mise à jour des informations GCI (Informations de - JVC AR390 | Instructions - Page 85
Accordez le canal que vous souhaitez. 2 ROCK Vérification du numéro d'identification de la radio satellite XM Lors de la sélection de "XM1", "XM2" ou "XM3", choissiez le "Channel 0". "RADIO ID" et le numéro d'identification à 8 chiffres (alphanumérique) apparaissent alternativement sur l'affichage - JVC AR390 | Instructions - Page 86
pour iPod, KS-PD100 (vendu séparément) à la prise du changeur de CD à l'arrière de l'appareil. Préparation: Assurez-vous que "CHANGER" est choisi rapide de plage vers l'arrière/vers l'avant Après avoir appuyé sur M MODE, appuyez sur les touches suivantes pour... ONE RPT: Fonctionne de la même fa - JVC AR390 | Instructions - Page 87
autre appareil extérieur Vous pouvez connecter un appareil extérieur à: • la prise de changeur de CD à l'arrière de cet appareil en utilisant les adaptateurs suivants: - Adaptateur d'entrée de ligne, stéréo de 3,5 mm (3/16 pouces) (non fournie) Lecteur audio portable, etc. APPAREILS EXTÉRIEURS 19 - JVC AR390 | Instructions - Page 88
sélectionner un mode sonore préréglé adapté à votre genre de musique (iEQ: égaliseur intelligent). Valeur préréglée pour chaque mode sonore Mode sonore BASS (graves) Fréq. Niveau Q Valeur préréglée MID (médiums) TRE (aigus) Fréq. Niveau Q Fréq. Niveau Q LOUD (loudness) USER 60 Hz 00 - JVC AR390 | Instructions - Page 89
Vous pouvez ajuster les caractéristiques du son comme vous le souhaitez. • L'ajustement réalisé est enregistré pour le mode sonore actuellement choisi (iEQ), y compris "USER". 1 2 FADER *1 Ajustez la balance de sortie avantarrière des enceintes. R06 à F06 BALANCE *2 Ajustez la balance de sortie - JVC AR390 | Instructions - Page 90
DEMO Démonstration des affichages CLOCK DISP*1 Affichage de l'horloge Élément ( : Réglage initial) • DEMO ON • DEMO OFF • CLOCK ON • CLOCK OFF CLOCK HOUR Ajustement des heures CLOCK MIN Ajustement des minutes CLOCK horloge fournies par le cana de la radio satellite. : Annulation. : Choisissez votre - JVC AR390 | Instructions - Page 91
CD JVC, [15], ou un iPod Apple, [18]. : Pour connecter un lecteur audio portable à la prise de changeur de CD, [19]. TAG DISPLAY Radio. *7 Est affiché uniquement quand "L/O MODE" est réglé sur "SUB.W". *8 Est affiché uniquement quand une des sources suivantes est choisie-FM, AM, CD, Bluetooth - JVC AR390 | Instructions - Page 92
"SETTINGS". 4 Choisissez une option de réglage. *1 Apparaît uniquement quand un téléphone Bluetooth est connecté. *2 Apparaît uniquement quand un téléphone Bluetooth est connecté et qu'il est compatible avec les messages textuels (notifiés par l'adaptateur Bluetooth JVC). *3 Bluetooth Audio:Affiche - JVC AR390 | Instructions - Page 93
et 8 caractères (maximum) pour chaque titre. • Quand le tuner HD Radio est connecté, cette fonctionnalité n'est pas disponible. 1 Choisissez FM/AM. d'un disque, la lecture s'arrête. La prochaine fois que vous choisissez "CD" comme source de lecture, la lecture reprend à partir de l'endroit où elle - JVC AR390 | Instructions - Page 94
si un disque comprend à la fois des fichiers CD audio (CD-DA) et des fichiers MP3/WMA. • Cet etc.) ou du support (tâche, rayure, gondolage) sont incorrectes. • Les CD-RW nécessite un fichiers enregistrés au mode VBR (débit binaire variable). Les fichiers enregistrés au mode VBR affichent une dur - JVC AR390 | Instructions - Page 95
pas basés sur Windows Media® Audio. - Fichiers au format WMA prot utiliser la fonction Bluetooth. Si le message Radio satellite • Vous pouvez aussi connecter la radio JVC SIRIUS PnP ("Plug and Play"), en utilisant l'adaptateur de radio SIRIUS JVC, KS-U100K (non fourni) sur la prise de changeur de CD - JVC AR390 | Instructions - Page 96
érations à partir de iPod sont hors service. Réalisez toutes les opérations à consultez le site Web JVC suivant: - JVC AR390 | Instructions - Page 97
pendant l'écoute de la radio. Connectez l'antenne solidement. • Le disque ne peut pas être reproduit. Insérez le disque correctement. • Le CD-R/CD-RW ne peut pas être reproduit. • Insérez un CD-R/CD-RW finalisé. • Les plages sur les le CD-R/CD-RW ne • Finalisez le CD-R/CD-RW avec l'appareil que - JVC AR390 | Instructions - Page 98
), connectez de nouveau le périphérique. • Le périphérique audio connecté ne peut pas Vérifiez si le périphérique audio connecté prend en charge être commandé. AVRCP (Audio Video Remote Control Profile). * Pour les opérations Bluetooth, référez-vous aux instructions fournies avec l'adaptateur - JVC AR390 | Instructions - Page 99
l'affichage précédent réapparaît pendant l'écoute de la radio satellite SIRIUS. Remèdes/Causes Fixez le mode de réception sur "DIGITAL" ou "ANALOG" (voir CD. Appuyez sur le touche de réinitialisation du changeur de CD. Réinitialisez l'autoradio (voir page 3). Démarrez la suscription pour la radio - JVC AR390 | Instructions - Page 100
train de changer les informations l'écoute de la radio satellite XM. du canal et audio. Le texte d'information est temporairement indisponible. micrologiciel. • Chargez de la batterie. • Le son est déformé. Mettez hors service l'égaliseur sur cet appareil ou sur iPod. • "NO IPOD" apparaît sur - JVC AR390 | Instructions - Page 101
Pour remettre un disque dans sa boîte, insérez-le délicatement sur le support central (avec la surface imprimée dirigée vers le haut). • Conservez les disques dans crayon, un stylo, etc. N'utilisez pas les disques suivants: CD Single-disque de 8 cm (3-3/16 pouces) Disque gondolé Autocollant - JVC AR390 | Instructions - Page 102
SECTION DE L'AMPLIFICATEUR AUDIO Puissance de sortie Impédance: Impédance de sortie: Autre prise: Q (bande passante): KD-AR390: KD-G340: KD-AR390: KD-G340: 4 Ω (4 Ω à 8 Ω admissibles) ±12 dB (60 du changeur CD, Entrée pour la télécommande de volant (uniquement pour le KD-AR390), Antenne SECTION - JVC AR390 | Instructions - Page 103
CD Type: Système de détection du signal: Nombre de canaux: Réponse en fréquence: Plage dynamique: Rapport signal sur bruit: Pleurage et scintillement: Format de décodage MP3: (MPEG1/2 Audio Layer 3) Format de décodage WMA (Windows Media® Audio P): (approx.) Taille d'installation: Taille du panneau: - JVC AR390 | Instructions - Page 104
Having TROUBLE with operation? Please reset your unit Refer to page of How to reset your unit Still having trouble?? USA ONLY Call 1-800-252-5722 http://www.jvc.com We can help you! EN, SP, FR © 2007 Victor Company of Japan, Limited 1007DTSMDTJEIN - JVC AR390 | Instructions - Page 105
Instructions CD RECEIVER KD-AR390/KD-G340
-
 1
1 -
 2
2 -
 3
3 -
 4
4 -
 5
5 -
 6
6 -
 7
7 -
8
-
9
-
10
-
11
-
12
-
13
-
14
-
15
-
16
-
17
-
18
-
19
-
20
-
21
-
22
-
23
-
24
-
25
-
26
-
27
-
28
-
29
-
30
-
31
-
32
-
33
-
34
-
35
-
36
-
37
-
38
-
39
-
40
-
41
-
42
-
43
-
44
-
45
-
46
-
47
-
48
-
49
-
50
-
51
-
52
-
53
-
54
-
55
-
56
-
57
-
58
-
59
-
60
-
61
-
62
-
63
-
64
-
65
-
66
-
67
-
68
-
69
-
70
-
71
-
72
-
73
-
74
-
75
-
76
-
77
-
78
-
79
-
80
-
81
-
82
-
83
-
84
-
85
-
86
-
87
-
88
-
89
-
90
-
91
-
92
-
93
-
94
-
95
-
96
-
97
-
98
-
99
-
100
-
101
-
102
-
103
-
104
-
105
 |
 |

ENGLISH
ESPAÑOL
FRANÇAIS
CD RECEIVER
KD-AR390/KD-G340
RECEPTOR CON CD
KD-AR390/KD-G340
RÉCEPTEUR CD
KD-AR390/KD-G340
For canceling the display demonstration, see page 4.
Para cancelar la demostración en pantalla, consulte la página 4.
Pour annuler la démonstration des affichages, référez-vous à la page 4.
For installation and connections, refer to the separate manual.
Para la instalación y las conexiones, refiérase al manual separado.
Pour l’installation et les raccordements, se référer au manuel séparé.
INSTRUCTIONS
MANUAL DE INSTRUCCIONES
MANUEL D’INSTRUCTIONS
GET0487-001A
[J]
For customer Use:
Enter below the Model
No. and Serial No. which
are located on the top or
bottom of the cabinet. Retain
this information for future
reference.
Model No.
Serial No.