JVC DLA-HD10KSU DLA-HD10K Owner's Manual (50 pages)
JVC DLA-HD10KSU - 1080p Home Theater Projector Manual
 |
View all JVC DLA-HD10KSU manuals
Add to My Manuals
Save this manual to your list of manuals |
JVC DLA-HD10KSU manual content summary:
- JVC DLA-HD10KSU | DLA-HD10K Owner's Manual (50 pages) - Page 1
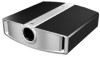
ENGLISH FRANÇAIS ® HOME THEATER PROJECTOR PROJECTEUR CINÉMA MAISON ® DLA-HD10KU/E INSTRUCTIONS DLA-HD10KSU/E MANUEL D'INSTRUCTIONS ON OPERATE OFF CHP LIGHT TEST MENU EXIT ENTER PRESET T ZOOM W HIDE FOCUS For Customer use : Enter below the serial No. which is located on - JVC DLA-HD10KSU | DLA-HD10K Owner's Manual (50 pages) - Page 2
) Language for Manuals of Products using problem with ordinary video-cassette playback images. About the installation place Do not install the projector in a place that cannot support service. Please read these Important Safeguards carefully before use. - All the safety and operating instructions - JVC DLA-HD10KSU | DLA-HD10K Owner's Manual (50 pages) - Page 3
normally by following the oper- ating instructions. Adjust only those controls that are covered by the Operation Manual, as an improper adjustment of controls other hazards. - Upon completion of any service or repairs to this product, ask the service technician to perform safety checks to determine - JVC DLA-HD10KSU | DLA-HD10K Owner's Manual (50 pages) - Page 4
, to avoid a possible shock hazard by inadvertent connection to the main supply. If a new main plug has to be fitted, then follow the instruction given below: WARNING: THIS APPARATUS MUST BE EARTHED. IMPORTANT: The wires in the mains lead on this product are coloured in accordance with the - JVC DLA-HD10KSU | DLA-HD10K Owner's Manual (50 pages) - Page 5
you wish to dispose of this product, please visit our web page www.jvc-europe.com to obtain information about the take-back of the product. [ de pré-collecte et le recyclage de ce produit, contactez votre mairie, le service d'évacuation des ordures ménagères ou le magasin dans lequel vous avez achet - JVC DLA-HD10KSU | DLA-HD10K Owner's Manual (50 pages) - Page 6
(Empresas) Si desea desechar este producto, visite nuestra página Web www.jvc-europe.com para obtener información acerca de la retirada del producto. [Otros pretender eliminar este produto, visite a nossa página da web em www.jvc-europe.com para obter informações sobre a devolução do produto. [Outros - JVC DLA-HD10KSU | DLA-HD10K Owner's Manual (50 pages) - Page 7
affald kan være strafbar ifølge lovgivningen i nogle lande. (Professionelle brugere) Hvis du ønsker at bortskaffe dette produkt, kan du på vores webside www.jvc-europe.com få information om tilbagetagning af produktet. [Lande uden for EU] Hvis du ønsker at bortskaffe dette produkt, bedes du gøre det - JVC DLA-HD10KSU | DLA-HD10K Owner's Manual (50 pages) - Page 8
SAFETY PRECAUTIONS (continued) www.jvc-europe.com. 8 - JVC DLA-HD10KSU | DLA-HD10K Owner's Manual (50 pages) - Page 9
image could be burnt into this D-ILA device. Pay special attention when projecting video games and computer program images. There is no problem with ordinary video cassette playback images. Viewing Conditions (Brightness of Room) oBrightness of the room Avoid direct exposure of screen to direct - JVC DLA-HD10KSU | DLA-HD10K Owner's Manual (50 pages) - Page 10
41 Troubleshooting 42 Terminal Description 44 Pin Arrangement 44 RS-232C External Control 45 Specifications 47 Accessories The following accessories are packed together with this unit. Please confirm all items. If any item is missing, please contact your dealer. Instructions - JVC DLA-HD10KSU | DLA-HD10K Owner's Manual (50 pages) - Page 11
unit. Do not block or allow warm air to blow into them. This may cause the unit to malfunction. C Power Zoom Lens DLA-HD10KU/E :1.9x power zoom lens DLA-HD10KSU/E:1.4x power zoom lens ● Before projection, remove the lens cap. (A Page 26) D Remote Sensor (Front) When operating with the remote control - JVC DLA-HD10KSU | DLA-HD10K Owner's Manual (50 pages) - Page 12
for a connection with the screen. F [SERVICE] Terminal This terminal is intended for servicing purposes. Do not use it. Using it may give rise to error and malfunction of the unit. G [RS-232C] Terminal (D-sub 9 Pin) This is the RS-232C interface-specific terminal. This unit can be controlled by - JVC DLA-HD10KSU | DLA-HD10K Owner's Manual (50 pages) - Page 13
ENGLISH Control Panel A BC W ZOOM T - + FOCUS RS232C Rx Tx MENU OPERATE EXIT ON OPERATE OFF HIDE H I J DE F G A [Rx/Tx] Indicator This indicator lights up during communication with the computer using the RS-232C terminal. (A Page 15) [Rx] : Lights up when this unit is receiving RS-232C - JVC DLA-HD10KSU | DLA-HD10K Owner's Manual (50 pages) - Page 14
Controls and Features (continued) Indicators STAND BY A OPERATE B LAMP C TEMP D FAN E HIDE F A [STAND BY] Indicator Light on : When in the standby mode. (A Pages 15, 26) Blinking : When in the cool down mode. (A Pages 15, 27) B [OPERATE] Indicator Light on : When this unit is currently - JVC DLA-HD10KSU | DLA-HD10K Owner's Manual (50 pages) - Page 15
ENGLISH Indicator Display This unit displays operational states using different combination of indicators. ● Please refer to page 35 for explanations on warning indication for *2. ● Please refer to page 41 for indications when an abnormality occurs in this unit. Indicator Display on the Top Surface - JVC DLA-HD10KSU | DLA-HD10K Owner's Manual (50 pages) - Page 16
Controls and Features (continued) Remote Control F Cursor [J / K / H / I] Buttons A Use these buttons when adjusting the menu items. (A Pages 29, 30) B ON OPERATE OFF I C CHP LIGHT TEST J D MENU E EXIT K L F ENTER G PRESET T H ZOOM W HIDE M FOCUS N A Remote Control's - JVC DLA-HD10KSU | DLA-HD10K Owner's Manual (50 pages) - Page 17
ENGLISH Loading Batteries into the Remote Control Load batteries into the remote control. If the remote control starts to function erratically, replace the batteries. a Open the back cover Press the back cover slightly and slide it in the direction of the arrow. b Load the batteries Insert the 2 - JVC DLA-HD10KSU | DLA-HD10K Owner's Manual (50 pages) - Page 18
Installing the Projector Precautions for Installation Please read the following carefully when installing this unit. Installation Environment This unit is a precision device. Do not install it at the following places. Doing so may cause fire or malfunction of the unit. ● Where there is water, - JVC DLA-HD10KSU | DLA-HD10K Owner's Manual (50 pages) - Page 19
ENGLISH Mounting this Unit When mounting of this unit is required, do so by removing the 4 feet and make use of the 4 screw holes (M8 nuts) at the bottom of this unit. Allow sufficient space around the air inlets to avoid blocking them. Air Inlet Precautions for Ceiling-mount ● To ceiling-mount - JVC DLA-HD10KSU | DLA-HD10K Owner's Manual (50 pages) - Page 20
Installing the Projector (continued) Projector and Screen Installation The optimum image can be obtained when the center of this projector's lens and the screen are placed perpendicular to each other. Take note of the projection angle when placing them. Failing to do so may give rise to trapezoidal - JVC DLA-HD10KSU | DLA-HD10K Owner's Manual (50 pages) - Page 21
DLA-HD10KSU/E DLA-HD10KSU/E uses a 1.4x power zoom lens for projection, so when expanded to the maximum it can project at 1.4 times the size of the minimum. o DLA-HD10KU/E DLA-HD10KU in the table above are provided only as a guide. Please use them as reference during installation. The projected - JVC DLA-HD10KSU | DLA-HD10K Owner's Manual (50 pages) - Page 22
Installing the Projector (continued) Lens Shift Setting This unit comes with a Lens Shift feature that enables upward/downward adjustment of the projection screen position. Adjust accordingly depending on the installation conditions. ● The shift level is between 0 % and 60 %. The shift level is set - JVC DLA-HD10KSU | DLA-HD10K Owner's Manual (50 pages) - Page 23
ENGLISH Effective Range of Remote Control Unit The operable distance of the remote control unit is about 7 m for direct reception. The remote control unit can be used by having the transmission signal reflected off a screen. ● If the fluorescent lamp is lit, the remote control unit might not - JVC DLA-HD10KSU | DLA-HD10K Owner's Manual (50 pages) - Page 24
to Various Devices Connecting to Devices Before connection, be sure to turn off both the projector and the device to be connected. ● Read the manual that is supplied with the device to be connected thoroughly. Connecting to Devices ● Depending on your DVI-D cable, the signal may attenuate and the - JVC DLA-HD10KSU | DLA-HD10K Owner's Manual (50 pages) - Page 25
ENGLISH Connecting the Power Cord (Supplied) Before plugging in the power cord, ensure that all devices have been connected. a Connect the supplied power cord to the power input terminal of this unit a Power Cord (Supplied) b b Connect the earth wire to the earth terminal available in the - JVC DLA-HD10KSU | DLA-HD10K Owner's Manual (50 pages) - Page 26
Basic Operation Procedures If setting for this unit is not completed, please refer to AAdjustments and Settings Using MenusB (A Page 28) upon turning on the power and perform the required setting accordingly. Once the basic setting is completed, this unit can be used by simply performing the - JVC DLA-HD10KSU | DLA-HD10K Owner's Manual (50 pages) - Page 27
ENGLISH ON OPERATE OFF CHP LIGHT TEST MENU EXIT f - A ENTER PRESET T ZOOM W HIDE FOCUS e d Indicator d Adjusting focus To focus on nearer points, press the [FOCUS +] button To focus on farther points, press the [FOCUS -] button e Hiding the image temporarily Press the [HIDE] button ● The - JVC DLA-HD10KSU | DLA-HD10K Owner's Manual (50 pages) - Page 28
Adjustments and Settings Using Menus The menus displayed on the screen are used to perform adjustment and setting for this unit. Menu Structure The menus of this unit have the following structure. Characters on the screen are displayed in English only. Main Menu Image Adjust Setup Options - JVC DLA-HD10KSU | DLA-HD10K Owner's Manual (50 pages) - Page 29
ENGLISH Menu Operation Buttons The menus are operated using buttons on this unit or remote control unit. ON OPERATE OFF CHP LIGHT TEST MENU EXIT ENTER PRESET T ZOOM W HIDE FOCUS Menu Operation Buttons RS232C Rx Tx MENU OPERATE EXIT ON + T OPERATE OFF FOCUS ZOOM HIDE - W Menu - JVC DLA-HD10KSU | DLA-HD10K Owner's Manual (50 pages) - Page 30
Adjustments and Settings Using Menus (continued) Procedures for Menu Operation ON OPERATE OFF CHP LIGHT TEST MENU EXIT ENTER a, f d b, c PRESET T ZOOM W HIDE FOCUS a Press the [MENU] button ● The main menu is displayed on the screen. Image Adjust Setup Options Information Gamma Color - JVC DLA-HD10KSU | DLA-HD10K Owner's Manual (50 pages) - Page 31
software. (Default picture quality is equivalent to ANormalB) You can download the Gamma adjustment software from the following website. http://www.jvc-victor.co.jp Color Temp. Adjusts the color temperature of the projected image. Setting Values: AD65B,AUser1B,AUser2B Default Value: AD65B - JVC DLA-HD10KSU | DLA-HD10K Owner's Manual (50 pages) - Page 32
Adjustments and Settings Using Menus (continued) C Options Menu Menu Display Adjusts the display duration of the menu screen. Setting Values: A15secB,AOnB Default Value: A15secB ● The menu screen display will not disappear automatically when this is set to AOnB. Press the [EXIT] button to clear - JVC DLA-HD10KSU | DLA-HD10K Owner's Manual (50 pages) - Page 33
ENGLISH Screen Masking Image for which quality at the outer area has deteriorated can be projected by masking (hiding) the outer area of the projected image. a Project image onto the screen ON OPERATE OFF CHP LIGHT TEST MENU EXIT ENTER b, e c, d PRESET T ZOOM W HIDE FOCUS Image for which - JVC DLA-HD10KSU | DLA-HD10K Owner's Manual (50 pages) - Page 34
Picture Shift Setting When projecting images with black bands at the top and bottom (cinema image), use this to move the image up or down while retaining one of the black bands at the upper or lower end. a Project the image on the screen ON OPERATE OFF CHP LIGHT TEST MENU EXIT ENTER b, e c, - JVC DLA-HD10KSU | DLA-HD10K Owner's Manual (50 pages) - Page 35
ENGLISH Replacing the Lamp Light-source Lamp and Lamp Usage Time The life of light-source lamps used for this unit is about 2000 hours. ● The lamp life of 2000 hours is merely the average life span of light-source lamps and we do not provide any guarantee for this figure. The lamp life may not - JVC DLA-HD10KSU | DLA-HD10K Owner's Manual (50 pages) - Page 36
Replacing the Lamp (continued) Procedure for Lamp Replacement a Remove the control panel cover ● Please refer to page 12 for details on removing the control panel cover. b Loosen the screws and remove the lamp cover ● Loosen the 1 screws with a F screwdriver. Control Panel Cover c Loosen the - JVC DLA-HD10KSU | DLA-HD10K Owner's Manual (50 pages) - Page 37
ENGLISH e Insert the lamp unit until it is fully in Handling the Lamp Unit Do not touch the glass surface of the lamp directly with your hand or stain it. Touching it with a bare hand may dirty the surface, hence shortening the lamp life, causing marked performance deterioration such as darkened - JVC DLA-HD10KSU | DLA-HD10K Owner's Manual (50 pages) - Page 38
Replacing the Lamp (continued) Resetting Lamp Time After installing a new lamp (lamp unit), reset the lamp time. The lamp time counter will be reset and a new count will start. ● If the accumulated lamp time has reached 2000 hours, this unit will not work (lamp does not light up) unless the lamp - JVC DLA-HD10KSU | DLA-HD10K Owner's Manual (50 pages) - Page 39
ENGLISH Cleaning and Replacing the Filter Clean the filter regularly. Otherwise, air intake efficiency may deteriorate and malfunction may occur. If the filter is extremely dirty and cannot be cleaned, or if it is damaged, replace the filter with a new one (inner filter: LC32058002A). Otherwise, - JVC DLA-HD10KSU | DLA-HD10K Owner's Manual (50 pages) - Page 40
What to do when these messages are displayed Message No Signal DVI-D Out Of Range Cause (Details) No device is connected to the [DVI] terminal. The DVI-D cable is connected to the [DVI] terminal but there is no signal input. NInput the video signals. A video signal that cannot be used with this - JVC DLA-HD10KSU | DLA-HD10K Owner's Manual (50 pages) - Page 41
ENGLISH Warning Indication About warning indicators If abnormality occurs in this unit during projection, the warning mode will be triggered and the type of abnormality will be indicated by a combination of indicators displayed on the top surface of this unit. ● This unit will then automatically - JVC DLA-HD10KSU | DLA-HD10K Owner's Manual (50 pages) - Page 42
Troubleshooting Before sending the unit for repair, check the following points. Symptom Probable Cause Corrective Action Reference Page Power is not supplied Is the power cord - JVC DLA-HD10KSU | DLA-HD10K Owner's Manual (50 pages) - Page 43
ENGLISH Symptom Remote control unit does not work Probable Cause Are batteries installed correctly? Are batteries exhausted? Is there an obstructive object between the remote control unit and remote sensor? Is the remote control held too far away from the sensor? Corrective Action Reference Page - JVC DLA-HD10KSU | DLA-HD10K Owner's Manual (50 pages) - Page 44
Terminal Description Pin Arrangement [RS-232C] Terminal 9876 54321 Pin No. 1 2 3 4 5 Signal Name N/C RD TD N/C GND Pin No. 6 7 8 9 Signal Name N/C N/C N/C N/C [DVI-D] Terminal 8 7 65 4 3 2 1 16 15 14 13 12 11 10 9 24 23 22 21 20 19 18 17 Pin No. Signal Name 1 TMDS data 2- 2 TMDS data 2+ - JVC DLA-HD10KSU | DLA-HD10K Owner's Manual (50 pages) - Page 45
the response data format against the received commands are explained here. For details, please consult your authorized dealer. a Communication Specifications Communication specifications for this unit are as follows: Baud Rate Data Length Parity Stop Bit Flow Control 9600/19200 bps 8 bit None - JVC DLA-HD10KSU | DLA-HD10K Owner's Manual (50 pages) - Page 46
Terminal Description (continued) C Parameters used for the data format The following 3 types of parameters are used for command and response data: (1) Numeric value (2) ON/OFF (3) Special parameters Each parameter is as follows: (1) Numeric value A 2-byte hexadecimal value (sign included) is - JVC DLA-HD10KSU | DLA-HD10K Owner's Manual (50 pages) - Page 47
Specifications Model Name/Article Name Emission Method Display Panel/Size Projection Lens DLA-HD10KU/E DLA-HD10KSU/E Light-source Lamp Screen Size Projection Distance DLA-HD10KU/E DLA-HD10KSU (External control) SERVICE 1-line, 3.5 mm diameter, stereo mini-jack ן1 (For Service) SCREEN TRIGGER 1- - JVC DLA-HD10KSU | DLA-HD10K Owner's Manual (50 pages) - Page 48
343 Specifications (continued) Dimensions (Unit: mm) Top Bottom 280 558.5 10 513 Front Lens Center 256.5 42 Side 282.5 202 116.5 152.5 25.2 193.7 16.5 110 48 - JVC DLA-HD10KSU | DLA-HD10K Owner's Manual (50 pages) - Page 49
Memo 49 ENGLISH - JVC DLA-HD10KSU | DLA-HD10K Owner's Manual (50 pages) - Page 50
DLA-HD10KU/E/DLA-HD10KSU/E ® HOME THEATER PROJECTOR © 2005 Victor Company Of Japan, Limited
-
 1
1 -
 2
2 -
 3
3 -
 4
4 -
 5
5 -
 6
6 -
 7
7 -
8
-
9
-
10
-
11
-
12
-
13
-
14
-
15
-
16
-
17
-
18
-
19
-
20
-
21
-
22
-
23
-
24
-
25
-
26
-
27
-
28
-
29
-
30
-
31
-
32
-
33
-
34
-
35
-
36
-
37
-
38
-
39
-
40
-
41
-
42
-
43
-
44
-
45
-
46
-
47
-
48
-
49
-
50
 |
 |

LCT1971-001A
For Customer use :
Enter below the serial No. which is located
on the side panel of the cabinet. Retain
this information for future reference.
Model No.
Serial No.
Pour utilisation par le client :
Entrer ci-dessous le N° de série qui est situé
sur le panneau latéral du coffret. Garder cette
information comme référence pour le futur.
N° de modèle
N° de série
HOME THEATER PROJECTOR
PROJECTEUR CINÉMA MAISON
®
®
DLA-HD10KU/E
DLA-HD10KSU/E
INSTRUCTIONS
MANUEL D’INSTRUCTIONS
ON
ENTER
OFF
CHP
TEST
MENU
EXIT
LIGHT
OPERATE
HIDE
PRESET
ZOOM
T
W
FOCUS
ENGLISH
DLA-HD10KU/DLA-HD10KSU
FRANÇAIS
DLA-HD10KU/DLA-HD10KSU