JVC GM-V42UG Instructions
JVC GM-V42UG - Plasma Monitor Manual
 |
View all JVC GM-V42UG manuals
Add to My Manuals
Save this manual to your list of manuals |
JVC GM-V42UG manual content summary:
- JVC GM-V42UG | Instructions - Page 1
PLASMA DISPLAY MONITOR GM-V42UG GM-V42UB INSTRUCTIONS For Customer Use: Enter below the Model No. and the Serial No. which is located on the rear panel of the cabinet. Retain this information for future reference. Model No. Serial No. MENU INPUT POWER LCT1389-001B - JVC GM-V42UG | Instructions - Page 2
- JVC GM-V42UG | Instructions - Page 3
INSTRUCTIONS Model GM-V42UG GM-V42UB Thank you for purchasing this JVC Monitor. Before using the monitor, read this manual carefully so that you know how to use the Monitor correctly. Refer to this manual whenever questions or problems about operation arise. Be sure to read and observe the safety - JVC GM-V42UG | Instructions - Page 4
GM-V42UG CAUTION: Changes or modifications not approved by JVC could void the user's authority to operate the equipment. NOTE: This equipment has been tested and found to comply with the limits for a Class A digital device, pursuant to Part instruction manual radio/TV unstable cart, stand, or table. - JVC GM-V42UG | Instructions - Page 5
: a) When the power supply cord or plug is damaged. b) If liquid has been spilled, or objects have fallen on the product. c) If the product has been exposed to rain or water. d) If the product operated normally by following the operating instructions. Adjust only those controls that are covered by - JVC GM-V42UG | Instructions - Page 6
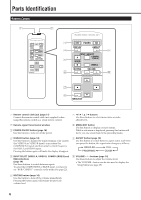
RM-C579 REMOTE CONTROL UNIT 3 OFF POWER ON DISPLAY 4 ASPECT 9 INPUT SELECT A 5 VIDEO COMPO. /(RGB B) B RGB A MUTING VOLUME 6 p 7 8 MENU/EXIT 1 Remote control cable jack (page 11) Connect the remote control cable (not supplied) when using this remote control as a wired remote control - JVC GM-V42UG | Instructions - Page 7
View 1 2 MENU INPUT POWER MENU INPUT POWER Bottom View 3 45 6 1 Remote sensor/power lamp Point the front end of the wireless remote control toward here. When the Monitor is turned on, the power lamp glows green. It glows orange in standby mode. 2 Self-diagnostic lamps (page 39) These - JVC GM-V42UG | Instructions - Page 8
POWER button either on the remote control or on the Monitor. 6 OPTION terminal (page 13) Connect the power cord of the Cooling Fan Unit (not supplied) when installing the Monitor vertically. 7 SPEAKER OUT L/R terminals (page 11) Connect external speakers, such as unique JVC speakers (not supplied - JVC GM-V42UG | Instructions - Page 9
are loop-through terminals, the devices connected to this video output terminal should be correctly terminated. Otherwise, pictures become abnormally bright or the Monitor screen gets affected abnormally. p VIDEO B terminals (page 12) • AUDIO (L/MONO, R) input terminals (pin jack) Connect these - JVC GM-V42UG | Instructions - Page 10
the dealer where you purchased the Monitor. • Remote control (RM-C579) x 1 • Power cord x 1 • Batteries (AA/R6P) x 2 • Ferrite core x 1 (Only for GM-V42UG) Installing the Batteries Put the batteries in the remote control as follows. If the remote control has become erratic in operation, change - JVC GM-V42UG | Instructions - Page 11
. If this happens, use the remote control as a wired remote control or move the Monitor where it is free from these effects. When installing the Monitor on a stand Front View Side View 150 (415/16 ) 200 (77/8) 50 (2) 150 (415/16 ) Wall MENU INPUT POWER 50 (2) Unit: mm (inch) Take - JVC GM-V42UG | Instructions - Page 12
above is input, a part of the screen may become void or an unnecessary picture may appear. • Signals, though they are within the acceptable range of frequencies, may not be displayed normally, depending on the signal type. • Depending on the connected equipment, the Monitor may not be compatible - JVC GM-V42UG | Instructions - Page 13
COMPO. /(RGB B) INPUT SELECT DISPLAY ASPECT OFF POWER ON RM-C579 REMOTE CONTROL UNIT To audio input To RS-232C To monitor output To audio output Cable with stereo mini jacks (not supplied) Power cord (supplied) ❊ To a wall outlet Ferrite core (supplied to GM-V42UG) • Make sure to attach the - JVC GM-V42UG | Instructions - Page 14
To B output Personal computer (used as the playback To R output source) To HD/Cs output To VD output Notes: • You can connect another VCR or Monitor to the VIDEO A OUT terminal. However, when connecting a VCR to the VIDEO A terminals, do not connect both IN and OUT terminals to the same VCR - JVC GM-V42UG | Instructions - Page 15
on or off the Monitor. Preparation: The POWER switch on the rear must be set to "| (on)" (so that the Monitor is in standby mode). • Select the input. Preparation: "REMOTE SWITCH" should be set correctly to select your desired input (see page 27). Notes: • There is no remote control on/off switch - JVC GM-V42UG | Instructions - Page 16
Rear View 1 POWER DISPLAY 3 MUTING RM-C579 REMOTE CONTROL UNIT OFF POWER ON DISPLAY ASPECT INPUT SELECT A COMPO. /(RGB B) VIDEO B RGB A MUTING VOLUME MENU/EXIT Daily Operations 1 Turn on the main power. Set POWER on the back of the Monitor to "| (on)". The POWER lamp on the upper - JVC GM-V42UG | Instructions - Page 17
Changing the Aspect Ratio RM-C579 REMOTE CONTROL UNIT OFF POWER ON DISPLAY ASPECT INPUT SELECT A COMPO. /(RGB B) VIDEO B RGB A MUTING VOLUME ASPECT With this Monitor, you can select among three types of wide screens (FULL, ZOOM, and PANORAMIC) in addition to the REGULAR screen of - JVC GM-V42UG | Instructions - Page 18
the buttons either on the remote control or on Monitor for menu operations. • Refer also to "Menu Classifications" on pages 34 and 36. Adjusting the Picture Quality Picture quality can be set for each input mode. 1 Press MENU/EXIT (or MENU on the Monitor) to display the Main Menu. Cursor (3) MAIN - JVC GM-V42UG | Instructions - Page 19
alternately to adjust to the appropriate size. 1 Press MENU/EXIT (or MENU on the Monitor) to display the Main Menu. Cursor (3) MAIN MENU PICTURE ADJ. SIZE/POSITION ADJ. FUNCTION SELECT STATUS DISPLAY ENTER: SELECT: EXIT: MENU 2 Press 5/∞ to move the cursor (3) to "SIZE/POSITION ADJ." * Appearing - JVC GM-V42UG | Instructions - Page 20
) MENU INPUT POWER MENU INPUT POWER 5 2 / 3 5 / MENU RM-C579 REMOTE CONTROL UNIT OFF POWER ON DISPLAY ASPECT INPUT SELECT the adjustments. To cancel the reset, press MENU/EXIT (or MENU on the Monitor). Note: • Adjustment values for both horizontal and vertical sizes of the screen are - JVC GM-V42UG | Instructions - Page 21
" settings of the color temperature. 1 On the remote control: Press MENU/EXIT while holding VOLUME - to display the Setup Menu. On the Monitor: Press MENU while holding 2 to display the Setup Menu. Cursor (3) SET-UP MENU STATUS DISPLAY CONTROL LOCK REMOTE SWITCH HD SIGNAL MODE WHITE BALANCE TIMER - JVC GM-V42UG | Instructions - Page 22
key. "NO" then MENU key. 3 Press 3 again to reset the adjustments. To cancel the reset, press MENU/EXIT (or MENU on the Monitor). RM-C579 REMOTE CONTROL UNIT OFF POWER ON DISPLAY ASPECT INPUT SELECT A COMPO. /(RGB B) VIDEO B RGB A MUTING VOLUME 5 5 MENU/EXIT MENU/EXIT 2 / 3 5 / 20 - JVC GM-V42UG | Instructions - Page 23
aspect ratio by pressing ASPECT. (See page 15.) 1 Press MENU/EXIT (or MENU on the Monitor) to display the Main Menu. Cursor (3) MAIN MENU PICTURE ADJ. SIZE/POSITION ADJ. FUNCTION SELECT STATUS DISPLAY ENTER: SELECT: EXIT: MENU Setting the Receivable Signal Types You can set the receivable signal - JVC GM-V42UG | Instructions - Page 24
on the MENU INPUT POWER Monitor) to display the Main Menu. 2 / 3 MENU/EXIT MENU INPUT POWER Cursor (3) MAIN MENU PICTURE ADJ. SIZE/POSITION ADJ. FUNCTION SELECT STATUS DISPLAY ENTER: SELECT: EXIT: MENU 5 5 5 / MENU RM-C579 REMOTE CONTROL UNIT OFF POWER ON DISPLAY ASPECT INPUT SELECT - JVC GM-V42UG | Instructions - Page 25
is the normal setting. Change the setting to LOW when you use a long connecting cord and the picture flickers and blurs on the screen. 1 Press MENU/EXIT (or MENU on the Monitor) to display the Main Menu. Resetting the Function Selection Menu Settings You can reset all the Function Selection Menu - JVC GM-V42UG | Instructions - Page 26
can be done by using the buttons on the Monitor. You can also show these information by pressing DISPLAY on the remote control. (See page 14.) 1 Press MENU (or MENU/EXIT on the remote control) to display the Main Menu. Cursor (3) MAIN MENU PICTURE ADJ. SIZE/POSITION ADJ. FUNCTION SELECT STATUS - JVC GM-V42UG | Instructions - Page 27
confirm the hours of use and the model name on the Setup Menu. This may be necessary when you ask for any service. 1 On the remote control: Press MENU/EXIT while holding VOLUME - to display the Setup Menu. On the Monitor: Press MENU while holding 2 to display the Setup Menu. Showing the On-screen - JVC GM-V42UG | Instructions - Page 28
Functions (Continued) 2 / 3 VOLUME - MENU/EXIT MENU INPUT POWER MENU INPUT POWER 5 / MENU RM-C579 REMOTE CONTROL UNIT OFF POWER ON DISPLAY ASPECT INPUT SELECT A COMPO. /(RGB B) VIDEO B RGB A MUTING VOLUME Prohibiting the Monitor's Button Operations This function allows you to - JVC GM-V42UG | Instructions - Page 29
show any picture though you select the COMPONENT input (see page 22). 1 On the remote control: Press MENU/EXIT while holding VOLUME - to display the Setup Menu. On the Monitor: Press MENU while holding 2 to display the Setup Menu. Cursor (3) SET-UP MENU STATUS DISPLAY CONTROL LOCK REMOTE SWITCH HD - JVC GM-V42UG | Instructions - Page 30
- MENU/EXIT 5 5 MENU INPUT POWER MENU INPUT POWER 5 / MENU RM-C579 REMOTE CONTROL UNIT OFF POWER ON DISPLAY ASPECT INPUT SELECT A COMPO. /(RGB B) VIDEO B RGB A MUTING VOLUME MENU/EXIT 2 / 3 5 / Setting the Clock and the Power On/Off Timer You can turn the Monitor on and off - JVC GM-V42UG | Instructions - Page 31
shift the position (pixels) of the displayed picture on the screen so that you can avoid the screen from being burned in. 1 On the remote control: Press MENU/EXIT while holding VOLUME - to display the Setup Menu. On the Monitor: Press MENU while holding 2 to display the Setup Menu. Cursor (3) SET - JVC GM-V42UG | Instructions - Page 32
being burned in with the still picture. You can activate/deactivate the function with the ColorReverse On/Off Timer. 1 On the remote control: Press MENU/EXIT while holding VOLUME - to display the Setup Menu. On the Monitor: Press MENU while holding 2 to display the Setup Menu. Cursor (3) SET-UP - JVC GM-V42UG | Instructions - Page 33
2/3. Refreshing the Screen After the power is turned off, a whitish image may be left on the screen. In that case, leave the monitor in a white back state for a while, and the image will disappear. 1 On the remote control: Press MENU/EXIT while holding VOLUME - to display the Setup Menu. On the - JVC GM-V42UG | Instructions - Page 34
SELECT: EXIT: MENU 5 5 VOLUME - RM-C579 REMOTE CONTROL UNIT OFF POWER ON DISPLAY ASPECT INPUT SELECT A COMPO. /(RGB B) VIDEO B RGB Color-Reverse function manually. The Refresh timer works in the same way as mentioned above. Select "TIMER" in the menu to control the functions - JVC GM-V42UG | Instructions - Page 35
MODEL NAME : GM-V42UG ADJUST: SELECT: EXIT: MENU 3 Press 3. The confirmation screen appears. all reset Are you sure? "YES" then key. "NO" then MENU key. To cancel the reset, press MENU/EXIT (or MENU on the Monitor). 4 Press 3 again to reset all the Menu settings and adjustments. The power - JVC GM-V42UG | Instructions - Page 36
Menu Classifications Main Menu Main Menu MAIN MENU PICTURE ADJ. SIZE/POSITION ADJ. FUNCTION SELECT STATUS DISPLAY ENTER: SELECT: EXIT: MENU Picture Adjustment Menu VIDEO A PICTURE ADJ. CONTRAST BRIGHT CHROMA PHASE SHARPNESS sub menu reset : +01 : 00 : -02 : 00 : 00 ADJUST: SELECT: EXIT: MENU - JVC GM-V42UG | Instructions - Page 37
menu reset Adjusts the contrast of the picture. Adjusts the brightness of the picture. Adjusts the color density of the picture. Adjusts the color phase. Adjusts the outlines of the picture. Displays the fine adjustment bar. Resets the Picture Adjustment Menu settings to defaults. SIZE/POSITION - JVC GM-V42UG | Instructions - Page 38
Classifications (Continued) Setup Menu SET-UP MENU STATUS DISPLAY CONTROL LOCK REMOTE SWITCH HD SIGNAL MODE WHITE BALANCE TIMER 1/2 : 2/2 PIXEL SHIFT : OFF POWER SAVE : OFF COLOR-REVERSE REFRESH reset all reset HOUR METER x100h : 123 MODEL NAME : GM-V42UG ADJUST: SELECT: EXIT: MENU - JVC GM-V42UG | Instructions - Page 39
DISPLAY CONTROL LOCK REMOTE SWITCH HD SIGNAL MODE WHITE BALANCE TIMER PIXEL SHIFT POWER SAVE COLOR-REVERSE REFRESH reset all reset HOUR METER MODEL (See page 26.) Set the selectable input terminals when controlling the Monitor with the external control unit (See page 27.) Select the High-Definition ( - JVC GM-V42UG | Instructions - Page 40
on the POWER switch. •Set the timer to "OFF" on the menu. •Select the correct input by pressing INPUT SELECT (VIDEO A, VIDEO B, COMPO./(RGB B) or RGB A) on the remote control (or INPUT on the Monitor). •Connect the devices correctly. The picture becomes blurred. •Are signals being supplied from - JVC GM-V42UG | Instructions - Page 41
name where you purchased the Monitor To Model Name: Plasma Display Monitor GM-V42UG/GM-V42UB The self-diagnostic lamps light or flash as listed on the following table. Please give me immediate advice or service if necessary. Self-diagnostic lamps NO. Lamp position Conditions 1 Upper & Lights - JVC GM-V42UG | Instructions - Page 42
VIDEO A, VIDEO B input COMPONENT input Audio power output Operating conditions VIDEO A Video input Video output Audio input VIDEO B Y/C input Video input Audio input COMPONENT/RGB B COMPONENT input RGB input Audio input GM-V42UG GM-V42UB Gray Silver Type 42 wide format 16:9 (Wide format) 852 - JVC GM-V42UG | Instructions - Page 43
*1 Model name RGB A RGB input Audio input REMOTE terminals OPTION terminal AUDIO OUT terminals SPEAKER OUT (L/R) terminals GM-V42UG GM-V42UB Monitor is precision equipment and needs dedicated packing material for transportation. Never use any packing material supplied from other than JVC or JVC - JVC GM-V42UG | Instructions - Page 44
GM-V42UG/GM-V42UB PLASMA DISPLAY MONITOR Specifications (Continued) Pin assignment (Specifications for terminals) • Y/C terminal • RS-232C terminal This is a female 57.5 (2 3/8) 640 (251/4) 577 (22 3/4) 533 (21) MENU INPUT POWER 1.5 ( 1/16) Unit: mm (inch) © 2003 VICTOR COMPANY OF JAPAN,
-
 1
1 -
 2
2 -
 3
3 -
 4
4 -
 5
5 -
 6
6 -
 7
7 -
8
-
9
-
10
-
11
-
12
-
13
-
14
-
15
-
16
-
17
-
18
-
19
-
20
-
21
-
22
-
23
-
24
-
25
-
26
-
27
-
28
-
29
-
30
-
31
-
32
-
33
-
34
-
35
-
36
-
37
-
38
-
39
-
40
-
41
-
42
-
43
-
44
 |
 |

INSTRUCTIONS
GM-V42UG
GM-V42UB
For Customer Use:
Enter below the Model No. and the Serial
No. which is located on the rear panel of the
cabinet. Retain this information for future
reference.
Model No.
Serial No.
MENU INPUT
POWER
PLASMA DISPLAY MONITOR
LCT1389-001B