JVC GR D270 Instructions - Page 46
Audio Dubbing, Insert Editing
 |
View all JVC GR D270 manuals
Add to My Manuals
Save this manual to your list of manuals |
Page 46 highlights
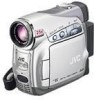
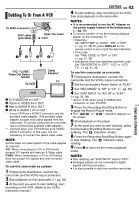
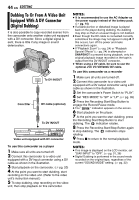
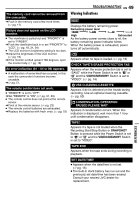
46 EN EDITING Audio Dubbing The audio track can be customised only when recorded in the 12-BIT and SP modes. (੬ pg. 32) ● Use the provided remote control. Microphone Connector ● While an optional microphone is connected, the built-in microphone is disabled. ● To perform Audio Dubbing with a video unit connected to the camcorder's S/AV connector, first set "S/AV INPUT" to "A/V IN" or "S IN" in VIDEO Menu. (੬ pg. 31, 36) The "AUX" indication appears instead of "MIC". Insert Editing Speaker REW INSERT START/ STOP PAUSE PLAY STOP A.DUB Stereo Microphone 1 Play back the tape to locate the point where editing will start, then press PAUSE (9). 2 While holding A. DUB (D) on the remote control, press PAUSE (9). The "9D" and "MIC" indicators appear. 3 Press PLAY (U), then begin "narrating". Speak into the microphone. ● To pause dubbing, press PAUSE (9). 4 To end Audio Dubbing, press PAUSE (9), then STOP (8). To hear the dubbed sound during playback Set "NARRATION" to "ON" or "MIX". (੬ pg. 31, 35) NOTES: ● Sound is not heard from the speaker during Audio Dubbing. ● When editing onto a tape that was recorded at 12-BIT, the old and new soundtracks are recorded separately. ● If you dub onto a blank space on the tape, the sound may be disrupted. Make sure you only edit recorded areas. ● If feedback or howling occurs during TV playback, move the camcorder's microphone away from the TV, or turn down the TV's volume. ● If you change from 12-BIT to 16-BIT in midrecording and then use the tape for Audio Dubbing, it is not effective from the point where 16-BIT recording began. ● During Audio Dubbing, when the tape moves to scenes recorded in the LP mode, scenes recorded in 16-BIT audio or a blank portion, Audio Dubbing stops. ● Audio dubbing is also possible using an optional microphone connected to the MIC connector. You can record a new scene into a previously recorded tape, replacing a section of the original recording with minimal picture distortion at the in and outpoints. The original audio remains unchanged. ● Use the provided remote control. NOTES: ● Before performing the following steps, make sure that "TIME CODE" for "CAMERA DISPLAY" and "VIDEO DISPLAY" is set to "ON". (੬ pg. 31, 34, 36) ● Insert Editing is not possible on a tape recorded in the LP mode or on a blank portion of a tape. 1 Play back the tape, locate the Edit-Out point and press PAUSE (9). Confirm the time code at this point. (੬ pg. 19) 2 Press REW (3) until the Edit-In point is located, then press PAUSE (9). 3 Press and hold INSERT (I) on the remote control, then press PAUSE (9). The "9I" indicator and the Time Code (min.:sec.) appear and the camcorder enters Insert-Pause mode. 4 Press START/STOP to begin editing. ● Confirm the insert at the time code you checked in step 1. ● To pause editing, press START/STOP. Press it again to resume editing. 5 To end Insert Editing, press START/STOP, then STOP (8). NOTES: ● Program AE with special effects (੬ pg. 42) can be used to spice up the scenes being edited during Insert Editing. ● During Insert Editing, the date and time information changes. ● If you perform Insert Editing onto a blank space on the tape, the audio and video may be disrupted. Make sure you only edit recorded areas. ● During Insert Editing, when the tape moves to scenes recorded in the LP mode or a blank portion, Insert Editing stops. (੬ pg. 50)
-
 1
1 -
2
-
3
-
4
-
5
-
6
-
7
-
8
-
9
-
10
-
11
-
12
-
13
-
14
-
15
-
16
-
17
-
18
-
19
-
20
-
21
-
22
-
23
-
24
-
25
-
26
-
27
-
28
-
29
-
30
-
31
-
32
-
33
-
34
-
35
-
36
-
37
-
38
-
39
-
40
-
 41
41 -
 42
42 -
 43
43 -
 44
44 -
 45
45 -
 46
46 -
 47
47 -
 48
48 -
 49
49 -
 50
50 -
 51
51 -
52
-
53
-
54
-
55
-
56
 |
 |