JVC GR-D295U Instructions - Page 25
D.S.C. RECORDING, Basic Shooting (D.S.C. Snapshot), Interval Shooting - video camera
 |
UPC - 046838020049
View all JVC GR-D295U manuals
Add to My Manuals
Save this manual to your list of manuals |
Page 25 highlights
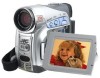
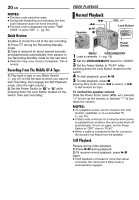
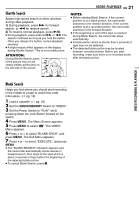
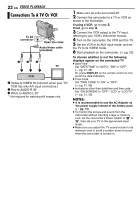
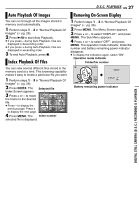
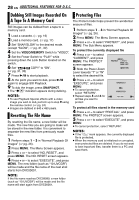
Basic Shooting (D.S.C. Snapshot) You can use your camcorder as a Digital Still Camera for taking snapshots. Still images are stored in the memory card. NOTE: Before continuing, perform the procedures listed below: ● Power (੬ pg. 13) ● Loading a Memory Card (੬ pg. 17) SNAPSHOT Power Switch VIDEO/ MEMORY Lock Button 1 Remove the lens cap. 2 Open the LCD monitor fully. (੬ pg. 18) 3 Set the VIDEO/MEMORY Switch to "MEMORY". 4 Set the Power Switch to "A" or "M" while pressing down the Lock Button located on the switch. ● To change the Image Size and/or Picture Quality, ੬ pg. 31, 34. 5 Press SNAPSHOT. The "O" indication appears while the snapshot is being taken. ● Still images are recorded in the snapshot mode with no frame. ● To delete unwanted still images, refer to "Deleting Files" (੬ pg. 29). ● When you do not want to hear the shutter sound, set "BEEP" to "OFF". (੬ pg. 31, 33) NOTE: If shooting is not performed for approx. 5 minutes when the Power Switch is set to "A" or "M" and power is supplied from the battery pack, the camcorder shuts off automatically to save power. To perform shooting again, push back and pull out the viewfinder again or close and re-open the LCD monitor. D.S.C. RECORDING EN 25 Approximate Number of Storable Images ● The number increases or decreases depending on the Picture Quality/Image Size, etc. Image Size/Picture Quality 640 x 480/FINE 640 x 480/STANDARD 1024 x 768/FINE 1024 x 768/STANDARD SD Memory Card 8 MB 16 MB 32 MB 64 MB 47 95 205 425 160 295 625 1285 21 47 95 200 65 145 310 640 Image Size/Picture Quality 640 x 480/FINE 640 x 480/STANDARD 1024 x 768/FINE 1024 x 768/STANDARD MultiMediaCard 8 MB 16 MB 32 MB 55 105 215 190 320 645 25 50 100 75 160 320 Interval Shooting During Interval Shooting mode, the camcorder continues to take snapshots automatically with an interval of your desired setting. 1 Set "INT.SHOT" to "ON". (੬ pg. 31, 35) ● "INTERVAL" and " " appear. 2 Set "INT.TIME" to the desired shooting interval. (੬ pg. 31, 35) 3 Set the Power Switch to "A" or "M" while pressing down the Lock Button located on the switch. 4 Press SNAPSHOT. ● First shot is taken after 2 seconds. ● The "O" indicator appears while the snapshot is being taken. ● The clock icon " " turns while waiting for the next shot is being taken. ● The next shot is being taken automatically when the shooting interval set in step 2 has passed. 5 Press SNAPSHOT to stop Interval Shooting. DIGITAL STILL CAMERA (D.S.C.) RECORDING & PLAYBACK CONTINUED ON NEXT PAGE
-
 1
1 -
2
-
3
-
4
-
5
-
6
-
7
-
8
-
9
-
10
-
11
-
12
-
13
-
14
-
15
-
16
-
17
-
18
-
19
-
 20
20 -
 21
21 -
 22
22 -
 23
23 -
 24
24 -
 25
25 -
 26
26 -
 27
27 -
 28
28 -
 29
29 -
 30
30 -
31
-
32
-
33
-
34
-
35
-
36
-
37
-
38
-
39
-
40
-
41
-
42
-
43
-
44
-
45
-
46
-
47
-
48
-
49
-
50
-
51
-
52
-
53
-
54
-
55
-
56
 |
 |