JVC GR-D295U Instructions - Page 28
ADDITIONAL FEATURES FOR D.S.C., Dubbing Still Images Recorded On A Tape To A Memory Card - to pc
 |
UPC - 046838020049
View all JVC GR-D295U manuals
Add to My Manuals
Save this manual to your list of manuals |
Page 28 highlights
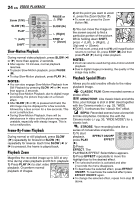
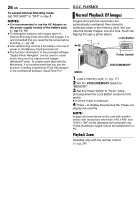
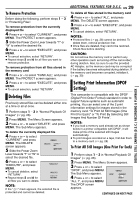
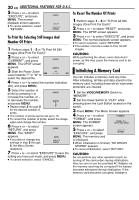
28 EN ADDITIONAL FEATURES FOR D.S.C. Dubbing Still Images Recorded On A Tape To A Memory Card Still images can be dubbed from a tape to a memory card. 1 Load a cassette. (੬ pg. 16) 2 Load a memory card. (੬ pg. 17) 3 Set "SNAP/SLOW" to the desired mode. (except "SLOW", ੬ pg. 31, 32) 4 Set the VIDEO/MEMORY Switch to "VIDEO". 5 Set the Power Switch to "PLAY" while pressing down the Lock Button located on the switch. 6 Set " COPY" to "ON". (੬ pg. 31, 35) 7 Press 4/9 to start playback. 8 At the point you want to dub, press 4/9 again to engage Still Playback. 9 To dub the image, press SNAPSHOT. ● The " " indication appears during dubbing. NOTES: ● To use Playback Special effects with a video image you wish to dub, perform up to step 9 using the remote control. (੬ pg. 24) ● Images are dubbed in 640 x 480 pixels. Resetting The File Name By resetting the file name, a new folder will be made. The new files you are going to make will be stored in the new folder. It is convenient to separate the new files from previously made files. 1 Perform steps 1 - 3 in "Normal Playback Of Images" (੬ pg. 26). 2 Press MENU. The Menu Screen appears. 3 Press + or - to select "NO. RESET", and press MENU. The NO. RESET screen appears. 4 Press + or - to select "EXECUTE", and press MENU. The new folder (such as "101JVCGR") will be made and the file name of the next shot starts from DVC00001. NOTE: If the file name reaches DVC09999, a new folder (such as "101JVCGR") will be made and the file name will start again from DVC00001. Protecting Files The Protect mode helps prevent the accidental erasure of files. 1 Perform steps 1 - 3 in "Normal Playback Of Images" (੬ pg. 26). 2 Press MENU. The Menu Screen appears. 3 Press + or - to select "PROTECT", and press MENU. The Sub Menu appears. To protect the currently displayed file 4 Press + or - to select "CURRENT", and press MENU. The PROTECT screen appears. MENU PROTECT CURRENT PROT . AL L CANC . ALL 5 Slide the Power Zoom RETURN Lever towards "T" or "W" to select the desired file. 6 Press + or - to select "EXECUTE", and press PROT EC T MENU. ● To cancel protection, select "RETURN". PROT EC T ED ● Repeat steps 5 and 6 for W RETURN T all files you want to protect. To protect all files stored in the memory card 4 Press + or - to select "PROT.ALL", and press MENU. The PROTECT screen appears. 5 Press + or - to select "EXECUTE", and press MENU. ● To cancel protection, select "RETURN". NOTES: ● If the " " mark appears, the currently displayed file is protected. ● When the memory card is initialized or corrupted, even protected files are deleted. If you do not want to lose important files, transfer them to a PC and save them.
-
 1
1 -
2
-
3
-
4
-
5
-
6
-
7
-
8
-
9
-
10
-
11
-
12
-
13
-
14
-
15
-
16
-
17
-
18
-
19
-
20
-
21
-
22
-
 23
23 -
 24
24 -
 25
25 -
 26
26 -
 27
27 -
 28
28 -
 29
29 -
 30
30 -
 31
31 -
 32
32 -
 33
33 -
34
-
35
-
36
-
37
-
38
-
39
-
40
-
41
-
42
-
43
-
44
-
45
-
46
-
47
-
48
-
49
-
50
-
51
-
52
-
53
-
54
-
55
-
56
 |
 |