JVC GR-D33 Instruction Manual
JVC GR-D33 - MiniDV Camcorder With 16x Optical Zoom Manual
 |
UPC - 074101484793
View all JVC GR-D33 manuals
Add to My Manuals
Save this manual to your list of manuals |
JVC GR-D33 manual content summary:
- JVC GR-D33 | Instruction Manual - Page 1
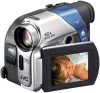
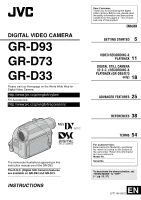
DIGITAL VIDEO CAMERA GR-D93 GR-D73 GR-D33 Please visit our Homepage on the World Wide Web for Digital Video Camera: http://www.jvc.co.jp/english/cyber/ For Accessories: http://www.jvc.co.jp/english/accessory/ The camcorder illustrations appearing in this instruction manual are of the GR-D93. The - JVC GR-D33 | Instruction Manual - Page 2
servicing) instructions JVC BN-V408U/V416U/V428U battery packs and, to recharge them or supply power to the camcorder from an AC outlet, use the provided multi-voltage AC Adapter. (An appropriate conversion adapter lens camcorder. CAUTION! Connecting cables (Audio/Video, S-Video, etc.) to the camcorder - JVC GR-D33 | Instruction Manual - Page 3
scene... ...make sure you only use cassettes with the Mini DV mark . ...make sure you only use memory cards* with the mark or . ...remember that this camcorder is not compatible with other digital video formats. ...remember that this camcorder is intended for private consumer use only. Any - JVC GR-D33 | Instruction Manual - Page 4
To Or From A VCR 34 Dubbing To A Video Unit Equipped With A DV Connector (Digital Dubbing 35 Connection To A Personal Computer 36 Audio Dubbing (GR-D93/73 only 37 Insert Editing (GR-D93/73 only 37 REFERENCES 38 ADDITIONAL INFORMATION 38 TROUBLESHOOTING 40 CAUTIONS 45 USER MAINTENANCE 48 - JVC GR-D33 | Instruction Manual - Page 5
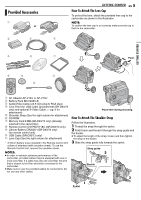
confirm the lens cap is on correctly make sure the cap is flush to the camcorder. GETTING STARTED Push. 6 9 0 2 4 3 w 5 e T W a AC Adapter AP-V14U or AP-V15U b Battery Pack BN-V408U-B c Audio/Video Cable (ø3.5 mini-plug to RCA plug) d Core Filter (for USB Cable (provided with GR-D93/73 - JVC GR-D33 | Instruction Manual - Page 6
connector Mark Battery pack mount Arrow Battery pack BATT.RELEASE AC Adapter Wind once. 3 Close the core filter until it clicks shut. To AC outlet NOTES: ● Take care not to damage the cable. ● When connecting a cable, attach the end with the core filter to the camcorder. This camcorder's 2-way - JVC GR-D33 | Instruction Manual - Page 7
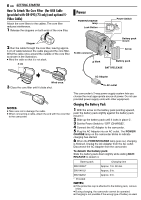
. ● GR-D93 Battery pack LCD battery packs to cover 3 times the planned shooting time. ATTENTION: Before detaching the power source, make sure that the camcorder's power is turned off. Failure to do so can result in a camcorder malfunction. Using AC Power Connect the AC Adapter to the camcorder - JVC GR-D33 | Instruction Manual - Page 8
VIDEO/ MEMORY Switch (GR-D93/73 only). Power Switch Position A (Full Auto Recording): Allows you to record using NO special effects or manual "Month" is highlighted. 6 Rotate the MMENU/VOL. CAMERA DISPLAY Wheel to input the month, and press it not highlighted, the camcorder's internal clock - JVC GR-D33 | Instruction Manual - Page 9
Pull out the viewfinder fully and adjust it manually for best viewability. 3 Turn the Diopter the MMENU/VOL. Wheel to select "n", and press it. The CAMERA DISPLAY Menu appears. 5 Rotate the MMENU/VOL. BRIGHT Wheel Mounting To attach the camcorder to a tripod, align the direction stud and screw to - JVC GR-D33 | Instruction Manual - Page 10
(GR-D93/73 only) The provided memory card is already inserted in the camcorder at the time of purchase. Card Cover (MEMORY CARD) PUSH HERE Memory card Cassette holder Make sure the window force. Replace the battery pack with a fully charged one or use AC power before continuing. - JVC GR-D33 | Instruction Manual - Page 11
EN 11 1 Remove the lens cap. 2 Open the LCD monitor fully. (੬ pg. 12) 3 Set the VIDEO/MEMORY Switch to "VIDEO". (GR-D93/73 only) 4 Set the Power Switch to "A" or "M" while pressing down the Lock Button located on the switch. ● The POWER/CHARGE lamp lights and the camcorder enters the Record-Standby - JVC GR-D33 | Instruction Manual - Page 12
m" means the camcorder is calculating the Digital zoom cannot be used when the VIDEO/MEMORY Switch is set to "MEMORY". (GR-D93/73 only) ● Macro shooting (as close as approx. 5 cm (2") to the subject) is possible when the Power Zoom Lever is set all the way to "W". Also see "TELE MACRO" in MANUAL - JVC GR-D33 | Instruction Manual - Page 13
to 180° so that it faces forward, then point the lens toward yourself and start recording. VIDEO RECORDING EN 13 Recording From The Middle Of A Tape 1) code starts counting up again from "00:00:00". This means the camcorder may record the same time codes as those existing in a previously recorded - JVC GR-D33 | Instruction Manual - Page 14
the volume. NOTES: ● The playback picture can be viewed in the LCD monitor, VIDEO". (GR-D93/73 only) 3 Set the Power Switch to "PLAY" while pressing down the Lock Button located on the switch. 4 During Stop mode, press BLANK SEARCH. ● The "BLANK SEARCH" indication appears and the camcorder - JVC GR-D33 | Instruction Manual - Page 15
operation when the remote sensor is directly exposed to sunlight or powerful lighting. VIDEO PLAYBACK EN 15 Buttons And Functions T W A Infrared beam transmitting window The following buttons are available only when the camcorder's Power Switch is set to "PLAY". B AUDIO Button pg. 25, 28) C PAUSE - JVC GR-D33 | Instruction Manual - Page 16
than approx. 2 seconds. ● During Slow-Motion Playback, due to digital image processing, the picture may take on a mosaic effect. ● After SLOW (YI or up to 44X (70X for GR-D93) at any time during video playback and D.S.C. playback. 1) Press PLAY (U) to start video playback. Or perform normal playback - JVC GR-D33 | Instruction Manual - Page 17
pg. 25, 28) NOTES: ● It is recommended to use the AC Adapter as the power supply instead of the battery pack. (੬ pg. 7) ● To monitor the picture and sound from the camcorder without inserting a tape or memory card*, set the camcorder's Power Switch to "A" or "M", then set your TV to the appropriate - JVC GR-D33 | Instruction Manual - Page 18
a Digital Still Camera for taking snapshots. Still images are stored in the memory card. NOTE: Before continuing, perform the procedures listed below: ● Power (੬ pg. 6) ● Loading A Memory Card (੬ pg. 10) SNAPSHOT Monitor Opening Button Power Switch Lock Button VIDEO/MEMORY 1 Remove the lens cap - JVC GR-D33 | Instruction Manual - Page 19
with it. ● To use Playback Special effects with a video image you wish to dub, perform up to step 8 using the remote control (provided). (੬ pg. 16) ● Images are dubbed in 640 x 480 pixels. D.S.C. RECORDING (GR-D93/D73 only) EN 19 DIGITAL STILL CAMERA (D.S.C.) RECORDING & PLAYBACK (GR-D93/D73 only) - JVC GR-D33 | Instruction Manual - Page 20
Playback Of Files 5 4/9 1 Load a memory card. (੬ pg. 10) 2 Set the VIDEO/MEMORY Switch to "MEMORY". 3 Set the Power Switch to "PLAY" while pressing down the Lock * GR-D93 only ● Images shot with devices (such as JVC GR-DVM70) that are not compatible with DCF cannot be viewed with this camcorder; " - JVC GR-D33 | Instruction Manual - Page 21
made SIZE: Image size QUALITY: Picture quality FOLDER : 1 0 battery indicator ( ) disappear. ● To display the indicators again, select "ON". Operation mode indicator Folder/file number 100-0013 MENU D I SPLAY OFF ON RETURN Battery indicator DIGITAL STILL CAMERA (D.S.C.) RECORDING & PLAYBACK (GR - JVC GR-D33 | Instruction Manual - Page 22
22 EN ADDITIONAL FEATURES FOR D.S.C. (GR-D93/D73 only) Protecting Files The Protect mode helps prevent the accidental erasure of files. 1 Load a memory card. (੬ pg. 10) 2 Set the VIDEO/MEMORY Switch to "MEMORY". 3 Set the Power Switch to "PLAY" while pressing down the Lock Button located on - JVC GR-D33 | Instruction Manual - Page 23
sure to use the provided AC Adapter, as the memory card may be corrupted if the battery becomes exhausted during deletion. If the memory card becomes corrupted, initialize it. (੬ pg. 24) Setting Print Information (DPOF Setting) This camcorder is compatible with the DPOF (Digital Print Order Format - JVC GR-D33 | Instruction Manual - Page 24
FEATURES FOR D.S.C. (GR-D93/D73 only) file names which are in use. Even if you delete an image or video clip file with a number in the middle of range, the number will camcorder) during initialization. Also, be sure to use the provided AC Adapter, as the memory card may be corrupted if the battery - JVC GR-D33 | Instruction Manual - Page 25
-to-use, onscreen menu system that simplifies many of the more detailed camcorder settings. (੬ pg. 26 - 28) MMENU/VOL. Power Switch Lock Menus m CAMERA (੬ pg. 26) q MANUAL (੬ pg. 26) s SYSTEM (੬ pg. 27) n CAMERA DISPLAY (੬ pg. 27) o DSC (GR-D93/73 only) (੬ pg. 27) t VIDEO (੬ pg. 28) n VIDEO DISPLAY - JVC GR-D33 | Instruction Manual - Page 26
Editing (੬ pg. 37) are possible on tapes recorded in the SP mode. (GR-D93/73 only) ● If the recording mode is switched, the playback picture will be blurred at the switching point. ● It is recommended that tapes recorded in the LP mode on this camcorder TV's instruction manual. During playback - JVC GR-D33 | Instruction Manual - Page 27
this mode, refer to your wide-screen TV's instruction manual. During playback/recording on 4:3 TVs/LCD monitor/viewfinder, the image is elongated vertically. * Available only when the VIDEO/MEMORY Switch is set to "VIDEO". (GR-D93/73 only) WIND CUT [OFF]: Disengages the function. ON : Helps cut down - JVC GR-D33 | Instruction Manual - Page 28
CAMERA Menu is also applicable to memory card recording. Playback Menus VIDEO [ ] = Factory-preset SOUND MODE and NARRATION During tape playback, the camcorder and output in stereo on both "L" and "R" channels. NOTES: ● For GR-D93/73 Owners: You can also use AUDIO button on the provided remote - JVC GR-D33 | Instruction Manual - Page 29
Light can be used to brighten the subject in the dark place during video recording or D.S.C. shooting. 1 Press LIGHT repeatedly to change the setting. GAIN UP" in CAMERA Menu. (੬ pg. 26) • "DIS" in MANUAL Menu. (੬ pg. 26) ● During Night-Alive, it may be difficult to bring the camcorder into focus. To - JVC GR-D33 | Instruction Manual - Page 30
to the next. Wipe or Fader works when video recording is started or stopped. 1 Set the VIDEO/MEMORY Switch to "VIDEO". (GR-D93/73 only) 2 Set the Power wipe out from lower left to upper right, leaving a black screen. WIPE-WINDOW: The scene starts in the center of a black screen and wipes in toward - JVC GR-D33 | Instruction Manual - Page 31
picture camcorder automatically adjusts the focus from approx. 10 m (32 ft) to infinity. From less than 10 m, adjust the focus manually VIDEO/MEMORY Switch is set to "VIDEO". (GR-D93/73 only) Snapshot (For Video a cable is lens is smeared or blurred, accurate focusing is not possible. Keep the lens - JVC GR-D33 | Instruction Manual - Page 32
twice or set the Power Switch to "A". If FOCUS is pressed once, the camcorder will enter the focus adjustment mode again. Manual focus indicator NOTES: ● Be sure to focus the lens in the maximum telephoto position when you use the Manual Focus mode. If you focus in on a subject in the wide-angle - JVC GR-D33 | Instruction Manual - Page 33
advanced camcorder operators control this function manually to video light or similar type of lighting is used. [ ] = Factory-preset Manual White Balance Adjustment Adjust the white balance manually balance manually, the setting is retained even if the power is turned off or the battery removed. - JVC GR-D33 | Instruction Manual - Page 34
's Record- Pause mode and press 4/9 on the camcorder. 11 Repeat steps 8 - 10 for additional editing. Stop the VCR and camcorder. NOTES: ● It is recommended to use the AC Adapter as the power supply instead of the battery pack. (੬ pg. 7) ● As the camcorder starts to play your footage, it will appear - JVC GR-D33 | Instruction Manual - Page 35
. Since a digital signal is sent, there is little if any image or sound deterioration. To DV IN/OUT Core filter DV cable (optional) To DV IN/OUT Video unit equipped with DV connector EDITING EN 35 NOTES: ● It is recommended to use the AC Adapter as the power supply instead of the battery pack - JVC GR-D33 | Instruction Manual - Page 36
software and drivers. ● The software operation manual is provided as PDF file on the CD-ROM. ● It is recommended to use the AC Adapter as the power supply instead of the battery pack. (੬ pg. 7) ● Never connect the USB cable and the DV cable simultaneously to the camcorder. Connect only the cable - JVC GR-D33 | Instruction Manual - Page 37
(GR-D93/73 only) Insert Editing (GR- camcorder's AV connector, first set "S/AV INPUT" to "ON" in VIDEO Menu. (੬ pg. 25, 28) The "AUX" indication appears instead of "MIC". You can record a new scene into a previously recorded tape, replacing a section of the original recording with minimal picture - JVC GR-D33 | Instruction Manual - Page 38
AC Adapter from the camcorder. • Unplug the AC Adapter from the AC outlet. • Detach the battery from the camcorder. ● Using the optional AA-V40U AC Power Adapter/Charger . See "Recording From The Middle Of A Tape" (੬ pg. 13). VIDEO RECORDING (pg. 11) ● When you use the LCD monitor outdoors in direct - JVC GR-D33 | Instruction Manual - Page 39
RECORDING (GR-D93/D73 only) (pg. 18) ● Clean the video heads using an optional dry cleaning cassette when: • No picture during playback. • Blocks of noise appear during playback. For details, ੬ pg. 46. ● If Stop mode continues for 5 minutes when power is supplied from a battery, the camcorder shuts - JVC GR-D33 | Instruction Manual - Page 40
to indicate for charging if the battery pack is attached to the camcorder and its power is supplied from the AC Adapter. HPush back and pull out the viewfinder again or close and re-open the LCD monitor to return to the Record-Standby mode. Video and D.S.C. Recording Recording cannot be performed - JVC GR-D33 | Instruction Manual - Page 41
The date/time is not set. HSet the date/time. (੬ pg. 8) ● The built-in clock battery has run out and the previously set date/time has been erased. HConsult your nearest JVC dealer for replacement. There is no picture. ● The camcorder is not getting power, or some other malfunction exists. HTurn the - JVC GR-D33 | Instruction Manual - Page 42
. The cassette will not load properly. ● The battery's charge is low. HInstall a fully charged battery. (੬ pg. 6, 7) The memory card cannot be removed from the camcorder. - (GR-D93/73 only) - HPush in the memory card a few more times. (੬ pg. 10) Picture does not appear on the LCD monitor. ● The - JVC GR-D33 | Instruction Manual - Page 43
not set. (੬ pg. 8) ● Appears when the built-in clock (lithium) battery is discharged and the previously set date/time is erased. (੬ pg. 8) LENS CAP Appears for 5 seconds after power is turned on if the lens cap is attached. A. DUB ERROR! - (GR-D93/73 only) - Appears if Audio Dubbing is attempted on - JVC GR-D33 | Instruction Manual - Page 44
a file that is not compatible with DCF or a file with a size that is not compatible with this camcorder. CHECK CARD'S WRITE PROTECTION SWITCH - (GR-D93/73 only) - Appears when you attempt to shoot digital still images when the write protection tab on the SD Memory Card is set to the "LOCK" position - JVC GR-D33 | Instruction Manual - Page 45
C73 series type use an AC plug adapter, called a "Siemens Plug", as shown. For this AC plug adapter, consult your nearest JVC dealer. Plug adapter Battery Packs The supplied battery pack is a lithium-ion battery. Before using the supplied battery pack or an optional battery pack, be sure to - JVC GR-D33 | Instruction Manual - Page 46
After the camcorder plays back for about 20 seconds, it stops automatically. Also refer to the cleaning cassette's instructions. If, after using the cleaning cassette, the problems still exist, consult your nearest JVC dealer. Mechanical moving parts used to move the video heads and video tape tend - JVC GR-D33 | Instruction Manual - Page 47
video tape, and can lead to internal damage to the camcorder battery pack, AC Adapter, etc.) and wait a few minutes and then re-connect it and proceed as usual from the beginning. CAUTIONS EN 47 Declaration of Conformity Model Number : GR-D93U/D73U/D33U Trade Name : JVC Responsible party : JVC - JVC GR-D33 | Instruction Manual - Page 48
48 EN USER MAINTENANCE After Use Cleaning The Camcorder 1 Turn off the camcorder. 2 Slide and hold OPEN/EJECT in ● Cleaning should be done only after the battery pack has been removed or other power units have been disconnected. ● Mould may form if the lens is left dirty. ● When using a cleaner - JVC GR-D33 | Instruction Manual - Page 49
power zoom lens (GR-D93) Filter diameter ø30.5 mm LCD monitor 2.37" diagonally measured, LCD panel/TFT active matrix system Viewfinder Electronic viewfinder with 0.24" color LCD Speaker Monaural White LED Light Effective distance: 1.5 m SPECIFICATIONS EN 49 For Digital Video Camera Format DV format - JVC GR-D33 | Instruction Manual - Page 50
50 EN INDEX - JVC GR-D33 | Instruction Manual - Page 51
31) c Power Zoom Lever [T/W] (੬ pg. 12) d Manual Focus Button [FOCUS] (੬ pg. 32) Blank Search Button Video Input**/Output Connector [S-VIDEO] (੬ pg. 17, 34) U USB (Universal Serial Bus) Connector (GR-D93/73 only) (੬ pg. 36) V Digital Video Connector [DV IN/OUT] (i.Link*) (੬ pg. 35, 36) W Audio/Video - JVC GR-D33 | Instruction Manual - Page 52
camcorder.) j Time Code (੬ pg. 27, 28) k Digital Image Stabilizer ("DIS") (੬ pg. 26) During D.S.C. Recording Only (GR-D93/73 only) 1280 15 During Both Video 9) (The level indicator g moves.) l Battery Indicator (੬ pg. 43) m Date/Time (੬ pg. 8) n Manual Focus Adjustment Indicator (੬ pg. 32) a - JVC GR-D33 | Instruction Manual - Page 53
During Video Playback 1 2 34 5 12 b i t /MI X L MIC BLANK SEARCH PUSH "STOP" BUTTON TO CANCEL D : Audio Dubbing (GR-D93/73 only) 9D : Audio Dubbing Pause (GR-D93/73 only) (Appear while a tape is running.) e Sound Input For Audio Dubbing (GR-D93/73 only) (੬ pg. 37) f Battery Indicator (੬ pg. 43 - JVC GR-D33 | Instruction Manual - Page 54
32 Memory Card 10, 45 Menu Screen CAMERA 26 CAMERA DISPLAY 27 D.S.C. Playback 21 - 24 DSC 27 MANUAL 26 SYSTEM 27, 28 VIDEO 28 VIDEO DISPLAY 28 Motor Drive Mode 31 MultiMediaCard 10, 45 N Night-Alive 29 P Picture Quality (QUALITY 27 Playback sound (SOUND MODE, NARRATION) ........ 28 - JVC GR-D33 | Instruction Manual - Page 55
Playback 16 Snapshot 18, 31 Snapshot Mode (SNAP MODE 26 Sound Mode (SOUND MODE 26, 28 Speaker Volume 14 Specifications 49 Still Playback 14 S-Video/AV input (S/AV INPUT 28, 34, 35 T Telephoto setting (TELE MACRO 26 Time Code (TIME CODE 13, 27 Tripod Mounting 9 U Unloading A Cassette 10 - JVC GR-D33 | Instruction Manual - Page 56
EN GR-D93 GR-D73 GR-D33 COPYRIGHT© 2003 VICTOR COMPANY OF JAPAN, LTD. US Printed in Malaysia 1203-FO-ID-PJ
-
 1
1 -
 2
2 -
 3
3 -
 4
4 -
 5
5 -
 6
6 -
 7
7 -
8
-
9
-
10
-
11
-
12
-
13
-
14
-
15
-
16
-
17
-
18
-
19
-
20
-
21
-
22
-
23
-
24
-
25
-
26
-
27
-
28
-
29
-
30
-
31
-
32
-
33
-
34
-
35
-
36
-
37
-
38
-
39
-
40
-
41
-
42
-
43
-
44
-
45
-
46
-
47
-
48
-
49
-
50
-
51
-
52
-
53
-
54
-
55
-
56
 |
 |
LYT1196-001C
EN
ENGLISH
GR-D93
GR-D73
GR-D33
Please visit our Homepage on the World Wide Web for
Digital Video Camera:
For Accessories:
INSTRUCTIONS
GETTING STARTED
5
VIDEO RECORDING &
PLAYBACK
11
DIGITAL STILL CAMERA
(D.S.C.) RECORDING &
PLAYBACK (GR-D93/D73
only)
18
ADVANCED FEATURES
25
REFERENCES
38
TERMS
54
For Customer Use:
Enter below the Model No. and Serial
No. which is located on the bottom of
the camcorder. Retain this information
for future reference.
Model No.
Serial No.
To deactivate the demonstration, set
“DEMO MODE” to “OFF”.
(
±
pg. 25, 27)
DIGITAL VIDEO CAMERA
Dear Customer,
Thank you for purchasing this digital
video camera. Before use, please read
the safety information and precautions
contained in the pages 2 – 3 to ensure
safe use of this product.
The camcorder illustrations appearing in this
instruction manual are of the GR-D93.
The D.S.C. (Digital Still Camera) features
are available on GR-D93 and GR-D73.