JVC GRSXM37U Instructions
JVC GRSXM37U - Compact S-VHS Camcorder Manual
 |
UPC - 046838017216
View all JVC GRSXM37U manuals
Add to My Manuals
Save this manual to your list of manuals |
JVC GRSXM37U manual content summary:
- JVC GRSXM37U | Instructions - Page 1
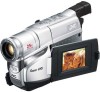
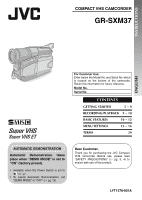
INSTRUCTIONS COMPACT VHS CAMCORDER GR-SXM37 ENGLISH For Customer Use: Enter below the Model No. and Serial No. which is located on the bottom of the camcorder. Retain this information for future reference. Model No. Serial No. CONTENTS GETTING STARTED 5 ~ 9 RECORDING/PLAYBACK 9 ~ 10 BASIC - JVC GRSXM37U | Instructions - Page 2
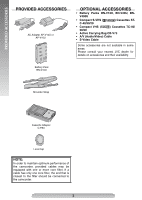
40/30/20 • Compact VHS ( ) Cassettes TC-40/ 30/20 • Active Carrying Bag CB-V75 • A/V (Audio/Video) Cable • S-Video Cable Some accessories are not available in some areas. Please consult your nearest JVC dealer for details on accessories and their availability. Battery Pack BN-V10U Shoulder - JVC GRSXM37U | Instructions - Page 3
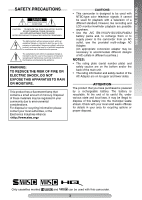
triangle is intended to alert the user to the presence of important operating and maintenance (servicing) instructions in the literature accompanying the anywhere. • Use the JVC BN-V10U/V12U/V20U/V400U battery packs and, to recharge them or to supply power to the camcorder from an AC outlet, - JVC GRSXM37U | Instructions - Page 4
apparatus during lightning storms or when unused for long periods of time. 12)Refer all servicing to qualified service personnel. Servicing is required when the apparatus has been damaged in any way, such as power-supply cord or plug is damaged, liquid has been spilled or objects have fallen into the - JVC GRSXM37U | Instructions - Page 5
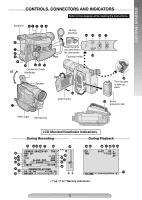
, CONNECTORS AND INDICATORS Refer to this diagram while reading the instructions. Eyepiece 5 1 2 3 4 6 7 8 5 9 45˚ ! "# $ Connector Cover Viewfinder Speaker - During shooting % & () Keep the lens cap attached to the camcorder Cassette holder ~ 180° 90° + LCD monitor , Turn the gear to - JVC GRSXM37U | Instructions - Page 6
Output Connector [A pg. 11 8 Video Output Connector [V pg. 11 9 Battery Release Switch [BATTERY RELEASE pg. 7 ! DC IN Connector pg. 7 " • Recording Start/Stop Button pg. 9 • REFRESH Button pg. 7 # Lock Button pg. 8 $ Power Switch [PLAY, OFF pg. 7, 8, 9 % POWER/CHARGE Lamp pg. 7 & • Retake - JVC GRSXM37U | Instructions - Page 7
(50) BN-V20U 160 140 (optional) (85) (80) BN-V400U (optional) 380 (210) 330 (195) Using AC Power Connect the AC Adapter to the camcorder (੬ step 2) of "Charging the Battery Pack"). • The provided AC Adapter features automatic voltage selection in the AC range from 110V to 240V. ATTENTION - JVC GRSXM37U | Instructions - Page 8
battery from the camcorder. • Using the optional AA-V15 AC Power Adapter/Charger, you can charge the BN-V10U/V12U/V20U/V400U battery pack without the camcorder cannot be stored in memory if the built-in clock battery runs out. Consult an authorised JVC dealer for replacement, or set the date/time as - JVC GRSXM37U | Instructions - Page 9
aligned vertically with the camera (do not tilt it tape. • The cassette holder cannot be opened while the camcorder is in record mode or detached from power source. + Erase protection tab RECORDING Set REC MODE, S-VHS (S-VHS ET), TAPE For VIDEO RECORDING/VIDEO PLAYBACK • The camcorder shuts off - JVC GRSXM37U | Instructions - Page 10
, the quality of image may suffer. To deactivate Digital Zoom, set "D.ZOOM" (੬pg. 14) to "OFF" in CAMERA MENU. Quick Review To check the end of the last recording. 1) Make sure the camcorder is in Record- Standby mode. 2) Press 1 ~ and release quickly. Tape is rewound for approx. 1 second and played - JVC GRSXM37U | Instructions - Page 11
Be sure to sure to use the following cable: YTU94146A S-Video cable. Consult the JVC Service Center described on the sheet included in the package for details on its availability. Make sure to connect the end with a core filter to the camcorder. The core filter reduces interference. • Be sure to lower - JVC GRSXM37U | Instructions - Page 12
camcorder when finished. Using The Cassette Adapter Use this to play back an S-VHS-C/VHS-C video cassette recorded with this camcorder on a SVHS-C/VHS To go from TOP MENU to CAMERA MENU, rotate the MENU Wheel 1 to select "3 TO CAMERA MENU" and press it. C video tape when inserting the compact - JVC GRSXM37U | Instructions - Page 13
keeps the light on as long as the camcorder is turned on. • It is recommended to set M.W.B. (੬pg. 14) to in CAMERA MENU when you use the video light. • The battery pack's charge may be low even though the battery indicator ( ) does not blink, the camcorder may turn off automatically when you turn on - JVC GRSXM37U | Instructions - Page 14
switching point. CAMERA MENU STABILIZER The Picture Stabilizer compensates for unstable images caused by camera-shake, manually, the setting is retained even if the power is turned off or the battery is removed. • White balance cannot be used when the "SEPIA" or "B/W:MONO" mode (੬pg. 13, "Digital - JVC GRSXM37U | Instructions - Page 15
when the power is turned camcorder but also on a Super VHS VCR. - Tapes recorded in S-VHS ET mode cannot be played back on some VCRs, including some JVC VCRs. • Tapes recorded in S-VHS or S-VHS ET mode cannot be played back correctly on a normal VHS VCR. • S-VHS ET does not work with S-VHS tapes - JVC GRSXM37U | Instructions - Page 16
SETTINGS VCR MENU VCR MENU C OUN T E R ME MO RY OF F C OUN T E R R E S E T Y E S 2EXI T COUNTER MEMORY Makes it easier to locate a specific tape segment. 1) Set the Power Switch $ to "PLAY" while pressing down the Lock Button #. 2) Press the MENU Wheel 1 in. The VCR MENU screen appears. 3) Rotate - JVC GRSXM37U | Instructions - Page 17
and time displays disappear. • If you remove the power source from the camcorder while the power is on, all settings and selections are erased. Make sure to turn the camcorder's power off before disconnecting the power source. The tape will not eject. • The battery pack is running low. • If the LCD - JVC GRSXM37U | Instructions - Page 18
tapes In case of connecting the unit's AC Adapter to an AC wall outlet automatically erases the previously recorded video and service life. ... fully charged and then fully discharged the battery every 6 months when storing it over a long period of time. ... remove from charger or powered - JVC GRSXM37U | Instructions - Page 19
the video tape, and can lead to internal damage to the camcorder itself. after the battery pack has been removed or other power units have JVC could void the user's authority to operate the equipment. This equipment has been tested and found to comply with the limits for a Class B digital instructions - JVC GRSXM37U | Instructions - Page 20
SPECIFICATIONS SPECIFICATIONS Camcorder General Format : S-VHS/VHS NTSC standard Power source : DC 11 V (Using AC Adapter) DC 6 V (Using battery pack) Power consumption Viewfinder on : 3.5 W LCD monitor on : 4.3 W Video light : 0.4 W Maximum : 9.2 W (When charging a battery) Signal - JVC GRSXM37U | Instructions - Page 21
de alimentación CA de la toma de corriente alterna. Desconecte el adaptador de alimentación CA de la cámara de video. Para la extracción de la batería... ... deslice BATTERY RELEASE 9 y extraiga la batería. Batería BN-V10U BN-V12U (opcional) BN-V20U (opcional) BN-V400U (opcional) Tiempo de carga - JVC GRSXM37U | Instructions - Page 22
es posible cargar la batería BN-V10U/V12U/V20U/V400U sin la cámara de video. Sin embargo, no es posible utilizarlo como un adaptador de CA. • Para mal, deje de usarla inmediatamente y consulte a su concesionario local de JVC. Colocación/Extracción de un cassette 1) Abra completamente el monitor LCD y - JVC GRSXM37U | Instructions - Page 23
utilizando el monitor LCD: Asegúrese que el monitor LCD esté completamente abierto. La cámara de video ingresa al modo de Espera de grabación y PAUSE 3 es mostrado. • El visor y el los altavoces. O simplemente reproduzca la cinta en un VCR de VHS utilizando el adaptador de cassette. ੬ pág. 12 23 - JVC GRSXM37U | Instructions - Page 24
Auto/Manual Focus pg. 10 Provided Accessories pg. 2 Auto Shut Off pg. 9 B Backlight Compensation pg. 10 Battery Pack pg. 7, 18 Brighten/Darken The Image pg. 13 Brighten/Darken The LCD Monitor.......... pg. 9, 15 C Q Quick Review pg. 10 R Recording pg. 9 Recording Format (S-VHS/ S-VHS ET
-
 1
1 -
 2
2 -
 3
3 -
 4
4 -
 5
5 -
 6
6 -
 7
7 -
8
-
9
-
10
-
11
-
12
-
13
-
14
-
15
-
16
-
17
-
18
-
19
-
20
-
21
-
22
-
23
-
24
 |
 |
ENGLISH
INSTRUCTIONS
AUTOMATIC DEMONSTRATION
Automatic
Demonstration
takes
place when “DEMO MODE” is set to
“ON” (factory-preset).
•
Available when the Power Switch is set to
“
” or “
”.
•
To cancel Automatic Demonstration, set
"DEMO MODE" to "OFF" (
±
pg. 15).
Dear Customer,
Thank you for purchasing the JVC Compact
VHS camcorder. Before use, please read
“SAFETY PRECAUTIONS” (
±
pg. 3, 4) to
ensure safe use of this product.
LYT1378-001A
COMPACT VHS CAMCORDER
GR-SXM37
CONTENTS
GETTING STARTED
5 ~ 9
RECORDING/PLAYBACK
9 ~ 10
BASIC FEATURES
10 ~ 12
MENU SETTINGS
12 ~ 16
TERMS
24
For Customer Use:
Enter below the Model No. and Serial No. which
is located on the bottom of the camcorder.
Retain this information for future reference.
Model No.
Serial No.