JVC GZ HD6 Easy Start Guide
JVC GZ HD6 - Everio Camcorder - 1080p Manual
 |
View all JVC GZ HD6 manuals
Add to My Manuals
Save this manual to your list of manuals |
JVC GZ HD6 manual content summary:
- JVC GZ HD6 | Easy Start Guide - Page 1
easy start guide is designed to navigate you to using your new Everio quickly. Please refer to the owner's manual for a detailed listing of features. For our online tutorials please visit: http://camcorder.jvc.com/tutorials.jsp SUPPLIED ACCESSORIES FOR THE CAMERA AC Adapter AP-V30U Battery Pack - JVC GZ HD6 | Easy Start Guide - Page 2
. "Installing the Provided Software" "Connecting this Unit to PC" Trouble with Uploading Videos • Check if you have created an account with YouTube™. Trouble with Using the Provided Software Everio MediaBrowser Consult the customer service center below. • Pixela User Support Center Region USA
-
 1
1 -
 2
2
 |
 |

AV
Press halfway to focus
Press fully to take still image
STILL IMAGE RECORDING
VIDEO RECORDING
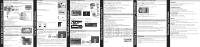
INSERTING THE microSD CARD*
Q
Close the LCD to turn Off the Power
R
Attach battery
T
Connect the AC adapter to outlet
R
Install a microSD Card
SUPPLIED ACCESSORIES FOR THE CAMERA
AVAILABLE ACCESSORIES FOR THE CAMERA
TYPES OF USABLE microSD CARDS
Memory Cards
Capacity
!
Video
(UXP)
#
Still images
(1920x1080/FINE)
microSDHC
Cards
<SD High-
capacity>
Supports
4GB to 8GB
8GB
44min.
8420
4GB
22min.
4200
microSD
Cards
Supports
256MB to 2GB
2GB
-
2100
1GB
-
1030
512MB
-
510
256MB
-
260
Note: Operations are confirmed on the following microSD cards.
Manufacturer
Panasonic, TOSHIBA, SanDisk, ATP
Video
Class 4 or higher compatible microSDHC card (4 GB to 8 GB)
Still image
microSD card (256 MB to 2 GB), microSDHC card (4 GB to 8 GB)
•
Using cards other than those specified above may result in recording failure or data
loss.
CHARGING THE BATTERY
Battery Type
Charging Time
Continuous
Recording
Actual
Recording
BN-VG114US (Supplied)
2hr.30min.
1hr.20min.
0hr.45min.
BN-VG121US
3hr.30min.
2hr.05min.
1hr.10min.
Note: The battery pack is not charged at the time of purchase
CAUTION
•
Be sure to use JVC battery packs. If you use any other battery packs besides JVC
battery packs, safety and performance cannot be guaranteed.
Product Name
Description
Battery Pack
• BN-VG114US
• BN-VG121US
• Provides a longer recording time than the battery
pack that comes with this unit or it can also be used
as a spare battery pack.
Battery Charger
• AA-VG1U
• Enables the battery pack to be charged without using
this unit.
To order any of these accessory please visit
www.JVC.com
or call 1-800-858-6442
S
Connect AC adapter into DC Terminal
Bottom
Open
RECORDING FILES
AV
Press to Start Recording.
The information below will be
displayed on the LCD during
recording.
1920
Battery Pack
Cover
Charging in progress:
Blinks
Charge finished:
Goes out
Image Size
Shutter Speed
Image Quality
Remaining Number of Shots
Focus
Recording in Progress
Recording Media
Battery Indicator
Video Quality
Remaining Recording Time
Zooming
Recording Media
Battery Indicator
:Record-Standby
:Recording in Progress
(Wide
angle)
(Telephoto)
•
Press again to Stop Recording.
Scene Counter
Lights up in green
when focused
Lights up during still
image recording
PLAYBACK VIDEOS
Q
Open the card slot cover
• Turn off the power before inserting
or removing a card
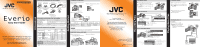
Easy Start Guide
This easy start guide is designed to navigate you to
using your new Everio quickly. Please refer to the
owner’s manual for a detailed listing of features.
For our online tutorials please visit:
AC Adapter
AP-V30U
Battery Pack
BN-VG114US
USB Cable
(Type A - Mini Type B)
AV Cable
CD-ROM
Basic User
Guide
Component Cable
(GZ-HD620)
RCU
(GZ-HD620)
Lens Cap
(GZ-HD500)
INFO
SNAP
SHOT
START
/STOP
INDEX
•
Lithium Battery
(Pre-installed in the
remote control)
Q
Open the LCD monitor to turn on the unit.
R
Press
L
button to select the playback mode.
S
Press
A
/
B
button to select the video or still
image mode.
AV
R
S
Q
Press
Press
T
Select from the index screen (highlight
thumbnails) using the Slider.
U
Touch the
C
button.
NOV.01.2010 PM04:55
VIDEO PLAYBACK
5
Select
Touch
4
110V - 240V
* SD card not included
PLAYBACK ON A TV
Preparation:
• Turn off both camera and TV.
L
To connect using the HDMI mini
connector
• When connecting to a 1080p
compatible TV, set [HDMI OUTPUT]
to [AUTO 1].
AV
HDMI Mini Connector
AC Adapter
DC Connector
HDMI Connector
HDMI Cable (optional)
(Mini to full-sized HDMI cable)
To AC Outlet
TV
Q
Open the LCD monitor to turn on the unit.
• For GZ-HD500, remove the lens cap.
R
Press
L
button to select the recording mode.
S
Press
A
/
B
button to select the video or still
image mode.
The Mode will be displayed in the LCD
AV
R
S
Q
Press
Press
JVC U.S.A.
A Division of JVC Americas Corp.
1700 Valley Road, Wayne, NJ 07470
www.jvc.com
Customer Service
TOLL FREE: 1-800-252-5722
For our online tutorials please visit:
Register your EVERIO online at:
REGISTER.JVC.COM
and receive a special offer.
0110ASR-SW-VM
C0H4
Getting Started
Recording Files
Playing Back Files
Accessories