JVC GZ-MG50US Software Guide
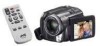
JVC GZ-MG50US - Everio Camcorder - 1.33 MP Manual
 |
UPC - 046838021800
View all JVC GZ-MG50US manuals
Add to My Manuals
Save this manual to your list of manuals |
JVC GZ-MG50US manual content summary:
- JVC GZ-MG50US | Software Guide - Page 1
ENGLISH SOFTWARE INSTALLATION AND USB CONNECTION GUIDE EN LYT1469-001B - JVC GZ-MG50US | Software Guide - Page 2
(Windows 17 Disconnecting the USB cable (Windows®) .... 17 User's Guide/Help/Readme (Windows®) ....... 18 Backing Up Video files (Windows 19 JVC SOFTWARE LICENSE AGREEMENT IMPORTANT TO CUSTOMERS: PLEASE MAKE SURE TO READ THIS CAREFULLY BEFORE INSTALLING OR USING THE SOFTWARE PROGRAM NAMED "DIGITAL - JVC GZ-MG50US | Software Guide - Page 3
applicable law. (2) You may not copy or use the Program, in whole or in part, other than as expressly specified in this Agreement. (3) You have no right to grant ALL SUCH PROBLEM AT YOUR OWN COST AND EXPENSE. 5 LIMITED LIABILITY TO THE EXTENT PERMITTED BY APPLICABLE LAW, IN NO EVENT SHALL JVC AND - JVC GZ-MG50US | Software Guide - Page 4
is a "Commercial Item" as defined in Federal Acquisition Regulation (FAR) part 2.101 (g) consisting unpublished "Commercial Computer Software" as those items are used at FAR part 12.212 and is only licensed to You with the same use rights JVC grants all commercial end users pursuant to the terms of - JVC GZ-MG50US | Software Guide - Page 5
equipment according to the operating procedures described in this manual. ● Use only the provided CD-ROM. Never use any other CD-ROM to run this software. ● Do not attempt to modify this software. ● Changes or modifications not approved by JVC could void user's authority to operate the equipment - JVC GZ-MG50US | Software Guide - Page 6
specifications or performance of the OS, other applications or drivers. CyberLink For details of CyberLink's technical support service, refer to the "Readme" of each software or the following list. To access "Readme", refer to "User's Guide/Help/Readme (Windows®)" (੬ pg. 18). Region Europe 1 Europe - JVC GZ-MG50US | Software Guide - Page 7
the PIXELA User Support Center in your region. Region North America Europe Asia Location Los Angeles U.K. Philippines Phone # +1-213-341-0163 +44-1489-564-764 +63-2-438-0090 Please check the PIXELA website for latest information and downloading. http://www.pixela.co.jp/oem/jvc/e/index.html - JVC GZ-MG50US | Software Guide - Page 8
Photo Navigator The following requirements must be satisfied to connect a camera to a PC and to use Digital Photo Navigator. OS CPU RAM Free hard disk space Connector Display Miscellaneous : Windows® 2000 Professional SP4 [2000] (pre-installed), Windows® XP Home Edition [XP] (pre- - JVC GZ-MG50US | Software Guide - Page 9
The following requirements must be satisfied to use CyberLink DVD Solution. OS CPU RAM Free hard disk space Connector Display Miscellaneous Supported media : Windows® 2000 Professional SP4 [2000] (pre-installed), Windows® XP Home Edition [XP] (pre-installed), or Windows® XP Professional [XP] (pre - JVC GZ-MG50US | Software Guide - Page 10
above is not a guarantee that the provided software will work on all personal computers meeting those . ● Other product and company names included in this instruction manual are trademarks and/or registered trademarks of their respective holders JVC Accessories" on our world web site at: http://www - JVC GZ-MG50US | Software Guide - Page 11
From the [SETUP] screen in step 2, you can install the following drivers or software. Before start installing, quit any other software you are using. (Check that there are no other application icons on the status bar.) Digital Photo Navigator 1.5 This application is used to organize still images and - JVC GZ-MG50US | Software Guide - Page 12
moment until the installation is finished and [Setup Complete] screen appears. 10 Click [Finish] then restart the PC. Install all of the desired software in the same way. To display [SETUP] screen, double-click the CDROM icon in the [My Computer] window. [Choose Destination Location] screen appears - JVC GZ-MG50US | Software Guide - Page 13
provided software: Video files captured with this camera can only be handled on the provided software. Please install and use the provided software It is recommended to use the AC Adapter as the power supply instead of the battery pack. ● When the USB cable is connected, turning on or off the camera - JVC GZ-MG50US | Software Guide - Page 14
Viewing the Contents of a Recording Medium (Windows®) 1 If you want to view the contents in the SD Memory Card, make sure that the card is set in the camera. 2 Set the camera's power switch to the playback mode while pressing down the lock button located on the switch. The camera turns on. 3 Connect - JVC GZ-MG50US | Software Guide - Page 15
recorded in the recording medium. ● Saving the wrong kinds of files in a recording medium or deleting files or folders from a recording medium can cause problems with the operation of the camera. When it is necessary to delete a file from a recording medium, delete it through the camera. Also, do - JVC GZ-MG50US | Software Guide - Page 16
in PCs. Usage of a PC that supports USB 2.0 is required. Playing Back Files on files Use the PowerDVD 5 NE. You can install this software from the provided CD-ROM. For more details of PowerDVD due to the inadequate processing speeds or other problems. To copy still images: Copy the folder within - JVC GZ-MG50US | Software Guide - Page 17
file names ● Files which are not in MPEG2 format ● Files prepared on any application other than the provided software ● Edited files which were not produced on a JVC Hard Disk Camcorder. Also, be sure to turn off the SVRT function when editing the video files using PowerDirector Express NE. (Do - JVC GZ-MG50US | Software Guide - Page 18
Help/Readme (Windows®) * The model name depends on the connected camera. This manual only refers to software installation and PC connection. For more details of each software, refer to its User's Guide/Help/Readme. 8 CyberLink DVD Solution Following steps are the example of CyberLink PowerDirector - JVC GZ-MG50US | Software Guide - Page 19
8 Digital Photo Navigator The User's Guide is included on the CD-ROM in PDF format. Right-click the CD-ROM icon in [My Computer], then click [Open]. Double-click the [Docs] folder, then double-click the [PhotoNavi] folder. Open the "Start.pdf" file and click the button of the desired language. Note - JVC GZ-MG50US | Software Guide - Page 20
5 Copy the entire [SD_VIDEO] folder. When returning folders backed up to the PC back to the camera, be sure to first erase the [SD_VIDEO] folder in the camera HDD before copying the [SD_VIDEO] folder of the PC. Playing Back Copied Video (Windows®) Creating play lists using multiple files and - JVC GZ-MG50US | Software Guide - Page 21
cannot be edited together. ● If a still image is inserted into video in 16:9 aspect ratio, the image must be squeeze processed first by using the Digital Photo Navigator. - 21 - CONTINUED ON NEXT PAGE - JVC GZ-MG50US | Software Guide - Page 22
4 Select [DVD Format] and click [Next]. ● If the video is [ULTRA FINE], [FINE], or [NORMAL], select [High Quality NTSC (or PAL) DVD]. If the video is [ECONOMY], select [Long Play NTSC (or PAL) DVD]. Encoding is not performed on unedited video, and high-speed processing is performed at the original - JVC GZ-MG50US | Software Guide - Page 23
the DVD-Video. Check that you do not exceed the recordable capacity of the DVD For more details for creating a DVDs, refer to the User's Guide of PowerDirector and PowerProducer installed on the PC. (੬ pg. 18) "PRG001" folder 2 Start PowerDirector Express NE and click [Load a media folder] of the - JVC GZ-MG50US | Software Guide - Page 24
If a still image is inserted into video in 16:9 aspect ratio, the image must be squeeze processed first by using the Digital Photo Navigator. 4 Select [Create a File (Everio Series)], and then select [Next]. (Example of transition) 5 Select the same mode as the recording mode of the editing data - JVC GZ-MG50US | Software Guide - Page 25
6 Click [Start]. This starts conversion of the edited file. The file is saved to the location displayed in the storage location. Before creating slideshows or titles on a DVD that includes video in 16:9 aspect ratio, still images must first undergo the squeeze process. 11Click [Open media files]. - JVC GZ-MG50US | Software Guide - Page 26
Load the provided CD-ROM into the PC. Double click the CD-ROM icon. 2 Double-click the [Capty MPEG Edit EX for Everio] folder in the CD-ROM. 3 Double-click the [Capty MPEG Edit EX.pkg] icon. 4 Click [Continue] when you asked to continue installing the software. Introduction screen appears. - 26 - - JVC GZ-MG50US | Software Guide - Page 27
Important Information carefully and click [Continue]. License screen appears. 9 Select the desitination volume and click [Continue]. Installation Type screen appears. 7 Read the Software License Agreement carefully and click [Continue]. 10Click [Upgrade] if you perform a basic installation of the - JVC GZ-MG50US | Software Guide - Page 28
USB cable to connect the camera to the PC. NOTES: ● It is recommended to use the AC Adapter as the power supply instead of the battery pack. ● When the USB cable is connected, turning on or off the camera causes malfunctions of the PC. ● Connect the camera directly to the PC - JVC GZ-MG50US | Software Guide - Page 29
Viewing the Contents of a Recording Medium (Macintosh) 4 Double-click the memory card icon on the desktop. The folders in the recording medium appear. 1 If you want to view the contents in the SD Memory Card, make sure that the card is set in the camera. 2 Set the camera's power switch to the - JVC GZ-MG50US | Software Guide - Page 30
recorded in the recording medium. ● Saving the wrong kinds of files in a recording medium or deleting files or folders from a recording medium can cause problems with the operation of the camera. When it is necessary to delete a file from a recording medium, delete it through the camera. Also, do - JVC GZ-MG50US | Software Guide - Page 31
manual only refers to software installation and PC connection. For more details of the software, refer to its Help/Readme. 8 Capty MPEG Edit EX 1 Open the [Capty MPEG Edit EX for Everio folder. Support information and the limit are mentioned. INFORMATION For the exclusive URL for Everio, refer to - JVC GZ-MG50US | Software Guide - Page 32
Capty MPEG Edit EX. 1 Double click the [Macintosh HD] icon. Step2 To combine two or more files, they the [Applications] folder. 3 Open the [Capty MPEG Edit EX for Everio] folder. 4 Double click the [Capty MPEG Edit EX for Everio] icon to start Capty MPEG Edit EX. * When switching from Trimming - JVC GZ-MG50US | Software Guide - Page 33
Where. 4 Click [Save] to save the file. ● Use the default audio setting of [Dolby Digital] and the bit rate. Change the bit rate according to the video quality. QUALITY ULTRA FINE FINE NORMAL ECONOMY Bit rate 384Kbps 384Kbps 256Kbps 128Kbps ● To edit the combine file, reopen the file that was - JVC GZ-MG50US | Software Guide - Page 34
File Trimming (Macintosh) Skip to Step9 if you do not edit video files. Step5 Switching to Trimming Mode. 1 Click [View] from the Capty MPEG Edit EX menu bar. 2 Click [Trimming]. * When switching from File Combination Mode to Trimming Mode, the data being edited will be lost. Step6 Opening file. 1 - JVC GZ-MG50US | Software Guide - Page 35
image quality degradation due to editing. ● Wide-screen video is supported. ● Video files in the Everio hard disk can be used without conversion. For more information, http://www.pixela.co.jp/oem/jvc/e/ NOTES: ● MPEG files edited with the [Create a File (Everio Series)] command through the Windows - JVC GZ-MG50US | Software Guide - Page 36
EN SOFTWARE INSTALLATION AND USB CONNECTION GUIDE © 2005 Victor Company of Japan, Limited Printed in Malaysia M5E3 0705FOH-AL-VP
-
 1
1 -
 2
2 -
 3
3 -
 4
4 -
 5
5 -
 6
6 -
 7
7 -
8
-
9
-
10
-
11
-
12
-
13
-
14
-
15
-
16
-
17
-
18
-
19
-
20
-
21
-
22
-
23
-
24
-
25
-
26
-
27
-
28
-
29
-
30
-
31
-
32
-
33
-
34
-
35
-
36
 |
 |

SOFTWARE INSTALLATION AND
USB CONNECTION GUIDE
ENGLISH
LYT1469-001B
EN