JVC GZ-MS100U Instructions - Page 11
Camcorder, Video Recording Start/Stop Button [START - power adapter
 |
UPC - 683728187361
View all JVC GZ-MS100U manuals
Add to My Manuals
Save this manual to your list of manuals |
Page 11 highlights
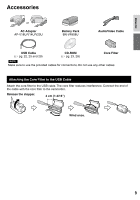
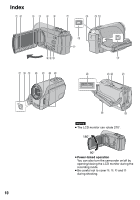
ENGLISH Camcorder ! Touch Sensor (Z pg. 6) # OK (DISP) Button [OK/DISP] (Z pg. 13) $ Menu Button [MENU] % Power Switch [ ] (You can turn off the camcorder by pressing and holding this button.) & Speaker ( Playback/Recording Mode Switching Button [SELECT PLAY/REC] (Z pg. 16) ) Access/Charge Lamp [ACCESS/CHRG.] (Blinks when you access files or charge the battery. Do not turn off the power or remove the battery pack/AC adapter while accessing files.) * Direct DVD Button [DIRECT DVD] (Z pg. 22)/Information Button [INFO] (Z pg. 15) + Upload/Upload Pre-Record Mode Button [UPLOAD] (Z pg. 27) , Auto/Manual Mode Button [AUTO/ MANUAL] - Mode Switch [!, #] . Video Recording Start/Stop Button [START/ STOP] (Z pg. 16) / Still Image Shooting Button [SNAPSHOT] (Z pg. 17) 0 Zoom Lever [W 7 , T ,] (Z pg. 18) Speaker Volume Control [-VOL+] (Z pg. 18) 1 DC Jack [DC] (Z pg. 14) 2 Audio/Video Jack [AV] 3 USB (Universal Serial Bus) Jack [ 2 ] (Z pg. 22, 25 and 29) 4 LED Light 5 Camera Sensor 6 Lens Cover 7 Lens 8 Lens Cover Switch [ =, > ] 9 Stereo Microphone : SD Card Slot ; Stud Hole < Tripod Mounting Socket = Battery Release Button [BATT.] (Z pg. 14) > Battery Pack Mount (Z pg. 14) ? Grip Strap 11
-
 1
1 -
2
-
3
-
4
-
5
-
 6
6 -
 7
7 -
 8
8 -
 9
9 -
 10
10 -
 11
11 -
 12
12 -
 13
13 -
 14
14 -
 15
15 -
 16
16 -
17
-
18
-
19
-
20
-
21
-
22
-
23
-
24
-
25
-
26
-
27
-
28
-
29
-
30
-
31
-
32
-
33
-
34
-
35
-
36
-
37
-
38
-
39
-
40
-
41
-
42
-
43
-
44
-
45
-
46
-
47
-
48
-
49
-
50
-
51
-
52
-
53
-
54
-
55
-
56
-
57
-
58
-
59
-
60
-
61
-
62
-
63
-
64
-
65
-
66
-
67
-
68
-
69
-
70
-
71
-
72
-
73
-
74
-
75
-
76
-
77
-
78
-
79
-
80
 |
 |