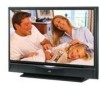
JVC HD52G786 Instructions - Page 15
Quick Setup, Getting Started - manuals
 |
UPC - 046838020285
View all JVC HD52G786 manuals
Add to My Manuals
Save this manual to your list of manuals |
Page 15 highlights
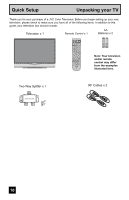
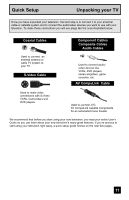
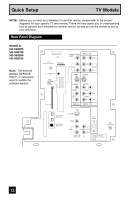
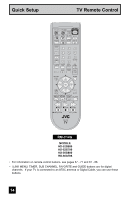
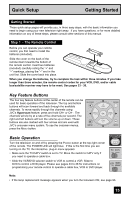
Quick Setup Getting Started Getting Started These quick setup pages will provide you, in three easy steps, with the basic information you need to begin using your new television right away. If you have questions, or for more detailed information on any of these steps, please consult other sections of this manual. Step 1 - The Remote Control Before you can operate your remote control, you first need to install the batteries (included). Slide the cover on the back of the remote down towards the bottom of the remote control. Insert two batteries (included) carefully noting the "+" and "-" markings, placing the "-" end in the unit first. Slide the cover back into place. When you change the batteries, try to complete the task within three minutes. If you take longer than three minutes, the remote control codes for your VCR, DVD, and/or cable box/satellite receiver may have to be reset. See pages 33 - 36. Key Feature Buttons The four key feature buttons at the center of the remote can be used for basic operation of the television. The top and bottom MUTING GUIDE buttons will scan forward and back through the available CH channels. To move rapidly through the channels using JVC's Hyperscan feature, press and hold CH+ or CH-. The channels will zip by at a rate of five channels per second. The VOL OK VOL right and left buttons will turn the volume up or down. These buttons are also marked with four arrows and are used with CH JVC's onscreen menu system. To use the onscreen menus, MENU BACK press the MENU button. Basic Operation Turn the television on and off by pressing the POWER button at the top right corner of the remote. The POWER LED will light blue. If this is the first time you are turning on the TV, the interactive plug-in menu appears. • Make sure the TV/CATV switch is set to TV. Move the switch to CATV only if you need to operate a cable box. • Slide the VCR/DVD selector switch to VCR to control a VCR. Slide to DVD to control a DVD player. Please see pages 33 to 36 for instructions on programming your remote control to operate a cable box, VCR or DVD player. POWER T TV CATV MUL VCR DVD Note: • If the lamp replacement message appears when you turn the television ON, see page 93. 15
-
 1
1 -
2
-
3
-
4
-
5
-
6
-
7
-
8
-
9
-
 10
10 -
 11
11 -
 12
12 -
 13
13 -
 14
14 -
 15
15 -
 16
16 -
 17
17 -
 18
18 -
 19
19 -
 20
20 -
21
-
22
-
23
-
24
-
25
-
26
-
27
-
28
-
29
-
30
-
31
-
32
-
33
-
34
-
35
-
36
-
37
-
38
-
39
-
40
-
41
-
42
-
43
-
44
-
45
-
46
-
47
-
48
-
49
-
50
-
51
-
52
-
53
-
54
-
55
-
56
-
57
-
58
-
59
-
60
-
61
-
62
-
63
-
64
-
65
-
66
-
67
-
68
-
69
-
70
-
71
-
72
-
73
-
74
-
75
-
76
-
77
-
78
-
79
-
80
-
81
-
82
-
83
-
84
-
85
-
86
-
87
-
88
-
89
-
90
-
91
-
92
-
93
-
94
-
95
-
96
-
97
-
98
-
99
-
100
-
101
-
102
-
103
-
104
 |
 |
