JVC HD52G786 Instructions - Page 93
How to Replace the Lamp - lamp cover
 |
UPC - 046838020285
View all JVC HD52G786 manuals
Add to My Manuals
Save this manual to your list of manuals |
Page 93 highlights
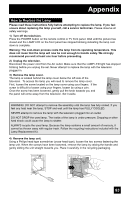
Appendix How to Replace the Lamp Please read these instructions fully before attempting to replace the lamp. If you feel unsure about replacing the lamp yourself, call a service technician. Please observe all safety warnings. 1) Turn off the television. Press the POWER button on the remote control or TV front panel. Wait until the picture has closed and the LAMP LED on the front panel has stopped blinking indicating the lamp cool down is complete. Warning: The cool-down process cools the lamp from its operating temperature. This does not mean that the lamp will now be cool enough to handle safely. We strongly recommend you wait at least one hour before proceeding. 2) Unplug the television. Disconnect the power cord from the AC outlet. Make sure that the LAMP LED light has stopped blinking before you unplug the set. Never attempt to replace the lamp with the television plugged in. 3) Remove the lamp cover. The lamp is located behind the lamp cover below the left side of the television. To access the lamp you will need to remove the lamp cover. First, loosen the screw located on the lamp cover using your fingers. If the screw is difficult to loosen using your fingers, loosen by using a coin. Once the screw has been loosened, gently pull the knob towards you and the panel will come away from the television. Set it aside. WARNING: DO NOT attempt to remove the assembly until the lamp has fully cooled. If you feel any heat near the lamp, STOP and wait until the lamp has FULLY COOLED. NEVER attempt to remove the lamp with the television plugged into an outlet. DO NOT DROP the used lamp. The inside of the lamp is under pressure. Dropping or other hard shock could cause the lamp to shatter. ALWAYS recycle the used lamp. Because the lamp contains a small amount of mercury, it cannot be thrown away with regular trash. Follow the recycling instructions included with the Lamp Replacement Kit. 4) Remove the lamp unit. Using a Philips head type screwdriver (cross-head type), loosen the two screws fastening the lamp unit. When the screws have been loosened, remove the lamp by raising the handle and gently sliding the unit straight towards you. Place it carefully in the recycling packaging. 93
-
 1
1 -
2
-
3
-
4
-
5
-
6
-
7
-
8
-
9
-
10
-
11
-
12
-
13
-
14
-
15
-
16
-
17
-
18
-
19
-
20
-
21
-
22
-
23
-
24
-
25
-
26
-
27
-
28
-
29
-
30
-
31
-
32
-
33
-
34
-
35
-
36
-
37
-
38
-
39
-
40
-
41
-
42
-
43
-
44
-
45
-
46
-
47
-
48
-
49
-
50
-
51
-
52
-
53
-
54
-
55
-
56
-
57
-
58
-
59
-
60
-
61
-
62
-
63
-
64
-
65
-
66
-
67
-
68
-
69
-
70
-
71
-
72
-
73
-
74
-
75
-
76
-
77
-
78
-
79
-
80
-
81
-
82
-
83
-
84
-
85
-
86
-
87
-
 88
88 -
 89
89 -
 90
90 -
 91
91 -
 92
92 -
 93
93 -
 94
94 -
 95
95 -
 96
96 -
 97
97 -
 98
98 -
99
-
100
-
101
-
102
-
103
-
104
 |
 |