JVC KD AVX33 Instructions
JVC KD AVX33 - EXAD - DVD Player Manual
 |
UPC - 046838027956
View all JVC KD AVX33 manuals
Add to My Manuals
Save this manual to your list of manuals |
JVC KD AVX33 manual content summary:
- JVC KD AVX33 | Instructions - Page 1
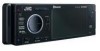
DVD/CD RECEIVER RECEPTOR CON DVD/CD RÉCEPTEUR DVD/CD KD-ADV38/KD-AVX33 KD-ADV38 KD-AVX33 For canceling the display demonstration, see page 5. Para cancelar la demonstración en pantalla, consulte la página 5. Pour annuler la démonstration des affichages, référez-vous à la page 5. For installation - JVC KD AVX33 | Instructions - Page 2
pursuant to Part 15 of the FCC Rules. These limits are designed to provide reasonable protection against harmful interference in a residential installation. This equipment generates, uses, and can radiate radio frequency energy and, if not installed and used in accordance with the instructions, may - JVC KD AVX33 | Instructions - Page 3
26 USB operations 29 Bluetooth® operations- Cellular phone/audio player .......... 31 • If this does not work, reset the unit. For safety... • Do not raise the volume level too much, as this will block outside sounds, making driving dangerous. • Stop the car before performing any complicated - JVC KD AVX33 | Instructions - Page 4
/WAV/AAC*4 ISO 9660 level 1, level 2, Romeo, MPEG4 Joliet DVD+VR • DVD-RAM cannot be played. Dual Disc DVD side Non-DVD side CD/VCD Audio CD/CD Text (CD-DA)/DTS-CD VCD (Video CD) CD-ROM CD-I (CD-I Ready) CD Recordable/Rewritable (CD-R/-RW) • Compliant to ISO 9660 level 1, level 2, Romeo - JVC KD AVX33 | Instructions - Page 5
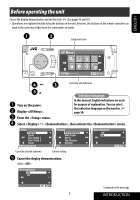
explained mainly using the buttons on the unit; however, the buttons on the remote controller can work in the same way if they have the same names or Ÿ Display . ! Enter the menu. In this manual, English indications are used for purpose of explanation. You can select the indication - JVC KD AVX33 | Instructions - Page 6
(twice) ENGLISH Clock Time Set 12Hours/24Hours OSD Clock 1:00AM ¤ Return to the menu. # Select ], then activate the screen. ‹ Set the clock time. Time Set Hours 1 : 00AM ENT Exit Time Set Minutes 3 : 45PM ENT Exit $ Return to the menu. › Select < - JVC KD AVX33 | Instructions - Page 7
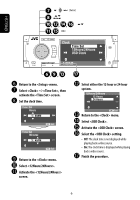
TUNER = SAT (SIRIUS/XM) = DISC (DVD/VCD/CD) = USB =CD-CH, iPod, D.PLAYER, or EXT-IN =Bluetooth Phone =Bluetooth Audio = AV-IN =(back to the Tilt1 - Tilt4). • Attenuate the sound (if the power is on). Adjust the volume. Change the display information. Remote sensor Display window • DISC/USB - JVC KD AVX33 | Instructions - Page 8
function. • See the Installation/Connection Manual (separate i ; volume) for connection. Caution: • Do not expose batteries to heat or flame. o a s IMPORTANT: If Dual Zone is activated (☞ page 26), the remote controller functions only for operating the DVD/CD player. 1*1 • Turns on the - JVC KD AVX33 | Instructions - Page 9
. Bluetooth Phone: Ends the call. • DISC +/- buttons: Changes discs for "CD-CH." Bluetooth Audio • CD changer: Selects the disc directly. - Press briefly: Auto Search - Press and hold: Manual Search . • DVD Audio: Selects audio stream ( ). For Apple iPod/JVC D. player operations: • DVD-VR: Turn - JVC KD AVX33 | Instructions - Page 10
name is assigned, "No Name" appears. ! Search for a station-Auto Search. • Manual Search: Hold either 4 or ¢ until "Manual Search" appears on the display, then press it repeatedly. • The ST indicator lights up when receiving an FM stereo broadcast with sufficient signal strength. When an FM stereo - JVC KD AVX33 | Instructions - Page 11
ENGLISH Tuning in to stations with sufficient signal strength This function works only for FM bands. Once you have activated this function (selected ), it always works when searching for FM stations. 1 AV Menu FM station automatic presetting -SSM (Strong-station Sequential Memory) This - JVC KD AVX33 | Instructions - Page 12
ENGLISH Manual presetting Ex.: Storing FM station of 92.5 MHz into preset number 4 the FM bands. • Preset List can also be accessed through = . (☞ right ) Selecting preset stations On the remote: 1 2 or On the unit: or 1 FM1 1 87.5 2 89.9 3 97.9 4 92.5 5 108.0 6 107.9 Store - JVC KD AVX33 | Instructions - Page 13
ENGLISH Disc operations The disc type is automatically detected, and playback starts automatically (for some discs: automatic start depends on its internal program). If a disc does not have any disc menu, all tracks in it will be played repeatedly until you change the source or eject the disc. If - JVC KD AVX33 | Instructions - Page 14
5 ∞ Select program no./Play List no. 3: 45PM Program no.(or Play List no.)/Chapter no./ Playing time Group no./Track no./Playing time DVD AUDIO MLP MULTI G 01 02 0:45:38 BONUS B.S.P RPT 3: 45PM 4 ¢ Press: Select track Hold: Reverse/forward search*1 5 ∞ Select group BONUS indicator (☞ page 22 - JVC KD AVX33 | Instructions - Page 15
ENGLISH DVD DivX FRONT 2CH T 01 C 02 0:45:38 Current Folder Name Current File Name.avi RPT 3: 45PM 4 ¢ Press: Select track Hold: Reverse/forward search for DivX/ - JVC KD AVX33 | Instructions - Page 16
¢ Press: Select track Hold: Reverse/forward search*1 5 ∞ Press: Select folder Hold: Display Folder List *1 Search speed: x2 ] x10. *3 "No Name" appears for conventional CDs. Folder no./Track no./Playing time Tag data will be shown instead of folder/file names when they are recorded and - JVC KD AVX33 | Instructions - Page 17
ENGLISH Selecting playback modes You can use only one of the following playback modes-Intro/Repeat/Random. Ex. To select Track Repeat 1 AV Menu 3 Mode All Off Intro Repeat Random Off Setup ENT Enter 2 AV Menu Mode ENT Enter Mode menu icon 4 Repeat Off Track Folder ENT Set When one of - JVC KD AVX33 | Instructions - Page 18
ENGLISH Selecting tracks on the list If a disc includes folders, you can display the Folder/ Track (File) Lists, then start playback. 1 Folder List My Best Cinema Pops My Best2 Favorite Song Off Cinema2 ENT Prohibiting disc ejection You can lock a disc in the loading slot. NO EJECT? - JVC KD AVX33 | Instructions - Page 19
ENGLISH Operations using the remote controller-RM-RK251 : Stop playback. : Start playback/Pause (if pressed during playback). : Reverse/forward search.*2 (No sound can be heard.) (Slow motion*3 during pause. No sound can be heard.) : Press: Select chapter (during playback or pause). Hold: - JVC KD AVX33 | Instructions - Page 20
1st press 2nd press : Stop playback. : Start playback/Pause (if pressed during playback). : Reverse/forward search.*4 (No sound can be heard.) (Slow motion*5 during pause. No sound can be heard.) Reverse slow motion does not work. : Press: Select chapter (during playback or pause). Hold: Reverse - JVC KD AVX33 | Instructions - Page 21
. : Start playback/Pause (if pressed during playback). = Select track. = : During PBC playback... : Reverse/forward search.*4 (Forward slow motion*5 during pause. No sound can be heard.) Reverse slow motion does not work. = = : Select an item on the menu. To return to the previous menu, press - JVC KD AVX33 | Instructions - Page 22
to activate the center speaker; otherwise, no sound comes out of the center speaker (☞ page channel encoded sources such as Dolby Digital*1, DTS*2, and DVD Audio. (When activated, "MULTI" is shown on on the disc. 3 Follow the interactive instructions shown on the monitor. Selecting browsable still - JVC KD AVX33 | Instructions - Page 23
. (☞ below) On the remote controller: • You cannot change the settings using the remote controller. *1 Manufactured under license PLII Music Panorama CenterWidth On • Panorama: Select to add wraparound sound effect. • Center Width: Adjust the center image so it may be heard - JVC KD AVX33 | Instructions - Page 24
ENGLISH Operations using the on-screen bar (DVD/VCD/DivX/MPEG1/MPEG2/ JPEG) These operations are possible on the monitor using the remote controller. 1 Display the on-screen bar. (☞ page 25) 2 Select an item. 3 Make a selection. If a pop-up menu appears... • For entering time/numbers... : Move the - JVC KD AVX33 | Instructions - Page 25
track Current folder/track Current folder/file (JPEG) 5 Time indication TOTAL Elapsed playing time of the disc T. REM Remaining title time (for DVD) Remaining disc time (for others) TIME Elapsed playing time of the current chapter/track*2 REM Remaining time of the current chapter/track - JVC KD AVX33 | Instructions - Page 26
Zone is in use, you can only operate the DVD/CD player using the remote controller. 1 AV Menu On the remote controller: 1 2 Adjust the volume through the source is changed to "DISC." * DVD VIDEO DIGITAL FLAT DUAL-S 2 T 01 C 02 0:45:38 *1 JVC original headphone virtual surround system. This - JVC KD AVX33 | Instructions - Page 27
Artist Robert M. Smith Title Rain Track : 6 / 14 Cloudy Fair Fog Hail Indian summer Rain Shower Snow Thunder Typhoon Wind Winter sky Ex.: CD Text 1 Playback mode selection window: appears when OSD is pressed (☞ below). 2 Selected playback mode (☞ below) 3 Elapsed playing time of the current track - JVC KD AVX33 | Instructions - Page 28
For discs except DVD, VCD, and CD While Dual Zone is on, these operations are possible on the external monitor using the remote controller. While not /06/25 L-1 Time 19:00 10:30 17:00 13:19 22:00 8:23 Title JVC DVD World 2004 Music Festival children 001 children 002 PLAY LIST No Date 1 07/05/25 2 - JVC KD AVX33 | Instructions - Page 29
is in use. • All tracks in the USB device will be played repeatedly until you change the source. *1 Except for JVC D. Player XA-HD500. *2 Except for MPEG2 files recorded by JVC Everio camcorder (extension code ). *3 This unit can play back AAC files encoded using iTunes. This unit cannot play - JVC KD AVX33 | Instructions - Page 30
before disconnecting a USB device. • Make sure all important data has been backed up to avoid losing the data. • Do not leave a USB device in the car, expose to direct sunlight, or high temperature to avoid deformation or cause damages to the device. Selecting playback modes You can use only one of - JVC KD AVX33 | Instructions - Page 31
call-from phone book, from call history (Redial/Missed Call/Received Call), by dialing number, by preset numbers, by voice command • Receiving the Text Message • Play back a Bluetooth audio player Pairing and PIN Code When you connect a Bluetooth device to the unit for the first time, make pairing - JVC KD AVX33 | Instructions - Page 32
, "Device Unfound" appears.) 2 Select a device you want to connect. 3 Enter the specific PIN code of the device to the unit. • Refer to the instructions supplied with the device to check the PIN code. 4 Use the Bluetooth device to connect. Now connection is established and you can use the device - JVC KD AVX33 | Instructions - Page 33
Device The unit displays the list of the preset devices. 2 Select a device you want to connect. Deleting a registered device 1 Select "Bluetooth Phone" or "Bluetooth Audio," then select a registered device you want to delete. 2 Perform steps 2 and 3 of "Registering using " on page 32, then - JVC KD AVX33 | Instructions - Page 34
Menu> Answer incoming call Hold: Display list ~ Select "Bluetooth Phone." Ÿ Enter the menu. ! Establish the connection with a device, then make a call (or settings using the menu). ☞ pages 32, 48, 56, and 57 When the sound is stopped or interrupted during the use of - JVC KD AVX33 | Instructions - Page 35
Bluetooth Phone." To read the message later • The message is stored into = . (☞ page 56) When is set to Access the message list to read a message. (☞ page 56) Making a call 1 Display the . P902i Redial Received the instruction manual supplied - JVC KD AVX33 | Instructions - Page 36
through = = . AV Menu Setup AV Menu ENT Enter Bluetooth ENT Enter Bluetooth menu icon Direct operations to redial stored in preset number 4. To call a preset number On the remote: On the unit: 1 Preset List 1 11122223333 2 22233336666 3 44455556666 - JVC KD AVX33 | Instructions - Page 37
/disconnecting a registered device" on page 33) You can use the following buttons on the remote controller for the Bluetooth audio operations. For details, ☞ pages 8 and 9. Bluetooth Information: If you wish to receive more information about Bluetooth, visit our JVC web site. 37 OPERATIONS - JVC KD AVX33 | Instructions - Page 38
List It is recommended to use a JVC MP3-compatible CD changer with your unit. • You can play only CDs (CD-DA) and MP3 discs. Preparation: Make 03 DISC 04 DISC 05 Off DISC 06 ENT "No Name" appears for conventional CDs • While playing an MP3 disc, you can select and start playing a track - JVC KD AVX33 | Instructions - Page 39
menu To use menu ☞ above. ☞ page 38. Disc List = Folder List = File List You can use the following buttons on the remote controller to operate the CD changer. or : Select disc Press: Select folder (MP3 only) Press: Select track Hold: Reverse/forward search 39 EXTERNAL DEVICES - JVC KD AVX33 | Instructions - Page 40
after connection: 1 Turn on the power. 2 Select "SAT" for the source. 2 Select "SAT" for the source. JVC DLP starts updating all the SIRIUS channels. (☞ "GCI update" column below.) • Once completed, JVC DLP tunes in to the preset channel, CH184. 3 Check your SIRIUS ID, see page 53. 4 Contact - JVC KD AVX33 | Instructions - Page 41
DISP: Switches the display to program information-artist name/song name (/composer name: only for SIRIUS Satellite radio). POWER]ON SIRIUS/XM Band Preset no. ☞ page 46 Channel no. ENGLISH For SIRIUS Radio ~ Select "SAT." Ÿ Select the bands. SAT FLAT XM1 Preset1 01ch Category Name Channel - JVC KD AVX33 | Instructions - Page 42
40 4 Hank's Place 5 Audio Visions 6 Preview ENT 4 SAT FLAT XM1 Preset4 3Bch Rock XM Music Club 3: 45PM Selecting preset channels On the remote only: 1 2 Selecting on the lists You can select a channel using one of the following lists-Preset list/Category list/Channel list. 1 AV Menu - JVC KD AVX33 | Instructions - Page 43
required to connect the interface adapter (KSPD100 for Apple iPod or KS-PD500 for JVC D. player) to the CD changer jack on the rear. Preparation: Make sure or is selected for the external input setting. (☞ page 53) D.PLAYER FLAT 01 0:45:38 Album Name Artist Name Track Title - JVC KD AVX33 | Instructions - Page 44
ENGLISH Listening to other external components AV-INPUT You can connect an external component to the LINE IN/VIDEO IN plugs. • You can also connect a Navigation System to the VIDEO IN plug so that you can watch the navigation screen (Make sure is selected for ). (☞ page 53) - JVC KD AVX33 | Instructions - Page 45
ENGLISH EXT-INPUT You can connect an external component to the CD changer jack on the rear using the Line Input Adapter-KS-U57 (not supplied) or AUX Input Adapter-KS-U58 (not supplied). POWER]ON Assigned - JVC KD AVX33 | Instructions - Page 46
into User1, User2, and User3. 1 Repeat steps ~ and Ÿ, then in step !... Equalizer Flat Hard Rock R&B Pop Jazz ENT Exit Edit Equalizer ENT Enter ! Select a sound mode. Equalizer Flat Hard Rock R&B Pop Jazz ENT Exit 2 Adjust. 60.0 Hz +03 ENT Store • For preset equalizing values of each - JVC KD AVX33 | Instructions - Page 47
ENGLISH Assigning titles to the sources POWER]ON Press: Change character set Hold: Erase title Title Entry Station Name ABC Radio DISP A a 0 Á á ENT Store You can assign titles as follows. FM/AM stations Up to 16 characters-up to 30 stations AV-IN EXT-IN Up to 16 characters • If you try to - JVC KD AVX33 | Instructions - Page 48
Pass Filter> setting ~ AV Menu Setup ENT Enter Non-available items will be displayed being shaded. Ÿ Sound menu icon AV Menu Sound ENT Enter List Bluetooth Dual Zone ! Sound Fader/Balance Volume Adjust Subwoofer High Pass Filter Crossover Through • For some items, repeat this steps to - JVC KD AVX33 | Instructions - Page 49
-lighter or darker. Tint : Adjust the tint if the human skin color is unnatural. *1 The ILLUMINATION CONTROL lead connection is required. (☞ Installation/Connection Manual) *2 Adjustable only when the source is a disc or USB containing pictures or movies, or "AV-IN." Continued on the next page 49 - JVC KD AVX33 | Instructions - Page 50
ENGLISH Menu items Selectable settings, [reference page] Aspect*3 You can change the aspect ratio of the picture. Aspect ratio of incoming signal 4:3 16:9 Full : For 16:9 original pictures Display Auto : • For "DISC": Aspect ratio is automatically selected to match to the incoming signals - JVC KD AVX33 | Instructions - Page 51
Disc Setup 1*7 ENGLISH Menu items Menu Language Audio Language Selectable settings, [reference page] Select the initial disc menu language; Initial English (☞ also page 64). Select the initial audio language; Initial English (☞ also page 64). Subtitle Select the initial subtitle language or - JVC KD AVX33 | Instructions - Page 52
separately the left and right. Regardless of the setting above... • No sound comes out of the subwoofer while playing Dolby Pro Logic IIMovie or Music if the front speaker is set to . • No sound comes out of the center speaker when surround is deactivated. Disc Setup - JVC KD AVX33 | Instructions - Page 53
External Input*12 For connecting an external component to the CD changer jack on the rear. Changer/iPod/D. Player*13: CD changer, iPod, or D. player ☞ [38, 43] External Input : Any other than the above. ☞ [45] • For connecting JVC DLP/XMDJVC100, this setting is not required. It is automatically - JVC KD AVX33 | Instructions - Page 54
phone. Initialize Initialize all settings you have made in . Press ENT, then reset the unit. (☞ page 3) *14 The TEL MUTING lead connection is required. See Installation/Connection Manual (separate volume). Equalizer Flat/Hard Rock/R&B/Pop/Jazz/Dance/Country/Reggae/Classic/User1/User2 - JVC KD AVX33 | Instructions - Page 55
for FM. ☞ [11] Only for FM/AM stations, AV-IN and EXT-IN. ☞ [47] All Off/Intro/Repeat/Random Only for disc/USB playback and iPod/D. player. ☞ [17, 30, 39, 43] *19 Items listed under vary among the playback sources. 55 SETTINGS - JVC KD AVX33 | Instructions - Page 56
. *20 Selectable only for "Bluetooth Phone" or "Bluetooth Audio." Select a device (or "NEW DEVICE") before operating the menu. *21 Selectable only when the device is compatible with Text Message. When operating the Bluetooth device, refer also to the instructions supplied with the device. 56 - JVC KD AVX33 | Instructions - Page 57
message by ringing and displaying "Receiving Message." To read the message, press ENT (☞ page 35). Manual : The unit does not inform you the arrival of a message. MIC Setting*23 Adjust microphone volume connected to the unit. 01, 02, 03 Version*24 The Bluetooth software and hardware versions are - JVC KD AVX33 | Instructions - Page 58
unit in the following cases: • After starting the heater in the car. • If it becomes very humid inside the car. Should this occur, the unit may malfunction. In this case, eject center holder (with the printed surface facing up). • Make sure to store discs into the cases after use. Stick-on label 58 - JVC KD AVX33 | Instructions - Page 59
received stations are preset in No.1 (lowest frequency) to No. 6 (highest frequency). Disc General • In this manual details about DVD-VR format and play list, refer to the instructions supplied This unit supports the DivX files whose resolution is 720 x 576 pixels or less. • This unit supports DivX - JVC KD AVX33 | Instructions - Page 60
mod>*. * is an extension code used for the MPEG2 files recorded by JVC Everio camcorders. • The stream format should conform to MPEG system/ program stream. • MPEG multi-channel DVD Video, DivX 2-channel and MPEG 2-channel sources. If is selected, stereo sounds are emitted only - JVC KD AVX33 | Instructions - Page 61
other players. • to its instructions. • Connect car in a safe place. • Some Bluetooth devices may not be connected to this unit depending on the Bluetooth supports the function you have tried. • Device Unfound : No available Bluetooth device is detected by . • Loading : The unit is updating - JVC KD AVX33 | Instructions - Page 62
operating an iPod or a D. player, some operations may not be performed correctly or as intended. In this case, visit the following JVC web site: For iPod users: For D. player users: - JVC KD AVX33 | Instructions - Page 63
00 +02 00 User 1/2/3 00 00 00 00 00 00 00 • "DVD Logo" is a trademark of DVD Format/Logo Licensing Corporation registered in the US, Japan and other countries. • countries. • iPod and iTunes are trademarks of Apple Inc., registered in the U.S. and other countries. About sounds reproduced through - JVC KD AVX33 | Instructions - Page 64
ENGLISH Language codes (for DVD/DivX language selection) Code Language Code Language AA Afar FA Persian AB Abkhazian FI Finnish AF Afrikaans FJ Fiji AM Ameharic FO Faroese AR Arabic - JVC KD AVX33 | Instructions - Page 65
activated, the remote controller only functions for operating the DVD/CD player.) • Change the source. • Start the playback on the external component connected to VIDEO IN plug. • Check the cords and connections. • Signal input is too weak. Reset the unit. (☞ page 3) Store stations manually. (☞ page - JVC KD AVX33 | Instructions - Page 66
Elapsed playing time is not correct. • "Not Support" appears on the monitor and track is skipped. sound is sometimes interrupted. Parking brake lead is not connected properly. (☞ Installation/Connection Manual from the one played back using other players. • Readout time varies depending on the - JVC KD AVX33 | Instructions - Page 67
connect the device. (☞ page 32) • The unit does not make pairing with the Bluetooth device. • Enter the same PIN code for both the unit and target device. If the PIN code of the device is not indicated on its instructions, try "0000" or "1234." • Select the device name from , then - JVC KD AVX33 | Instructions - Page 68
appears on the monitor. • "Channel is Updating XX% completed" or "UPDATING" appears on the monitor and no sound can be heard. • "OFF AIR" text information for the selected channel. The receiver is updating the channel information and it takes a few reset the unit. Reconnect the Satellite radio after a - JVC KD AVX33 | Instructions - Page 69
clear and legible. • Check the connecting cable and its connection. • Charge the battery. • For D. player: Update the firmware version. Deactivate the equalizer either on this unit or the iPod/ D. player. Check the connecting cable and its connection. The headphones are disconnected during playback - JVC KD AVX33 | Instructions - Page 70
LINE IN, VIDEO IN, MIC IN, USB input terminal, Antenna input Output: 2nd AUDIO OUT, VIDEO OUT Others: CD changer, OE REMOTE Frequency Range: FM (with channel laser) Frequency Response: DVD, fs=48 kHz: 16 Hz to 22 000 Hz DVD, fs=192 kHz: 16 Hz to 88 000 Hz VCD/CD: 16 Hz to 20 - JVC KD AVX33 | Instructions - Page 71
to +40°C (32°F to 104°F) Dimensions (W × H × D): Installation Size (approx.): 182 mm × 52 mm × 160 mm (7-3/16" × 2-1/16" × 6-5/16") Panel Size (approx.): 188 mm × 58 mm × 12 mm (7-7/16" × 2-5/16" × 1/2") Mass (approx.): 2.1 kg (4.7 lbs) (excluding accessories) BLUETOOTH GENERAL Design and - JVC KD AVX33 | Instructions - Page 72
producto JVC. Como primer paso, por favor lea detenidamente este manual para de Clase B, de conformidad con la Parte 15 de las reglas de la FCC JVC pueden anular la autoridad del usuario para operar el equipo. [Sólo Unión Europea] ADVERTENCIAS: Para evitar daños y accidentes • NO instale - JVC KD AVX33 | Instructions - Page 73
Dual 26 Operaciones de USB 29 Operaciones Bluetooth®- Teléfono celular/reproductor de audio 31 reinicialice la unidad. Escuchando el cambiador de CD ........ 38 Para fines de seguridad... • No la radio satelital ......... 40 Escuchando el iPod/reproductor D. ... 43 Escuchado otros componentes - JVC KD AVX33 | Instructions - Page 74
9660 Nivel 1, Nivel 2, MPEG4 Romeo, Joliet DVD+VR • Los discos DVD-RAM no se pueden reproducir. Dual Disc Lado DVD Lado no-DVD CD/VCD Audio CD/CD Text (CD-DA)/DTS-CD VCD (Vídeo CD) CD-ROM CD-I (CD-I Ready) CD Grabable/reescribible CD-DA (CD-R/-RW) MP3/WMA/WAV/AAC*4 • Compatible con - JVC KD AVX33 | Instructions - Page 75
ENT Enter Menú actualmente seleccionado ~ Encienda la unidad. Ÿ Visualice el . ! Acceda al menú . Idioma para las indicaciones: En este manual, se utilizan indicaciones en inglés para las explicaciones. Podrá seleccionar el idioma de indicación que desea en el monitor. ( página 50 - JVC KD AVX33 | Instructions - Page 76
(dos veces) ESPAÑOL Clock Time Set 12Hours/24Hours OSD Clock 1:00AM ¤ Vuelva al menú . # Seleccione ] y, a continuación, active la pantalla . ‹ Ponga el reloj en hora. Time Set Hours 1 : 00AM ENT Exit Time Set Minutes 3 : 45PM ENT Exit $ Vuelva al menú . - JVC KD AVX33 | Instructions - Page 77
= SAT (SIRIUS/XM) = DISC (DVD/VCD/CD) = USB =CD-CH, iPod, D.PLAYER, o EXT-IN = Bluetooth Phone =Bluetooth Audio = AV-IN =(vuelta al comienzo) se compone de los siguientes submenús-Setup/Equalizer/Sound/ Disc Surround/Mode/List/Bluetooth/Dual Zone. • Para los detalles, consulte las páginas - JVC KD AVX33 | Instructions - Page 78
remoto en el volante de dirección. • Para la conexión, consulte el Manual de instalación/conexión (volumen separado). i ; Precaución: • No exponga ( página 26), el control remoto funcionará sólo para controlar el reproductor DVD/CD. 1*1 • Enciende la unidad. • Atenúa el sonido si el sistema est - JVC KD AVX33 | Instructions - Page 79
DVD: Selecciona el título/grupo. DVD-VR: Selecciona el programa/lista de reproducción. USB/otros discos (excepto VCD/CD mantenga pulsado: Búsqueda manual Para las operaciones de operaciones de Apple iPod/ reproductor D. de JVC: • ∞: reproducción. Bluetooth Phone: Finaliza la llamada. Bluetooth Audio: - JVC KD AVX33 | Instructions - Page 80
47). Si no hay ningún nombre asignado, aparecerá "No Name". ! Búsqueda de una emisora-Búsqueda automática. • Búsqueda manual: Sostenga 4 o ¢ hasta que aparezca "Manual Search" en la pantalla y, a continuación, presiónelo repetidamente. • El indicador ST se enciende al recibir una radiodifusión FM - JVC KD AVX33 | Instructions - Page 81
ESPAÑOL Para sintonizar emisoras con un señal suficientemente fuerte Esta función funciona sólo para las bandas FM. Una vez activada (se selecciona ), esta función siempre funcionará al efectuar la búsqueda de emisoras FM. 1 AV Menu Preajuste automático de emisoras FM-SSM (Memoria - JVC KD AVX33 | Instructions - Page 82
ESPAÑOL Preajuste manual Ej.: Almacenando una emisora FM de 92,5 MHz en el número de preajuste 4 de la banda FM1. 1 Selección de emisoras preajustadas En el control remoto: 1 2 - JVC KD AVX33 | Instructions - Page 83
ESPAÑOL Operaciones de los discos El tipo de disco se detecta automáticamente, y la reproducción se inicia automáticamente (para algunos discos: el inicio automático depende de su programa interno). Si el disco no dispone de ningún menú de disco, todas las pistas del mismo serán reproducidas - JVC KD AVX33 | Instructions - Page 84
. • Cada vez que presiona el botón, la imagen reproducida y la información del disco aparecen alternativamente. Tipo de disco Formato de audio Modo Surround DVD VIDEO DIGITAL MULTI T 01 C 02 0:45:38 ESPAÑOL CHAP. RPT 3: 45PM 4 ¢ Pulse : Seleccionar un capítulo Modo de Nº de título/Nº de cap - JVC KD AVX33 | Instructions - Page 85
ESPAÑOL DVD DivX FRONT 2CH T 01 C 02 0:45:38 Current Folder Name Current File Name.avi RPT 3: 45PM 4 ¢ Pulse : Seleccionar la pista Sostener: Búsqueda hacia atrás/adelante - JVC KD AVX33 | Instructions - Page 86
Sostener: Búsqueda hacia atrás/ adelante*1 Título de disco/nombre del artista/título de pista (sólo para CD Text)*3 Nº de pista/tiempo de reproducción Formato de audio (MP3/WMA/WAV/AAC) página 46 CD MP3 FLAT T 01 02 0:45:38 Current Folder Name Current File Name.mp3 RPT 3: 45PM 4 ¢ Pulse - JVC KD AVX33 | Instructions - Page 87
ESPAÑOL Selección de los modos de reproducción Podrá utilizar solamente uno de los siguientes modos 3 de reproducción-Introducciones musicales/repetida/ aleatoria. Ej.: Para seleccionar repetición de pista 1 AV Menu 4 Setup ENT Enter 2 AV Menu Mode All Off Intro Repeat Random Off Repeat - JVC KD AVX33 | Instructions - Page 88
ESPAÑOL Selección de pistas en la lista Si un disco incluye carpetas, podrá visualizar las listas de carpetas/pistas (archivo) y luego iniciar la reproducción. 1 Folder List My Best Cinema Pops My Best2 Favorite Song Off Cinema2 ENT Aparece la lista de carpetas. • Mantenga pulsado el bot - JVC KD AVX33 | Instructions - Page 89
ESPAÑOL Operaciones utilizando el control remoto-RM-RK251 : : : : Pare la reproducción. Inicia la reproducción/Pausa (si lo pulsa durante la reproducción). Búsqueda hacia atrás/adelante.*2 (El sonido no se escucha.) (Cámara lenta*3 durante la pausa. El sonido no se escucha.) Pulse: Selecciona un - JVC KD AVX33 | Instructions - Page 90
ESPAÑOL : Pare la reproducción. : Inicia la reproducción/Pausa (si lo pulsa durante la reproducción). : Búsqueda hacia atrás/adelante.*2 (El sonido no se escucha.) : Pulse: Selecciona la pista. Sostener: Búsqueda hacia atrás/adelante.*3 (El sonido no se escucha.) : Selecciona la carpeta. Para - JVC KD AVX33 | Instructions - Page 91
ESPAÑOL : Pare la reproducción. : Inicia la reproducción. (Slide show: se muestra cada archivo durante unos segundos). Muestra el archivo actual hasta que lo cambie, si lo pulsa durante la presentación de diapositivas. : Selecciona la pista. : Pare la reproducción. : Inicia la reproducción/ pausa - JVC KD AVX33 | Instructions - Page 92
52). • El modo All surround también se puede usar para "USB". MULTI: Para fuentes codificadas multicanal, como por ejemplo, Dolby Digital*1, DTS*2, y DVD Audio. (Al activarse, aparece "MULTI" en la pantalla de información de fuente). Dolby Pro Logic II(Movie/Music): Para fuentes de 2 canales excepto - JVC KD AVX33 | Instructions - Page 93
ESPAÑOL 4 Surround On Auto Through Dolby PLII Movie Dolby PLII Music ENT Set • Auto: Cuando se introducen señales digitales multicanal, se activa surround "MULTI". Cuando se introducen señales de 2 canales o 2,1 canales, se activa "4CH STEREO". • Through: Todas las señales de canal entrantes se - JVC KD AVX33 | Instructions - Page 94
ESPAÑOL Operaciones usando la barra en pantalla (DVD/VCD/DivX/MPEG1/ MPEG2/JPEG) Estas operaciones se pueden realizar en el monitor usando el control remoto. 1 Visualice la barra en pantalla. ( página 25) 2 Seleccione - JVC KD AVX33 | Instructions - Page 95
Carpeta/archivo actual (JPEG) 5 Indicación de la hora TOTAL Tiempo de reproducción transcurrido del disco T. REM Tiempo estante del título (para DVD) Tiempo restante del disco (para los otros) TIME Tiempo de reproducción transcurrido del capítulo/pista actual*2 REM Tiempo restante del cap - JVC KD AVX33 | Instructions - Page 96
operaciones de la Zona Dual (DISC). • No se puede seleccionar "USB" para la fuente principal. 3 Opere el reproductor DVD/CD. *1 Sistema virtual Surround para auriculares original de JVC. Este Surround también será efectivo para la fuente principal "DISC" si se ha seleccionado "On/ Surround On" para - JVC KD AVX33 | Instructions - Page 97
Artist Robert M. Smith Title Rain Track : 6 / 14 Cloudy Fair Fog Hail Indian summer Rain Shower Snow Thunder Typhoon Wind Winter sky Ej.: CD Text 1 Ventana de selección del modo de reproducción: aparece cuando se pulsa OSD ( debajo). 2 Modo de reproducción seleccionado ( debajo) 3 Tiempo de - JVC KD AVX33 | Instructions - Page 98
Operaciones utilizando la pantalla de lista Para discos, excepto DVD, VCD y CD Mientras esté activada la Zona Dual, estas operaciones 4ch 6 07/06/25 L-1 Time 19:00 10:30 17:00 13:19 22:00 8:23 Title JVC DVD World 2004 Music Festival children 001 children 002 PLAY LIST No Date 1 07/05/25 2 07/06 - JVC KD AVX33 | Instructions - Page 99
HDD (disco duro) portátil, etc. ~ Conecte un dispositivo USB. Cable USB desde la parte trasera de la unidad. • No se puede conectar un ordenador al terminal USB ( ) de para el reproductor D. de JVC XA-HD500. *2 Excepto archivos MPEG2 grabados mediante la cámara JVC Everio (código de extensión - JVC KD AVX33 | Instructions - Page 100
ESPAÑOL Precaución: • Evite usar el dispositivo USB si puede amenazar la seguridad de conducción. • No extraiga ni conecte repetidamente el dispositivo USB mientras "Now Reading..." esté parpadeando en la pantalla del monitor. • No ponga en marcha el motor del coche si hay un dispositivo USB - JVC KD AVX33 | Instructions - Page 101
de Audio) AVRCP (Audio/Video Remote Control Profile- Perfil de Control Remoto de Audio/Video) SPP (Serial Port Profile-Perfil de Puerto Serie) OPP (Object Push Profile-Perfil de carga de objetos) Apareamiento y código PIN Cuando se conecta por primera vez un dispositivo Bluetooth a la unidad, efect - JVC KD AVX33 | Instructions - Page 102
introducir cualquier número que desee (número de 1 a 16 dígitos). * Algunos dispositivos tienen su propio código PIN: Introduzca el código PIN específico en la unidad. 7 Haga funcionar el dispositivo Bluetooth objetivo. (Mientras "Open..." está parpadeando en la pantalla). Ingrese el mismo código - JVC KD AVX33 | Instructions - Page 103
la página 32 y luego... 1 NEW DEVICE Dial Menu Message Open Search Special Device Borrar un dispositivo registrado 1 Seleccione "Bluetooth Phone" o "Bluetooth Audio" y, a continuación, seleccione el dispositivo registrado que desea borrar. La unidad visualiza la lista de dispositivos preajustados - JVC KD AVX33 | Instructions - Page 104
" de la página 33) Estado del dispositivo*2 Intensidad de la señal / Recordatorio de la batería *1 Puede ajustar el nivel de volumen de "Bluetooth Phone" sin afectar el de las demás fuentes. *2 Aparece solamente cuando la información procede del dispositivo. *3 Cada vez que pulsa 5 ∞, aparecerá el - JVC KD AVX33 | Instructions - Page 105
a "Bluetooth Phone". Para leer el mensaje más tarde • El mensaje queda almacenado en = . ( página 56) Cuando se ajusta a Para leer un mensaje, acceda a la lista de mensajes. ( página 56) Cómo hacer una llamada 1 Visualice . P902i Redial Received - JVC KD AVX33 | Instructions - Page 106
Dialling ... Jack 09845671234 también se puede acceder a través de = = . AV Menu Setup AV Menu ENT Enter Bluetooth ENT Enter Icono del menú Bluetooth Operaciones directas para remarcación / Marcación por voz Puede utilizar las funciones siguientes - JVC KD AVX33 | Instructions - Page 107
dispositivo registrado" de la página 33) Los siguientes botones del control remoto se pueden utilizar para las operaciones de audio de Bluetooth. Para los detalles, páginas 8 y 9. Información Bluetooth: Si desea obtener más información sobre Bluetooth, visite el sitio web de JVC. 37 OPERACIONES - JVC KD AVX33 | Instructions - Page 108
: Selecciona la carpeta (sólo MP3) Sostener: Visualiza la lista de discos Se recomienda usar un cambiador de CD compatible con MP3 JVC con este receptor. • Puede reproducir sólo discos CD (CD-DA) y MP3. Preparativos: Asegúrese de que se ha seleccionado para el ajuste de entrada externa - JVC KD AVX33 | Instructions - Page 109
los discos cargados Para usar el menú arriba. Los siguientes botones del control remoto se pueden utilizar para operar el cambiador de CD. página 38. Para usar el menú Disc List = Folder List = File List o : Seleccionar el disco. Pulse: Selecciona la carpeta (sólo MP3). Pulse - JVC KD AVX33 | Instructions - Page 110
jack del cambiador de CD de la parte trasera de esta unidad. • SIRIUS radio DLP (Down Link Processor) de JVC, para escuchar la radio (7474). Una vez que haya finalizado su suscripción, aparecerá "Subscription Updated Press Any Key to Continue" en el monitor. El Sintonizador universal XMDirectTM - JVC KD AVX33 | Instructions - Page 111
DISP: Cambia la pantalla a información de programa-nombre del artista/nombre de la canción (/nombre del compositor: sólo para la radio satelital SIRIUS). POWER]ON N° de preajuste Banda SIRIUS/XM página 46 Nº de canal ESPAÑOL Para la radio SIRIUS ~ Seleccione "SAT". Ÿ Seleccione las bandas. SAT - JVC KD AVX33 | Instructions - Page 112
ESPAÑOL Cómo almacenar canales en la memoria Se pueden preajustar seis canales para cada banda. Ej.: Almacenando un canal en el número de preajuste 5 1 Sintonice el canal que desee. SAT FLAT XM1 3Bch Rock XM Music Club 3: 45PM 2 Visualice la lista de preajustes. XM1 Store ENT 1 Channel - JVC KD AVX33 | Instructions - Page 113
el reproductor D. de JVC) al jack del cambiador de CD de la parte trasera. Preparativos: Asegúrese de que se ha seleccionado o 4 Repita los pasos 2 y 3 para seleccionar una pista. • Al seleccionar una pista, se iniciará la reproducción. • Para volver al menú anterior... para el - JVC KD AVX33 | Instructions - Page 114
ESPAÑOL Escuchado otros componentes externos AV-INPUT Puede conectar un componente externo a las clavijas LINE IN/VIDEO IN. • También puede conectar un Sistema de navegación a la clavija VIDEO IN para poder ver la pantalla de navegación (Asegúrese de haber seleccionado para - JVC KD AVX33 | Instructions - Page 115
ESPAÑOL EXT-INPUT Puede conectar un componente externo al jack del cambiador de CD de la parte trasera mediante el adaptador de entrada de línea-KS-U57 (no suministrado) o el adaptador de entrada AUX-KS-U58 (no suministrado). POWER]ON Título asignado ( pá - JVC KD AVX33 | Instructions - Page 116
Ecualización de sonido POWER]ON Edit 60.0 Hz +03 ENT Store ESPAÑOL Selección del modo de sonido ~ AV Menu Ÿ Setup ENT Enter Icono del menú del ecualizador AV Menu Equalizer ENT Enter ! Seleccione un modo de sonido. Equalizer Flat Hard Rock R&B Pop Jazz ENT Exit • Para los valores de - JVC KD AVX33 | Instructions - Page 117
SSM Title Entry Ej.: Cuando se selecciona FM como fuente Title Entry Station Name ABC DISP A a 0 Á á ENT Store ! Asigne un título. 1 Seleccione un carácter y, a continuación, mueva la posición de entrada. Setup 2 AV Menu ENT Enter Mode ENT Enter Icono del menú de modo • Para cambiar el juego - JVC KD AVX33 | Instructions - Page 118
Disc Surround (Disco Surround) ESPAÑOL Setup ENT Enter Mode (Modo) List (Lista) Bluetooth Dual Zone Ej.: Cambio del ajuste (Filtro pasaaltos) ~ AV Menu ! (Bluetooth) (Zona Dual) Sound Fader/Balance Volume Adjust Subwoofer High Pass Filter Crossover Through Ÿ Setup ENT - JVC KD AVX33 | Instructions - Page 119
clara o más oscura. Tint : Ajusta el matiz si la tez de las personas no es natural. *1 Se requiere la conexión del conductor ILLUMINATION CONTROL. ( Manual de instalación/conexión) *2 Puede ajustarse sólo cuando la fuente sea un disco o USB que contenga imágenes o películas, o "AV-IN". Continúa en - JVC KD AVX33 | Instructions - Page 120
ESPAÑOL Display (Pantalla) Opciones del menú Configuraciones seleccionables, [página de referencia] Aspect (Aspecto)*3 Puede cambiar la relación de aspecto de la imagen. Relación de aspecto de la señal entrante 4:3 16:9 Full : Para imágenes originales 16:9 Auto : • Para "DISC": La relación - JVC KD AVX33 | Instructions - Page 121
Disc Setup 1 (Config. Disco 1)*7 ESPAÑOL Opciones del menú Configuraciones seleccionables, [página de referencia] Menu Language (Idioma de Selecciona el idioma inicial del menú de disco; Inicial English ( Menu) también página 64). Audio Language (Idioma de Selecciona el idioma de audio inicial - JVC KD AVX33 | Instructions - Page 122
) o menos. • Los altavoces delanteros y traseros no se pueden ajustar separadamente entre la izquierda y la derecha. Independientemente del ajuste anterior... • El sonido no sale del subwoofer mientras se reproduce Dolby Pro Logic IIMovie o Music si el altavoz delantero está ajustado a . • No - JVC KD AVX33 | Instructions - Page 123
parte trasera. Changer/iPod/D. Player*13 : Cambiador de CD, iPod, reproductor D., [38, 43] External Input : Con excepción de lo de arriba. [45] • Para conectar el JVC DLP/XMDJVC100, este ajuste no es necesario. Será detectado automáticamente. Input (Entrada) *10 Aparece sólo cuando está conectada - JVC KD AVX33 | Instructions - Page 124
en . Pulse ENT y luego reposicione la unidad ( página 3). *14 Se requiere la conexión del conductor TEL MUTING. Consulte el manual de instalación/conexión (volumen separado). Equalizer (Ecualizador) Flat/Hard Rock/R&B/Pop/Jazz/Dance/Country/Reggae/Classic/User1 (User1)/User2 (User2)/User3 - JVC KD AVX33 | Instructions - Page 125
Entry (Entrada Título) Sólo para emisoras FM/AM, AV-IN y EXT-IN. [47] All Off/Intro/Repeat/Random Sólo para reproducción del disco/USB y iPod/reproductor D. (Desconect. Todos/Intro/ [17, 30, 39, 43] Repetir/Aleatoria) *19 Las opciones listadas bajo varían según las fuentes de reproducci - JVC KD AVX33 | Instructions - Page 126
Delete Pair (Borrar Vínculo) Sólo para los dispositivos registrados. Borre los dispositivos registrados. *20 Selecciónelo sólo para "Bluetooth Phone" o "Bluetooth Audio". Seleccione un dispositivo (o "NEW DEVICE") antes de utilizar el menú. *21 Solamente se puede seleccionar cuando el dispositivo - JVC KD AVX33 | Instructions - Page 127
: La unidad le informa la llegada de un mensaje emitiendo un pitido audible y visualizando "Receiving Message". Para leer el mensaje, pulse ENT ( página 35). Manual : La unidad no informa la llegada de un mensaje. MIC Setting (Config. Micrófono)*23 Ajusta el volumen del micrófono conectado a la - JVC KD AVX33 | Instructions - Page 128
ESPAÑOL Mantenimiento Cómo limpiar el conector Un desmontaje frecuente producirá el deterioro de los conectores. Para reducir esta posibilidad al mínimo, limpie periódicamente los conectores con un palillo de algodón, teniendo cuidado de no dañar los conectores. Para mantener los discos limpios - JVC KD AVX33 | Instructions - Page 129
8 cm (3-3/16 pulgada) . • Este receptor sólo podrá reproducir archivos de CD de audio (CD-DA) si hay diferentes tipos de archivos de audio (MP3/WMA/WAV/AAC) grabados • Para los detalles sobe el formato DVD-VR y la lista de reproducción, consulte el manual entregado con el equipo de grabación. - JVC KD AVX33 | Instructions - Page 130
es un código de extensión utilizado para archivos MPEG2 grabados mediante videocámaras JVC Everio. • El formato de flujo debe cumplir con el flujo de sistema/ la máxima velocidad de bit para las señales de vídeo (promedio): - DVD: 4 Mbps - USB: 2 Mbps Reproducción de archivos JPEG • Esta unidad puede - JVC KD AVX33 | Instructions - Page 131
Error" otra vez, revise si el dispositivo admite la función que ha intentado realizar. • Device Unfound : No se ha detectado ningún dispositivo Bluetooth disponible mediante . • Loading : La unidad está actualizando la guía telefónica y/o mensaje de texto. • Please Wait... : La unidad se est - JVC KD AVX33 | Instructions - Page 132
de JVC con el adaptador de radio SIRIUS KS-U100K de JVC (no suministrado) a la toma del cambiador de CD, situada en la parte JVC: Para usuarios de iPod: Para los usuarios del reproductor D.: - JVC KD AVX33 | Instructions - Page 133
00 +02 00 User 1/2/3 00 00 00 00 00 00 00 • "DVD Logo" es una marca comercial de DVD Format/ Logo Licensing Corporation registrado en los EE.UU., Japón y otros de Microsoft Corporation en los Estados Unidos y/u otros países. • iPod y iTunes son marcas comerciales de Apple Inc., registradas en los - JVC KD AVX33 | Instructions - Page 134
ESPAÑOL Códigos de idiomas (para selección del idioma de DVD/DivX) Código Idioma Código Idioma Código Idioma Código Idioma Código Idioma AA Afar FA Persa KL Groenlandés OC Ocitano ST Sesotho AB Abkasiano FI Finlandés - JVC KD AVX33 | Instructions - Page 135
funciona. • Aparece "No Signal". • Aparece "Mecha Error Push Reset" en el monitor, y el panel no se mueve. • lo para la reproducción Surround. El sonido no sale para la reproducción en estéreo. Este sí control remoto funciona sólo para controlar el reproductor DVD/CD). • Cambia la fuente. • Inicie la - JVC KD AVX33 | Instructions - Page 136
por usted. • El tiempo de reproducción transcurrido no es correcto. • Aparece "Not Support" en el monitor y se omiten las pistas. • Se generan ruidos. • Las cable del freno de estacionamiento no está correctamente conectado. ( Manual de Instalación/Conexión) • Conecte correctamente el cable de vídeo. - JVC KD AVX33 | Instructions - Page 137
el dispositivo Bluetooth. • Ingrese el mismo código PIN para la unidad y el dispositivo objetivo. Si el código PIN del Reset 08" en el monitor. Conecte correctamente este receptor y el cambiador de CD y pulse el botón de reinicialización del cambiador de CD. • Aparece "Reset 01" - "Reset - JVC KD AVX33 | Instructions - Page 138
"No Name" o "---" en el monitor. No hay información de texto para el canal seleccionado. • Aparece "Channel is Updating XX% El receptor está actualizando la información de canal y completed" o "UPDATING" en el monitor y no tarda algunos minutos en finalizar. se escucha ningún sonido. • La señal - JVC KD AVX33 | Instructions - Page 139
de firmware. • El sonido está distorsionado. Desactive el ecualizador en esta unidad o en el iPod/ iPod o reproductor D. • Aparece "Reset 01" - "Reset 07" en el monitor. Desconecte el adaptador de esta unidad y del iPod/ reproductor D. Seguidamente, vuélvalo a conectar. • Aparece "Reset - JVC KD AVX33 | Instructions - Page 140
IN, VIDEO IN, MIC IN, terminal de entrada USB, Entrada de antena Salida: 2nd AUDIO OUT, VIDEO OUT Otros: Cambiador de CD, OE REMOTE Gama de frecuencias: FM ) señal: Respuesta de frecuencias: DVD, fs=48 kHz: 16 Hz a 22 000 Hz DVD, fs=192 kHz: 16 Hz a 88 000 Hz VCD/CD: 16 Hz a 20 000 Hz - JVC KD AVX33 | Instructions - Page 141
máx.: Menos de 500 mA/5 V Versión: Bluetooth 1.2 certified Potencia de salida: Máx. +4 de Audio) AVRCP (Audio/Video Remote Control Profile-Perfil de Control Remoto (aprox.): 2,1 kg (4,7 lbs) (excluyendo accesorios) BLUETOOTH GENERAL El diseño y las especificaciones se encuentran sujetos - JVC KD AVX33 | Instructions - Page 142
Merci pour avoir acheté un produit JVC. Veuillez lire attentivement toutes les instructions avant d'utiliser l'appareil afin de bien comprendre son fonctionnement et d'obtenir les meilleures performances possibles. IMPORTANT POUR PRODUITS LASER 1. PRODUIT LASER CLASSE 1 2. ATTENTION: N'ouvrez pas - JVC KD AVX33 | Instructions - Page 143
Zones ....... 26 Opérations USB 29 Opérations Bluetooth®- Téléphone portable/lecteur audio ... 31 • Si Pour sécurité... • N'augmentez pas trop le volume car cela bloquerait les sons de l'extérieur rendant coute du changeur de CD 38 Écoute de la radio satellite 40 Écoute de iPod/lecteur D 43 É - JVC KD AVX33 | Instructions - Page 144
Niveau 1, Niveau 2, Romeo et Joliet DVD+VR • Les DVD-RAM ne peuvent pas être reproduits. Dual Disc Côté DVD Face non DVD CD/VCD CD Audio/CD Text (CD-DA)/DTS-CD VCD (CD Vidéo) CD-ROM CD-I (CD-I Ready) CD enregistrable/réinscriptible CD-DA (CD-R/-RW) • Compatibles avec ISO 9660 Niveau - JVC KD AVX33 | Instructions - Page 145
. Vous pouvez choisir la langue des indications sur le moniteur. ( page 50) ⁄ Choisissez ] , puis mettez en service l'écran . Setup Display Clock Disc Setup 1 Disc Setup 2 Tuner Demonstration Display Demonstration Wall Paper Scroll Tag Display Dimmer On - JVC KD AVX33 | Instructions - Page 146
fois) FRANÇAIS Clock Time Set 12Hours/24Hours OSD Clock 1:00AM ¤ Retournez au menu . # Choisissez ], puis mettez en service l'écran. ‹ Réglez l'horloge. Time Set Hours 1 : 00AM ENT Exit Time Set Minutes 3 : 45PM ENT Exit $ Retournez au menu . › Choisissez - JVC KD AVX33 | Instructions - Page 147
source. TUNER = SAT (SIRIUS/XM) = DISC (DVD/VCD/CD) = USB =CD-CH, iPod, D.PLAYER, ou EXT-IN = Bluetooth Phone = Bluetooth Audio = AV-IN =(retour au début) • Vous • Affichez ou faites disparaître le *1. • Met en service Voice Dialing [Maintenez pressée]. • Atténuation du son (si l'appareil - JVC KD AVX33 | Instructions - Page 148
fonction de télécommande de volant. • Référez-vous au Manuel d'installation/ raccordement (volume séparé) pour les connexion. Attention: • N'exposez la fonction de double zone est en service ( page 26), la télécommande fonctionne uniquement pour commander le lecteur de DVD/CD. i ; o a s 1*1 • - JVC KD AVX33 | Instructions - Page 149
iPod d'Apple/lecteur D. de JVC Bluetooth Audio: Lecture/pause. Sur les menus: Retour. e*2 Ajuste le niveau volume à travers la fiche 2nd AUDIO OUT. ( page 26) r*2 Met en et hors service la fonction de double zone. t*1*2 Choisit les modes sonores préréglés. y • DVD • Changeur de CD: Choisit le disque - JVC KD AVX33 | Instructions - Page 150
nom n'est affecté, "No Name" apparaît. ! Recherchez une station-Recherche automatique. • Recherche manuelle: Maintenez pressé 4 ou ¢ jusqu'à ce que "Manual Search" apparaisse sur l'affichage, puis appuyez répétitivement sur la touche. • L'indicateur ST s'allume lors de la réception d'une émission - JVC KD AVX33 | Instructions - Page 151
avec un signal suffisamment fort Fonctionne uniquement pour les bandes FM. Une fois que vous avez mis en service cette fonction (choisissez ), elle reste toujours en service lors de la recherche des stations FM. 1 AV Menu Setup ENT Enter 2 AV Menu Préréglage automatique des - JVC KD AVX33 | Instructions - Page 152
FRANÇAIS Préréglage manuel Ex.: Mémorisation de la station FM de fréquence 92,5 MHz sur le numéro de préréglage 4 de la bande FM1. 1 Sélection de stations préréglées Sur la télécommande: 1 2 ou 2 Accordez la station que vous souhaitez prérégler. No Name 92.5 MHz 3 FM1 1 87.5 2 89.9 3 97.9 4 105 - JVC KD AVX33 | Instructions - Page 153
la commande effectuée. • Dans certains cas, la commande peut être refusée sans que " " apparaisse. Insérez un disque. La lecture démarre automatiquement. Face portant l'étiquette Attention: Ne mettez pas vos doigts derrière le panneau de commande. FRANÇAIS Précautions sur le réglage du volume - JVC KD AVX33 | Instructions - Page 154
No de programme (ou No. de liste de lecture)/No. de chapitre/durée de lecture No de groupe/No de plage/Durée de lecture DVD AUDIO MLP MULTI G 01 02 0:45:38 BONUS B.S.P RPT 3: 45PM 4 ¢ Appuyez: Sélection d'une plage Maintenez pressée: Recherche vers l'arrière/vers l'avant*1 5 ∞ Choisissez le - JVC KD AVX33 | Instructions - Page 155
FRANÇAIS DVD DivX FRONT 2CH T 01 C 02 0:45:38 Current Folder Name Current File Name.avi de lecture Pour les JPEG: No de dossier/No de fichier Indicateur PBC s'allume quand la fonction PBC est en service. page 46 VCD PBC FLAT 02 0:45:38 3: 45PM 4 ¢ Appuyez: Sélection d'une plage No de - JVC KD AVX33 | Instructions - Page 156
de plage/Durée de lecture Maintenez pressée: Titre de plage (uniquement pour Recherche vers l'arrière/vers l'avant*1 les CD Text)*3 Format audio (MP3/WMA/WAV/AAC) page 46 CD MP3 FLAT T 01 02 0:45:38 Current Folder Name Current File Name.mp3 RPT 3: 45PM 4 ¢ Appuyez: Sélection d'une plage - JVC KD AVX33 | Instructions - Page 157
titre actuel - - Track: Répète la plage actuelle - - Track: Reproduit les 15 premières secondes de chaque plage (pour les VCD: PBC hors service) Chapter: Répéter le chapitre actuel Program: Répète le programme actuel (non disponible pour la - lecture de liste de lecture) Track: Répète la - JVC KD AVX33 | Instructions - Page 158
FRANÇAIS Sélection de plages sur la liste Si un disque comprend des dossiers, vous pouvez afficher la liste des dossiers/plages (fichier), puis démarrer la lecture. 1 Folder List My Best Cinema Pops My Best2 Favorite Song Off Cinema2 ENT La liste des dossiers apparaît. • Maintenez la - JVC KD AVX33 | Instructions - Page 159
FRANÇAIS Opérations en utilisant de la télécommande-RM-RK251 : Arrêtez la lecture. : Démarre la lecture/Met la lecture en pause (si la touche est pressée pendant la lecture). : Recherche vers l'arrière/vers l'avant.*2 (Aucun son n'est entendu.) (Lecture au ralenti*3 si la touche est pressée - JVC KD AVX33 | Instructions - Page 160
la lecture ou une pause). : Sélection du format de l'image. : Sélection d'un canal audio (ST: stéréo, L: gauche, R: droit). : Met en/hors service les sous-titres. = = : Sélection d'un chapitre. Choisit un programme (quand l'appareil n'est pas en cours de lecture). (deux fois) = = : Choisit - JVC KD AVX33 | Instructions - Page 161
: Arrêtez la lecture. : Démarrez la lecture. (Diaporama: chaque fichier est affiché pendant quelques secondes.) Affiche le fichier actuel jusqu'à ce que vous le changiez, si vous appuyez sur cette touche pendant le diaporama. : Sélection d'une plage. : Sélection d'un dossier. : Sélection du format - JVC KD AVX33 | Instructions - Page 162
le numéro de code dépend du disque. 3 Suivez les instructions interactives qui apparaissent sur le moniteur. Sélection d'une image fixe codées multicanaux telles que Dolby Digital*1, DTS*2 et DVD Audio. (Quand la fonction est en service, "MULTI" apparaît sur l'écran d'information de source.) - JVC KD AVX33 | Instructions - Page 163
. • Through: Tous les signaux des canaux entrant sont envoyés aux enceintes correspondantes. • Dolby PLIIMovie: Met en service Dolby Pro Logic IIMovie. • Dolby PLIIMusic: Met en service Dolby Pro Logic IIMusic . Vous pouvez ajuter les réglages et . ( ci-dessous.) Sur - JVC KD AVX33 | Instructions - Page 164
FRANÇAIS Opérations en utilisant la barre sur l'écran (DVD/VCD/DivX/MPEG1/ MPEG2/JPEG) Ces opérations sont possibles sur le moniteur en utilisant la télécommande. 1 Affichez la barre sur écran. ( page 25) 2 Choisissez - JVC KD AVX33 | Instructions - Page 165
Dossier/fichier actuel (JPEG) 5 Indications de la durée TOTAL Durée de lecture écoulée du disque T. REM Durée de lecture restante du titre (pour les DVD) Durée de lecture restante du disque (pour les autres) TIME Durée de lecture écoulée du chapitre ou de la plage actuelle*2 REM Durée de - JVC KD AVX33 | Instructions - Page 166
• Quand le fonctionnement sur deux zone est en service, vous pouvez commander le lecture de DVD/ CD uniquement en utilisant la télécommande. 1 AV Menu principale. *1 Système Surround virtuel pour casque d'écoute original de JVC. Ce mode Surround fonctionne aussi pour la source principale "DISC" si - JVC KD AVX33 | Instructions - Page 167
Four seasons Artist Robert M. Smith Title Rain Track : 6 / 14 Cloudy Fair Fog Hail Indian summer Rain Shower Snow Thunder Typhoon Wind Winter sky Ex.: CD Text 1 Fenêtre de sélection du mode de lecture: apparaît quand OSD est pressée ( ci-dessous). 2 Mode de lecture choisi ( ci-dessous) 3 Durée de - JVC KD AVX33 | Instructions - Page 168
cran de liste Pour les disques sauf les DVD, VCD et CD Quand le fonctionnement sur deux zones est en service, ces opérations sont possibles sur le 06/25 L-1 Time 19:00 10:30 17:00 13:19 22:00 8:23 Title JVC DVD World 2004 Music Festival children 001 children 002 PLAY LIST No Date 1 07/05/25 2 - JVC KD AVX33 | Instructions - Page 169
pas choisir "USB" quand le fonctionnement sur deux zones est en service. • Toutes les plages du périphérique USB sont reproduites répétitivement jusqu'à ce que Sauf pour les lecteur D. JVC XA-HD500. *2 Sauf pour les fichiers MPEG2 enregistrés par le caméscope JVC Everio (code d'extension ). - JVC KD AVX33 | Instructions - Page 170
Attention: • Éviter d'utiliser le périphérique USB s'il peut gêner une conduite une conduite en toute sécurité. • Ne déconnectez puis reconnectez pas le périphérique USB répétitivement pendant que "Now Reading..." clignote sur l'écran du moniteur. • Ne démarrez pas le moteur de la voiture si un pé - JVC KD AVX33 | Instructions - Page 171
riphérique pour mettre en service la fonction Bluetooth. d'objet) Méthodes d' instructions fournies avec une nouvelle connexion Bluetooth. La le périphérique Bluetooth. connexion est établie à partir de cet • La marque du mot et les logos Bluetooth sont la appareil. propriété de Bluetooth - JVC KD AVX33 | Instructions - Page 172
spécifique de l'appareil extérieur sur cet appareil. • Référez-vous aux instructions fournies avec le périphérique pour vérifier le code PIN. 4 Utilisez le périphérique Bluetooth pour réaliser la connexion. Maintenant la connexion est établie et vous pouvez utiliser le périphérique à travers cet - JVC KD AVX33 | Instructions - Page 173
" à la page 32 puis... 1 NEW DEVICE Dial Menu Message Open Search Special Device Suppression d'un appareil enregistré 1 Choisissez "Bluetooth Phone" ou "Bluetooth Audio", puis choisissez l'appareil enregistré que vous souhaitez supprimer. L'appareil affiche la liste des périphériques prérégl - JVC KD AVX33 | Instructions - Page 174
de volume du microphone. ( page 57) Quand un appel arrive... Nom et numéro de téléphone (s'ils sont obtenus) La source change automatiquement sur "Bluetooth Phone". Quand est en service... L'appareil répond automatiquement aux appels entrant. ( page 57) • Quand est hors - JVC KD AVX33 | Instructions - Page 175
sur "Bluetooth Phone". Pour lire le message plus tard • Le message est mémorisé dans = . ( page 56) Quand est réglé sur Affichez la liste des messages pour lire un message. ( page 56) Pour faire un appel 1 Affichez le menu . P902i Redial Received - JVC KD AVX33 | Instructions - Page 176
AV Menu> = = . AV Menu Setup AV Menu ENT Enter Bluetooth ENT Enter Icône du menu Bluetooth Opérations directes pour 3 44455556666 4 09845671234 5 99988887777 6 55566668888 ENT Pour mettre en service la composition vocale Vous pouvez faire un appel avec votre voix. 2 - JVC KD AVX33 | Instructions - Page 177
phonique Bluetooth. Bluetooth Saut vers l'arrière/saut vers l'avant Devient bleu quand le périphérique POWER]ON Bluetooth est connecté. *1 Bluetooth ~ Choisissez "Bluetooth Audio". rique Bluetooth, Bluetooth Bluetooth. Pour plus de détails, pages 8 et 9. Informations sur le système Bluetooth - JVC KD AVX33 | Instructions - Page 178
ère/vers l'avant 5 ∞ Appuyez: Sélection du dossier (support MP3 uniquement) Maintenez pressée: Affichage de la liste des disques Il est recommandé d'utiliser un changeur de CD JVC compatible MP3 avec votre autoradio. • Vous pouvez uniquement reproduire des CD (CD-DA) et des disques MP3. Préparation - JVC KD AVX33 | Instructions - Page 179
Disc List = Folder List = File List Vous pouvez utiliser les touches suivantes sur la télécommande pour commander le changeur de CD. ou : Sélection du disque Appuyez: Sélection du dossier (MP3 uniquement) Appuyez: Sélection d'une plage. Maintenez pressée: Recherche vers l'arrière/vers - JVC KD AVX33 | Instructions - Page 180
(vendu séparément) à la prise du changeur de CD à l'arrière de l'appareil. • JVC SIRIUS radio DLP-Processeur de signaux satellite-terre pour la appelez le numéro vert SIRIUS au 1-888-539-SIRIUS (7474). "Subscription Updated Press Any Key to Continue" (Inscription mise à jour. Appuyez sur n'importe - JVC KD AVX33 | Instructions - Page 181
DISP: Commute sur l'affichage d'information du programme-nom de l'artiste/nom de la chanson (/nom du compositeur: uniquement pour la radio satellite SIRIUS). POWER]ON No de préréglage Bande SIRIUS/XM page 46 No de canal FRANÇAIS SAT FLAT XM1 Preset1 01ch Category Name Channel Name 3: 45PM - JVC KD AVX33 | Instructions - Page 182
FRANÇAIS Mémorisation des canaux Vous pouvez prérégler six canaux pour chaque bande. Ex.: Mémorisation d'un canal sur le numéro de préréglage 5 1 Accordez le canal que vous souhaitez. SAT FLAT XM1 3Bch Rock XM Music Club 3: 45PM 2 Affichez la liste des préréglages. XM1 Store ENT 1 - JVC KD AVX33 | Instructions - Page 183
la touche. Il est nécessaire de connecter l'adaptateur d'interface (KS-PD100 pour iPod d'Apple ou KS-PD500 le lecteur D. de JVC) à la prise de changeur de CD à l'arrière. Préparation: Assurez-vous que ou est choisi pour le réglage de l'entrée extérieure. ( page 53) ~ Choisissez - JVC KD AVX33 | Instructions - Page 184
FRANÇAIS Écoute d'un autre appareil extérieur AV-INPUT Vous pouvez connecter un appareil extérieur aux fiches LINE IN/VIDEO IN. • Vous pouvez aussi connecter un système de navigation à la fiche VIDEO IN de façon à pouvoir voir l'écran de navigation. (Assurez-vous que est choisi pour < - JVC KD AVX33 | Instructions - Page 185
EXT-INPUT Vous pouvez connecter un appareil extérieur aux prises du changeur de CD à l'arrière de l'appareil en utilisant l'adaptateur d'entrée de ligne-KS-U57 (non fourni) ou l'adaptateur d'entrée auxiliaire-KS-U58 (non fourni). POWER]ON Titre - JVC KD AVX33 | Instructions - Page 186
Égalisation du son POWER]ON Edit 60.0 Hz +03 ENT Store FRANÇAIS Sélection du mode sonore ~ AV Menu Ÿ Setup ENT Enter Icône du menu de l'égaliseur AV Menu Mémorisation de votre propre ajustement Vous pouvez mémoriser votre ajustement dans User1, User2 et User3. 1 Répétez les étapes ~ et Ÿ, - JVC KD AVX33 | Instructions - Page 187
Affectation de titres aux sources POWER]ON Appuyez: Changez le jeu de caractères Maintenez pressée: Effacez le titre Title Entry Station Name ABC Radio DISP A a 0 Á á ENT Store FRANÇAIS Vous pouvez affecter des titres comme suit. Stations FM/AM 16 caractères maximum-30 stations maximum AV- - JVC KD AVX33 | Instructions - Page 188
List (Liste) Bluetooth Dual Zone Ex. Changement du réglage (Bluetooth) (Double Zone) ! ~ AV Menu Sound Fader/Balance Volume ⁄ Icône du menu du son High Pass Filter Through AV Menu On Sound ENT Enter ENT Exit Articles du menu AV Menu Setup ENT Enter • Les - JVC KD AVX33 | Instructions - Page 189
/ WMA/WAV/AAC. Dimmer (Gradateur) Off : Annulation. On : Met en service le gradateur. Auto : Assombrit le moniteur quand vous allumez les feux de la La connexion du fil ILLUMINATION CONTROL est requise. ( Manuel d'installation/Raccordement) *2 Ajustable uniquement quand la source est un disque ou - JVC KD AVX33 | Instructions - Page 190
pour l'ajustement de l'horloge. Alaska, Pacific, Mountain, Central, Eastern, Atlantic, Newfoundland Mettez en service l'heure (DST) d'été si votre zone d'habitation y est soumise. Off : Annulation. On : Met en service l'heure d'été. Clock (Horloge) *3 Ne peut pas être ajusté pour les sources audio - JVC KD AVX33 | Instructions - Page 191
Disc Setup 1 (Réglage Disque 1)*7 FRANÇAIS Articles du menu Réglages pouvant être choisis, [page de référence] Menu Language (Langue du Choisissez la langue initiale du menu de disque; Réglage initial, Menu) English ( aussi page 64). Audio Language (Langue Audio) Choisissez la langue initiale - JVC KD AVX33 | Instructions - Page 192
lors de la lecture d'un support Dolby Digital. Auto: Choisissez ce réglage pour appliquer les effets aux supports codés multicanaux. On : Choisissez la distance de l'enceinte • Maintenez pressée ENT pour mettre en et hors service la tonalité de test. Vous pouvez ajuster le délai de sortie des - JVC KD AVX33 | Instructions - Page 193
ère. Changer/iPod/D. Player*13: Changeur de CD, iPod ou lecteur D. [38, 43] External Input : N'importe quel autre appareils que ceux donnés ci- dessus. [45] • Pour la connexion du JVC DLP/XMDJVC100, ce réglage n'est pas requis. Il est détecté automatiquement. Input (Entrée) *10 Apparaît uniquement - JVC KD AVX33 | Instructions - Page 194
: Annulation. On : Met en service la tonalité sonore des touches. TEL MUTING est requise. Référez-vous au Manuel d'installation/raccordement (volume séparé). Equalizer (Égaliseur) Flat/Hard User1 (User1)/User2 (User2)/User3 (User3), [46] Sound (Son) Articles du menu Fader/Balance (Fader/ Balance) - JVC KD AVX33 | Instructions - Page 195
pouvez changer le niveau de volume maximum de cet autoradio. Off : Met hors service l'amplificateur intégré. Low Power : VOL 00 à 30 (Choisissez ce [47] All Off/Intro/Repeat/Random Uniquement pour la lecture de disque/USB et iPod/lecteur D. (Arret Tout/Introduction/ [17, 30, 39, 43] Répétition/Al - JVC KD AVX33 | Instructions - Page 196
" ou "Bluetooth Audio". Choisissez un appareil (ou "NEW DEVICE") avant d'utiliser le menu. *21 Peut être choisi uniquement quand le périphérique est compatible avec les messages textuels. Lors de l'utilisation d'un appareil Bluetooth, référez-vous aussi aux instructions fournies avec l'appareil - JVC KD AVX33 | Instructions - Page 197
vous informe de l'arrivée d'un message par une sonnerie et en affichant "Receiving Message". Pour lire le message, appuyez sur ENT ( page 35). Manual : L'appareil ne vous informe pas de l'arrivée d'un message. MIC Setting (Régl. Microphone)*23 Version (Version)*24 Ajustez le volume du microphone - JVC KD AVX33 | Instructions - Page 198
Pour garder les disques propres Si le disque est sale, sa lecture risque d'être déformée. Si un disque est sale, essuyez-le avec un chiffon doux, en ligne remettre un disque dans sa boîte, insérez-le délicatement sur le support central (avec la surface imprimée dirigée vers le haut). • Conservez les - JVC KD AVX33 | Instructions - Page 199
de 8 cm (3-3/16 pouces). • Cet appareil peut uniquement reproduire les fichiers CD audio (CD-DA) si différents types de fichier (MP3/ WMA/WAV/AAC) sont • Pour les détails sur le format DVD-VR et la liste de lecture, référez-vous aux instructions fournies avec l'appareil d'enregistrement. Lecture de - JVC KD AVX33 | Instructions - Page 200
est le code d'extension pour les fichiers MPEG2 enregistrés par les caméscopes JVC Everio. • Le format de transmission en continu doit être conforme au glage . • Vous ne pouvez pas mettre en service le Surround pour les DVD Vidéo MPEG multicanaux ou les sources DivX 2 canaux et - JVC KD AVX33 | Instructions - Page 201
• Lors de la connexion d'un périphérique USB, référezvous aussi à ses instructions. • Connectez uniquement un périphérique USB à la fois à cet appareil. fonction que vous avez essayée. • Device Unfound : Aucun périphérique Bluetooth disponible n'est détecté avec . • Loading : L'appareil met - JVC KD AVX33 | Instructions - Page 202
la radio JVC SIRIUS PnP ("Plug and Play"), en utilisant l'adaptateur de radio SIRIUS JVC, KS-U100K (non fourni) sur la prise de changeur de CD à ce cas, consultez le site Web JVC suivant: Pour les utilisateurs de iPod: Pour les - JVC KD AVX33 | Instructions - Page 203
00 00 00 00 00 • Le "DVD Logo" est une marque de commerce de DVD Format/Logo Licensing Corporation, enregistrée aux É -Unis et/ou dans les autres pays. • iPod et iTunes sont des marques de commerce d'Apple pour un support codé multicanaux. (Quand le fonctionnement sur deux zones est en service, le - JVC KD AVX33 | Instructions - Page 204
FRANÇAIS Codes de langue (pour la sélection de la langue des DVD/DivX) Code Langue AA Afar AB Abkhazien AF Afrikaans AM Amharique AR Arabe AS Assamais AY Aymara AZ Azerbaïdjanais BA Bashkir BE Biélorusse - JVC KD AVX33 | Instructions - Page 205
télécommande ne fonctionne pas. • "No Signal" apparaît. • "Mecha Error Push Reset" apparaît sur le moniteur et le panneau ne bouge pas. • Le préré le fonctionnement sur deux zones est en service, la télécommande fonctionne uniquement pour commander le lecteur de DVD/CD). • Changez la source. • Dé - JVC KD AVX33 | Instructions - Page 206
frein de stationnement n'est pas connecté correctement. ( Manuel d'installation/Raccordement) • Aucune image n'apparaît sur le moniteur • Connectez est causé par la façon dont les plages ont été enregistrées. • "Not Support" apparaît sur le moniteur et la plage est sautée. • Du bruit est produit. - JVC KD AVX33 | Instructions - Page 207
. ( page 32) • L'appareil ne réalise pas le pairage avec le périphérique Bluetooth. • Entrez le même code PIN pour cet appareil et le périphérique cible. Si le code PIN du périphérique n'est pas indiqué sur ses instructions, essayez "0000" ou "1234". • Choisissez le nom de l'appareil à partir de - JVC KD AVX33 | Instructions - Page 208
retourne au canal précédent pendant l'écoute de la radio satellite XM. • "No Name" ou "---" apparaît sur le moniteur. • "Channel is Updating XX% completed " ou "UPDATING " apparaît sur le moniteur et aucun son ne peut être entendu. • "OFF AIR" apparaît sur le moniteur lors de l'écoute de la - JVC KD AVX33 | Instructions - Page 209
micrologiciel. • Le son est déformé. Mettez hors service l'égaliseur sur cet appareil ou sur iPod/lecteur D. • "Disconnect" apparaît sur le se trouve dans l'appareil. Importez des plages dans iPod ou le lecteur D. • "Reset 01" - "Reset 07" apparaît sur le moniteur. Déconnectez l'adaptateur au - JVC KD AVX33 | Instructions - Page 210
Entrée LINE IN, VIDEO IN, MIC IN, prise d'entrée USB, entrée d'antenne Sortie: 2nd AUDIO OUT, VIDEO OUT Autres: Changeur de CD, OE REMOTE Plage de fréquences: FM (avec : Réponse en fréquence: DVD, fs=48 kHz: 16 Hz à 22 000 Hz DVD, fs=192 kHz: 16 Hz à 88 000 Hz VCD/CD: 16 Hz à 20 000 Hz - JVC KD AVX33 | Instructions - Page 211
Courant maximum: Moins de 500 mA/5 V Version: Bluetooth 1.2 certifié Puissance de sortie: +4 dBm Max. tribution audio avancé) AVRCP (Audio/Video Remote Control Profile-Profile de télécommande audio à +40°C (32°F à 104°F) Dimensions (L × H × P): Taille d'installation (approx.): 182 mm × 52 mm × - JVC KD AVX33 | Instructions - Page 212
Having TROUBLE with operation? Please reset your unit Refer to page of How to reset your unit Still having trouble?? USA ONLY Call 1-800-252-5722 http://www.jvc.com We can help you! EN, SP, FR © 2007 Victor Company of Japan, Limited 0207MNMMDWJEIN - JVC KD AVX33 | Instructions - Page 213
Instructions DVD/CD RECEIVER KD-ADV38/KD-AVX33
-
 1
1 -
 2
2 -
 3
3 -
 4
4 -
 5
5 -
 6
6 -
 7
7 -
8
-
9
-
10
-
11
-
12
-
13
-
14
-
15
-
16
-
17
-
18
-
19
-
20
-
21
-
22
-
23
-
24
-
25
-
26
-
27
-
28
-
29
-
30
-
31
-
32
-
33
-
34
-
35
-
36
-
37
-
38
-
39
-
40
-
41
-
42
-
43
-
44
-
45
-
46
-
47
-
48
-
49
-
50
-
51
-
52
-
53
-
54
-
55
-
56
-
57
-
58
-
59
-
60
-
61
-
62
-
63
-
64
-
65
-
66
-
67
-
68
-
69
-
70
-
71
-
72
-
73
-
74
-
75
-
76
-
77
-
78
-
79
-
80
-
81
-
82
-
83
-
84
-
85
-
86
-
87
-
88
-
89
-
90
-
91
-
92
-
93
-
94
-
95
-
96
-
97
-
98
-
99
-
100
-
101
-
102
-
103
-
104
-
105
-
106
-
107
-
108
-
109
-
110
-
111
-
112
-
113
-
114
-
115
-
116
-
117
-
118
-
119
-
120
-
121
-
122
-
123
-
124
-
125
-
126
-
127
-
128
-
129
-
130
-
131
-
132
-
133
-
134
-
135
-
136
-
137
-
138
-
139
-
140
-
141
-
142
-
143
-
144
-
145
-
146
-
147
-
148
-
149
-
150
-
151
-
152
-
153
-
154
-
155
-
156
-
157
-
158
-
159
-
160
-
161
-
162
-
163
-
164
-
165
-
166
-
167
-
168
-
169
-
170
-
171
-
172
-
173
-
174
-
175
-
176
-
177
-
178
-
179
-
180
-
181
-
182
-
183
-
184
-
185
-
186
-
187
-
188
-
189
-
190
-
191
-
192
-
193
-
194
-
195
-
196
-
197
-
198
-
199
-
200
-
201
-
202
-
203
-
204
-
205
-
206
-
207
-
208
-
209
-
210
-
211
-
212
-
213
 |
 |

ENGLISH
FRANÇAIS
ESPAÑOL
KD-ADV38/KD-AVX33
For installation and connections, refer to the separate manual.
Para la instalación y las conexiones, refiérase al manual separado.
Pour l’installation et les raccordements, se référer au manuel séparé.
INSTRUCTIONS
MANUAL DE INSTRUCCIONES
MANUEL D’INSTRUCTIONS
LVT1658-001A
[J]
For canceling the display demonstration, see page 5.
Para cancelar la demonstración en pantalla, consulte la página 5.
Pour annuler la démonstration des affichages, référez-vous à la page 5.
DVD/CD RECEIVER
RECEPTOR CON DVD/CD
RÉCEPTEUR DVD/CD
KD-AVX33
KD-ADV38
For customer Use:
Enter below the Model No.
and Serial No. which are
located on the top or bottom
of the cabinet. Retain this
information for future
reference.
Model No.
Serial No.