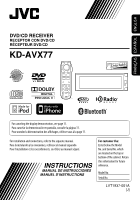
JVC KD-AVX77 Instructions
JVC KD-AVX77 - EXAD - DVD Player Manual
 |
UPC - 046838035494
View all JVC KD-AVX77 manuals
Add to My Manuals
Save this manual to your list of manuals |
JVC KD-AVX77 manual content summary:
- JVC KD-AVX77 | Instructions - Page 1
FRANÇAIS ESPAÑOL ENGLISH DVD/CD RECEIVER RECEPTOR CON DVD/CD RÉCEPTEUR DVD/CD KD-AVX77 For canceling the display demonstration, see les raccordements, se référer au manuel séparé. INSTRUCTIONS MANUAL DE INSTRUCCIONES MANUEL D'INSTRUCTIONS For customer Use: Enter below the Model No. and Serial No - JVC KD-AVX77 | Instructions - Page 2
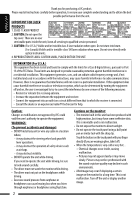
read all instructions carefully before operation, to ensure your complete understanding and to obtain the best possible performance from the unit. ENGLISH IMPORTANT FOR LASER PRODUCTS 1. CLASS 1 LASER PRODUCT 2. CAUTION: Do not open the top cover. There are no user serviceable parts inside the - JVC KD-AVX77 | Instructions - Page 3
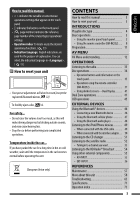
Display........... 41 Dual Zone operations 41 USB operations 45 EXTERNAL DEVICES Using the Bluetooth® devices 46 • Connecting a new Bluetooth device 46 • Using the Bluetooth cellular phone 47 • Using the Bluetooth audio player 48 Listening to the iPod/iPhone devices 49 • When connected with - JVC KD-AVX77 | Instructions - Page 4
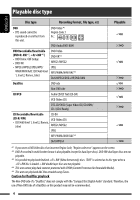
reproduced or emitted from this unit. DVD-Video *1 Region Code: 1 Ex.: DVD-Audio/DVD-ROM DVD Recordable/Rewritable (DVD-R/-RW *2, +R/+RW *3) • DVD Video: UDF bridge • DVD-VR • MPEG1/MPEG2/JPEG/MP3/ WMA/WAV/AAC: ISO 9660 level 1, level 2, Romeo, Joliet DVD-Video DVD-VR*4 MPEG1/MPEG2 JPEG MP3/WMA - JVC KD-AVX77 | Instructions - Page 5
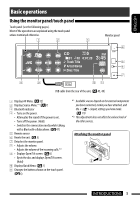
the following pages). Most of the operations are explained using the touch panel unless mentioned otherwise. Monitor panel USB cable from the rear of the unit, ( 45, 49) 1 Displays AV Menu. ( 12) 2 Displays Source Menu.*1 ( 7) 3 Bluetooth indicator 4 • Turns on the power. • Attenuates the sound - JVC KD-AVX77 | Instructions - Page 6
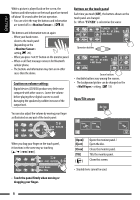
When a call/Text message comes in for Bluetooth cellular phone. • The buttons and information setting: Digital devices (CD/USB) produce very little noise compared also adjust the volume by moving your finger as illustrated on any part of the touch panel. When you drag your finger on the used. - JVC KD-AVX77 | Instructions - Page 7
frequently used functions by using Quick Menu. Displays screen. ( 18) Changes the HD Radio reception mode. ( 25) Enables to search for only HD Radio stations. ( 54) Changes setting. ( 18) Displays . ( 29) Changes the control of iPod/iPhone device for "iPod USB - JVC KD-AVX77 | Instructions - Page 8
or the like. If the effectiveness of the remote controller decreases, replace the batteries. Before using the remote controller: • Aim the remote controller directly at the remote sensor on the unit. control function. • See the Installation/Connection Manual (separate volume) for connection. 8 - JVC KD-AVX77 | Instructions - Page 9
/CD-CH: - DVD-Video: Selects the title. - DVD-VR: Selects the program/playlist. - MPEG1/MPEG2/MP3/WMA/WAV/AAC: Selects the folders if included. • iPod USB: Selects previous/next item.*2 • iPod (connected with KS-PD100): -5 : Enters the main menu (then 5/∞/ / work as menu selecting buttons - JVC KD-AVX77 | Instructions - Page 10
) button • Ends the call. BAND button • TUNER/HD Radio/SAT: Selects the bands. 7 (stop) button • DISC/USB: Stops playback. • Bluetooth: Pauses playback. t RETURN button*3 • VCD: Returns to the PBC menu. • DVD-Video/DVD-VR/MPEG1/MPEG2/JPEG/VCD: Cancels the pop-up menu on the on-screen bar. y MENU - JVC KD-AVX77 | Instructions - Page 11
ENGLISH Preparation Canceling the display demonstration and setting the clock ~ Turn on the power. Ÿ Display AV Menu. ! Select . ⁄ Cancel the demonstration. Touch to show the setting items. Select , then touch < >. @ Set the clock. Select < > (clock). Adjust the hour. - JVC KD-AVX77 | Instructions - Page 12
ENGLISH AV Menu understanding You can use the AV Menu for most of the operations and settings. . Ÿ Display AV Menu. • AV Setup: • Disc Surround: • Equalizer: • Sound: • Mode: • List: • Dual Zone: • Bluetooth: 13 - 20 21, 22 23 24 25, 26 27 - 29 41 - 44 29 - 32 ! Touch the desired icon/item to - JVC KD-AVX77 | Instructions - Page 13
. You can select the background picture of the screen. ♦ Ring, Plain, Road, Night, User Capture 1, User Capture 2, User Capture 3, User Capture 4 You can capture an image shown on the screen and use it as the background picture. ♦ Normal ♦ Zoom : Captures an image without enlargement. : Captures - JVC KD-AVX77 | Instructions - Page 14
ENGLISH Menu item Selectable setting/item Wallpaper Color You can select the color of the unnatural. *1 Connection to the car light control switch is required. (See the Installation/Connection Manual.) *2 Adjustable only when the source is "DISC/USB/iPod USB" (the media must contain pictures - JVC KD-AVX77 | Instructions - Page 15
. ♦ 12 Hours, 24 Hours ♦ Off : Cancels. ♦ On : The clock time is displayed on the playback picture. Select to adjust the clock automatically using the clock time data provided via the satellite radio channel. ♦ Off, Auto Clock *3 Not adjustable when no picture is shown. *4 Turn off the - JVC KD-AVX77 | Instructions - Page 16
this setting separately for each source-"DISC/USB." ♦ Audio : Plays back audio files. ♦ Still Picture : Plays back JPEG files. ♦ Video : Plays back MPEG1/MPEG2 files. ♦ Audio&Video : Plays back audio files and MPEG1/MPEG2 files. Artwork For "DISC/USB": "Jacket picture" is shown on the screen - JVC KD-AVX77 | Instructions - Page 17
to always use this function. Speaker Size *7, *8 You can adjust the speaker size setting. 1 Front speakers 2 Center speaker 3 Rear speakers 4 effect only when surround is activated. ( 21) *7 Selectable only for "DISC/USB." *8 Playback stops when you change the setting. *9 It takes 5 seconds - JVC KD-AVX77 | Instructions - Page 18
120 cm/48 inch (for center speaker), 150 cm/60 inch (for front and rear speakers). • Touch [cm/inch] to change the measuring unit-cm and inch. will not be degraded and the stereo effect will remain. Tuner Area Setting ♦ US ♦ Europe ♦ South America : When using in North/Central/South America. FM - JVC KD-AVX77 | Instructions - Page 19
the iPod/iPhone using the USB Audio and Video cable for iPod/iPhone. ( 49) : Select when connecting an AV component such as a VCR. : Select when connecting an audio component such as a portable audio player. : Select when connecting a rear view camera. : Select when connecting a Navigation System - JVC KD-AVX77 | Instructions - Page 20
touch tone. : Cancels. : Select either one which mutes the sounds while using the cellular phone. Monitor/Sensor You can turn off the buttons and information panel. WallPaper/ Buttons and information light up when your hand moves Prox. closer to the touch panel. WallPaper/ Buttons Manual. 20 - JVC KD-AVX77 | Instructions - Page 21
this function in the following cases: -When "iPod USB" is selected as the source. -When Dual Zone is in use. Turning on the surround 1 Select on • When 2-channel or 2.1-channel signals* come in, 4-channel stereo is activated. : All incoming channel signals are sent to - JVC KD-AVX77 | Instructions - Page 22
becomes stronger (normally set to ). * Adjustable when the center speaker is activated. ( 17) 3 Finish the procedure. • You cannot change the settings using the remote controller. 22 - JVC KD-AVX77 | Instructions - Page 23
mode suitable to the music genre. ♦ Flat (Initial), Hard Rock, R&B, Pop, Jazz, Dance, Country, Reggae, Classic, User1, User2, User3 • (For "DISC/USB") While surround is activated, you can use Equalizer in the following case: the source is CD-DA, VCD, or MP3/WMA/WAV/AAC files and is selected - JVC KD-AVX77 | Instructions - Page 24
Adjusts fader. [2/3]: Adjusts balance. [ ]: Resets the adjustments. • When using a two-speaker system, set the fader to the center (00). Adjust activate/deactivate the rear speakers. ♦ Off, On *1 For "DISC/USB": You can make the adjustments separately depending on the audio format-Dolby digital - JVC KD-AVX77 | Instructions - Page 25
Bluetooth • iPod USB • AV-IN, EXT-IN : Mono, SSM, Title Entry : Mono, DX/Local, SSM, Blend Hold : Repeat, Random : Repeat, Random, AudioBooks : Title Entry Initial: Underlined Menu item Mono DX/Local *1 SSM (Strongstation Sequential Memory)*2 Selectable setting/item When an FM stereo broadcast - JVC KD-AVX77 | Instructions - Page 26
♦ Program : Repeats current program (For DVD-VR, not available during Playlist ♦ Disc ♦ use.) : Functions the same as "Repeat One" of the iPod/iPhone. : Functions the same as "Repeat All" of the iPod/iPhone . ♦ Disc/USB : Randomly plays all tracks. (For VCD: When PBC is not in use.) ♦ All - JVC KD-AVX77 | Instructions - Page 27
stored in preset number 4. • Selecting a preset station on the list Ex.: When selecting an FM preset station SAT • Storing a preset channel manually 1 Touch [BAND]. 2 Touch [FUNC] to select < >, then [5 / ∞] to select a category. 3 Touch [ / ] to select a channel you want to preset. 4 Touch - JVC KD-AVX77 | Instructions - Page 28
list number of the current folder iPod USB Selecting a track/video from *1 ♦ Music : Playlists, Artists, Albums, Songs, Podcasts, Genres, Composers, Audiobooks ♦ Videos : Video Playlists, Movies, Music Videos, TV Shows, Video Podcasts ♦ Shuffle Songs : Starts playback. Touch - JVC KD-AVX77 | Instructions - Page 29
You can preset the entered number by selecting a preset number. ♦ Voice Dialing*3 : Available only when the connected cellular phone has the voice recognition system = Speak the name you want to call. *1 Only for the device connected for Bluetooth phone. *2 You can display the last opened menu in - JVC KD-AVX77 | Instructions - Page 30
when , , or in is . [Enter]: Confirms the entry. 2 Operate the Bluetooth device to connect while "Open..." is displayed on use the device through the unit. • The device remains registered even after you disconnect the device. Use / - JVC KD-AVX77 | Instructions - Page 31
Bluetooth device. ♦ Last : The last connected Bluetooth device. ♦ Off ♦ On ♦ Reject : The unit does not answer the calls automatically. Answer the calls manually transfer the phone book memory to the unit. (Refer to the instruction manual supplied with your cellular phone.) 3 Touch [ ] to finish - JVC KD-AVX77 | Instructions - Page 32
software/hardware versions*7 ♦ Phone Device/Audio Device : The connected device names *6 Depends on the amplifier gain control. ( 24) *7 If you wish to receive more information about Bluetooth, visit the following JVC web site: (English website only) 32 - JVC KD-AVX77 | Instructions - Page 33
Manual Search: Hold either [ ]or [ ] until "Manual Search" appears on the screen, then touch it repeatedly. • The ST indicator lights up when receiving an FM stereo Directly from the touch panel • You can also select a preset station using the remote controller ( 9, 10) and from the Preset List ( 27 - JVC KD-AVX77 | Instructions - Page 34
ejection You can lock a disc in the loading slot. (Hold) (Hold) • Be careful not to drop the disc when it ejects. • If this does not work, reset your unit. ( 3) To cancel the prohibition, repeat the same procedure to select . 34 - JVC KD-AVX77 | Instructions - Page 35
MPEG, JPEG, VR-PRG (program), VR-PLAY (playlist), PBC 4 Audio format-Dolby Digital, LPCM, MP3, WMA, WAV, AAC 5 Surround/sound mode ( 21, 23) 6 [4 /¢] • DVD Video/DVD-VR: Selects chapter. • MPEG1/MPEG2/JPEG/VCD/CD/MP3/WMA/WAV/ AAC: Selects track. • DVD Video/DVD-VR/MPEG1/MPEG2/VCD/CD/ MP3/WMA/WAV/AAC - JVC KD-AVX77 | Instructions - Page 36
/ 3]: Selects the menu items. [MENU]: Displays the disc menu [ ]: Confirms the selection [ ]: Returns to the previous menu Returns to A D For DVD playback [ ]: Changes the audio language, audio stream, or audio channel [ ]: Changes or turns off the subtitle language [ ]: Changes the view angle 36 - JVC KD-AVX77 | Instructions - Page 37
using motion*2 during pause (No sound can be heard.) - DVD-VR: Reverse slow motion does not work. • MPEG1/MPEG2: Reverse/forward track search*4 (No sound (Hold) • JPEG: Select file • DVD-Video: Select title (during play or pause) Select folder • DVD-VR: Select program Select playlist (during play - JVC KD-AVX77 | Instructions - Page 38
during pause. (No sound can be heard.) - Reverse slow motion does not work. • Select track • Reverse/fast forward track search*3 (No sound can be While holding SHIFT, press DIRECT repeatedly to select the desired search mode. DVD-Video: DVD-VR: MPEG1/MPEG2: JPEG: MP3/WMA/WAV/AAC: VCD/CD: 2 - JVC KD-AVX77 | Instructions - Page 39
search is possible during Original program playback (PG)/Playlist playback (PL). • To erase a misentry, press CLR (clear) while holding SHIFT. Using menu driven features • DVD Video 1 Press TOP M/MENU to enter the menu screen. 2 Press %/fi/@/# to select an item you want to start play. 3 Press ENT - JVC KD-AVX77 | Instructions - Page 40
DVD-Video Information Operation 1 Disc type 2 • DVD-Video: Audio signal format type and channel • VCD:PBC 3 Playback mode*1 DVD-Video: T. RPT: Title repeat C. RPT: Chapter repeat DVD audio language, audio stream, or audio channel Change or turn off the subtitle language Change the view angle - JVC KD-AVX77 | Instructions - Page 41
Navigation screen or rear view screen *1 Only when the signal comes in Dual Zone operations You can enjoy disc playback on the external monitor connected to the VIDEO OUT and 2nd AUDIO OUT plugs, while listening to any source other than "USB" through the speakers. • When Dual Zone is in use - JVC KD-AVX77 | Instructions - Page 42
the volume through the 2nd AUDIO OUT plug. Ex.: MP3/WMA • The volume level is shown on the connected external monitor. 3 Operate the DVD/CD player. To select operations. • You cannot select "USB" for the main source. Operations using the control screen For discs except DVD and VCD: While Dual Zone - JVC KD-AVX77 | Instructions - Page 43
ENGLISH Ex.: CD Text Selecting playback modes You can also change the playback modes using the playback mode selection window. • For JPEG, Random cannot be selected. 1 2 Except for JPEG: Select a playback mode. 3 Select your desired option. 1 The playback mode selection - JVC KD-AVX77 | Instructions - Page 44
the remote controller. While playback is stopped... 1 Display the list screen. Using Dual Display While Dual Zone is on, the main source (other than "USB") and "DISC" can be displayed at the same time. • Dual Display works while watching a playback picture on the external monitor. Preparation: Make - JVC KD-AVX77 | Instructions - Page 45
operations You can connect a USB mass storage class device such as a USB memory, Digital Audio Player, portable HDD, etc. to the unit. • You can also connect the iPod/iPhone to the USB terminal of the unit. For details of the operations, 49. USB cable from the rear of the unit The source changes - JVC KD-AVX77 | Instructions - Page 46
the countries where you may use the Bluetooth® function. Bluetooth profile This unit supports the following Bluetooth profiles; • HFP (Hands-Free Profile) 1.5 • OPP (Object Push Profile) 1.1 • A2DP (Advanced Audio Distribution Profile) 1.2 • AVRCP (Audio/Video Remote Control Profile) 1.3 Connecting - JVC KD-AVX77 | Instructions - Page 47
phone To make a call, use . ( 29) When a call comes in... The source is changed to "Bluetooth" automatically. Name and phone one call, you can connect to the other. To read a received message, operate the cellular phone after stopping the car in a safe place. • You cannot read, edit, or - JVC KD-AVX77 | Instructions - Page 48
up to 6 phone numbers. 1 Display , , , or . ( 29) 2 Select a telephone number to store. (Hold) 3 Select a preset number. Now "Tom" is stored into preset no. 1. To call a preset number, 29. Using the Bluetooth audio player ~ Touch [SRC], then select - JVC KD-AVX77 | Instructions - Page 49
"When connected with the interface to the CD changer jack on the rear of the unit. adapter" ( 50). Watch the video USB Audio and Video cable for iPod/iPhone, KS-U30 See "When connected with the USB cable" (not supplied) to the USB cable from the rear of the below. unit.*1 When connected with the - JVC KD-AVX77 | Instructions - Page 50
When connected with the interface adapter ENGLISH Preparation: Make sure is selected for . ( 19) ~ Touch [SRC], then select "iPod." Playback starts automatically. Ÿ Touch [4] or [¢] to select a track. [ ]: Enters player's menu. [6]: Starts playback/pauses. [4 / ¢]: • - JVC KD-AVX77 | Instructions - Page 51
ENGLISH Listening to the CD changer It is recommended to use a JVC MP3-compatible CD changer with your unit. • You can play only CDs (CD-DA) and MP3 discs. Preparation: Make sure is selected for - JVC KD-AVX77 | Instructions - Page 52
of the following (not supplied) to the CD changer jack on the rear of this unit. • JVC SIRIUS satellite radio System, SC-C1 and KS-SRA100, PnP, SC-VDOC1 call SIRIUS toll-free at 1-888-539-SIRIUS (7474). "Subscription updated Press any key to continue" appears once subscription has been completed. - JVC KD-AVX77 | Instructions - Page 53
Tuning in to a channel you want ENGLISH [FUNC]: Changes items to select with [5 Categories - : Preset channels ( 27) Touch to display the program information-song name/ artist name (/composer name: only for SIRIUS). A Sound mode B Band C Preset number D Channel number E Category name F Channel - JVC KD-AVX77 | Instructions - Page 54
the CD changer jack on the rear of the unit. What is will have FM-like quality (in stereo) and FM digital will have CD receive conventional analog broadcasts. • Many HD Radio stations also offer more than one channel of programming. This service lights up when a digital audio broadcast is tuned in. B - JVC KD-AVX77 | Instructions - Page 55
back a disc. ( 41) • The aspect ratio of the navigation screen is fixed to regardless of the setting. ( 15) When is selected for ( 19) • You can use the source "AV-IN" for listening to an audio source connected to the LINE IN plugs. EXTERNAL DEVICES 55 - JVC KD-AVX77 | Instructions - Page 56
ENGLISH EXT-INPUT You can connect an external component to the CD changer jack on the rear using the Line Input Adapter, KS-U57 (not supplied) or AUX Input Adapter, KS-U58 (not supplied). A Sound mode B Assigned title ( 26) Preparation: Make sure - JVC KD-AVX77 | Instructions - Page 57
the following cases: • After starting the heater in the car. • If it becomes very humid inside the car. Should this occur, the unit may malfunction. In this in their cases after use. Unusual shape Transparent or semitransparent parts on its recording area C-thru Disc (semitransparent disc) - JVC KD-AVX77 | Instructions - Page 58
received stations are preset in no. 1 (lowest frequency) to no. 6 (highest frequency). Disc General • In this manual, words "track" and "file" are interchangeably used. • This unit can only play back audio For details about DVD-VR format and playlist, refer to the instructions supplied with the - JVC KD-AVX77 | Instructions - Page 59
and voice format. - WMA files which are not based upon Windows Media® Audio. - WMA files copy-protected with DRM. - AAC files encoded by using any cannot activate surround for MPEG multichannel DVD Video and MPEG 2-channel sources. If is set to , stereo sounds are emitted only through - JVC KD-AVX77 | Instructions - Page 60
such as dialing the numbers, using phone book, etc. When you perform these operations, stop your car in a safe place. • Some Bluetooth devices may not be connected to this unit depending on the Bluetooth version of the device. • This unit may not work for some Bluetooth devices. • Connecting - JVC KD-AVX77 | Instructions - Page 61
up to 128 characters when using the USB 2.0 cable or USB Audio and Video cable. Notice: When operating an iPod/iPhone, some operations may not be performed correctly or as intended. In this case, visit the following JVC web site: (English website only) For the - JVC KD-AVX77 | Instructions - Page 62
titles In addition to the roman alphabet (A - Z, a - z), you can use the following characters to assign titles. ( 26) • When is selected the volume level to "30." • After you change any of settings, turn off then on the power, and re-insert the - JVC KD-AVX77 | Instructions - Page 63
ENGLISH Language codes (for DVD language selection) Code Language Code Language Code Language Code MR Marathi SM Samoan VI Vietnamese DZ Bhutani IW Hebrew MS Malay (MAY) SN Shona VO Volapuk EL Greek JA Japanese MT Maltese SO Somali WO Wolof EO Esperanto JI Yiddish MY Burmese SQ Albanian XH - JVC KD-AVX77 | Instructions - Page 64
and logos are owned by the Bluetooth SIG, Inc. and any use of such marks by Victor Company of Japan, Limited (JVC) is under license. Other trademarks and trade names are those of their respective owners. • "Made for iPod" means that an electronic accessory has been designed to connect specifically - JVC KD-AVX77 | Instructions - Page 65
ENGLISH Troubleshooting What appears to be trouble is not always serious. Check the following points before calling a service center. • For operations with the external components, refer also to the instructions supplied with the adapters used for the connections (as well as the instructions - JVC KD-AVX77 | Instructions - Page 66
presetting does not Store stations manually. ( 27) work. • Static noise while used for • Tracks on the Recordable/Rewritable recording. discs cannot be skipped. • Playback does not start. • Insert the disc correctly again. • The format of files is not supported DVD Video. Disc in general 66 - JVC KD-AVX77 | Instructions - Page 67
from the one played back using other have intended them to are recorded. • "Not Support" appears on the screen The Bluetooth device. the PIN code of the device is not indicated on its instructions, try "0000" or "1234." • Echo or noise occurs. Adjust the microphone position. USB Bluetooth - JVC KD-AVX77 | Instructions - Page 68
the Bluetooth audio player correctly. screen. • "No Voice Device" appears on the The connected cellular phone does not have the voice recognition screen. system. • The iPod/iPhone does not turn on or does not work. • Check the connecting cable and its connection. • Update the firmware version - JVC KD-AVX77 | Instructions - Page 69
connection between the adapter and this unit. • The control of iPod does not work Reset the iPod. after disconnecting from this unit. • "No Disc" appears information for the selected channel. • "UPDATING" appears on the screen and no The receiver is updating the channel information and it sound - JVC KD-AVX77 | Instructions - Page 70
does not work at all. • Sound quality changes when receiving HD Radio audio. receiving conventional radio broadcast. Select or . ( 25) Reconnect this unit and the HD Radio tuner box correctly, then reset the unit. • Turn on the video component if it is not on. • Connect the video - JVC KD-AVX77 | Instructions - Page 71
REAR), CENTER Output Impedance OUT, SUBWOOFER OUT 5 V/20 kΩ load (full scale) 1 kΩ Color System NTSC Video Output (composite) 1 Vp-p/75 Ω Other Terminals Input LINE IN, VIDEO IN, USB input, Antenna input Output 2nd AUDIO 000 Hz Stereo Separation 40 DVD, fs=48 kHz 16 Hz to 22 000 Hz DVD - JVC KD-AVX77 | Instructions - Page 72
Service Area Profile USB 2.0 Full Speed Full Speed Maximum 12 Mbps Low Speed Maximum 1.5 Mbps Mass storage class FAT 32/16/12 DC 5 V 500 mA Bluetooth ) 1.1 A2DP (Advanced Audio Distribution Profile) 1.2 AVRCP (Audio/Video Remote Control Profile) 1.3 BLUETOOTH MONITOR Screen Size 5.4 - JVC KD-AVX77 | Instructions - Page 73
30, 46 Make a call 29 Play back an audio player 48 Preset phone number 48 iPod Audiobooks 26 Connecting method 49 Controlling unit 16, 49 Repeat/random play 26 Select a track/video 28, 49, 50 Start/pause playback 49, 50 Supported iPod/iPhone 61 CD changer Repeat/random play 26 Select - JVC KD-AVX77 | Instructions - Page 74
un producto JVC. Como primer paso, por favor lea detenidamente este manual para comprender para dispositivos de Clase B, de conformidad con la Parte 15 de las reglas de la FCC (Comisión modificaciones no aprobados por JVC pueden anular la autoridad del usuario para operar el equipo. ADVERTENCIAS: ( - JVC KD-AVX77 | Instructions - Page 75
Conexión de un nuevo dispositivo Bluetooth... 46 • Usar el teléfono celular Bluetooth 47 • Uso del reproductor de audio Bluetooth ....... 48 Para escuchar dispositivos iPod/iPhone ........ 49 • Cuando se conecta con el cable USB 49 • Cuando se conecta con el adaptador de interfaz... 50 Escuchando - JVC KD-AVX77 | Instructions - Page 76
Formato de grabación, tipo de archivo, etc. Reproducible DVD • El sonido DTS no se puede reproducir ni emitir desde esta unidad. DVD-Vídeo *1 Region Code: 1 Ej.: DVD-Audio/DVD-ROM DVD Grabable/reescribible (DVD-R/-RW *2, +R/+RW *3) • DVD Vídeo: Puente UDF • DVD-VR • MPEG1/MPEG2/JPEG/MP3/ WMA/WAV - JVC KD-AVX77 | Instructions - Page 77
de otro modo. Panel del monitor ESPAÑOL Cable USB desde la parte trasera de la unidad, ( 45, 49) 1 Visualiza el AV Menu. ( 12) 2 Visualiza Source Menu.*1 ( 7) 3 Indicador Bluetooth 4 • Encienda la unidad. • Atenúa el sonido (si el sistema está encendido). • Desconecta la alimentación. (Sostener - JVC KD-AVX77 | Instructions - Page 78
. - Cuando ingresa una llamada/mensaje de texto en el teléfono celular Bluetooth. • Los botones e información pueden encenderse en otros casos distintos de los anteriores. Precaución sobre el ajuste de volumen: Los dispositivos digitales (CD/USB) producen muy poco ruido al compararse con otras - JVC KD-AVX77 | Instructions - Page 79
de HD Radio solamente. ( 54) Cambia el ajuste . ( 18) Visualiza . ( 29) Cambia el control del dispositivo iPod/iPhone para "iPod USB". ( 16) • Los iconos disponibles varían según las fuentes. Visualiza el menú . ( 20) Cambia el modo de sonido. ( 23) Activa - JVC KD-AVX77 | Instructions - Page 80
Apunte el control remoto directamente hacia el sensor remoto del receptor. • NO exponga el sensor remoto a una luz brillante (luz solar directa o iluminación artificial). El receptor está equipado con la función de control remoto en el volante de dirección. • Para la conexión, consulte el Manual de - JVC KD-AVX77 | Instructions - Page 81
DISC/USB/CD-CH: - DVD-Vídeo: Selecciona el título. - DVD-VR: Selecciona el programa/lista AUDIO OUT si lo pulsa junto con el botón SHIFT. 4 Botón ASPECT*3 • Cambia la relación de aspecto de las imágenes reproducidas. 5 Botón PHONE*1 • Visualiza el último menú abierto en . • Visualiza el - JVC KD-AVX77 | Instructions - Page 82
BAND • TUNER/HD Radio/SAT: Selecciona las bandas. Botón 7 (parada) • DISC/USB: Detiene la reproducción. • Bluetooth: Pone la reproducción en pausa. t Botón RETURN*3 • VCD: Vuelve al menú PBC. • DVD-Vídeo/DVD-VR/MPEG1/MPEG2/JPEG/VCD: Cancela el menú emergente de la barra en pantalla. 10 y Botón MENU - JVC KD-AVX77 | Instructions - Page 83
AV Menu. ! Seleccione . ⁄ Cancele la demostración. Toque para mostrar las opciones de ajuste. Seleccione , después, toque < >. @ Ponga el reloj en hora. Seleccione < > (reloj). Ajuste la hora. Cambie la opción para ajustar (1), después, ajuste los minutos (2). ¤ Finalice - JVC KD-AVX77 | Instructions - Page 84
realizar las operaciones/hacer ajustes mediante estos pasos, a menos que se indique de otro modo. ~ Encienda la unidad. Ÿ Visualice el AV Menu. • AV Setup: • Disc Surround: • Equalizer: • Sound: • Mode: • List: • Dual Zone: • Bluetooth: 13 - 20 21, 22 23 24 25, 26 27 - 29 41 - 44 29 - 32 ! Toque - JVC KD-AVX77 | Instructions - Page 85
demostración a intervalos de 20 segundos. Puede seleccionar la imagen de fondo de la pantalla. ♦ Ring, Plain, Road, Night, User Capture 1, User Capture 2, User Capture 3, User Capture 4 Puede capturar una imagen mostrada en la pantalla y utilizarla como imagen de fondo. ♦ Normal ♦ Zoom : Captura - JVC KD-AVX77 | Instructions - Page 86
Wallpaper Color Puede seleccionar el color de la imagen de fondo. (Color PapelTapiz) ♦ Blue, Black, Orange, Red, Green, Yellow Text Color (Color Podrá seleccionar el . (Consulte el Manual de instalación/ conexión.) *2 Puede ajustarse sólo cuando la fuente sea "DISC/USB/iPod USB" (el medio debe - JVC KD-AVX77 | Instructions - Page 87
♦ Auto La relación de aspecto se selecciona automáticamente para que corresponda con las señales entrantes. Visualice Language (Idioma) *4 Seleccione el idioma para las indicaciones mostradas en la pantalla. ♦ English, Español, Français, Deutsch, Italiano, Nederlands, Svenska, Dansk, Руccĸий - JVC KD-AVX77 | Instructions - Page 88
el disco/USB contenga diferentes tipos de archivos. Puede guardar este ajuste separadamente para cada fuente-"DISC/USB". ♦ Audio : Reproduce archivos de audio. ♦ Still Picture : Reproduce archivos JPEG. ♦ Video : Reproduce archivos MPEG1/MPEG2. ♦ Audio&Video : Reproduce archivos de audio - JVC KD-AVX77 | Instructions - Page 89
El sonido no sale del subwoofer mientras se reproduce Dolby Pro Logic II Movie o Music si el altavoz delantero está ajustado a . • No sale . ( 21) *7 Sólo se puede seleccionar para "DISC/USB". *8 La reproducción se detiene cuando cambie el ajuste. *9 Se tardan 5 segundos o más en visualizar la - JVC KD-AVX77 | Instructions - Page 90
efecto estereofónico puede perderse). : Sujeto a interferencias de las emisoras adyacentes, pero la calidad del sonido no se degrada y no se pierde el efecto estereofónico. Sintonizador Area Setting (Ajuste de Área) ♦ US ♦ Europe ♦ South America : Cuando se utiliza en América del Norte/Central - JVC KD-AVX77 | Instructions - Page 91
( 55) ♦ Off ♦ iPod(Off) ♦ Audio&Video ♦ Audio ♦ Camera *13, *14 ♦ Navigation : Seleccione cuando no haya ningún componente conectado (no se visualiza "AV-IN" en Source Menu). : Se selecciona cuando conecta el iPod/iPhone mediante el cable USB Audio y Video para iPod/iPhone. ( 49) : Selecciónelo al - JVC KD-AVX77 | Instructions - Page 92
encienden siempre. Normal/Touch Los botones y la información se encienden cuando toca el panel táctil. WallPaper/ Los botones y la información se encienden cuando mueve la Prox. mano cerca 3) *17 Se requiere la conexión del conductor TEL MUTING. Consulte el Manual de instalación/conexión. 20 - JVC KD-AVX77 | Instructions - Page 93
se puede activar en los siguientes casos: -Cuando se selecciona "iPod USB" como fuente. -Cuando se está usando la Zona Dual. Activación del modo surround 1 Seleccione en el menú de AV. 2 Active el modo surround. Active el sonido Surround (1); después, toque para ver los modos - JVC KD-AVX77 | Instructions - Page 94
para añadir efecto de sonido envolvente. *: Ajuste la imagen central de manera que pueda escucharse sólo por el altavoz central, sólo por los altavoces delanteros izquierdo/derecho como una imagen "fantasma", o de diversas combinaciones de estos altavoces. Conforme aumenta - JVC KD-AVX77 | Instructions - Page 95
nero musical. ♦ Flat (Inicial), Hard Rock, R&B, Pop, Jazz, Dance, Country, Reggae, Classic, User1, User2, User3 • (Para "DISC/USB") Mientras surround está activado, puede utilizar el ecualizador en el siguiente caso: la fuente es CD-DA, VCD, o archivos MP3/WMA/WAV/AAC y está seleccionado para - JVC KD-AVX77 | Instructions - Page 96
Rear Speaker (Altavoz Trasero) *3 También podrá realizar los ajustes mediante arrastre. ♦ F06 a R06; Inicial 00 (fader) ♦ L06 a R06; Inicial 00 (compensazione) [5/∞]: Ajusta el fader. [2/3]: Ajusta el /USB": Puede realizar ajustes separadamente según el formato de audio-Dolby Digital y otros. *2 El - JVC KD-AVX77 | Instructions - Page 97
, iPod, Bluetooth • iPod USB • AV-IN, EXT-IN : Mono, SSM, Title Entry : Mono, DX/Local, SSM, Blend Hold : Repeat, Random : Repeat, Random, AudioBooks : Title Entry Inicial: Subrayado Opción del menú Ajuste/elemento seleccionable Mono (Mono) Activa el modo monoaural para mejorar las condiciones - JVC KD-AVX77 | Instructions - Page 98
disponibles dependen de los tipos de disco cargado y de archivo de reproducción. ♦ Chapter : Repite el capítulo actual. ♦ Title : Repite el título actual. ♦ Program : Repite el programa actual (para DVD-VR, no disponible durante la reproducción de la lista de reproducción). ♦ Disc : Repite - JVC KD-AVX77 | Instructions - Page 99
Cuando se selecciona una emisora FM preajustada SAT • Almacenamiento manual de un canal preajustado 1 Toque [BAND]. 2 Toque [FUNC] para seleccionar [ ], después [ 5 / ∞ ] para seleccionar una categoría. 3 Toque [ / ] para seleccionar el canal que desea preajustar. 4 Toque [ ], [List], despu - JVC KD-AVX77 | Instructions - Page 100
de pistas de la carpeta actual iPod USB Selección de una pista/vídeo desde *1 ♦ Music : Playlists, Artists, Albums, Songs, Podcasts, Genres, Composers, Audiobooks ♦ Videos : Video Playlists, Movies, Music Videos, TV Shows, Video Podcasts ♦ Shuffle Songs : Inicia la reproducci - JVC KD-AVX77 | Instructions - Page 101
el número de preajuste. ♦ Voice Dialing*3 : Disponible solamente cuando el teléfono celular conectado dispone del sistema de reconocimiento de voz = Diga el nombre que desea llamar. *1 Sólo para el dispositivo conectado para Bluetooth phone. *2 Podrá visualizar el último menú abierto en - JVC KD-AVX77 | Instructions - Page 102
>, , o en . 2 Seleccione el nombre/número el último carácter. [Enter]: Confirma la entrada. 2 Opere el dispositivo Bluetooth para conectar, mientras se visualiza "Open..." en la pantalla. Ingrese el mismo código PIN (que el ingresado en el paso anterior) en el - JVC KD-AVX77 | Instructions - Page 103
"Receiving Message". el último carácter. [Enter]: Confirma la entrada. 2 Haga funcionar el teléfono celular objetivo. Ingrese el mismo código PIN (que el ingresado en el paso anterior) en el teléfono celular y luego transfiera la memoria del teléfono celular a esta unidad. (Consulte el manual - JVC KD-AVX77 | Instructions - Page 104
y hardware Bluetooth*7 ♦ Phone Device/Audio Device : Los nombres de los dispositivos conectados *6 Depende del control de ganancia del amplificador. ( 24) *7 Si desea obtener más información sobre Bluetooth, visite el siguiente sitio web de JVC: (Solamente - JVC KD-AVX77 | Instructions - Page 105
"TUNER". Ÿ Toque [BAND]. ! Toque [ ] o [ ] para buscar una estación-Búsqueda automática. • Búsqueda manual: Mantenga pulsado [ ] o [ ] hasta que "Manual Search" aparezca en la pantalla y, a continuación, tóquelo repetidamente. • El indicador ST se enciende al recibir una radiodifusión FM estéreo con - JVC KD-AVX77 | Instructions - Page 106
disco no dispone de ningún menú de disco, todas las pistas del mismo serán reproducidas repetidamente hasta que usted cambie la fuente o expulse el disco. Si aparece " " en la pantalla, significa que la unidad no puede aceptar la operación que intentó realizar. • En algunos casos, puede suceder que - JVC KD-AVX77 | Instructions - Page 107
), VR-PLAY (lista de reproducción), PBC 4 Formato de audio-Dolby Digital, LPCM, MP3, WMA, WAV, AAC 5 Modo Surround/sonido ( 21, 23) 6 [4 /¢] • DVD Video/DVD-VR: Selecciona un capítulo. • MPEG1/MPEG2/JPEG/VCD/CD/MP3/WMA/WAV/ AAC: Selecciona la pista. • DVD Video/DVD-VR/MPEG1/MPEG2/VCD/CD/ MP3/WMA/WAV - JVC KD-AVX77 | Instructions - Page 108
Selecciona las opciones del menú. [MENU]: Visualiza el menú de disco [ ]: Confirma la selección [ ]: Vuelve al menú anterior. Vuelve a A D Para reproducción de DVD [ ]: Cambia el idioma de audio, el flujo de audio, o el canal de audio [ ]: Cambia o desactiva el idioma de los subtítulos [ ]: Cambia - JVC KD-AVX77 | Instructions - Page 109
cambie, si lo pulsa durante la presentación de diapositivas. • Búsqueda de retroceso/avance de capítulo*1 (El sonido no se escucha.) • Cámara lenta*2 durante la pausa (El sonido no se escucha.) - DVD-VR: La cámara lenta hacia atrás no funciona. • MPEG1/MPEG2: Búsqueda de retroceso/ avance de pista - JVC KD-AVX77 | Instructions - Page 110
de aspecto - - *1, *2, *3 37 Para buscar directamente un elemento 1 Mientras mantiene pulsado SHIFT, pulse repetidamente DIRECT para seleccionar el modo de búsqueda deseado. DVD-Vídeo: DVD-VR: MPEG1/MPEG2: JPEG: MP3/WMA/WAV/AAC: VCD/CD: 2 Mientras mantiene pulsado SHIFT, pulse los botones - JVC KD-AVX77 | Instructions - Page 111
ENT (entrada) para confirmar. • Para reanudar PBC, pulse TOP M/MENU. Operaciones usando la barraen pantalla (DVD-Video/DVD-VR/MPEG1/MPEG2/JPEG/VCD) Estas operaciones se pueden realizar en el monitor usando el control remoto. 1 Muestra la barra en pantalla. ( 40) (dos veces) • En algunos ajustes de - JVC KD-AVX77 | Instructions - Page 112
ón transcurrido del título/programa/ lista de reproducción actual.) DVD-Vídeo/DVD-VR: Tiempo restante del título/programa/lista de reproducción ón aleatoria*1 Cambia el idioma de audio, el flujo de audio, o el canal de audio Cambia o desactiva el idioma de los subtítulos Cambia el ángulo de visi - JVC KD-AVX77 | Instructions - Page 113
On> para . ( 15) • o para . ( 19) Mientras mira VIDEO OUT y 2nd AUDIO OUT, mientras escucha cualquier otra fuente distinta de "USB" a través de los altavoces. • Mientras se está usando la Zona Dual, sólo podrá operar el reproductor DVD/CD utilizando el - JVC KD-AVX77 | Instructions - Page 114
el volumen a través de la clavija 2nd AUDIO OUT. ESPAÑOL • Se muestra el nivel de volumen en el monitor externo conectado. 3 Opere el reproductor DVD/ se puede seleccionar "USB" para la fuente principal. Operaciones utilizando la pantalla de control Para discos que no sean DVD y VCD: Mientras est - JVC KD-AVX77 | Instructions - Page 115
ESPAÑOL Ej.: CD Text Selección de los modos de reproducción También puede cambiar los modos de reproducción utilizando la ventanilla de selección del modo de reproducción. • Para JPEG, no se puede seleccionar reproducción aleatoria. 1 2 Excepto para JPEG: Seleccione un modo de reproducción. 1 - JVC KD-AVX77 | Instructions - Page 116
ón de DVD, VCD y CD Mientras esté activada la Zona Dual, estas operaciones se pueden realizar en el monitor externo utilizando el control remoto fuente principal (distinta de "USB") y "DISC". • La Pantalla dual funciona mientras se mira una imagen reproducida en el monitor externo. Preparativos: - JVC KD-AVX77 | Instructions - Page 117
clase de almacenamiento masivo USB tal como una memoria USB, un reproductor de audio digital, un HDD (disco duro) portátil, etc. • También puede conectar un iPod/iPhone al terminal USB de la unidad. Para obtener detalles de las operaciones, 49. ESPAÑOL Cable USB desde la parte trasera de la unidad - JVC KD-AVX77 | Instructions - Page 118
de Control Remoto de Audio/Video) 1.3 Conexión de un nuevo dispositivo Bluetooth Conexión de un dispositivo Bluetooth por primera vez Cuando se conecta por primera vez un dispositivo Bluetooth a la unidad, efectúe el apareamiento entre la unidad y el dispositivo. El apareamiento permite que los - JVC KD-AVX77 | Instructions - Page 119
ESPAÑOL Usar el teléfono celular Bluetooth Para hacer una llamada, utilice . ( 29) Cuando entra una llamada... Cambio al dispositivo de conversación (entre el teléfono celular y la unidad) Durante una conversación telefónica... La fuente cambiará automáticamente a "Bluetooth". Nombre - JVC KD-AVX77 | Instructions - Page 120
, , , o . ( 29) 2 Seleccione el número telefónico que desea guardar. 3 Seleccione un número de preajuste. Ahora "Tom" ha quedado guardado en el Nº de preajuste 1. Para llamar un número preajustado, 29. Uso del reproductor de audio Bluetooth (Sostener - JVC KD-AVX77 | Instructions - Page 121
trasera de la unidad. Consulte "Cuando se conecta con el adaptador interfaz" ( 50). Ver vídeo Cable USB audio y vídeo para iPod/iPhone, KS-U30 Consulte "Cuando se conecta con el cable (no suministrado) al cable USB desde la parte USB" a continuación. trasera de la unidad.*1 Cuando se conecta - JVC KD-AVX77 | Instructions - Page 122
para seleccionar una pista. • Al seleccionar una pista, se iniciará la reproducción. • Para volver al menú anterior, toque [ ]. Para seleccionar el modo de reproducción, 26. Playlists Ô Artists Ô Albums Ô Songs Ô Genres Ô Composers Ô (vuelta al comienzo) 3 Toque [6] para confirmar la selección. 50 - JVC KD-AVX77 | Instructions - Page 123
ESPAÑOL Escuchando el cambiador de CD Se recomienda usar un cambiador de CD-compatible con MP3 JVC con este receptor. • Puede reproducir sólo discos CD tulo de álbum actual), si está grabado • Para seleccionar el modo de reproducción, 26. • Para seleccionar una pista MP3 de la lista de - JVC KD-AVX77 | Instructions - Page 124
suministradas) al jack del cambiador de CD de la parte trasera de esta unidad. • Sistema de radio satelital JVC SIRIUS, SC-C1 y KS-SRA100, PnP, SC- updated Press any key to continue". 2 Toque [SRC], y luego seleccione "SAT". El sintonizador XM* comienza a actualizar todos los canales XM. El - JVC KD-AVX77 | Instructions - Page 125
[∞] para seleccionar una categoría. • Para seleccionar un canal de entre todas las categorías, seleccione . ⁄ Toque [ ] o [ ] para seleccionar el canal que desea escuchar. • Mantenga pulsado [ ] o [ ] para cambiar rápidamente los canales. • Durante la búsqueda, se omiten los canales no válidos - JVC KD-AVX77 | Instructions - Page 126
de hacer funcionar, conecte el sintonizador HD Radio, KT-HD300 (de venta por separado) al jack del cambiador de CD en la parte posterior de la unidad. del artista/ título del álbum. A Cuando se sintoniza una transmisión de audio digital primero destella y después se enciende. B Banda C Número de - JVC KD-AVX77 | Instructions - Page 127
IN/VIDEO IN. ESPAÑOL ~ Toque [SRC], y luego seleccione "AV-IN". A Modo de sonido B Título asignado ( 26) Ÿ Encienda el VIDEO IN para poder ver la pantalla de navegación. Se visualiza siempre, independientemente de la fuente seleccionada. Preparativos: Asegúrese de haber seleccionado - JVC KD-AVX77 | Instructions - Page 128
ESPAÑOL EXT-INPUT Puede conectar un componente externo al jack del cambiador de CD de la parte trasera mediante el adaptador de entrada de línea-KS-U57 (no suministrado) o el adaptador de entrada AUX-KS-U58 (no suministrado). A Modo de sonido B Título asignado ( 26) Preparativos: Asegúrese de - JVC KD-AVX77 | Instructions - Page 129
un disco, límpielo con un lienzo suave, en línea recta desde el centro hacia el borde. • No utilice ningún tipo de solvente (por ejemplo, limpiador de autoadhesivo Forma irregular C-thru Disc (disco semitransparente) Partes transparente o semitransparentes en el área de grabación REFERENCIAS 57 - JVC KD-AVX77 | Instructions - Page 130
. Para cambiar a otro elemento, selecciónelo de la lista de reproducción. • Para los detalles sobe el formato DVD-VR y la lista de reproducción, consulte el manual entregado con el equipo de grabación. Pantalla de programa original/lista de reproducción • Programa original • Playlist 1 Número de - JVC KD-AVX77 | Instructions - Page 131
maras JVC Everio. Los archivos MPEG2 con el có USB. • El formato de flujo debe cumplir con el flujo de sistema/programa MPEG. El Windows Media® Audio. - Archivos almacenados en un iPod/iPhone). - Archivos que DVD Vídeo MPEG multicanal y fuentes MPEG de 2 canales. Si está ajustado a , el - JVC KD-AVX77 | Instructions - Page 132
unidad. • No utilice un dispositivo USB con 2 o más particiones. • Dependiendo la forma de los dispositivos USB y de los puertos de conexión, Bluetooth • Connection Error: El dispositivo está registrado pero ha fallado la conexión. Utilice u para volver a conectar el - JVC KD-AVX77 | Instructions - Page 133
128 caracteres cuando se utiliza el cable USB 2.0 o el cable USB audio y video. Nota: Cuando opera un iPod/iPhone, algunas operaciones pueden no funcionar correctamente o como se desea. En tal caso, visite el siguiente sitio web de JVC: (solamente en inglés) Para - JVC KD-AVX77 | Instructions - Page 134
nivel de volumen a "30". • Después de cambiar cualquiera de los ajustes , desconecte la alimentación y vuelva a insertar el disco (o inserte otro disco) para que el ajuste sea efectivo. • Cuando se selecciona para una imagen con una relación de aspecto - JVC KD-AVX77 | Instructions - Page 135
Códigos de idiomas (para selección del idioma de DVD) Código Idioma Código Idioma AA Afar FA Persa AB CO Corso IK Inupiak CS Checo IN Indonesio CY Galés IS Islandés DZ Butaní IW Hebreo EL Griego JA Japonés EO Esperanto JI Yidish ET Estonio JW Javanés EU Vasco KA Georgiano Código - JVC KD-AVX77 | Instructions - Page 136
marca Bluetooth y sus logotipos son propiedad de Bluetooth SIG, Inc., y cualquier uso de los mismos por Victor Company of Japan, Limited (JVC) de Apple. • "Works with iPhone" significa que un accesorio electrónico ha sido específicamente diseñado para conectar a un iPhone y ha sido certificado para - JVC KD-AVX77 | Instructions - Page 137
Language>. ( 15) Los mensajes descritos aquí están en el idioma de este manual. General ESPAÑOL Síntoma Soluciones/Causas • No sale sonido de los altavoces. • Ajuste el volumen al nivel óptimo. • Inspeccione los cables y las conexiones. • El sonido DTS no se puede reproducir a través de ninguna - JVC KD-AVX77 | Instructions - Page 138
muestra y "Freno de Mano" aparece conectado. en la pantalla, incluso cuando está Consulte el Manual de instalación/conexión. aplicado el freno de estacionamiento. • No aparece la imagen en el monitor • Conecte correctamente el cable de vídeo. externo. • Seleccione una entrada correcta en - JVC KD-AVX77 | Instructions - Page 139
una pista. Las pistas no fueron copiadas correctamente en el dispositivo USB. Copia otra vez las pistas, e intente de nuevo. • El dispositivo Bluetooth no detecta la • Vuelva a efectuar la búsqueda desde el dispositivo Bluetooth. unidad. • Reinicialice la unidad. Cuando aparezca "Abrir..." en la - JVC KD-AVX77 | Instructions - Page 140
el reproductor de audio en la pantalla. Bluetooth. • Aparece "No Apoyo" en la pantalla. El teléfono celular conectado no dispone de sistema de reconocimiento de voz. • El iPod/iPhone no se enciende o no funciona. • Verifique el cable de conexión y su conexión. • Actualice la versión de firmware - JVC KD-AVX77 | Instructions - Page 141
canal anterior. • Aparecerá "NO NAME" en la pantalla. No hay información de texto para el canal seleccionado. • "UPDATING" aparece en la pantalla y no se El receptor está actualizando la información de canal y escucha ningún sonido. tarda algunos minutos en finalizar. Radio satelital Contin - JVC KD-AVX77 | Instructions - Page 142
canal seleccionado no está emitiendo en ese momento. Seleccione otro canal o continúe escuchando el canal anterior. El receptor está cargando la información del canal y el audio. La información de texto no está disponible temporalmente Vuelva a conectar correctamente esta unidad y la radio por sat - JVC KD-AVX77 | Instructions - Page 143
REAR), CENTER Impedancia de salida OUT, SUBWOOFER OUT 5 V/20 kΩ de carga (plena escala) 1 kΩ Sistema de Color NTSC Salida de Vídeo (compuesto) 1 Vp-p/75 Ω Otros terminales Entrada LINE IN, VIDEO IN, entrada USB, entrada de antena Salida 2nd AUDIO DVD, fs=48 kHz 16 Hz a 22 000 Hz DVD, - JVC KD-AVX77 | Instructions - Page 144
USB 2.0 Full Speed Toda velocidad Baja velocidad Clase de almacenamiento masivo FAT 32/16/12 Máximo 12 Mbps Máximo 1,5 Mbps CC 5 V 500 mA Bluetooth Audio) 1.2 AVRCP (Perfil de Control Remoto de Audio/Video) 1.3 BLUETOOTH lbs) (excluyendo accesorios) GENERAL El diseño y las especificaciones se - JVC KD-AVX77 | Instructions - Page 145
carpeta 28, 35, 37, 38 Iniciar/parar/pausar/reanudar la reproducción 35, 36, 37, 38 USB Montar/desmontar 45 Reproducción repetida/aleatoria 26 Seleccionar una pista/carpeta ......28, 37, 38 Bluetooth Contestar/terminar la llamada 31, 47 Conectar/desconectar/borrar 30, 46 Hacer una llamada 29 - JVC KD-AVX77 | Instructions - Page 146
FRANÇAIS Merci pour avoir acheté un produit JVC. Veuillez lire attentivement toutes les instructions avant d'utiliser l'appareil afin de bien comprendre son fonctionnement et d'obtenir les meilleures performances possibles. IMPORTANT POUR PRODUITS LASER 1. PRODUIT LASER DE CLASSE 1 2. ATTENTION: - JVC KD-AVX77 | Instructions - Page 147
41 Opérations USB 45 APPAREILS EXTÉRIEURS Utilisation d'appareil Bluetooth 46 • Connexion d'un nouvel appareil Bluetooth... 46 • Utilisation d'un téléphone portable Bluetooth 47 • Utilisation d'un lecteur audio Bluetooth ....... 48 Écoute des périphériques iPod/iPhone.......... 49 • Lors de - JVC KD-AVX77 | Instructions - Page 148
peut pas être Region Code: 1 reproduit ni sorti par cet appareil. Ex.: Compatible FRANÇAIS DVD-Audio/DVD-ROM DVD Enregistrable/Réinscriptible DVD Vidéo (DVD-R/-RW *2, +R/+RW *3) • DVD Vidéo: UDF bridge • DVD-VR DVD-VR*4 MPEG1/MPEG2 • MPEG1/MPEG2/JPEG/MP3/WMA/ JPEG WAV/AAC: ISO 9660 Niveau - JVC KD-AVX77 | Instructions - Page 149
USB à partir de l'arrière de l'appareil, ( 45, 49) 1 Affiche le menu AV. ( 12) 2 Affiche le menu des sources.*1 ( 7) 3 Indicateur Bluetooth hors tension. (Maintenez pressée) • Change le support de conversation quand vous parlez avec un téléphone portable Bluetooth. ( 47) 5 Capteur de télécommande - JVC KD-AVX77 | Instructions - Page 150
moniteur. - Quand un appel/message textuel arrive (pour le téléphone portable Bluetooth). • Les boutons et les informations peuvent apparaître dans d'autres cas que cautions sur le réglage du volume: Les appareils numériques (CD/USB) produisent très peut de bruit par rapport aux autres sources. Ré - JVC KD-AVX77 | Instructions - Page 151
une recherche uniquement des stations HD Radio. ( 54) Change le réglage . ( 18) Affiche le menu . ( 29) Change la commande du périphérique iPod/iPhone pour "iPod USB". ( 16) FRANÇAIS • Les icônes disponibles varient en fonction des sources. Affiche le menu - JVC KD-AVX77 | Instructions - Page 152
FRANÇAIS Utilisation de la télécommande (RM-RK252) Mise en place des piles R03/LR03/AAA Insérez les piles dans la télécommande en respectant les polarités (+ et -). Attention: • Danger d'explosion si la pile est remplacée de façon incorrecte. Remplacez-la uniquement avec le même type de pile ou un - JVC KD-AVX77 | Instructions - Page 153
. • DISC/USB/CD-CH: - DVD Vidéo: Permet de choisir le titre. - DVD-VR: Choisit le même temps. (Maintenez pressée) • Bluetooth: - Saut vers l'arrière/saut vers AUDIO OUT. 4 Touche ASPECT*3 • Change le format des images reproduites. 5 Touche PHONE*1 • Affiche le dernier menu ouvert dans - JVC KD-AVX77 | Instructions - Page 154
arrêt) • DISC/USB: Arrête la lecture. • Bluetooth: Met la lecture en pause. t Touche RETURN*3 • VCD: Retourne au menu PBC. • DVD-Vidéo/DVD-VR/MPEG1/MPEG2/ • Met en et hors service la fonction de double zone. • Ne fonctionne pas comme touche "#". o Touche DIRECT • DISC/USB: Appuyez sur cette touche - JVC KD-AVX77 | Instructions - Page 155
FRANÇAIS Préparation Annulation de la démonstration des affichages et réglage de l'horloge ~ Mettez l'appareil hors tension. Ÿ Affichez le menu AV. ! Choisissez . ⁄ Annulez la démonstration. Touchez pour afficher les options de réglage. Choisissez , puis touchez < >. @ Ré - JVC KD-AVX77 | Instructions - Page 156
ces étapes sauf mentionné autrement. ~ Mettez l'appareil hors tension. Ÿ Affichez le menu AV. • AV Setup: • Disc Surround: • Equalizer: • Sound: • Mode: • List: • Dual Zone: • Bluetooth: 13 - 20 21, 22 23 24 25, 26 27 - 29 41 - 44 29 - 32 ! Touchez l'icône/option souhaitée pour réaliser les op - JVC KD-AVX77 | Instructions - Page 157
temporairement, touchez l'écran. : Met en service la démonstration à des intervalles de 20 secondes. Wall Paper (Papier Peint) Vous pouvez choisir l'image de fond de l'écran. ♦ Ring, Plain, Road, Night, User Capture 1, User Capture 2, User Capture 3, User Capture 4 Capture (Capturer) Vous pouvez - JVC KD-AVX77 | Instructions - Page 158
glage/option sélectionnable Wallpaper Color Vous pouvez choisir Dimmer (Gradateur) ♦ Off : Annulation. ♦ On : Met en service le gradateur. ♦ Auto : Assombrit le moniteur quand vous allumez les uniquement quand la source est "DISC/USB/iPod USB" (le support doit contenir des images ou des séquences - JVC KD-AVX77 | Instructions - Page 159
la position des boutons sur le panneau tactile. (Position Bouton) ♦ Left, Right Dual Display ♦ Off (Double Affichage) ♦ On : Annulation. : Met en service de Double affichage. ( 41, 44, 55) Time Set Réglage initial 1:00AM ( 11) (Réglage Heure) Time Format Choisissez le système d'affichage - JVC KD-AVX77 | Instructions - Page 160
&Video : Reproduit les fichiers audio et les fichiers MPEG1/ MPEG2. Artwork (Illustration) Pour "DISC/USB": "Jacket picture" apparaît sur l'écran. *8 ( 35) Pour "iPod USB": L'illustration apparaît sur l'écran sous l'indication "HEAD MODE". *9 ( 49) ♦ Off : Annulation. ♦ On : Met en service - JVC KD-AVX77 | Instructions - Page 161
♦ Auto : Choisissez ce réglage pour appliquer les effets aux supports codés multicanaux. ♦ On : Choisissez ce réglage pour toujours utiliser prend effet uniquement quand le Surround est en service. ( 21) *7 Peut être choisi uniquement pour "DISC/USB". *8 La lecture s'arrête quand vous - JVC KD-AVX77 | Instructions - Page 162
FRANÇAIS Article de menu Speaker Distance (Dist. Enceinte) *7 Réglage/option sélectionnable Vous pouvez ajuster la synchronisation de sortie des enceintes en service (ci-dessus). Disque Ajustez la distance des enceintes à partir de la position d'écoute dans une plage de 15 cm/6 inch à 600 cm/240 - JVC KD-AVX77 | Instructions - Page 163
55) ♦ Off ♦ iPod (Off) ♦ Audio&Video ♦ Audio ♦ Camera *13, *14 ♦ Navigation : Choisissez ce réglage quand aucun appareil n'est connecté ("AV-IN" n'est pas affiché sur le Menu des sources). : Choisissez ce réglage quand un iPod/iPhone est connecté en utilisant le câble USB Audio et Vidéo pour iPod - JVC KD-AVX77 | Instructions - Page 164
informations apparaissent quand vos Prox. doigts s'approchent du panneau tactile. WallPaper/ Les boutons et les informations apparaissent quand vous Touch touchez le panneau tactile. Off/Prox. Le panneau tactile se met en service quand vous approchez votre main de lui. Off/Touch Le panneau - JVC KD-AVX77 | Instructions - Page 165
sort de l'enceinte centrale. ( 17) • Vous ne pouvez pas mettre en service cette fonction dans les cas suivants: -Quand "iPod USB" est choisi comme source. -Quand le fonctionnement sur deux zones est utilisé. Mise en service du Surround 1 Choisissez sur le Menu AV. FRANÇAIS 2 Mettez - JVC KD-AVX77 | Instructions - Page 166
de ces enceintes. Plus le nombre est élevé, plus l'effet "fantôme" est important (normalement réglez-le sur ). * Ajustable quand l'enceinte centrale est en service. ( 17) 3 Terminez la procédure. • Vous ne pouvez pas changer les réglages en utilisant la télécommande. 22 - JVC KD-AVX77 | Instructions - Page 167
votre genre de musique. ♦ Flat (Réglage initial), Hard Rock, R&B, Pop, Jazz, Dance, Country, Reggae, Classic, User1, User2, User3 • (Pour "DISC/USB") pendant que le Surround est en service, vous pouvez utiliser l'égaliseur dans les cas suivants: la source est CD-DA, VCD, ou des fichiers MP3/WMA/WAV - JVC KD-AVX77 | Instructions - Page 168
Pass Haut) Crossover (Transition) Amplifier Gain (Gain Amplific.) *2 Rear Speaker (Enceinte Arrière) *3 Les ajustements peuvent aussi être en/hors service les enceintes arrière. ♦ Off, On *1 Pour "DISC/USB": Vous pouvez réaliser les ajustements séparément en fonction du format audio-Dolby Digital - JVC KD-AVX77 | Instructions - Page 169
sélectionnables quand la source est: • TUNER • HD Radio • DISC, USB, CD-CH, iPod, Bluetooth • iPod USB • AV-IN, EXT-IN : Mono, SSM, Title Entry : Mono, est suffisamment fort. L'indicateur LO s'allume. Mettez la fonction hors service. L'indicateur DX s'allume. SSM (Strong-station Vous pouvez préré - JVC KD-AVX77 | Instructions - Page 170
le programme actuel (Pour DVD-VR, non disponible pendant ♦ Disc/USB : Reproduit iPhone. ♦ Album : Fonctionne de la même façon que la fonction "Shuffle Albums" pour iPod/iPhone. ♦ Off : Annulation. AudioBooks (Livres audio entrés. *4 Vous pouvez mettre en service dans le menu - JVC KD-AVX77 | Instructions - Page 171
FRANÇAIS Source Opération/réglage TUNER/HD Radio • Mémorisation d'une station préréglée manuellement 1 Touchez [BAND], puis [ / ] pour accorder la station que vous souhaitez prérégler. 2 Touchez [ ], puis [List]. 3 Choisissez un numéro de préréglage. Ex.: Lors de la mémorisation d'une station FM - JVC KD-AVX77 | Instructions - Page 172
de la plage actuelle/nombre total de plages du dossier actuel iPod USB Sélection d'une plage/séquence vidéo à partir de *1 , Podcasts, Genres, Composers, Audiobooks ♦ Videos : Video Playlists, Movies, Music Videos, TV Shows, Video Podcasts ♦ Shuffle Songs : Démarrage de iPhone. 28 - JVC KD-AVX77 | Instructions - Page 173
sélectionnable Dial Menu ( avez composés. ♦ Received Calls : Affiche la Voice Dialing*3 : Disponible uniquement quand le téléphone portable connecté possède un système de reconnaissance vocale = Prononcez le nom que vous souhaitez appeler. *1 Uniquement pour l'appareil connecté pour Bluetooth - JVC KD-AVX77 | Instructions - Page 174
autre. Audio Disconnect (Audio Déconnect) *4 Delete Pairing (Supprimer Liais.) Uniquement pour les appareils enregistrés. Touchez [Yes] pour valider la suppression des périphériques enregistrés. New Pairing (Nouv. Liaison) Préparation: • Réglez le périphérique Bluetooth pour mettre en service la - JVC KD-AVX77 | Instructions - Page 175
Aucun appareil Bluetooth. ♦ Last : Le dernier appareil Bluetooth connecté. ♦ un message par une sonnerie et en affichant "Receiving Message". Vous pouvez copier la mémoire du ré phonique sur ce appareil. (Référez-vous au manuel d'instructions fourni avec votre téléphone portable.) 3 Touchez [ ] - JVC KD-AVX77 | Instructions - Page 176
*7 ♦ Phone Device/Audio Device : Les noms des périphériques connectés *6 Dépend de la commande de gain de l'amplificateur. ( 24) *7 Si vous souhaitez recevoir plus d'informations sur le système Bluetooth, consultez le site web de JVC suivant: (Page web en - JVC KD-AVX77 | Instructions - Page 177
Ÿ Touchez [BAND]. ! Touchez [ ] ou [ ] pour rechercher une station-Recherche automatique. • Recherche manuelle: Maintenez pressée [ ] ou [ ] jusqu'à ce que "Manual Search" apparaisse sur l'écran, puis touchez répétitivement le bouton. • L'indicateur ST s'allume lors de la réception d'une émission FM - JVC KD-AVX77 | Instructions - Page 178
FRANÇAIS Opérations des disques Le type du disque est détecté automatiquement, puis la lecture démarre (pour certains disques, le menu principal du disque apparaît). Si le disque ne possède pas de menu de disque, toutes ses plages sont reproduites répétitivement jusqu'à ce que vous changiez la - JVC KD-AVX77 | Instructions - Page 179
un dossier - Affiche la liste des dossiers/plages (Maintenez pressée) 2 Type de disque-DVD, VCD, CD 3 Format vidéo ou d'image/mode de lecture- VIDEO, MPEG, JPEG, VR-PRG (programme), VR-PLAY (liste de lecture), PBC 4 Format audio-Dolby Digital, LPCM, MP3, WMA, WAV, AAC 5 Mode Surround/sonore ( 21, 23 - JVC KD-AVX77 | Instructions - Page 180
de menu. [MENU]: Affiche le menu de disque [ ]: Valide la sélection [ ]: Retourne au menu précédent Retourne sur A D Pour la lecture de DVD [ ]: Change la langue des dialogues, le flux audio ou le canal audio [ ]: Change ou met hors service la langue des sous-titres [ ]: Change l'angle de vue 36 - JVC KD-AVX77 | Instructions - Page 181
. • Recherche de chapitre vers l'arrière/vers l'avant*1 (Aucun son n'est entendu.) • Lecture au ralenti*2 pendant une pause (Aucun son n'est entendu.) - DVD-VR: La lecture au ralenti vers l'arrière ne fonctionne pas. • MPEG1/MPEG2: Recherche de plage vers l'arrière/vers l'avant*4 (Aucun son n'est - JVC KD-AVX77 | Instructions - Page 182
*2, *3 37 Recherche d'un élément directement 1 Tout en maintenant pressée SHIFT, appuyez répétitivement sur DIRECT pour choisir le mode de recherche souhaité. DVD Vidéo: DVD-VR: MPEG1/MPEG2: JPEG: MP3/WMA/WAV/AAC: VCD/CD: 2 Tout en maintenant pressée SHIFT, appuyez sur les touches numériques - JVC KD-AVX77 | Instructions - Page 183
pour entrer le numéro souhaité. 3 Appuyez sur ENT (entrée) pour valider. • Pour reprendre la lecture PBC, appuyez sur TOP M/ MENU. Ex.: Recherche temporelle DVD Ex.: 1:02:00) Appuyez une fois sur %, puis deux fois sur # pour passer à la troisième entrée, deux fois sur %, puis appuyez sur ENT (entr - JVC KD-AVX77 | Instructions - Page 184
ée du disque (Pour les DVD-Vidéo, durée de lecture écoulée du titre/ programme/liste de lecture actuel.) DVD-Vidéo/DVD-VR: Durée de lecture aléatoire*1 Changez la langue des dialogues, le flux audio ou le canal audio Changez ou mettez hors service la langue des sous-titres Changement de l'angle de - JVC KD-AVX77 | Instructions - Page 185
est choisi pour . ( 15) • ou est choisi pour . ( 19) Lors de l'affichage VIDEO OUT et 2nd AUDIO OUT, tout en écoutant une autre source que "USB" par les enceintes. • Quand le fonctionnement sur deux zone est en service, vous pouvez commander le lecture de DVD - JVC KD-AVX77 | Instructions - Page 186
fiche 2nd AUDIO OUT. FRANÇAIS • Le niveau de volume apparaît sur le moniteur extérieur connecté. 3 Commandez le lecteur de DVD/CD. USB" comme source principale. Opérations en utilisant l'écran de commande Pour les disques sauf les DVD et VCD: Quand le fonctionnement sur deux zones est en service - JVC KD-AVX77 | Instructions - Page 187
FRANÇAIS Ex.: CD Text Sélection des modes de lecture Vous pouvez aussi changer les modes de lecture en utilisant la fenêtre de sélection de mode de lecture. • Pour JPEG, la lecture aléatoire ne peut pas être choisie. 1 2 Sauf pour les JPEG: Choisissez un mode de lecture. 1 Fenêtre de sélection - JVC KD-AVX77 | Instructions - Page 188
Opérations en utilisant l'écran de liste Pour les disques autres que les DVD, VCD et CD Quand le fonctionnement sur deux zones est en service, ces opérations sont possibles sur le moniteur extérieur en utilisant la télécommande. Quand la lecture est arrêtée... 1 Affichez l'écran de liste. - JVC KD-AVX77 | Instructions - Page 189
mémoire de grande capacité tel qu'une mémoire USB, un lecteur audio numérique, un disque dur portable, etc. à cet appareil. • Vous pouvez aussi connecter le iPod/iPhone à la prise USB de cet appareil. Pour en savoir plus, 49. FRANÇAIS Câble USB à partir de l'arrière de l'appareil La source change - JVC KD-AVX77 | Instructions - Page 190
être enregistrés en tout. • Un seul appareil pour Téléphone Bluetooth et un appareil pour Audio Bluetooth peuvent être connectés en même temps. • Pour utiliser la fonction fonction Bluetooth, vous devez mettre en service la fonction Bluetooth du périphérique. Utilisez dans le menu - JVC KD-AVX77 | Instructions - Page 191
un appel, utilisez . ( 29) Quand un appel arrive... La source change automatiquement sur "Bluetooth". Nom et numéro de téléphone (s'ils sont obtenus) Quand est en service... L'appareil répond automatiquement à l'appel entrant. ( 31) Commutation du support de conversation - JVC KD-AVX77 | Instructions - Page 192
prérégler un maximum de 6 numéros de téléphone. 1 Affichez , , ou . ( 29) 2 Choisissez un numéro éréglé, 29. Utilisation d'un lecteur audio Bluetooth (Maintenez pressée) FRANÇAIS ~ Touchez [SRC], puis choisissez "Bluetooth". Ÿ Touchez [ 6 ] pour - JVC KD-AVX77 | Instructions - Page 193
(non Référez-vous à "Lors de la connexion avec fourni) à la prise du changeur de CD à l'arrière de l'adaptateur d'interface" ( 50). l'appareil. Regarder une Câble USB Audio et Vidéo pour iPod/iPhone, KS-U30 Référez-vous à "Lors de la connexion avec séquence vidéo (non fourni) au câble - JVC KD-AVX77 | Instructions - Page 194
Lors de la connexion avec l'adaptateur d'interface FRANÇAIS Préparation: Assurez-vous que est choisi pour . ( 19) ~ Touchez [SRC], puis choisissez "iPod ". La lecture démarre automatiquement. Ÿ Touchez [4] ou [¢] pour choisir une plage. [ ]: Affiche le menu du lecteur. - JVC KD-AVX77 | Instructions - Page 195
FRANÇAIS Écoute du changeur de CD Il est recommandé d'utiliser un changeur de CD JVC compatible MP3-avec votre autoradio. • Vous pouvez uniquement reproduire des CD (CD-DA) et des disques MP3. Préparation: Assurez-vous que est choisi - JVC KD-AVX77 | Instructions - Page 196
la prise du changeur de CD à l'arrière de l'appareil. • Système de radio satellite JVC SIRIUS, SC-C1 et KS-SRA100, PnP, SC-VDOC1 et KS-SRA100, pour l'écoute de le numéro vert SIRIUS au 1-888-539-SIRIUS (7474). "Subscription updated Press any key to continue" (Inscription mise à jour. Appuyez sur n' - JVC KD-AVX77 | Instructions - Page 197
Accord d'un canal souhaité FRANÇAIS [FUNC]: Change les éléments à choisir avec [5 Catégories - : Canaux préréglés ( 27) Touchez pour afficher l'information du programme-nom de la chanson/nom de l'artiste (/nom du compositeur: uniquement pour SIRIUS). A Mode sonore B Bande C Numéro de préréglage - JVC KD-AVX77 | Instructions - Page 198
de stations HD Radio offrent aussi plus d'un canal de programmes. Ce service est appelé muliplex. • Pour en savoir plus sur les stations artiste/titre de l'album. A Clignote d'abord puis reste allumé quand une émission audio numérique est accordée. B Bande C Numéro de préréglage D Signal d'appel - JVC KD-AVX77 | Instructions - Page 199
de navigation Vous pouvez aussi connecter un système de navigation à la fiche VIDEO IN de façon à pouvoir voir l'écran de navigation. Toujours . ( 41) Quand est choisi pour ( 19) • Vous pouvez utiliser la source "AV-IN" pour écouter une source audio connectée aux fiches LINE - JVC KD-AVX77 | Instructions - Page 200
EXT-INPUT Vous pouvez connecter un appareil extérieur aux prises du changeur de CD à l'arrière de l'appareil en utilisant l'adaptateur d'entrée de ligne-KS-U57 (non fourni) ou l'adaptateur d'entrée auxiliaire-KS-U58 (non fourni). A Mode sonore B Titre affecté ( 26) Préparation: Assurez-vous que < - JVC KD-AVX77 | Instructions - Page 201
garder les disques propres Si le disque est sale, sa lecture risque d'être déformée. Si un disque est sale, essuyez-le avec un chiffon doux, en boîtier et soulevez légèrement le disque en el tenant par ses bords. • Tenez toujours le disque par ses Support central bords. Ne touchez pas la surface - JVC KD-AVX77 | Instructions - Page 202
utilisés de façon interchangeable. • Cet appareil peut uniquement reproduire les fichiers CD audio (CD-DA) si différents types de fichier (MP3/ WMA/WAV/AAC) • Pour les détails sur le format DVD-VR et la liste de lecture, référez-vous aux instructions fournies avec l'appareil d'enregistrement. Numéro - JVC KD-AVX77 | Instructions - Page 203
enregistrés par les caméscopes JVC Everio. Les fichiers MPEG2 sur un périphérique USB à mémoire de grande pas basés sur Windows Media® Audio. - Fichiers au format WMA qui se trouvent sur un iPod/iPhone). - Fichiers qui contiennent des donn pas mettre en service le Surround pour les DVD Vidéo MPEG - JVC KD-AVX77 | Instructions - Page 204
USB, référezvous aussi à ses instructions. • Connectez uniquement un périphérique USB à la fois à cet appareil. N'utilisez pas de nœud de raccordement USB. rations Bluetooth • Connection Error: Le périphérique est enregistré mais la connexion a échouée. Utilisez ou - JVC KD-AVX77 | Instructions - Page 205
du câble USB Audio et Vidéo. Avis: Lors de l'utilisation de iPod/iPhone, certaines opérations peuvent ne pas être réalisées correctement ou comme prévues. Dans ce cas, consultez le site Web JVC suivant: (Page web en anglais uniquement) Pour la connexion USB: Quand - JVC KD-AVX77 | Instructions - Page 206
niveau de volume est réglé au dessus de "30", l'appareil change automatiquement le volume sur "30". • Après avoir changé un des réglages , mettez l'appareil hors tension puis de nouveau sous tension, puis réinsérez le disque (ou insérez un autre disque) de fa - JVC KD-AVX77 | Instructions - Page 207
Codes de langue (pour la sélection de la langue des DVD) Code Langue Code Langue AA Afar FA Persan AB Abkhazien IK Inupiak CS Tchèque IN Indonésien CY Gallois IS Islandais DZ Bhutani IW Hébreu EL Grec JA Japonais EO Espéranto JI Yiddish ET Estonien JW Javanais EU Basque KA Géorgien - JVC KD-AVX77 | Instructions - Page 208
enceintes/sortie discrète analogique-LINE OUT (FRONT/REAR)/CENTER OUT/SUBWOOFER OUT: Les signaux multicanaux sont émis pour un support codé multicanal. (Quand le fonctionnement sur deux zones est en service, le même signal émis par les fiches 2nd AUDIO OUT est émis pour la source principale "DISC - JVC KD-AVX77 | Instructions - Page 209
service. • Pour les opérations des appareils extérieurs, référez-vous aussi aux modes d'emploi fournis avec les adaptateurs utilisés pour les connexion (de même qu'aux instructions connecté à la prise VIDEO IN. • Vérifiez service, la télécommande fonctionne uniquement pour commander le lecteur de DVD - JVC KD-AVX77 | Instructions - Page 210
" apparaît sur l'écran. • Changez le disque. • "Erreur de code régional" apparaît Le code de région n'est pas correct. ( 4) sur l'écran quand vous insérez un DVD Vidéo. Disques en général 66 - JVC KD-AVX77 | Instructions - Page 211
avec le périphérique Bluetooth. • Entrez le même code PIN pour cet appareil et l'appareil cible. Si le code PIN du périphérique n'est pas indiqué sur ses instructions, essayez "0000" ou "1234". • Il y a un écho ou du bruit. Ajustez la position du microphone. USB Bluetooth Suite à la page - JVC KD-AVX77 | Instructions - Page 212
ît sur Connectez cet appareil et le lecture audio Bluetooth l'écran. correctement. • "Aucun Périph. Vocal" apparaît sur Le téléphone portable connecté ne possède pas de système de l'écran. reconnaissance vocale. • iPod/iPhone ne peut pas être mis sous tension ou ne fonctionne pas. • Vérifiez - JVC KD-AVX77 | Instructions - Page 213
un autre canal ou continuez d'écouter le canal précédent. • "NO NAME" apparaît sur l'écran. Il n'y a pas de texte d'information pour le canal choisi. • "UPDATING" apparaît sur l'écran et aucun son L'autoradio est en train de mettre à jour les informations n'est entendu. des canaux et cela prend - JVC KD-AVX77 | Instructions - Page 214
ît sur l'écran lors de l'écoute L'appareil est en train de changer les informations de la radio satellite XM. du canal et audio. Le texte d'information est temporairement indisponible • "Réinitialisation08" apparaît sur l'écran. Reconnectez cet appareil et la radio satellite correctement, puis - JVC KD-AVX77 | Instructions - Page 215
OUT (FRONT, REAR), CENTER Impédance OUT, SUBWOOFER OUT Impédance de sortie 5 V/20 kΩ en charge (pleine échelle) 1 kΩ Standard de couleur NTSC Sortie vidéo (composite) 1 Vp-p/75 Ω Autres prises Entrée Sortie LINE IN, VIDEO IN, entrée USB, Entrée d'antenne 2nd AUDIO OUT Autres Changeur - JVC KD-AVX77 | Instructions - Page 216
(Object Push Profile-Profile de poussée d'objet) 1.1 A2DP (Advanced Audio Distribution Profile-Profile de distribution audio avancé) 1.2 AVRCP (Audio/Video Remote Control Profile-Profile de télécommande audio/ vidéo) 1.3 BLUETOOTH MONITEUR Taille de l'écran Écran large de 5,4 pouces à cristaux - JVC KD-AVX77 | Instructions - Page 217
28, 35, 37, 38 Démarrage/arrêt/pause/reprise de la lecture 35, 36, 37, 38 USB Fixation/retrait 45 Lecture répétée/aléatoire 26 Sélection d'une plage/dossier......28, 37, 38 Bluetooth Répondre à/terminer un appel ...........31, 47 Connexion/déconnexion/suppression 30, 46 Faire un appel 29 - JVC KD-AVX77 | Instructions - Page 218
Having TROUBLE with operation? Please reset your unit Refer to page of How to reset your unit Still having trouble?? USA ONLY Call 1-800-252-5722 http://www.jvc.com We can help you! EN, SP, FR © 2009 Victor Company of Japan, Limited 0309MNMMDWJEIN
-
 1
1 -
 2
2 -
 3
3 -
 4
4 -
 5
5 -
 6
6 -
 7
7 -
8
-
9
-
10
-
11
-
12
-
13
-
14
-
15
-
16
-
17
-
18
-
19
-
20
-
21
-
22
-
23
-
24
-
25
-
26
-
27
-
28
-
29
-
30
-
31
-
32
-
33
-
34
-
35
-
36
-
37
-
38
-
39
-
40
-
41
-
42
-
43
-
44
-
45
-
46
-
47
-
48
-
49
-
50
-
51
-
52
-
53
-
54
-
55
-
56
-
57
-
58
-
59
-
60
-
61
-
62
-
63
-
64
-
65
-
66
-
67
-
68
-
69
-
70
-
71
-
72
-
73
-
74
-
75
-
76
-
77
-
78
-
79
-
80
-
81
-
82
-
83
-
84
-
85
-
86
-
87
-
88
-
89
-
90
-
91
-
92
-
93
-
94
-
95
-
96
-
97
-
98
-
99
-
100
-
101
-
102
-
103
-
104
-
105
-
106
-
107
-
108
-
109
-
110
-
111
-
112
-
113
-
114
-
115
-
116
-
117
-
118
-
119
-
120
-
121
-
122
-
123
-
124
-
125
-
126
-
127
-
128
-
129
-
130
-
131
-
132
-
133
-
134
-
135
-
136
-
137
-
138
-
139
-
140
-
141
-
142
-
143
-
144
-
145
-
146
-
147
-
148
-
149
-
150
-
151
-
152
-
153
-
154
-
155
-
156
-
157
-
158
-
159
-
160
-
161
-
162
-
163
-
164
-
165
-
166
-
167
-
168
-
169
-
170
-
171
-
172
-
173
-
174
-
175
-
176
-
177
-
178
-
179
-
180
-
181
-
182
-
183
-
184
-
185
-
186
-
187
-
188
-
189
-
190
-
191
-
192
-
193
-
194
-
195
-
196
-
197
-
198
-
199
-
200
-
201
-
202
-
203
-
204
-
205
-
206
-
207
-
208
-
209
-
210
-
211
-
212
-
213
-
214
-
215
-
216
-
217
-
218
 |
 |

ENGLISH
FRANÇAIS
ESPAÑOL
KD-AVX77
LVT1937-001A
[J]
For canceling the display demonstration, see page 11.
Para cancelar la demonstración en pantalla, consulte la página 11.
Pour annuler la démonstration des affichages, référez-vous à la page 11.
For installation and connections, refer to the separate manual.
Para la instalación y las conexiones, refiérase al manual separado.
Pour l’installation et les raccordements, se référer au manuel séparé.
INSTRUCTIONS
MANUAL DE INSTRUCCIONES
MANUEL D’INSTRUCTIONS
DVD/CD RECEIVER
RECEPTOR CON DVD/CD
RÉCEPTEUR DVD/CD
For customer Use:
Enter below the Model
No. and Serial No. which
are located on the top or
bottom of the cabinet. Retain
this information for future
reference.
Model No.
Serial No.