JVC KD-X320BTS Instruction Manual
JVC KD-X320BTS Manual
 |
View all JVC KD-X320BTS manuals
Add to My Manuals
Save this manual to your list of manuals |
JVC KD-X320BTS manual content summary:
- JVC KD-X320BTS | Instruction Manual - Page 1
KD-X320BTS DIGITAL MEDIA RECEIVER INSTRUCTION MANUAL RÉCEPTEUR MULTIMÉDIA NUMÉRIQUE MANUEL D'INSTRUCTIONS RECEPTOR DE MEDIOS DIGITALES MANUAL DE INSTRUCCIONES ENGLISH FRANÇAIS ESPAÑOL Please read all instructions carefully before operation to obtain the best possible performance from the unit. - JVC KD-X320BTS | Instruction Manual - Page 2
to this equipment may cause harmful interference unless the modifications are expressly approved in the instruction manual. The user could lose the authority to operate this equipment if an unauthorized change or modification is made. FCC NOTE This equipment has been tested and found to comply - JVC KD-X320BTS | Instruction Manual - Page 3
Canada ont été respectées. Contains Bluetooth Module FCC ID: ZWYMC55 Contains Bluetooth ). But it is desirable that it should be installed and operated keeping the radiator at least 20cm or the transmitter by Industry Canada. To reduce potential radio interference to other users, the antenna type and - JVC KD-X320BTS | Instruction Manual - Page 4
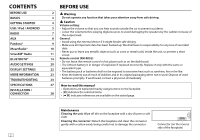
CONTENTS BEFORE USE BASICS GETTING STARTED USB / iPod / ANDROID RADIO AUX Pandora® iHeartRadio® SiriusXM® Radio BLUETOOTH® AUDIO SETTINGS DISPLAY SETTINGS MORE INFORMATION TROUBLESHOOTING SPECIFICATIONS INSTALLATION / CONNECTION BEFORE USE 2 Warning 3 Do not operate any function that takes your - JVC KD-X320BTS | Instruction Manual - Page 5
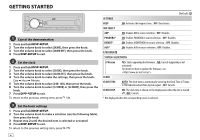
Remote sensor (Do not expose to bright sunlight.) Detach button How to reset Pull out the insulation sheet when using for the first time. How the battery To Turn on the power Adjust the volume Select a source Change the display information Your preset adjustments will also be erased. On the faceplate - JVC KD-X320BTS | Instruction Manual - Page 6
ON: Enables AUX in source selection. ; OFF: Disables. F/W UPDATE SYSTEM / BLUETOOTH F/W xxxx YES: Starts upgrading the firmware. ; NO: Cancels (upgrading is not activated). For details on how to update the firmware, see: . CLOCK CLOCK SYNC AUTO: The clock time is - JVC KD-X320BTS | Instruction Manual - Page 7
/ ANDROID Start playback The source changes automatically and playback starts. USB input car when not using. *2 When connecting an Android device, "Press [VIEW] to install JVC MUSIC PLAY APP" is shown. Follow the instructions to install the application. You can also install the latest version of JVC - JVC KD-X320BTS | Instruction Manual - Page 8
unit. While in ANDROID source, press repeatedly. AUTO MODE: Control from the unit (using JVC MUSIC PLAY application). AUDIO MODE: Control other media player applications from the Android device (without using JVC MUSIC PLAY application). However, you can still play/pause or file skip from the unit - JVC KD-X320BTS | Instruction Manual - Page 9
up when receiving an FM stereo broadcast until "M" flashes, then press repeatedly to search for a station manually. Settings in memory You can store up to 18 stations for until the desired item is selected/ activated or follow the instructions stated on the selected item. 5 Press to exit. To - JVC KD-X320BTS | Instruction Manual - Page 10
), PUBLIC, COLLEGE, HABL ESP (Spanish talk), MUSC ESP (Spanish music), HIP HOP, WEATHER Use a portable audio player 1 Connect a portable audio player (commercially available). 3.5 mm (1/8") stereo mini plug with "L" shaped connector (commercially available) Auxiliary input jack Portable audio - JVC KD-X320BTS | Instruction Manual - Page 11
Pandora® Preparation: Install the latest version of the Pandora application on your device (iPhone/ iPod touch), then create an account and log in to Pandora. • Select [ON] for [PANDORA] in [SRC SELECT]. ( 4) Start listening 1 Open the Pandora )*1 The source changes to PANDORA and broadcast starts - JVC KD-X320BTS | Instruction Manual - Page 12
iHeartRadio® Preparation: Install the latest version of iHeart Link for JVC application on your device (iPhone/ iPod touch), Press 1. station Scan for live station Press 4. *1 Do not leave the cable inside the car when not using. *2 If thumbs down is selected, the current track is skipped. On the - JVC KD-X320BTS | Instruction Manual - Page 13
commercial-free music plus the best sports, news, talk, comedy users in Canada: Online: Go to www.siriusxm.ca/activatexm Phone: Call 1-877-438-9677 4 Press repeatedly to select SIRIUS XM to start updating to search for a channel manually. • Pressing and holding changes the channel rapidly. If - JVC KD-X320BTS | Instruction Manual - Page 14
select LIVE, then press the knob. SmartFavorites and TuneStart™ User preset channels are initially assigned as the SmartFavorites channels. SmartFavorite channel channels 1 to 6 are assigned as SmartFavorites. Using SiriusXM tuner models later than SXV200: This unit can assign a maximum of 18 - JVC KD-X320BTS | Instruction Manual - Page 15
follow the instructions stated on 2 and 3 to enter a new 4-digit pass code. 5 Press the volume knob received signal. BUF USAGE 0% - 100% (0): Shows the memory usage for Replay buffer. SXM RESET YES: Resets stored channel and lock setting to default. ; NO: Cancels. *1 Displayed only when [USER - JVC KD-X320BTS | Instruction Manual - Page 16
device can be connected at any time. • This unit supports Secure Simple Pairing (SSP). • Some Bluetooth devices may not automatically connect to the unit after pairing. Connect the device to the unit manually. Refer to the instruction manual of the Bluetooth device for more information. • Once the - JVC KD-X320BTS | Instruction Manual - Page 17
BLUETOOTH® BLUETOOTH - Mobile phone Receive a call When there is an incoming call: - All the buttons flash. - The unit answers the call automatically if [AUTO ANSWER] is set to a selected time. ( 16) During a call: - If you turn off the unit or detach the faceplate, the Bluetooth the microphone - JVC KD-X320BTS | Instruction Manual - Page 18
for receiving a call 1 Press to enter Bluetooth mode the desired item is selected/activated or follow the instructions stated on the selected item. To return to the If the phone supports PBAP, the phonebook of the connected phone is automatically transferred to the unit when pairing. • This unit - JVC KD-X320BTS | Instruction Manual - Page 19
Voice Recognition features vary for each phone. Refer to the instruction manual of the connected phone for details. • This unit also supports the intelligent personal assistant function of iPhone. Delete a contact 1 Press to enter Bluetooth mode. 2 Turn the volume knob to select [RECENT CALL - JVC KD-X320BTS | Instruction Manual - Page 20
is designed to view JVC car receiver status and perform simple control operations on Android smart phones. For JVC Smart Music Control operations, visit JVC website: . Bluetooth compatibility check mode You can check the connectivity of the supported profile between the - JVC KD-X320BTS | Instruction Manual - Page 21
via Bluetooth Listen to Pandora Preparation: Select [ON] for [PANDORA] in [SRC SELECT]. ( 4) You can listen to Pandora on your smart phone (Android OS) through Bluetooth on this unit. 1 Open the Pandora application on your device. 2 Connect your Bluetooth audio player via Bluetooth connection - JVC KD-X320BTS | Instruction Manual - Page 22
to make a selection (see the following table), then press the knob. 3 Repeat step 2 until the desired item is selected/activated or follow the instructions stated on the selected item. 4 Press to exit. To return to the previous setting item, press . Default: XX EQ SETTING EQ PRESET FLAT - JVC KD-X320BTS | Instruction Manual - Page 23
maximum power of each speaker is less than 50 W to prevent damaging the speakers.) ; HIGH POWER: The maximum volume level is 50. D.T.EXP (Digital Track Expander) ON: Creates realistic sound by compensating the high-frequency components and restoring the rise-time of the waveform that are lost in - JVC KD-X320BTS | Instruction Manual - Page 24
item is selected/activated or follow the instructions stated on the selected item. 4 00 AM) AUTO: Changes between the day and night adjustments when you turn off or on the car headlights.*1 BRIGHTNESS Sets ; OFF: Cancels. *1 The illumination control wire connection is required. ( 29) *2 Some - JVC KD-X320BTS | Instruction Manual - Page 25
media or jvc.net/cs/car/>. About Pandora • Pandora is available only in the U.S., Australia and New Zealand. • Because Pandora is a third-party service, the specifications are subject to change jvc.net/cs/car/>. About Bluetooth • Depending on the Bluetooth version of the device, some Bluetooth - JVC KD-X320BTS | Instruction Manual - Page 26
. • JVC Playlist Creator and JVC Music Control are available from the following web site: . Change the display of the speaker wires are insulated properly. Turn the power on again. "PROTECTING SEND SERVICE" appears. Send the unit to the nearest service center. Source - JVC KD-X320BTS | Instruction Manual - Page 27
media player application or use another media player application. • Restart the Android device. • If this does not solve the problem, the connected Android device is unable to route the audio signal to unit. ( 23) ANDROID Cannot playback at [AUTO MODE]. • Make sure JVC MUSIC PLAY APP is installed - JVC KD-X320BTS | Instruction Manual - Page 28
if the device supports the function you have tried. Reset the unit and try the operation again. If "H/W ERROR" appears again, consult your nearest service center. Update the Bluetooth firmware. ( 4) If you have any troubles, try the following: 1 Check TROUBLESHOOTING 2 Reset the unit ( 3) 3 Contact - JVC KD-X320BTS | Instruction Manual - Page 29
DIN S/N = 46 dB) Frequency Response (±3 dB) Signal-to-Noise Ratio (MONO) Stereo 2.0 (Full speed) Windows Media Audio Bluetooth Version Frequency Range Output Power Maximum Communication Range Pairing Profile Bluetooth Ver.2.1+EDR/ Bluetooth Temperature Range 0°C to +40°C Installation Size (W × H × - JVC KD-X320BTS | Instruction Manual - Page 30
, then disconnect the terminal of the car battery. 2 Connect the wires properly. See Wiring connection. ( 29) 3 Install the unit to your car. See Installing the unit (in-dash mounting). 4 Connect the terminal of the car battery. 5 Reset the unit. ( 3) Installing the unit (in-dash mounting) Hook - JVC KD-X320BTS | Instruction Manual - Page 31
installation (A) Faceplate Fuse (10 A) Antenna terminal Vehicle dashboard MIC (Microphone input terminal) ( 14) Remote wire (not supplied) Ignition switch Car fuse block Separate red wire Make this connection if your vehicle factory wiring harness Join the same color wires together. Blue/white - JVC KD-X320BTS | Instruction Manual - Page 32
4 USB / iPod / ANDROID 5 RADIO 7 AUX 8 Pandora® 9 iHeartRadio® 10 Radio SiriusXM® 11 BLUETOOTH® 14 RÉGLAGES AUDIO 20 RÉGLAGES D'AFFICHAGE 22 PLUS D'INFORMATIONS 23 GUIDE DE DÉPANNAGE 24 SPÉCIFICATIONS 27 INSTALLATION / RACCORDEMENT 28 AVANT L'UTILISATION Avertissement - JVC KD-X320BTS | Instruction Manual - Page 33
FONCTIONNEMENT DE BASE Façade Bouton de volume (tournez/appuyez) Fenêtre d'affichage Attachez Détachez Télécommande (RM-RK52) Capteur de télécommande (Ne l'exposez Pas à la lumière directe du soleil.) Touche de détachement Comment réinitialiser Retirez la feuille d'isolant lors de la première - JVC KD-X320BTS | Instruction Manual - Page 34
source. ; OFF: Hors service. F/W UPDATE SYSTEM / BLUETOOTH F/W xxxx YES: Démarrer la mise à niveau du micrologiciel. ; NO: Annulation (la mise à niveau n'est pas activée). Pour en savoir plus sur la mise à niveau du micrologiciel, référez-vous à: . CLOCK CLOCK SYNC - JVC KD-X320BTS | Instruction Manual - Page 35
USB / iPod / ANDROID Démarrez la lecture La source change automatiquement et le lecture démarre. Prise d'entrée USB [VIEW] to install JVC MUSIC PLAY APP"apparaît. Suivez les instructions pour installer l'application. Vous pouvez aussi intaller la dernière version de l'application JVC MUSIC PLAY sur - JVC KD-X320BTS | Instruction Manual - Page 36
AUTO MODE: Commande à partir de l'appareil (en utilisant l'application JVC MUSIC PLAY). AUDIO MODE: Commande d'autres applications de lecture multimédia support suivant sont lus. • Mémoire interne ou smartphone (Mass Storage Class) sélectionné. • Lecteur sélectionné parmi plusieurs lecteurs. Change - JVC KD-X320BTS | Instruction Manual - Page 37
ce que l'élément souhaité soit sélectionné/activé ou suivez les instructions données pour l'élément sélectionné. 5 Appuyez sur pour quitter actuelle. 1 ONCE/ DAILY/ WEEKLY/ OFF: Sélectionnez la fréquence de mise en service de la minuterie. 2 FM/ AM/ SIRIUS XM*1: Sélectionner la source. 3 01 - JVC KD-X320BTS | Instruction Manual - Page 38
RADIO AUX Défaut: XX SSM SSM 01 - 06 / SSM 07 - 12 / SSM 13 - 18: Prérègle automatiquement un maximum de 18 stations pour FM. "SSM" s'arrête de clignoter quand les 6 premières stations sont mémorisées. Sélectionnez SSM 07 - 12 / SSM 13 - 18 pour mémoriser les 12 stations suivantes. IF BAND - JVC KD-X320BTS | Instruction Manual - Page 39
ou 6 pour mémoriser. Pour sélectionner une station mémorisée, appuyez sur la touche numérique 1, 4, 5 ou 6. (Accessoire du iPod/iPhone)*1 La source change sur PANDORA et la diffusion démarre. Pour Sur la façade Sur la télécommande Lecture / pause Appuyez sur le bouton de volume. Appuyez sur - JVC KD-X320BTS | Instruction Manual - Page 40
iHeartRadio® Préparation: Installez la dernière version de l'application iHeart Link for JVC sur votre appareil (iPhone/ iPod touch), puis créez un compte et connectez-vous sur iHeartRadio. • Sélectionnez [ON] pour [IHEART] dans [SRC SELECT]. ( 4) Démarrez l'écoute 1 - JVC KD-X320BTS | Instruction Manual - Page 41
. Pour les utilisateurs au États-Unis: En ligne: Allez sur www.siriusxm.com Téléphone: Appelez le 1-866-635-2349 Pour les utilisateurs au Canada: En ligne: Allez sur www.siriusxm.ca/activatexm Téléphone: Appelez le 1-877-438-9677 4 Appuyez répétitivement sur pour sélectionner SIRIUS XM et - JVC KD-X320BTS | Instruction Manual - Page 42
Radio SiriusXM® Relecture SiriusXM™ 1 Appuyez sur le bouton de volume. " " s'allume et l'appareil mémorise la position de pause. 2 Appuyez sur le bouton de volume pour démarrer la relecture. La relecture démarre à partir de la position de pause de l'étape 1. Pendant la relecture... Pour Sur la fa - JVC KD-X320BTS | Instruction Manual - Page 43
souhaité soit sélectionné/activé ou suivez les instructions données pour l'élément sélectionné. 5 Appuyez le réglage du verrouillage défini SiriusXM. ; USER DEFINED: Sélectionne le réglage du verrouillage dé pour la mémoire tampon de relecture. SXM RESET YES: Réinitialise les canaux mémorisés et - JVC KD-X320BTS | Instruction Manual - Page 44
fourni). Ajustez l'angle du microphone Pairage d'un périphérique Bluetooth Lors de la connexion d'un périphérique Bluetooth à l'appareil pour la et sélectionnez "JVC UNIT" sur le périphérique Bluetooth. "BT PAIRING" clignote sur l'affichage. • Pour certains périphériques Bluetooth, il se peut - JVC KD-X320BTS | Instruction Manual - Page 45
Si vous mettez hors tension l'appareil ou détachez la façade, la connexion Bluetooth est déconnectée. Pour Sur la façade Sur la télécommande Répondre à . Défaut: XX MIC LEVEL -10 - +10 (-4): La sensibilité du microphone augmente quand le numéro augmente. NOISE RDCT -5 - +5 (0): Ajustez le - JVC KD-X320BTS | Instruction Manual - Page 46
phone portable possède cette fonction. 1 Appuyez sur pour entrer en mode Bluetooth. 2 Tournez le bouton de volume pour réaliser une sélection (voir le ce que l'élément souhaité soit sélectionné/activé ou suivez les instructions données pour l'élément sélectionné. Pour retourner à l'option de - JVC KD-X320BTS | Instruction Manual - Page 47
de volume pour choisir [BLUETOOTH], puis appuyez sur le bouton. 3 Tournez le bouton de volume pour faire une sélection ( 18), puis appuyez sur le bouton. 4 Répétez l'étape 3 jusqu'à ce que l'élément souhaité soit sélectionné/ activé ou suivez les instructions données pour l'élément sélectionn - JVC KD-X320BTS | Instruction Manual - Page 48
USING PHONE" "PIN IS 0000" défile sur l'affichage. 2 Cherchez et sélectionnez "JVC UNIT" sur le périphérique Bluetooth (avant 3 minutes). 3 Réalisez (A), (B) ou (C) en fonction de ce qui apparait sur l'affichage. (A) "PAIRING" "XXXXXX" (code de 6 chiffres): Assurez-vous que le même code appara - JVC KD-X320BTS | Instruction Manual - Page 49
dans [SRC SELECT]. ( 4) Vous pouvez écouter Pandora sur votre smartphone (Android OS) via le Bluetooth de cet appareil. 1 Ouvrez l'application Pandora sur votre appareil. 2 Connectez votre lecteur audio Bluetooth via la connexion Bluetooth. ( 14) 3 Appuyez répétitivement sur pour sélectionner - JVC KD-X320BTS | Instruction Manual - Page 50
le tableau suivant), puis appuyez sur le bouton. 3 Répétez l'étape 2 jusqu'à ce que l'élément souhaité soit sélectionné/ activé ou suivez les instructions données pour l'élément sélectionné. 4 Appuyez sur pour quitter. Pour retourner à l'option de réglage précédente, appuyez sur . Défaut: XX - JVC KD-X320BTS | Instruction Manual - Page 51
RÉGLAGES AUDIO AUDIO BASS BOOST LOUD SUB.W LEVEL*4 SUB.W *6 SUB.W LPF*4 SUB.W PHASE*4 FADER BALANCE *7 VOL ADJUST AMP GAIN +01 / +02: Choisit votre niveau préféré d'accentuation des graves. ; OFF: Annulation. 01 / 02: Accentue les basses ou hautes fréquences pour produire un son plus équilibré - JVC KD-X320BTS | Instruction Manual - Page 52
ce que l'élément souhaité soit sélectionné/ activé ou suivez les instructions données pour l'élément sélectionné. 4 Appuyez sur pour quitter. Ajuste l'heure de mise en et hors service du gradateur. Tournez le bouton de volume pour régler l'heure de mise en service [ON], puis appuyez sur le bouton - JVC KD-X320BTS | Instruction Manual - Page 53
jvc.net/cs/car/>. À propos de Pandora • Pandora est disponible uniquement aux États-Unis, en Australie et en Nouvelle-Zélande. • Puisque Pandora est un service application, veuillez contacter Pandora à pandora-support@pandora. com. À propos de iHeartRadio • iHeartRadio® est un service tiers, et par - JVC KD-X320BTS | Instruction Manual - Page 54
connexions. Généralités "MISWIRING CHECK WIRING THEN PWR ON" apparaît. Mettez l'appareil hors tension, puis assurez-vous que les prises des câbles d'enceinte sont correctement isolées. Mettez de nouveau l'appareil sous tension. "PROTECTING SEND SERVICE" apparaît. Envoyez l'appareil au centre - JVC KD-X320BTS | Instruction Manual - Page 55
appareil. ( 23) • Assurez-vous que JVC MUSIC PLAY APP est installé sur le périphérique Android. ( UPDATE APP" "PLS LOGIN" "STATION NOT AVAILABLE" "STATION NOT SELECTED" "STREAM ERR" "THUMBS ERR" "TIMED OUT" Remède Assurez-vous que vous avez bien installé la dernière version de l'application Pandora - JVC KD-X320BTS | Instruction Manual - Page 56
est interrompu ou saute pendant la lecture d'un lecteur audio Bluetooth. Le lecteur audio Bluetooth connecté ne peut pas être commandé. "PAIRING FULL" "PLEASE WAIT" "BT DEVICE NOT FOUND" "NOT SUPPORT" "ERROR" "H/W ERROR" "BT ERROR PLS UPDATE" Remède • Réduisez la distance entre cet appareil et le - JVC KD-X320BTS | Instruction Manual - Page 57
de sensibilité (DIN S/N = 46 Media Audio Fichiers AAC-LC ".m4a" Format audio de forme d'onde RIFF (PCM linéaire uniquement) Fichiers FLAC Généralités Audio Bluetooth installation (L × H × P) Poids Sujet à changement sans notification. 20 Hz - 20 kHz 1 000 mV 30 kΩ Bluetooth Ver.2.1+EDR/ Bluetooth - JVC KD-X320BTS | Instruction Manual - Page 58
de votre véhicule qui offre une alimentation de 12 V CC et qui se met en et hors service avec la clé de contact. • Gardez tous les câbles à l'écart des dissipateurs thermiques. • Après avoir installé l'appareil, vérifiez si les lampes de frein, les indicateurs, les clignotants, etc. de la voiture - JVC KD-X320BTS | Instruction Manual - Page 59
l'amplificateur au châssis de la voiture pour éviter d'endommager l'appareil. Liste des pièces pour l'installation (A) Façade Tableau de bord du véhicule MIC (prise d'entrée microphone) ( 14) Fil de télécommande (non fournie) Interrupteur d'allumage Porte fusible Fil rouge séparé Réalisez cette - JVC KD-X320BTS | Instruction Manual - Page 60
/ ANDROID 5 RADIO 7 AUX 8 Pandora® 9 iHeartRadio® 10 Radio SiriusXM® 11 BLUETOOTH® 14 AJUSTES DE AUDIO 20 AJUSTES DE caso de tragarse, póngase con un médico inmediatamente. Cómo leer este manual • Las operaciones se explican utilizando principalmente los botones de la placa frontal. - JVC KD-X320BTS | Instruction Manual - Page 61
PUNTOS BÁSICOS Placa frontal Rueda de volumen (girar/pulsar) Ventanilla de visualización Fijar Desmontar Mando a distancia (RM-RK52) Sensor remoto (DO lo exponga a la luz solar brillante.) Botón de liberación Cómo reinicializar Retire la hoja aislante cuando se utilice por primera vez. Cómo - JVC KD-X320BTS | Instruction Manual - Page 62
; OFF: Se deshabilita. PANDORA* ON: Habilita PANDORA en la selección de UPDATE SYSTEM / BLUETOOTH F/W xxxx YES: Se empieza a actualizar el firmware. ; NO: Se cancela (la actualización no se activa). Para obtener información sobre cómo actualizar el firmware, consulte: - JVC KD-X320BTS | Instruction Manual - Page 63
deje el cable dentro del vehículo cuando no lo esté utilizando. *2 Cuando conecte un dispositivo Android, se mostrará "Press [VIEW] to install JVC MUSIC PLAY APP". Siga las instrucciones para instalar la aplicación. Antes de la conexión, también puede instalar la versión más reciente de la aplicaci - JVC KD-X320BTS | Instruction Manual - Page 64
MODE: Control desde la unidad (utilizando la aplicación JVC MUSIC PLAY). AUDIO MODE: Control de otras aplicaciones del el primer carácter. Pulse o gire rápidamente la rueda de volumen para seleccionar el carácter deseado (A a Z/ 0 a 9/ OTHERS). • Seleccione "OTHERS" si el primer carácter no - JVC KD-X320BTS | Instruction Manual - Page 65
de emisoras. (o) Pulse y mantenga pulsado (o pulse y mantenga pulsado en el RM-RK52) hasta que parpadee "M" y, a continuación, pulse repetidamente para la búsqueda manual de emisoras. Ajustes en la memoria Puede almacenar hasta 18 emisoras de FM y 6 emisoras de AM en la memoria. Almacene una - JVC KD-X320BTS | Instruction Manual - Page 66
RADIO AUX Predeterminado: XX SSM SSM 01 - 06 / SSM 07 - 12 / SSM 13 - 18: Configura automáticamente hasta 18 emisoras para FM. "SSM" deja de destellar cuando se almacenan las primeras 6 emisoras. Seleccione SSM 07 - 12 / SSM 13 - 18 para almacenar las 12 emisoras siguientes. IF BAND AUTO: - JVC KD-X320BTS | Instruction Manual - Page 67
Pandora® Preparativos: Instale la última versión de la aplicación Pandora en su dispositivo (iPhone/ iPod touch) y, a continuación, cree una cuenta e inicie sesión en Pandora. • Seleccione [ON] para [PANDORA] en [SRC SELECT]. ( 4) Comience a escuchar 1 Abra la aplicación Pandora en su dispositivo. 2 - JVC KD-X320BTS | Instruction Manual - Page 68
iHeartRadio® Preparativos: Instale la última versión de la aplicación iHeart Link for JVC en su dispositivo (iPhone/ iPod touch) y, a continuación, cree squeda rápida en la lista por carácter inicial (A a Z). 2 Gire la rueda de volumen o pulse para seleccionar el carácter que desee buscar. 3 - JVC KD-X320BTS | Instruction Manual - Page 69
se mostrarán todos los canales disponibles. 5 Gire la rueda de volumen para seleccionar un canal y luego púlsela. (o) Pulse para la búsqueda manual de un canal. • Para cambiar rápidamente de canal mantenga pulsado . La pantalla de entrada del código de acceso aparece cuando se selecciona un - JVC KD-X320BTS | Instruction Manual - Page 70
de 18 canales SmartFavorites. Inicialmente, todos los canales presintonizados se asignan a SmartFavorites. • Para los canales SmartFavorites, aparece "*" junto al último carácter del nombre de canal. 12 Le permite rebobinar y reproducir hasta 30 minutos de cualquier programa de noticias, charlas - JVC KD-X320BTS | Instruction Manual - Page 71
CH: Selecciona la configuración de bloqueo definida por SiriusXM. ; USER DEFINED: Selecciona la configuración de bloqueo definida por el usuario. (0): Muestra el uso de la memoria del búfer de reproducción. SXM RESET YES: Restablece los canales presintonizados y la configuración de bloqueo a los - JVC KD-X320BTS | Instruction Manual - Page 72
"JVC UNIT" en el dispositivo Bluetooth. "BT PAIRING" parpadea en la pantalla. • En el caso de algunos dispositivos Bluetooth, manual suministrado con su dispositivo Bluetooth. 3 Realice (A) o (B) dependiendo del texto se que desplace en la pantalla. En el caso de algunos dispositivos Bluetooth - JVC KD-X320BTS | Instruction Manual - Page 73
los Pulse la rueda de volumen durante una modos manos libres o conversación privada llamada. • Las operaciones pueden variar dependiendo - del teléfono móvil Bluetooth conectado. * No aplicable para iPhone. Durante una llamada, la unidad ajusta el volumen del teléfono en el iPhone con el de la - JVC KD-X320BTS | Instruction Manual - Page 74
su teléfono móvil dispone de esta función. 1 Pulse para ingresar al modo Bluetooth. 2 Gire la rueda de volumen para seleccionar (consulte la siguiente tabla) y letra que desee (A a Z, 0 a 9, y OTHERS). • Aparece"OTHERS"si el primer carácter no es una letra (A a Z) ni un número (0 a 9). 2 Gire la - JVC KD-X320BTS | Instruction Manual - Page 75
BLUETOOTH® DIAL NUMBER VOICE 1 Gire la rueda de volumen para seleccionar un número (0 a 9) o un carácter ( , #, +). 2 Pulse para mover la posición de varían según el teléfono. Si desea más información, consulte el manual de instrucciones del teléfono conectado. • Esta unidad también es compatible - JVC KD-X320BTS | Instruction Manual - Page 76
JVC Smart Music Control, visite el sitio web de JVC: . Modo de comprobación de compatibilidad Bluetooth "JVC UNIT" en el dispositivo Bluetooth (en el lapso de 3 minutos). 3 Realice (A), (B) o (C) dependiendo de los datos mostrados en la pantalla. (A) "PAIRING" - JVC KD-X320BTS | Instruction Manual - Page 77
indicaciones en pantalla difieren según su disponibilidad en el dispositivo conectado. Radio Internet a través de Bluetooth Escuchar Pandora Preparativos: Seleccione [ON] para [PANDORA] en [SRC SELECT]. ( 4) Puede escuchar Pandora en su teléfono inteligente (Android OS) a través de la conexi - JVC KD-X320BTS | Instruction Manual - Page 78
AJUSTES DE AUDIO Para En la placa frontal Seleccionar un ecualizador preajustado Pulse repetidamente. Pulse y, a continuación, gire la rueda de volumen antes de que transcurran 2 segundos. Ecualizador preajustado: FLAT (predeterminado), HARD ROCK, JAZZ, POP, R&B, TALK, USER1, USER2, VOCAL - JVC KD-X320BTS | Instruction Manual - Page 79
en los altavoces.) ; HIGH POWER: El nivel máximo de volumen es 50. D.T.EXP ON: Crea un sonido real compensando los componentes de alta frecuencia y (Expansor digital de restableciendo el tiempo de subida de la forma de onda que se pierde en la compresión de pistas) los datos de audio. ; OFF: Se - JVC KD-X320BTS | Instruction Manual - Page 80
AJUSTES DE VISUALIZACIÓN 1 Pulse y mantenga pulsado . 2 Gire la rueda de volumen para seleccionar (consulte la siguiente tabla) y luego púlsela. 3 Repita el paso step 2 hasta que se seleccione o active el elemento que desee o siga las instrucciones indicadas en el elemento seleccionado. 4 - JVC KD-X320BTS | Instruction Manual - Page 81
más reciente, consulte: . Acerca de Pandora • Pandora sólo está disponible en los EE esta aplicación, póngase en contacto con [email protected]. Acerca de iHeartRadio • Debido . Acerca de Bluetooth • Dependiendo de la versión Bluetooth del dispositivo, - JVC KD-X320BTS | Instruction Manual - Page 82
y las conexiones. General Aparece "MISWIRING CHECK WIRING THEN PWR ON". Apague la unidad y luego compruebe que los terminales de los cables de altavoz estén correctamente aislados. A continuación, vuelva a encender la unidad. Aparece "PROTECTING SEND SERVICE". Lleve la unidad al centro de - JVC KD-X320BTS | Instruction Manual - Page 83
DISCONNCTED" "NO SKIPS" "NO STATIONS" "NOT CONNCTD" "UPDATE APP" "PLS LOGIN" "STATION NOT AVAILABLE" "STATION NOT la última versión de la aplicación Pandora en su dispositivo. La comunicación es inestable ltima versión de la aplicación iHeart Link for JVC. No se inició sesión. Inicie sesión otra - JVC KD-X320BTS | Instruction Manual - Page 84
el dispositivo Bluetooth. • Bluetooth. No se puede controlar el reproductor de audio Bluetooth conectado. "PAIRING FULL" "PLEASE WAIT" "BT DEVICE NOT FOUND" "NOT SUPPORT" "ERROR" "H/W ERROR" "BT ERROR PLS UPDATE Bluetooth Bluetooth registrados durante [AUTO CNNCT]. Active Bluetooth firmware de Bluetooth - JVC KD-X320BTS | Instruction Manual - Page 85
dB) Sensibilidad de silenciamiento (DIN S/N = 46 dB) con MPEG-1/2 Audio Layer-3 Compatible con Windows Media Audio Archivos AAC-LC ".m4a" Formato de Bluetooth Versión Gama de frecuencias Potencia de salida Alcance máximo de comunicación Emparejamiento Perfil Bluetooth Ver.2.1+EDR/ Bluetooth - JVC KD-X320BTS | Instruction Manual - Page 86
ón. Precaución • Para fines de seguridad, deje que un profesional realice el cableado y el montaje. Consulte con un distribuidor de productos de audio para automóviles. • Instale esta unidad en la consola de su vehículo. No toque las partes metálicas de la unidad durante o un poco después del uso de - JVC KD-X320BTS | Instruction Manual - Page 87
Cable de señal (no suministrado) Amplificador de JVC*1 Fusible (10 A) Salida frontal Salida posterior/subwoofer del mando a distancia del volante de la dirección Junte los cables del mismo color. Conexión recomendada Azul/blanco: Remoto (200 mA máx.) Naranja/blanco: Iluminación Amarillo - JVC KD-X320BTS | Instruction Manual - Page 88
OR SERVICES; LOSS Microsoft and Windows Media are either registered Pandora, the Pandora logo, and the Pandora trade dress are trademarks or registered trademarks of Pandora Media Bluetooth® word mark and logos are registered trademarks owned by Bluetooth SIG, Inc. and any use of such marks by JVC
-
 1
1 -
 2
2 -
 3
3 -
 4
4 -
 5
5 -
 6
6 -
 7
7 -
8
-
9
-
10
-
11
-
12
-
13
-
14
-
15
-
16
-
17
-
18
-
19
-
20
-
21
-
22
-
23
-
24
-
25
-
26
-
27
-
28
-
29
-
30
-
31
-
32
-
33
-
34
-
35
-
36
-
37
-
38
-
39
-
40
-
41
-
42
-
43
-
44
-
45
-
46
-
47
-
48
-
49
-
50
-
51
-
52
-
53
-
54
-
55
-
56
-
57
-
58
-
59
-
60
-
61
-
62
-
63
-
64
-
65
-
66
-
67
-
68
-
69
-
70
-
71
-
72
-
73
-
74
-
75
-
76
-
77
-
78
-
79
-
80
-
81
-
82
-
83
-
84
-
85
-
86
-
87
-
88
 |
 |
ENGLISH
FRANÇAIS
ESPAÑOL
B5A-0117-00 [J]
KD-X320BTS
DIGITAL MEDIA RECEIVER
INSTRUCTION MANUAL
RÉCEPTEUR MULTIMÉDIA NUMÉRIQUE
MANUEL D’INSTRUCTIONS
RECEPTOR DE MEDIOS DIGITALES
MANUAL DE INSTRUCCIONES
Please read all instructions carefully before
operation to obtain the best possible performance
from the unit.
Veuillez lires les instructions attentivement avant
d’utiliser l’appareil afin d’obtenir les meilleures
performances possibles de l’appareil.
Por favor lea detenidamente este manual para
comprender a fondo todas las instrucciones y
obtener un máximo disfrute de esta unidad.
For customer Use:
Enter below the Model No. and Serial No. which are
located on the top or bottom of the cabinet. Retain this
information for future reference.
Model No.
Serial No.