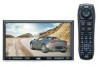
JVC KW AVX810 Instructions
JVC KW AVX810 - DVD Player With LCD Manual
 |
UPC - 046838031939
View all JVC KW AVX810 manuals
Add to My Manuals
Save this manual to your list of manuals |
JVC KW AVX810 manual content summary:
- JVC KW AVX810 | Instructions - Page 1
FRANÇAIS ESPAÑOL ENGLISH DVD RECEIVER WITH MONITOR RECEPTOR DVD CON MONITOR RÉCEPTEUR DVD ET MONITEUR KW-AVX810 KW-AVX810 KW-AVX810 For canceling the display demonstration, see page 10. Para cancelar la demonstración en pantalla, consulte la página 10. Pour annuler la démonstration des affichages - JVC KW AVX810 | Instructions - Page 2
the receiver is connected. - Consult the dealer or an experienced radio/TV technician for help. Caution Changes or modifications not approved by JVC could void the user's authority to operate the equipment. WARNINGS: To prevent accidents and damage • DO NOT install any unit or wire any cable in - JVC KW AVX810 | Instructions - Page 3
touch panel 7 Basic operations- Remote controller (RM-RK252) ...... 8 at the same time [Hold] [Hold] • If this does not work, reset the unit. Cautions 13 Disc operations 16 SD operations 30 USB operations 32 EXTERNAL DEVICES Bluetooth® operations- Cellular phone/audio player .......... 34 - JVC KW AVX810 | Instructions - Page 4
. *5 To reproduce DTS sound, use the digital connection. (☞ Installation/Connection Manual) Caution for DualDisc playback The Non-DVD side of a "DualDisc" does not comply with the "Compact Disc Digital Audio" standard. Therefore, the use of Non-DVD side of a DualDisc on this product may not be - JVC KW AVX810 | Instructions - Page 5
the following cases: - When you touch the touch panel or move your hand nearby* - When you use the remote controller - When a call/Text Message comes in (for Bluetooth cellular phone) * Depending on the setting. (☞ page 62) The lights of the monitor panel buttons are always turned on - JVC KW AVX810 | Instructions - Page 6
ENGLISH Detaching/attaching the monitor panel Detaching 1 While the unit is turned on: * * You can also use OPEN on the monitor panel. Then press [ Detach ]. 2 Yes Detach? No The monitor panel opens by about 50°. • It closes automatically when no operation is done for about a minute. The - JVC KW AVX810 | Instructions - Page 7
11 Displays and erases Short Cut icons. ☞ page 12 Changes the sources. Remote sensor ☞ page 11 To detach the monitor panel. Adjusts the volume.* Changes the display information. • Turns on the power. • Turns off the power. [Hold] • Attenuates the sound (if the power - JVC KW AVX810 | Instructions - Page 8
with the steering wheel remote control function. • See the Installation/Connection Manual (separate volume) for connection. 1 • Turns on the power. • Attenuates the sound if the power is on. • Turns off the power if pressed and held (while the power is on). 2 "DISC/SD/USB/USB iPod": Reverse - JVC KW AVX810 | Instructions - Page 9
Auto Search - Press and hold: Manual Search For satellite tuner operations: • then 5 / ∞ / 4 / ¢ work as menu selecting buttons). • 4 / SD/USB": Stops playback. "USB iPod": Enters menu. "Bluetooth PHONE": Ends the call. "Bluetooth AUDIO": Pauses. t VCD: Returns to the PBC menu. y • DVD - JVC KW AVX810 | Instructions - Page 10
shaded on the AV Menu screens. Indication language: In this manual, English indications are used for purpose of explanation. You can select the indication language. (☞ page 59) ~ Turn on the power. @ Set the clock. Moves to the preceding menu page Setup Demonstration Wall - JVC KW AVX810 | Instructions - Page 11
"TUNER" or "HD Radio" = "SAT" = "DISC"(DVD/ VCD/CD) = "SD" = "USB" or "USB iPod" = "CD-CH", "iPod", or "EXT-IN" = "Bluetooth PHONE" = "Bluetooth AUDIO" = "AV-IN" = (back to the beginning) Playback picture and clock time in large numbers Navigation screen* • You cannot select these sources if they - JVC KW AVX810 | Instructions - Page 12
vary among the sources. ABC Radio Displays menu. ☞ page 62 Changes the sound mode. ☞ page 55 Short Cut window appears. • To erase the window, press the button again. 2 Press a Short Cut icon. Turns on or off Track/Chapter Repeat. ☞ pages 21, 31, 33, 42, and 50 Displays - JVC KW AVX810 | Instructions - Page 13
. Ÿ Press [BAND]. ! Press [ ] or [ ] to search for a station-Auto Search. • Manual Search: Hold either [ ]or [ ] until "Manual Search" appears on the screen, then press it repeatedly. • The ST indicator lights up when receiving an FM stereo broadcast with sufficient signal strength. 13 OPERATIONS - JVC KW AVX810 | Instructions - Page 14
ENGLISH When an FM stereo broadcast is hard to receive 1 • You can also use MENU on the monitor panel. 2 FM station automatic presetting -SSM (Strong-station Sequential Memory) This function works only for FM bands. You can preset six stations for each band. 1 • You can also use MENU on the - JVC KW AVX810 | Instructions - Page 15
ENGLISH Manual presetting Ex.: Storing FM station of 92.5 MHz into preset number 4 of the FM1 band. 1 Tune in to a station you want to preset. 92.5 MHz No Name • You can also display the Preset List by pressing [ ]. 2 Display the Preset List. Selecting a preset station On the remote: 1 2 or [Hold] - JVC KW AVX810 | Instructions - Page 16
ENGLISH Disc operations The disc type is automatically detected, then playback starts (for some discs, the top menu of the disc appears). If a disc does not have any disc menu, all tracks on it will be played repeatedly until you change the source or eject the disc. If " " appears on the screen, - JVC KW AVX810 | Instructions - Page 17
page 11) Disc type Audio format Sound mode (☞ page 55) Playback mode DVD Video: Title no./Chapter no./Playing time *1 DVD-VR: Program no. panel. In the explanation, they are indicated inside [ ]. These buttons also work when they are not shown on the touch panel (while watching the playback - JVC KW AVX810 | Instructions - Page 18
ENGLISH While playing the following discs, press . • Each time you press the button, the display changes to show the different information (☞ page 11). Disc type Sound mode (☞ page 55) For DivX/MPEG1/MPEG2: Folder no./Track no./Playing time Video format For JPEG: Folder no./Track no. *2 Folder - JVC KW AVX810 | Instructions - Page 19
Title Artist Name Album Title *4 Only for CD Text *5*6 [3 / 8] [7] [4 ¢] Starts playback/pauses Stops playback Press: Selects track Hold: Reverse/forward search*7 Audio format (MP3/WMA/WAV/AAC) Sound mode (☞ page 55) Folder no./Track no./Playing time Current Folder Name Current File Name.mp3 - JVC KW AVX810 | Instructions - Page 20
/forward search Displays Short Cut icons. [] Displays screen [7] Stops playback • The above buttons also work when they are not shown you can select a menu item directly by touching it on the screen B For DVD/VCD/DivX menu operation playback [5 ∞ 2 3] Selects the menu items [ENTER] - JVC KW AVX810 | Instructions - Page 21
tracks of the current folder Folder: Randomly plays all tracks of current folder, then tracks of next folders Disc (All): Randomly plays all tracks Short Cut icon, you can also turn on or off Track/Chapter Repeat. 21 OPERATIONS - JVC KW AVX810 | Instructions - Page 22
ENGLISH Selecting tracks on the list If a disc includes folders, you can display the Folder/ Track (File) Lists, then start playback. 1 • You can also use MENU on the monitor panel. 2 You can browse Folder/Track Lists by using the bar as illustrated. - Press : Skips the List up or down. - Drag : - JVC KW AVX810 | Instructions - Page 23
ENGLISH Operations using the remote controller-RM-RK252 Stop playback. Start playback/pause (if pressed 16 ] 1/8 ] 1/4 ] 1/2 *3 Search speed: x2 ] x10 You can change the following items using the on-screen bar-audio language, subtitle language, view angle, etc. (☞ pages 28 and 29) 23 OPERATIONS - JVC KW AVX810 | Instructions - Page 24
during pause*2 (No sound can be heard.) • Reverse slow motion does not work Press: Select chapter (during playback or pause). Hold: Reverse/forward search*3 speed: 1/32 ] 1/16 ] 1/8 ] 1/4 ] 1/2 *3 Search speed: x2 ] x10 You can change audio stream and subtitle (on/off) using the on-screen bar. 24 - JVC KW AVX810 | Instructions - Page 25
2nd press For DivX6: Using menu driven features 1 2 Select an item you want to start playback. 3 *4 Search speed: ¡1 ] ¡2 ] ¡3 *5 Search speed: ¡1 ] ¡2 3rd press You can change audio stream and subtitle (on/off) using the on-screen bar. (DivX only) 25 OPERATIONS - JVC KW AVX810 | Instructions - Page 26
). Reverse/forward search*1 (No sound can be heard.) Forward slow motion during pause*2 (No sound can be heard.) • Reverse slow motion does not work. Press: Select track. Hold: Reverse/forward search*3 (No sound can be heard.) Select aspect ratio. During PBC playback... Select an item on the - JVC KW AVX810 | Instructions - Page 27
ENGLISH Stop playback. Start playback/pause (if pressed during playback). Reverse/forward search*4 Press: Select track. Hold: Reverse/forward search*5 Select track. *4 Search speed: x2 ] x5 ] x10 ] x20 ] x60 *5 Search speed: x2 ] x10 Stop playback. Start playback/pause (if pressed during playback). - JVC KW AVX810 | Instructions - Page 28
These operations are possible on the screen using the remote controller, while playing the following discs-DVD/VCD/DivX/MPEG1/MPEG2/JPEG. 1 Display the or playlist may not be displayed depending on the recording equipment. Ex.: For DVD Video 2 Select an item. 3 Make a selection. If a pop-up menu - JVC KW AVX810 | Instructions - Page 29
Video. Items shown on the bar vary due to the disc type. 1 Disc type 2 • DVD: Audio signal format • VCD: PBC 3 Playback mode *1 DVD Video: C. RPT: Chapter repeat T. RPT: Title repeat DVD-VR: C. RPT: Chapter repeat PG. RPT: Program repeat DivX/MPEG1/MPEG2: T. RPT: Track repeat F. RPT: Folder repeat - JVC KW AVX810 | Instructions - Page 30
back FairPlay-encrypted files. [Twice] Caution: Do not place your finger behind the monitor panel. To eject the SD card Push in the SD card lightly. • You can also eject the SD card by holding OPEN (when the monitor panel is closed). Caution: • Do not release your finger quickly; otherwise, the - JVC KW AVX810 | Instructions - Page 31
of the current folder Repeats all files of the current folder Random Folder: Randomly plays all tracks of current folder, then tracks of next folders SD (All): Randomly plays all tracks - * By pressing Short Cut icon, you can also turn on or off Track Repeat. 31 OPERATIONS - JVC KW AVX810 | Instructions - Page 32
Audio Player, portable HDD, etc. to the unit. • You can also connect the iPod to the USB terminal of the unit. For details of the operations, ☞ pages 48 to 50. ~ Connect a USB device. USB cable MPEG2 files recorded by JVC Everio camcorder (extension code start the car engine if a USB device is connected. - JVC KW AVX810 | Instructions - Page 33
current folder, then tracks of next folders folder USB (All): Randomly plays all tracks Folder: Repeats all files of the current folder - * By pressing Short Cut icon, you can also turn on or off Track Repeat. 33 OOPPEERRAATTIOIONNSS - JVC KW AVX810 | Instructions - Page 34
ENGLISH Bluetooth® operations - Cellular phone/audio player For Bluetooth operations, it is required to connect the Bluetooth Adapter (KS-BTA200) to the CD changer jack on the rear. • Refer also to the instructions supplied with the Bluetooth Adapter and the Bluetooth device. • Refer to the list ( - JVC KW AVX810 | Instructions - Page 35
the unit. • Refer to the instructions supplied with the device to check the PIN code. 6 Operate the Bluetooth device to connect while "Connecting..." unit. To connect/disconnect a registered device 1 Select "Bluetooth PHONE" or "Bluetooth AUDIO," then select a registered device you want to connect/ - JVC KW AVX810 | Instructions - Page 36
can be registered.) Hold: Activates function Displays screen. *1 When a cellular phone with audio function is connected, appears. *2 This button appears when the Bluetooth Adapter is connected. *3 This adjustment does not affect the volume level of the other sources - JVC KW AVX810 | Instructions - Page 37
65) Device Name Receiving Message Jack Read ? Yes No To read the message, press [Yes]. The source is changed to "Bluetooth PHONE." To read the message later, press [No]. • The message is stored into = . (☞ page 64) When is set to - JVC KW AVX810 | Instructions - Page 38
To redial previously dialed numbers 1 Entering a phone number • You cannot use the remote controller to enter phone numbers. 2 You can enter [0] - [9 Menu> screen by holding SOURCE on the monitor panel. • By pressing Short Cut icon, you can easily activate function. • You can - JVC KW AVX810 | Instructions - Page 39
panel. 2 Exit Ex.: Selecting 2 Select a telephone number to store. 3 List Back 3 Select a preset number. [Hold] Back Now "Tom" is stored into preset no. 1. You can use the following buttons on the remote controller for the Bluetooth phone operations. • Displays - JVC KW AVX810 | Instructions - Page 40
You can use the following buttons on the remote controller for the Bluetooth audio operations. Starts playback/pauses. Reverse/forward skip Bluetooth Information: If you wish to receive more information about Bluetooth, visit the following JVC web site: - JVC KW AVX810 | Instructions - Page 41
ENGLISH Listening to the CD changer It is recommended to use a JVC MP3-compatible CD changer with your unit. • You can play only CDs (CD-DA) and MP3 discs. Ex.: While playing an MP3 disc Folder no./ - JVC KW AVX810 | Instructions - Page 42
of the current disc All: Randomly plays all tracks of all loaded discs * By pressing Short Cut icon, you can also turn on or off Track Repeat. You can use the following buttons on the remote controller to operate the CD changer. Selects disc. Selects folder (MP3 only). • Press: Selects track - JVC KW AVX810 | Instructions - Page 43
this unit. • JVC SIRIUS Satellite radio interface, KS-SRA100, for listening to SIRIUS Satellite radio. • JVC Smart Digital Adapter, XMDJVC100, for you can call SIRIUS toll-free at 1-888-539SIRIUS (7474). "Subscription Updated Press Any Key to Continue" appears on the monitor once subscription has - JVC KW AVX810 | Instructions - Page 44
ENGLISH Tuning in to a channel you want Preset no. Band Channel no. Sound mode (☞ page 55) Signal Reception indicator SAT SR1 1 01 C A T Category Name Channel Name LEVEL 3:45 PM Song Title Artist Name Composer Name CATEGORY CATEGORY BAND Only for SIRIUS For SIRIUS Radio ~ Press [ - JVC KW AVX810 | Instructions - Page 45
for each band. Ex.: Storing a channel into preset number 4 1 Tune in to a station you want to preset. Selecting preset channels On the remote: 1 SAT SR1 23 C A T Music Club Channel Name LEVEL 3:45 PM Song Title Artist Name Composer Name CATEGORY CATEGORY BAND 3 2 Display the Preset - JVC KW AVX810 | Instructions - Page 46
high-quality digital sound-AM digital will have FM-like quality (in stereo) and FM digital will have CD-like quality-with static-free and it can also receive conventional analog broadcasts. • Many HD Radio stations also offer more than one channel of programming. This service is called multicasting. - JVC KW AVX810 | Instructions - Page 47
ENGLISH Changing HD Radio reception mode While receiving an HD Radio broadcast, the unit tunes to digital or analog audio automatically due to the receiving condition. 1 CHANNEL Tuning in to stations with sufficient signal strength This function works only for FM bands. Once you have activated - JVC KW AVX810 | Instructions - Page 48
the iPod You can connect the iPod using the following cable or adapter: To listen to the music Cable/adapter USB 2.0 cable (supplied for the iPod) To watch the video Interface Adapter for iPod-KS-PD100 (not supplied) USB Audio and Video cable for iPod-KS-U20K (not supplied) To operate ☞ "When - JVC KW AVX810 | Instructions - Page 49
ENGLISH Selecting a track/video from 1 • You can also use MENU on the monitor panel. 2 Exit *1 Press to move to the previous/next pages of the list *2 You can also select Search Mode and tracks/ videos by using the bar. (☞page 22) Search modes: - For : Playlists, Artists, - JVC KW AVX810 | Instructions - Page 50
2 Exit 3 Audiobooks Normal Faster Slower Changing the play speed of the audio books You can select the playback speed of the "Audiobook" sound file in corresponding indicators light up alternately on the screen. *1 By pressing Short Cut icon, you can also turn on or off Track Repeat. *2 You - JVC KW AVX810 | Instructions - Page 51
ENGLISH When connected with the interface adapter Track no./Playing time Sound mode (☞ page 55) Playback mode (☞ page 50) [4 ¢] [SEARCH] [3 / 8] Press: Selects tracks Hold: Reverse/forward search Enters player's menu Starts playback/ - JVC KW AVX810 | Instructions - Page 52
ENGLISH Using other external components AV-INPUT You can connect an external component to the LINE IN/VIDEO IN jacks. Sound mode (☞ page 55) Assigned title (☞ page 56) ~ Press [SOURCE], then press [AV-IN]. (☞ page 11) • You can also use SOURCE on the monitor panel. Press it repeatedly. Ÿ Turn on - JVC KW AVX810 | Instructions - Page 53
To display the operation buttons (☞ page 20) while viewing the navigation screen • The operation buttons displayed on the screen vary among above buttons except [KEY] also work when they are not shown on the screen (while viewing the navigation screen). When is selected for - JVC KW AVX810 | Instructions - Page 54
ENGLISH EXT-INPUT You can connect an external component to the CD changer jack on the rear using the Line Input Adapter-KS-U57 (not supplied) or AUX Input Adapter-KS-U58 (not supplied). Sound mode (☞ page 55) Assigned title (☞ page 56) Preparation: Make sure is selected for - JVC KW AVX810 | Instructions - Page 55
ENGLISH Sound equalization By pressing Short Cut icon, you can easily change the sound mode. • For preset values of each sound mode, ☞ page 73. ~ • You can also use MENU on the monitor - JVC KW AVX810 | Instructions - Page 56
Assigning titles to the sources ENGLISH @ ; / You can assign titles as follows. FM/AM stations* Up to 16 characters-up to 30 stations. AV-IN EXT-IN Up to 16 characters * You cannot assign titles to the HD Radio stations. ~ Select the source. (☞ page 11) • For FM/AM stations: Select the band, - JVC KW AVX810 | Instructions - Page 57
7 Exit Setup AV Input Camera Input External Input Audio&Video Off iPod External Back Setup AV Input Camera Input External Input Back Exit Off iPod (Off) Audio&video Audio Navigation Exit Setup AV Input Camera Input External Input Navigation Off iPod External Back Exit 57 SETTINGS - JVC KW AVX810 | Instructions - Page 58
for watching the playback picture. The setting will be stored-one for "DISC/SD/USB" (common) and the other for "AV-IN." -15 to ILLUMINATION CONTROL lead connection is required. (☞ Installation/Connection Manual) *2 Adjustable only when the source is "DISC/SD/USB" (the media must contain pictures or - JVC KW AVX810 | Instructions - Page 59
daylight saving time. Clock *3 Not adjustable when no picture is shown. *4 After you change the indication language setting, turn off then on the power so that your setting takes effect. *5 Appears only when SIRIUS Satellite Radio or XM Satellite Radio is connected. *6 Appears only when - JVC KW AVX810 | Instructions - Page 60
. Still Picture: Plays back JPEG files. Video: Plays back DivX/MPEG1/MPEG2 files. (Not applicable to "SD") Audio&Video: Plays back audio files and DivX/MPEG1/MPEG2 files. (Not applicable to "SD") This unit has its own Registration Code. Once you have played back a file with which the Registration - JVC KW AVX810 | Instructions - Page 61
the USB Audio and Video cable for iPod. ☞ [48] Audio&Video: Select when connecting an AV component such as a VCR. Audio: Select when connecting an audio component such as a portable audio player. Navigation : Select when connecting a Navigation System. *2 Selectable only for "DISC", "SD", and "USB - JVC KW AVX810 | Instructions - Page 62
Adapter, this setting is not required. They are automatically detected. Off: Cancels. On: Activates the key-touch tone. Off: Cancels. Muting1, Muting2: Select either one which mutes the sounds while using the cellular phone is required. See Installation/Connection Manual. The rear view through - JVC KW AVX810 | Instructions - Page 63
can change the maximum volume level of this unit. Off: Deactivates the built-in amplifier. Low: VOL 00 to 30 (Select this if the maximum power of the speakers is less than 50 W.) High: VOL 00 to 50 *5 For digital sources: you can make the adjustments separately depending on the - JVC KW AVX810 | Instructions - Page 64
For "CD-CH": Disc List, Folder List, and Track List (☞ page 41) Bluetooth *5 Menu items Dial Menu *6 Message *7 Selectable settings, [reference page] Select the history is also shown. *5 Selectable only for "Bluetooth PHONE" or "Bluetooth AUDIO." Select a device (or "NEW DEVICE") before operating - JVC KW AVX810 | Instructions - Page 65
phone connected for "Bluetooth PHONE." Not selectable when "NEW DEVICE" is selected. *10 If you wish to receive more information about Bluetooth, visit the following JVC web site: When operating the Bluetooth device, refer also to the instructions - JVC KW AVX810 | Instructions - Page 66
Moisture condensation Moisture may condense on the lens inside the unit in the following cases: • After starting the heater in the car. • If it becomes very humid inside the car. Should this occur, the unit may malfunction. In this case, eject the disc and leave the unit turned on for a few - JVC KW AVX810 | Instructions - Page 67
received stations are preset in no. 1 (lowest frequency) to no. 6 (highest frequency). Disc General • In this manual, words "track" and "file" are interchangeably used. • This unit can only play back audio DVD-VR • For details about DVD-VR format and Playlist, refer to the instructions supplied - JVC KW AVX810 | Instructions - Page 68
JVC Audio. - WMA/AAC files copy-protected with DRM. - AAC files encoded by using any other application than iTunes. - AAC files copy-protected with FairPlay (except those stored on an iPod). - Files which have the data such as AIFF, ATRAC3, etc. SD • If "No SD Card" appears after removing an SD card - JVC KW AVX810 | Instructions - Page 69
refer also to its instructions. • Connect only card reader. • When connecting with a USB cable, use the USB 2.0 cable . • This unit may not play back files in a USB device properly when using a USB extension cord. • This unit cannot assure proper functions or supply power - JVC KW AVX810 | Instructions - Page 70
Error: Try the operation again. If "Error" appears again, check if the device supports the function you have tried. • Device Unfound: No available Bluetooth device is detected by . • Loading: The unit is updating the phone book and/ or Text Message. • Please Wait...: The unit is preparing to - JVC KW AVX810 | Instructions - Page 71
the USB 2.0 cable or USB Audio and Video cable. Notice: When operating an iPod, some operations may not be performed correctly or as intended. In this case, visit the following JVC web site: - For the USB connection: - For the inferface adapter connection - JVC KW AVX810 | Instructions - Page 72
compatible with these multi-channel sources to this terminal, and set correctly. (☞ page 60) Playback disc Output signals DVD 48 kHz, 16/20/24 bits Linear PCM 48 kHz, 16 bits stereo Linear PCM* 96 kHz, Linear PCM 48 kHz, 16 bits - JVC KW AVX810 | Instructions - Page 73
02 00 User1/2/3 00 00 00 00 00 00 00 Language codes (for DVD/DivX language selection) Code Language Code Language AA Afar FA Persian AB Abkhazian RM Rhaeto-Romance RN Kirundi RO Rumanian RW Kinyarwanda SA Sanskrit SD Sindhi SG Sangho SH Serbo-Croatian SI Singhalese SK Slovak SL - JVC KW AVX810 | Instructions - Page 74
double-D symbol are trademarks of Dolby Laboratories. • "DTS" and "DTS Digital Out" are registered trademarks of DTS, Inc. • "DVD Logo" is a trademark of DVD The Bluetooth word mark and logos are owned by the Bluetooth SIG, Inc. and any use of such marks by Victor Company of Japan, Limited (JVC) is - JVC KW AVX810 | Instructions - Page 75
ENGLISH Troubleshooting What appears to be trouble is not always serious. Check the following points before calling a service center. • For operations with the external components, refer also to the instructions supplied with the adapters used for the connections (as well as the instructions - JVC KW AVX810 | Instructions - Page 76
start. • Insert the disc correctly again. • The format of files is not supported by the unit. • The playback picture is not clear and legible. Adjust items . Brake" appears on the screen, even when the (☞ Installation/Connection Manual) parking brake is engaged. • No picture appears on the - JVC KW AVX810 | Instructions - Page 77
The tracks are not properly copied into the SD card/USB interrupted. device. Copy tracks again, and try again. • Bluetooth device does not detect the unit. This unit can be connected with one Bluetooth cellular phone and one Bluetooth audio player at a time. While connected to a device, this - JVC KW AVX810 | Instructions - Page 78
button of the CD changer. • The CD changer does not work at all. Reset the unit. (☞ page 3) • " selected channel. • "UPDATING" appears on the screen and no The receiver is updating the channel information and loading the channel information and audio. Text information is temporarily unavailable - JVC KW AVX810 | Instructions - Page 79
changes when receiving HD Radio stations. • No sound can be heard. • "Reset08" appears on the screen. • The iPod does not turn on or does not work. • Sound iPod. Disconnect the adapter from both this unit and iPod. Then, connect them again. Check the connection between the adapter and this unit. - JVC KW AVX810 | Instructions - Page 80
μV/75 Ω) Alternate Channel Selectivity (400 kHz): 65 dB Frequency Response: 40 Hz to 15 000 Hz Stereo Separation: 35 dB Sensitivity/Selectivity: 20 μV/35 dB Non-contact optical pickup (semiconductor laser) Frequency Response: DVD, fs=48 kHz/96 kHz: VCD/CD: 16 Hz to 22 000 Hz 16 Hz to 20 - JVC KW AVX810 | Instructions - Page 81
SD Aspect Ratio: 16:9 (wide) Power Requirement: Operating Voltage: DC 14.4 °C (32°F to 104°F) Dimensions (W × H × D): • With trim plate and sleeve attached Installation Size (approx.): Panel Size car, consult your telephone directory for the nearest car audio speciality shop. 81 REFERENCES - JVC KW AVX810 | Instructions - Page 82
JVC. Como primer paso, por favor lea detenidamente este manual B, de conformidad con la Parte 15 de las reglas de JVC pueden anular la autoridad del usuario para operar el equipo. [Sólo Unión Europea] ADVERTENCIAS: Para evitar daños y accidentes • NO instale ningún receptor o tienda ningún cable - JVC KW AVX810 | Instructions - Page 83
comunes 11 Para escuchar la radio 13 Operaciones de los discos 16 Operaciones de SD 30 Operaciones de USB 32 DISPOSITIVOS EXTERNOS Operaciones Bluetooth®-teléfono celular/reproductor de audio......... 34 Escuchando el cambiador de CD ........ 41 Para escuchar la radio satelital ......... 43 - JVC KW AVX810 | Instructions - Page 84
con iTunes. *5 Utilice la conexión digitalpara reproducirsonido DTS. (☞ Manual de Instalación/Conexión) Precaución sobre la reproducción de DualDisc El lado no DVD de un "DualDisc" no es compatible con la norma "Compact Disc Digital Audio". Por consiguiente, no se recomienda usar el lado no - JVC KW AVX810 | Instructions - Page 85
Antes de las operaciones Panil táctil ESPAÑOL Panel del monitor : Botones en el panel táctil En las explicaciones, se indican dentro de [ ]. Para los detalles sobre las operaciones del panel táctil, consulte la sección de funcionamiento de cada fuente. Cuando desliza su dedo sobre el panel tá - JVC KW AVX810 | Instructions - Page 86
ESPAÑOL Desmontaje/fijación del panel del monitor Desmontando 1 Mientras la unidad está encendida: * * También puede usar OPEN en el panel del monitor. A continuación, pulse [ Detach ]. 2 Yes Detach? No El panel del monitor se apaga aproximadamente 50º. • Se cierra automáticamente si no se - JVC KW AVX810 | Instructions - Page 87
ctil Visualiza la pantalla . ☞ página 57 Visualiza la pantalla . ☞ página 11 Visualiza y borra los iconos de Atajo (Short Cut). ☞ página 12 ESPAÑOL Cambia las fuentes. Sensor remoto ☞ página 11 Para desenganchar el panel del monitor. Ajusta el volumen.* Cambia la informaci - JVC KW AVX810 | Instructions - Page 88
/AAA ESPAÑOL Instale las pilas en dirección. • Para la conexión, consulte el Manual de instalación/conexión (volumen separado). 2 3 la alimentación está conectada). "DISC/ SD/ USB/ USB iPod": Búsqueda regresiva DVD/DivX 6: Muestra el número de disco. • VCD: Reanuda la reproducción de PBC. • DVD - JVC KW AVX810 | Instructions - Page 89
automática - Pulse y mantenga pulsado: Búsqueda manual Para las operaciones del sintonizador satelital: • 5 / SD/USB": Detiene la reproducción. "USB iPod": Ingresa en el menú . "Bluetooth PHONE": Finaliza la llamada. "Bluetooth AUDIO": Pone en pausa. t VCD: Vuelve al menú PBC. y • DVD - JVC KW AVX810 | Instructions - Page 90
puesta en hora del reloj. • Las opciones no disponibles aparecerán sombreadas en las pantallas AV Menu. Idioma para las indicaciones: En este manual, se utilizan indicaciones en inglés para las explicaciones. Puede seleccionar el idioma de indicación. (☞ página 59) ~ Encienda la unidad. @ Ponga el - JVC KW AVX810 | Instructions - Page 91
reproducida y hora del reloj en números grandes "TUNER" o "HD Radio" = "SAT" = "DISC"(DVD/ VCD/CD) = "SD" = "USB" o "USB iPod" = "CD-CH", "iPod", o "EXT-IN" = "Bluetooth PHONE" = "Bluetooth AUDIO" = "AV-IN" = (vuelta al comienzo) Pantalla de navegación* • Podrá seleccionar algunas fuentes si no - JVC KW AVX810 | Instructions - Page 92
ún las fuentes. ABC Radio Visualiza el menú . ☞ página 62 Cambia el modo de sonido. ☞ página 55 Aparece la ventana de Atajos (Short Cut). • Para borrar la ventana, pulse el botón nuevamente. 2 Pulse un icono de Atajo. Activa o desactiva la repetición de pista/capítulo ☞ páginas 21 - JVC KW AVX810 | Instructions - Page 93
Púlselo repetidamente. Ÿ Pulse [BAND]. ! Pulse [ ] o [ ] para efectuar la búsqueda de una emisora-Búsqueda automática • Búsqueda manual: Mantenga pulsado [ ]o [ ] hasta que "Manual Search" aparezca en la pantalla y, a continuación, púlselo repetidamente. • El indicador ST se enciende al recibir una - JVC KW AVX810 | Instructions - Page 94
ESPAÑOL Cuando una radiodifusión en FM estéreo sea difícil de recibir 1 • También puede usar MENU en el panel del monitor. Preajuste automático de emisoras FM-SSM (Memoria secuencial de las emisoras más fuertes) Esta función funciona sólo para las bandas FM. Se pueden preajustar seis emisoras para - JVC KW AVX810 | Instructions - Page 95
ESPAÑOL Preajuste manual Ej.: Almacenando una emisora FM de 92,5 MHz en el número de preajuste 4 de la banda FM1. 1 Sintonice la emisora que desea preajustar. 92.5 MHz - JVC KW AVX810 | Instructions - Page 96
ESPAÑOL Operaciones de los discos El tipo de disco se detecta automáticamente y, a continuación, se inicia la reproducción (con algunos discos, aparece el menú superior del disco). Si el disco no dispone de ningún menú de disco, todas las pistas del mismo serán reproducidas repetidamente hasta que - JVC KW AVX810 | Instructions - Page 97
pantalla cambia para mostrarle una información diferente. (☞ página 11) Tipo de disco Formato de audio Modo de sonido (☞ página 55) Modo de reproducción DVD Vídeo: Nº de título/Nº de capítulo/tiempo de reproducción DVD-VR: Nº de programa (o Nº de lista de reproducción)/Nº de capítulo/ *1 Tiempo de - JVC KW AVX810 | Instructions - Page 98
ESPAÑOL Mientras se reproducen los siguientes discos, pulse . • Cada vez que pulsa el botón, la pantalla cambia para mostrarle una información diferente (☞ página 11). Para DivX/MPEG1/MPEG2: Nº de carpeta/Nº de pista/tiempo de reproducción Formato de vídeo Para JPEG: Nº de carpeta/Nº de pista Tipo - JVC KW AVX810 | Instructions - Page 99
CD-Text *5*6 [3 / 8] [7] [4 ¢] Comienza la reproducción/pausa Detiene la reproducción Pulse: Selecciona la pista Sostener: Búsqueda hacia atrás/adelante*7 Formato de audio (MP3/WMA/WAV/AAC) Modo de sonido (☞ página 55) Nº de carpeta/Nº de pista/tiempo de reproducción Current Folder Name Current - JVC KW AVX810 | Instructions - Page 100
íficamente los botones de operación para los diversos discos Toque la pantalla (parte central). *1 *2 Toque [KEY]. Toque [KEY]. Toque [KEY]. Para ándola sobre la pantalla B Para la operación del menú de reproducción de DVD/VCD/DivX [5 ∞ 2 3] Selecciona las opciones del menú [ENTER] Confirma la - JVC KW AVX810 | Instructions - Page 101
Selección de los modos de reproducción Solamente puede uno de los siguientes modos de reproducción-Repetida o aleatoria. Ej.: Para seleccionar repetición de pista 1 3 ESPAÑOL • También puede usar MENU en el panel del monitor. 2 Al seleccionar uno de los modos de reproducción, el indicador - JVC KW AVX810 | Instructions - Page 102
ESPAÑOL Selección de pistas en la lista Si un disco incluye carpetas, podrá visualizar las listas de carpetas/pistas (archivo) y luego iniciar la reproducción. 1 • También puede usar MENU en el panel del monitor. 2 También puede seleccionar las listas de carpetas/ pistas mediante la barra, tal - JVC KW AVX810 | Instructions - Page 103
] x60 *2 Velocidad a cámara lenta: 1/32 ] 1/16 ] 1/8 ] 1/4 ] 1/2 *3 Velocidad de búsqueda: x2 ] x10 Puede cambiar las siguientes opciones utilizando la barra en pantalla en pantalla-idioma de audio, idioma para los subtítulos, ángulo de visión, etc. (☞ páginas 28 y 29) 23 OPERACIONES - JVC KW AVX810 | Instructions - Page 104
pantalla. *1 Velocidad de búsqueda: x2 ] x5 ] x10 ] x20 ] x60 *2 Velocidad a cámara lenta: 1/32 ] 1/16 ] 1/8 ] 1/4 ] 1/2 *3 Velocidad de búsqueda: x2 ] x10 También puede cambiar el flujo de audio y los subtítulos (activación/desactivación) mediante la barra en pantalla. 24 - JVC KW AVX810 | Instructions - Page 105
control por menú 1 2 Selecciona una opción deseada para iniciar la reproducción. 3 *4 Velocidad de búsqueda: ¡1 ] ¡2 ] ¡3 *5 Velocidad de búsqueda: ¡1 ] ¡2 También puede cambiar el flujo de audio y los subtítulos (activación/desactivación) mediante la barra en pantalla. (Sólo DivX) 25 OPERACIONES - JVC KW AVX810 | Instructions - Page 106
Pare la reproducción. Inicia la reproducción. (Slide show: se muestra cada archivo durante unos segundos). Muestra el archivo actual hasta que lo cambie, si lo pulsa durante la presentación de diapositivas. Selecciona el archivo Seleccionar la carpeta. Selecciona una relación de aspecto. ESPAÑOL - JVC KW AVX810 | Instructions - Page 107
ESPAÑOL Pare la reproducción. Inicia la reproducción/pausa (si lo pulsa durante la reproducción). Búsqueda hacia atrás/adelante*4 Pulse: Selecciona la pista. Sostener: Búsqueda hacia atrás/adelante*5 Selecciona la pista. *4 Velocidad de búsqueda: x2 ] x5 ] x10 ] x20 ] x60 *5 Velocidad de búsqueda: - JVC KW AVX810 | Instructions - Page 108
Lista de reproducción en cualquier momento mientras se reproduce un DVD-VR con sus datos grabados. 1 Visualiza la pantalla Programa en la pantalla utilizando el control remoto, mientras se reproducen los siguientes discos-DVD/VCD/DivX/MPEG1/MPEG2/ JPEG. ESPAÑOL 1 Visualiza la barra en pantalla - JVC KW AVX810 | Instructions - Page 109
mostradas en la barra varían según el tipo de disco. 1 Tipo de disco 2 • DVD: Formato de señal de audio • VCD: PBC 3 Modo de reproducción *1 DVD Vídeo: C. RPT: Repetición de capítulo T. RPT: Repetición de título DVD-VR: C. RPT: Repetición de capítulo PG. RPT: Repetición de programa DivX/MPEG1/MPEG2 - JVC KW AVX810 | Instructions - Page 110
fuente. • Asegúrese de tener una copia de respaldo de todos los datos importantes. ~ Abra el panel del monitor. ! Inserte una tarjeta SD. ESPAÑOL Aparece el menú . Ÿ * Esta unidad puede reproducir archivos AAC codificados con iTunes. Esta unidad no puede reproducir archivos codificados - JVC KW AVX810 | Instructions - Page 111
de la carpeta actual Random Folder: Reproduce aleatoriamente todas las pistas de la carpeta actual y luego las pistas de las siguientes carpetas SD (All): Reproducir aleatoriamente todas las pistas - * También puede activar o desactivar la repetición de pista pulsando el icono . 31 OPERACIONES - JVC KW AVX810 | Instructions - Page 112
audio digital, un HDD (disco duro) portátil, etc. • También puede conectar un iPod al terminal USB de la unidad. Para obtener detalles de las operaciones, ☞ páginas 48 a 50. ~ Conecte un dispositivo USB. ESPAÑOL Cable USB desde la parte grabados mediante la cámara JVC Everio (código de extensión - JVC KW AVX810 | Instructions - Page 113
ESPAÑOL Selección de los modos de reproducción Solamente puede uno de los siguientes modos de 3 reproducción-Repetida o aleatoria. Ej.: Para seleccionar repetición de pista 1 • También puede usar MENU en el panel del monitor. 2 Al seleccionar uno de los modos de reproducción, el indicador - JVC KW AVX810 | Instructions - Page 114
lo está, pulse [5] o [∞] para seleccionarlo. 1 Para utilizar por primera vez un dispositivo Bluetooth a través de la unidad ("Bluetooth PHONE" y "Bluetooth AUDIO"), usted deberá establecer una conexión Bluetooth inalámbrica entra la unidad y el dispositivo. • Una vez establecida la conexión, ésta - JVC KW AVX810 | Instructions - Page 115
carácter que está antes del cursor. • [Del]: Borra el carácter sobre el que está el cursor. • [Enter]: Confirma la entrada. 5 Opere el dispositivo Bluetooth conectar/desconectar un dispositivo registrado 1 Seleccione "Bluetooth PHONE" o "Bluetooth AUDIO" y, a continuación, seleccione el dispositivo - JVC KW AVX810 | Instructions - Page 116
un teléfono celular con función de audio, aparecerá . *2 Este botón aparece cuando está conectado el adaptador Bluetooth. *3 Este ajuste no afecta al nivel de volumen de las otras fuentes. ~ Pulse [SOURCE] y, a continuación, pulse [Bluetooth PHONE]. (☞ página 11) • También puede usar SOURCE en - JVC KW AVX810 | Instructions - Page 117
un método de llamada, y luego efectúe la llamada. ESPAÑOL Device Name Receiving Message Jack Read ? Yes No Back Exit Para leer el mensaje, pulse [Yes]. La fuente será cambiada a "Bluetooth PHONE". Para leer el mensaje posteriormente, pulse [No]. • El mensaje queda almacenado en - JVC KW AVX810 | Instructions - Page 118
. Para volver a marcar los números marcados previamente 1 2 Sólo podrá introducir [0] - [9 hasta 32 números) • [BS]: Borra el carácter que está antes del cursor. • [Del]: Borra el carácter sobre el que está el 3 cursor. • [Preset]:Va a la lista de preajustes. Puede preajustar el número - JVC KW AVX810 | Instructions - Page 119
ónicos. 1 Selecccione el número telefónico que desea memorizar en , , , o . 1 Pulse [ ] en el panel táctil o MENU en el panel del monitor. 2 Pulse [Bluetooth]. 3 Pulse [Dial Menu], luego... Para llamar un número preajustado 1 • También puede usar - JVC KW AVX810 | Instructions - Page 120
del control remoto se pueden utilizar para las operaciones de audio de Bluetooth. Comienza la reproducción/pausa. Salto hacia atrás/adelante • ón Bluetooth: Si desea obtener más información sobre Bluetooth, visite el siguiente sitio web de JVC: 40 - JVC KW AVX810 | Instructions - Page 121
ESPAÑOL Escuchando el cambiador de CD Se recomienda usar un cambiador de CD compatible con MP3 JVC con este receptor. • Puede reproducir sólo discos CD (CD-DA) y MP3. Ej.: Mientras se reproduce un disco MP3 Nº de carpeta/Nº de pista/tiempo de reproducción - JVC KW AVX810 | Instructions - Page 122
Selección de los modos de reproducción Solamente puede uno de los siguientes modos de 3 reproducción-Repetida o aleatoria. Ej.: Para seleccionar la repetición de pistas de un disco MP3 (para CDs, ☞ página 21.) 1 Back Exit • También puede usar MENU en el panel del monitor. 2 ESPAÑOL Back - JVC KW AVX810 | Instructions - Page 123
parte trasera de esta unidad. • Interfaz de radio satelital SIRIUS de JVC, KS-SRA100, para escuchar la radio satelital SIRIUS. • Adaptador digital inteligente de JVC ). Una vez que haya finalizado su suscripción, aparecerá "Subscription Updated Press Any Key to Continue" en el monitor. Active su - JVC KW AVX810 | Instructions - Page 124
Sintonice el canal que desee N° de preajuste Banda Nº de canal Modo de sonido (☞ página 55) Indicador de recepción de la señal SAT SR1 1 01 C A T Category Name Channel Name LEVEL 3:45 PM Song Title Artist Name Composer Name CATEGORY CATEGORY BAND Sólo para SIRIUS ESPAÑOL Para la radio - JVC KW AVX810 | Instructions - Page 125
Cómo almacenar canales en la memoria Se pueden preajustar seis canales para cada banda. Ej.: Almacenando un canal en el número de preajuste 4 1 Sintonice la emisora que desea preajustar. Selección de los canales de preajuste En el control remoto: 1 ESPAÑOL SAT SR1 23 C A T Music Club - JVC KW AVX810 | Instructions - Page 126
-HD300 (de venta por separado) al jack del cambiador de CD en la parte posterior de la unidad. ¿Qué es la tecnología HD Radio? La tecnolog .hdradio.com . Cuando se sintoniza una transmisión de audio digital primero destella y después se enciende. ☞ página 47 Intensidad de - JVC KW AVX810 | Instructions - Page 127
Hold Back Exit Local DX Start Analog Digital Auto Exit Analog Digital Auto Para sintonizar de audio analógico solamente Para sintonizar audio digital solamente Cambia entre audio digital y analógico automáticamente Se detectan solamente las emisoras con una seńal suficientemente fuerte - JVC KW AVX810 | Instructions - Page 128
con el iPod) Para ver vídeo Adaptador de interfaz para iPod-KSPD100 (no suministrado) Cable USB audio y video para iPod- KS-U20K (no suministrado) Para hacer funcionar ☞ "Cuando se conecta con el cable USB" tal como se explica a continuación. ☞ "Cuando se conecta con el adaptador interfaz" en - JVC KW AVX810 | Instructions - Page 129
ESPAÑOL Selección de una pista/vídeo desde 1 *1 Pulse para desplazarse a las páginas anterior/ siguiente de la lista *2 También podrá seleccionar el modo búsqueda y las pistas/vídeos mediante la barra. (☞ página 22) • También puede usar MENU en el panel del monitor. 2 Modos de bú - JVC KW AVX810 | Instructions - Page 130
Selección de los modos de reproducción 1 • También puede usar MENU en el panel del monitor. 2 Cambio de la velocidad de reproducción de los audio libros Puede seleccionar la velocidad de reproducción de un archivo de sonido "Audiobook" en su iPod. 1 • También puede usar MENU en el panel del monitor - JVC KW AVX810 | Instructions - Page 131
Cuando se conecta con el adaptador de interfaz Nº de pista/tiempo de reproducción ESPAÑOL Modo de sonido (☞ página 55) Modo de reproducción (☞ página 50) [4 ¢] [SEARCH] [3 / 8] Pulse: Selecciona pistas Sostener: Búsqueda hacia atrás/adelante Ingresa en el menú del reproductor Comienza la - JVC KW AVX810 | Instructions - Page 132
a reproducir la fuente. Para visualizar los botones de operación (☞ página 20) mientras observa la imagen de reproducción Toque la pantalla (parte central). Toque la pantalla (parte central). • Si no se efectúa ninguna operación durante unos 5 segundos, los botones de operación desaparecen. 52 - JVC KW AVX810 | Instructions - Page 133
según las fuentes de reproducción. Toque la pantalla (parte central). Toque la pantalla (parte central). • Si no se efectúa ninguna operación se ha seleccionado para (☞ página 61) • Puede usar la fuente "AV-IN" para escuchar una fuente de audio conectada a los jacks - JVC KW AVX810 | Instructions - Page 134
ESPAÑOL EXT-INPUT Puede conectar un componente externo al jack del cambiador de CD de la parte trasera mediante el adaptador de entrada de línea-KS-U57 (no suministrado) o el adaptador de entrada AUX-KS-U58 (no suministrado). Modo de sonido (☞ página - JVC KW AVX810 | Instructions - Page 135
ESPAÑOL Ecualización de sonido El modo de sonido se puede cambiar fácilmente pulsando el icono de Atajo . • Para los valores preajustados de cada modo de sonido, ☞ página 73. ~ • También puede usar MENU en el panel del monitor. Ÿ Cómo almacenar sus propios ajustes Los ajustes realizados se - JVC KW AVX810 | Instructions - Page 136
en cuanto a los caracteres disponibles, ☞ página 74). • [Store]: Confirme la entrada. • [2/3]: Mueve el cursor. • [BS]: Borra el carácter que está antes del cursor. • [Del]: Borra el carácter sobre el que está el cursor. • [Cap]: Cambia la caja (mayúsculas/ minúsculas). • [A 0 Ä]: Cambia el juego de - JVC KW AVX810 | Instructions - Page 137
Metal Blue Once Auto 6 Auto 7 Exit Las opciones no disponibles aparecen sombreadas. Back Setup AV Input Camera Input External Input Back Exit Off iPod (Off) Audio&video Audio Navigation Exit Setup AV Input Camera Input External Input Navigation Off iPod External Back Exit 57 AJUSTES - JVC KW AVX810 | Instructions - Page 138
matiz si la tez de las personas no es natural. • Pulse [5] o [∞] para ajustar. *1 Se requiere la conexión del conductor ILLUMINATION CONTROL . (☞ Manual de Instalación/Conexión) *2 Puede ajustarse sólo cuando la fuente sea "DISC/SD/USB" (el medio debe contener imágenes o películas) o "AV-IN". 58 - JVC KW AVX810 | Instructions - Page 139
El procedimiento de ajuste de opciones se describe en la página 57. ESPAÑOL Opciones del menú Configuraciones seleccionables, [página de referencia] Aspect (Aspecto) *3 Puede cambiar la relación de aspecto de la imagen. Relación de aspecto de la señal entrante 4:3 16:9 Pantalla Language ( - JVC KW AVX810 | Instructions - Page 140
. Still Picture: Reproduce archivos JPEG. Video: Reproduce archivos DivX/MPEG1/MPEG2. (No aplicable a "SD") Audio&Video: Reproduce archivos de audio y archivos DivX/MPEG1/ MPEG2. (No aplicable a "SD") Esta unidad dispone de su propio código de registro. Una vez que se reproduzca un archivo que tenga - JVC KW AVX810 | Instructions - Page 141
selecciona cuando conecta el iPod mediante el cable USB Audio y Video para iPod. ☞ [48] Audio&Video: Selecciónelo al conectar un componente AV, como una videograbadora (VCR). Audio : Selecciónelo al conectar un componente de audio, como un reproductor de audio portátil. Navegation : Selecciónelo al - JVC KW AVX810 | Instructions - Page 142
componente externo al jack del cambiador de CD en la parte trasera. Changer/iPod*3: Cambiador de CD o iPod. necesidad de realizar este ajuste para conectar el adaptador Bluetooth, el interfaz de radio satelital y el adaptador Smart REVERSE GEAR SIGNAL. Consulte el Manual de instalación/conexión. La - JVC KW AVX810 | Instructions - Page 143
la potencia máxima de los altavoces sea inferior a 50 W.) High: VOL 00 a 50 *5 Para fuentes digitales: puede realizar los ajustes separadamente, según el formato de audio-Dolby Digital/DTS y otros. 63 AJUSTES - JVC KW AVX810 | Instructions - Page 144
no enviados. Sent : Mensajes enviados. • También se muestra el número de mensajes contenidos en cada historial. *5 Selecciónelo sólo para "Bluetooth PHONE" o "Bluetooth AUDIO". Seleccione un dispositivo (o "NEW DEVICE") antes de utilizar el menú. *6 Sólo para el dispositivo conectado para - JVC KW AVX810 | Instructions - Page 145
para "Bluetooth PHONE". *9 Sólo para el teléfono celular conectado para "Bluetooth PHONE". No se puede seleccionar cuando se ha seleccionado "NEW DEVICE". *10 Si desea obtener más información sobre Bluetooth, visite el siguiente sitio web de JVC: Cuando - JVC KW AVX810 | Instructions - Page 146
arriba). • Asegúrese de guardar los discos en sus estuches después del uso. Pegatinas y restos de pegatina Rótulo autoadhesivo Forma irregular C-thru Disc (disco semitransparente) Partes transparente o semitransparentes en el área de grabación. 66 - JVC KW AVX810 | Instructions - Page 147
DVD-VR y la lista de reproducción, consulte el manual entregado con el equipo de grabación. Reproducción de archivo Reproducción de archivos DivX • Esta unidad puede reproducir archivos DivX con el código de extensión , , o (sin distinción de caja-mayúsculas/minúsculas). • "Audio - JVC KW AVX810 | Instructions - Page 148
para archivos MPEG2 grabados mediante videocámaras JVC Everio. Los archivos MPEG2 con el có en Low Level). • "Audio streams" (flujos de audio) deben cumplir con MPEG1 Audio Layer-2 o Dolby Digital. SD card Check the SD card" en el monitor. Reemplace la tarjeta SD. No extraiga ni instale la tarjeta SD - JVC KW AVX810 | Instructions - Page 149
suceder que esta unidad no pueda reconocer un dispositivo USB conectado a través de un lector de tarjetas USB. • Al efectuar la conexión con un cable USB, utilice un cable USB 2.0. • Puede suceder que esta unidad no pueda reproducir correctamente archivos en un dispositivo USB cuando se utilice un - JVC KW AVX810 | Instructions - Page 150
"Error" otra vez, revise si el dispositivo admite la función que ha intentado realizar. • Device Unfound: No se ha detectado ningún dispositivo Bluetooth disponible mediante . • Loading: La unidad está actualizando la guía telefónica y/o mensaje de texto. • Please Wait...: La unidad se est - JVC KW AVX810 | Instructions - Page 151
USB 2.0 o el cable USB audio y video. Nota: Cuando opera un iPod, algunas operaciones pueden no funcionar correctamente o como se desea. En tal caso, visite el siguiente sitio web de JVC: - Para la conexión USB: - Para la conexión del adaptador de interfaz - JVC KW AVX810 | Instructions - Page 152
conecte un amplificador o decodificador compatible con estas fuentes multicanal a este terminal, y ajuste correctamente . (☞ página 60) Disco de reproducción Señales de salida DVD 48 kHz, 16/20/24 bit PCM Lineal 48 kHz, 16 bit estéreo - JVC KW AVX810 | Instructions - Page 153
00 00 00 00 00 Códigos de idiomas (para selección del idioma de DVD/DivX) Código Idioma Código Idioma AA Afar FA Persa AB Abkasiano FI Finlandés Kinyarwanda TO Tonga LV Letón, Latvio SA Sánscrito TR Turco MG Malagasio SD Sindhi TS Tsonga MI Maorí SG MK Macedonio SH ML Malayalam SI - JVC KW AVX810 | Instructions - Page 154
DTS Digital Out" son marcas registradas de DTS, Inc. • "DVD Logo" es una marca comercial de DVD Format/Logo Licensing Corporation registrado en los EE.UU., Japón Bluetooth y sus logotipos son propiedad de Bluetooth SIG, Inc., y cualquier uso de los mismos por Victor Company of Japan, Limited (JVC) - JVC KW AVX810 | Instructions - Page 155
Síntomas Soluciones/Causas • No sale sonido de los altavoces. • en la pantalla, y el panel no se mueve. • Aparece "SD Loading Error" en el monitor. • Aparece "No Signal". • componente externo conectado a la clavija VIDEO IN. • Inspeccione los cables y las conexiones. • La señal de entrada es muy - JVC KW AVX810 | Instructions - Page 156
el freno de estacionamiento. El cable del freno de estacionamiento no está correctamente conectado. (☞ Manual de Instalación/Conexión) • No aparece depende escorrecto. de cómo fueron grabadas las pistas. • Aparece "Not Support" en la pantalla y se La pista no se puede reproducir. omiten - JVC KW AVX810 | Instructions - Page 157
SD/dispositivo USB. Copia otra vez las pistas, e intente de nuevo. Este receptor puede conectarse con un teléfono celular Bluetooth y un reproductor de audio Bluetooth el receptor y el reproductor de audio Bluetooth. • Desconecte el dispositivo conectado para "Bluetooth PHONE". • Apague la unidad y - JVC KW AVX810 | Instructions - Page 158
radio satelital XM. • Aparecerá "NO NAME" en la pantalla. • Aparece "UPDATING" en la pantalla y no se escucha ningún sonido. • Aparece "OFF AIR" canal anterior. El receptor está cargando la información del canal y el audio. La información de texto no está disponible temporalmente. Vuelva a conectar - JVC KW AVX810 | Instructions - Page 159
Recepción de HD Radio ESPAÑOL Síntomas Soluciones/Causas • La calidad del sonido cambia cuando se reciben emisoras HD Radio. Fije el modo de recepción en o . (☞ página 47) • El sonido no se escucha. • Se selecciona "Analog" cuando se reciben todas las transmisiones digitales - JVC KW AVX810 | Instructions - Page 160
de control del ecualizador: Nivel de Salida de Audio LINE OUT (FRONT REAR), SUBWOOFER: Sistema de Entrada de antena VIDEO OUT Otros: Cambiador de CD, OE REMOTE, DIGITAL OUT (óptico) Gama de frecuencias: FM (con el DVD, fs=48 kHz/96 kHz: 16 Hz a 22 000 Hz VCD/CD: 16 Hz a 20 000 Hz Gama din - JVC KW AVX810 | Instructions - Page 161
SD ESPAÑOL USB MONITOR Sistema de archivo compatible: FAT 32/16/12 Capacidad 8 Mbytes a 2 Gbytes Velocidad de transferencia Máximo 10 aviso. Si necesita un kit para su automóvil, consulte su directorio telefónico para buscar la tienda especializada en car audio más cercana. 81 REFERENCIAS - JVC KW AVX810 | Instructions - Page 162
Merci pour avoir acheté un produit JVC. Veuillez lire attentivement toutes les instructions avant d'utiliser l'appareil afin de bien comprendre son fonctionnement et d'obtenir les meilleures performances possibles. IMPORTANT POUR PRODUITS LASER 1. PRODUIT LASER CLASSE 1 2. ATTENTION: N'ouvrez pas - JVC KW AVX810 | Instructions - Page 163
Pour sécurité... • N'augmentez pas trop le volume car cela bloquerait les sons de l'extérieur rendant la conduite de la carte SD 30 Opérations USB 32 APPAREILS EXTÉRIEURS Opérations Bluetooth®- Téléphone portable/lecteur audio ... 34 Écoute Guide de dépannage 75 Spécifications 80 3 INTRODUCTION - JVC KW AVX810 | Instructions - Page 164
son Surround DTS, utilisez la connexion numérique. ( ☞ Manuel d'installation/raccordement) Précautions pour la lecture de disques à double face La face non DVD d'un disque à "DualDisc" n'est pas compatible avec le standard "Compact Disc Digital Audio". Par conséquent, l'utilisation de la face non - JVC KW AVX810 | Instructions - Page 165
pressée] L'écran se met de nouveau en service dans les cas suivants: - Quand vous touchez le panneau tactile - Quand vous appuyez sur MENU, DISP, DETACH ou OPEN sur le panneau du moniteur - Quand un appel/message textuel arrive (pour le téléphone portable Bluetooth) - Quand le signal de la caméra - JVC KW AVX810 | Instructions - Page 166
Retrait/fixation du panneau du moniteur Détachement 1 Pendant que l'appareil est sous tension: * * Vous pouvez aussi utiliser OPEN sur le panneau du moniteur. Puis appuyez sur [ Detach ]. 2 Yes Detach? No Le panneau du moniteur s'ouvre sur environ 50°. • Il se referme automatiquement quand - JVC KW AVX810 | Instructions - Page 167
Opérations de base - Panneau du moniteur/panneau tactile Affiche l'écran . ☞ page 57 Affiche l'écran . ☞ page 11 Affiche et fait disparaître les icônes de raccourci. ☞ page 12 FRANÇAIS Change les sources. Capteur de ☞ page 11 télécommande Pour détacher le panneau du - JVC KW AVX810 | Instructions - Page 168
de volant. • Référez-vous au Manuel d'installation/ raccordement (volume séparé) pour les connexion. hors tension (quand il est sous tension). 2 "DISC/ SD/ USB/ USB iPod": Recherche vers l'arrière 3 Ajuste 5 • DVD/DivX 6: Affiche le menu de disque. • VCD: Reprend la lecture PBC. • DVD-VR: Affiche - JVC KW AVX810 | Instructions - Page 169
images reproduites. r "TUNER/HD Radio/SAT": Choisit les bandes. "DISC/SD/USB": Arrêt de la lecture "USB iPod": Affiche le menu . "Bluetooth PHONE": Termine l'appel. "Bluetooth AUDIO": Pause t VCD: Retourne au menu PBC. y • DVD Vidéo/DivX 6: Affiche le menu de disque. • VCD: Reprend la - JVC KW AVX810 | Instructions - Page 170
Préparation pour les opérations Vous pouvez annuler la démonstration sur l'écran et régler l'horloge. • Les articles non disponibles apparaissent en gris sur les écrans de menu AV. Langue des indications: Dans ce manuel, les indications en anglais sont utilisées à titre d'exemple. Vous pouvez - JVC KW AVX810 | Instructions - Page 171
disponibles dépendent des appareils extérieurs que vous avez connectés, des supports que vous avez attachés et des réglages que vous HD Radio" = "SAT" = "DISC"(DVD/ VCD/CD) = "SD" = "USB" ou "USB iPod" = "CD-CH", "iPod" ou "EXT-IN" = "Bluetooth PHONE" = "Bluetooth AUDIO" = "AV-IN" = (retour - JVC KW AVX810 | Instructions - Page 172
la répétition de plage/chapitre ☞ pages 21, 31, 33, 42 et 50 Affiche le menu . ☞ page 59 Met en service la fonction . ☞ page 37 Affiche le menu . ☞ page 38 3 Setup Beep Telephone Muting Illumination Motion Sensitiv. Initialize Normal Proximity/Motion Touch Panel - JVC KW AVX810 | Instructions - Page 173
sur [BAND]. ! Appuyez sur [ ] ou [ ] pour rechercher une station-Recherche automatique. • Recherche manuelle: Maintenez pressée [ ] ou [ ] jusqu'à ce que "Manual Search" apparaisse sur l'écran, puis appuyez répétitivement sur la touche. • L'indicateur ST s'allume lors de la réception d'une émission - JVC KW AVX810 | Instructions - Page 174
FRANÇAIS Quand une émission FM stéréo est difficile à recevoir 1 • Vous pouvez aussi utiliser MENU sur le panneau du moniteur. 2 Préréglage automatique des stations FM-SSM (Mémorisation automatique séquentielle des stations puissantes) Fonctionne uniquement pour les bandes FM. Vous pouvez préré - JVC KW AVX810 | Instructions - Page 175
Préréglage manuel Ex.: Mémorisation de la station FM de fréquence 92.5 MHz sur le numéro de préréglage 4 de la bande FM1. 1 Accordez la station que vous souhaitez prérégler. Sélection d'une station préréglée Sur la télécommande: 1 92.5 MHz No Name • Vous pouvez aussi afficher la liste des préré - JVC KW AVX810 | Instructions - Page 176
Opérations des disques Le type du disque est détecté automatiquement, puis la lecture démarre (pour certains disques, le menu principal du disque apparaît). Si le disque ne possède pas de menu de disque, toutes ses plages sont reproduites répétitivement jusqu'à ce que vous changiez la source ou é - JVC KW AVX810 | Instructions - Page 177
page 11) Type de disque Format audio Mode sonore (☞ page 55) Mode de lecture DVD Vidéo: No de titre/No de chapitre/Durée de lecture DVD-VR: No de programme (ou re/vers l'avant*3 Choisit le titre/programme/liste de lecture *1 Pour les DVD-VR, la lecture VR-PRG (programme) ou VR-PLAY (liste de - JVC KW AVX810 | Instructions - Page 178
des dossiers/plages 01 ]: Affiche la liste des dossiers/plages Mode sonore (☞ page 55) L'indicateur PBC s'allume quand la fonction PBC est en service. No de plage/Durée de lecture PBC *2 [3 / 8] [7] [4 ¢] Lance la lecture/pause Arrêt de la lecture Appuyez: Choisit une plage Maintenez press - JVC KW AVX810 | Instructions - Page 179
Appuyez: Choisit une plage Maintenez pressée: Recherche vers l'arrière/vers l'avant*7 FRANÇAIS No de dossier/No de plage/Durée de lecture Format audio (MP3/WMA/WAV/AAC) Mode sonore (☞ page 55) Current Folder Name Current File Name.mp3 Current Track Title Artist Name Album Title *4 Les donn - JVC KW AVX810 | Instructions - Page 180
de lecture). *1 Pendant qu'un menu de disque est affiché pour un DVD, [KEY] est affiché automatiquement. Sur le menu de disque, vous pouvez en le touchant sur l'écran B Pour les opérations de lecture du menu DVD/VCD/DivX [5 ∞ 2 3] Choisit les articles de menu [ENTER] Valide la sélection - JVC KW AVX810 | Instructions - Page 181
plages du dossier actuel - Track: Répète la plage actuelle* (PBC non Disc (All): Reproduit aléatoirement toutes les utilisé) plages (PBC hors service) Track: Répète la plage actuelle* Disc (All): Reproduit aléatoirement toutes les plages Track: Répète la plage actuelle* Folder: Reproduit al - JVC KW AVX810 | Instructions - Page 182
Sélection de plages sur la liste Si un disque comprend des dossiers, vous pouvez afficher la liste des dossiers/plages (fichier), puis démarrer la lecture. 1 • Vous pouvez aussi utiliser MENU sur le panneau du moniteur. 2 Vous pouvez parcourir les listes de dossiers/plages en utilisant la barre de - JVC KW AVX810 | Instructions - Page 183
FRANÇAIS Opérations en utilisant de la télécommande-RM-RK252 Arrêtez la lecture. Démarre la lecture/met la lecture en pause (si la touche est pressée pendant la lecture). Recherche vers l'arrière/vers l'avant*1 (Aucun son n'est entendu.) Lecture au ralenti si la touche est pressée pendant une pause - JVC KW AVX810 | Instructions - Page 184
de recherche: x2 ] x5 ] x10 ] x20 ] x60 *2 Vitesse de la lecture au ralenti: 1/32 ] 1/16 ] 1/8 ] 1/4 ] 1/2 *3 Vitesse de recherche: x2 ] x10 Vous pouvez changer le flux audio et les sous-titres (en/hors service) en utilisant la barre sur l'écran. 24 - JVC KW AVX810 | Instructions - Page 185
de commande à partir du menu 1 2 Choisit l'élément que vous souhaitez reproduire. 3 *4 Vitesse de recherche: ¡1 ] ¡2 ] ¡3 *5 Vitesse de recherche: ¡1 ] ¡2 Vous pouvez changer le flux audio et les sous-titres (en/hors service) en utilisant la barre sur l'écran. (DivX uniquement) 25 FONCTIONNEMENT - JVC KW AVX810 | Instructions - Page 186
Arrêtez la lecture. Démarrez la lecture. (Diaporama: chaque fichier est affiché pendant quelques secondes.) Affiche le fichier actuel jusqu'à ce que vous le changiez, si vous appuyez sur cette touche pendant le diaporama. Choisissez un fichier. Sélection d'un dossier. Sélection du format de l'image. - JVC KW AVX810 | Instructions - Page 187
FRANÇAIS Arrêtez la lecture. Démarre la lecture/met la lecture en pause (si la touche est pressée pendant la lecture). Recherche vers l'arrière/vers l'avant*4 Appuyez sur la touche: Sélection d'une plage. Maintenez pressée: Recherche vers l'arrière/vers l'avant*5 Sélection d'une plage. *4 Vitesse - JVC KW AVX810 | Instructions - Page 188
de la liste de lecture à n'importe quel moment pendant la lecture d'un DVD-VR avec ses données enregistrées. 1 Affichez l'écran de programme sur l'écran en utilisant la télécommande, lors de la lecture des disques suivants-DVD/VCD/DivX/MPEG1/MPEG2/JPEG. FRANÇAIS 1 Affiche la barre sur écran. - JVC KW AVX810 | Instructions - Page 189
sur la barre varient en fonction du type de disque. 1 Type de disque 2 • DVD: Format de signal audio • VCD: PBC 3 Mode de lecture *1 DVD Vidéo: C. RPT: Répétition de chapitre T. RPT: Répétition de titre DVD-VR: C. RPT: Répétition de chapitre PG. RPT: Répétition de programme DivX/MPEG1/MPEG2 - JVC KW AVX810 | Instructions - Page 190
de la même façon que vous le faites avec les fichiers sur les disques. (☞ pages 18 à 27) • Toutes les plages de la carte SD sont reproduites répétitivement jusqu'à ce que vous changiez la source. • Assurez-vous que toutes les données importantes ont été sauvegardées. ~ Ouvrez le panneau du - JVC KW AVX810 | Instructions - Page 191
: Répète tous les fichiers du dossier actuel Random Folder: Reproduit aléatoirement toutes les plages du dossier actuel, puis toutes les plages des dossiers suivants SD (All): Reproduire aléatoirement toutes les plages - * En appuyant sur l'icône de raccourci , vous pouvez aussi mettre en ou hors - JVC KW AVX810 | Instructions - Page 192
USB à mémoire de grande capacité tel qu'une mémoire USB, un lecteur audio numérique, un disque dur portable, etc. à cet appareil. • Vous pouvez ées. *1 Sauf pour les fichiers MPEG2 enregistrés par le caméscope JVC Everio (code d'extention ). *2 Cet appareil peut reproduire les fichiers - JVC KW AVX810 | Instructions - Page 193
des dossiers suivants USB (All): Reproduire aléatoirement toutes les plages - * En appuyant sur l'icône de raccourci , vous pouvez aussi mettre en ou hors service la répétition de plage. 33 FFOONNCCTTIOIONNNNEEMMEENNTT - JVC KW AVX810 | Instructions - Page 194
peut être connecté en même temps pour chaque source ("Bluetooth PHONE" et "Bluetooth AUDIO"). Pour enregistrer un nouveau périphérique en utilisant Préparation: • Réglez le périphérique Bluetooth pour mettre en service la fonction Bluetooth. • Assurez-vous que "NEW DEVICE" est choisi. Si non - JVC KW AVX810 | Instructions - Page 195
déconnectez. Utilisez (ou mettez en service ) pour connecter le même appareil instructions fournies avec le périphérique pour vérifier le code PIN. 6 Utilisez le périphérique Bluetooth appareil. 1 Choisissez "Bluetooth PHONE" ou "Bluetooth AUDIO", puis choisissez l'appareil - JVC KW AVX810 | Instructions - Page 196
peut être enregistré.) Maintenez pressée: Met en service la fonction Affichez l'écran . *1 Quand un téléphone portable muni d'une fonction audio est connecté, apparaît. *2 Cette touche apparaît quand l'adaptateur Bluetooth est connecté. *3 Cet ajustement n'affecte pas le - JVC KW AVX810 | Instructions - Page 197
Name Back Exit 4 Choisissez une méthode d'appel, puissez passez l'appel. Device Name Receiving Message Jack Read ? Yes No Back Exit FRANÇAIS Pour lire le message, appuyez sur [Yes]. La source change sur "Bluetooth PHONE". Pour lire le message plus tard, appuyez sur [No]. • Le message est - JVC KW AVX810 | Instructions - Page 198
ou VOL +/-). Entrée d'un numéro de téléphone • Vous ne pouvez pas utiliser la télécommande pour entrer les numéros de téléphone. Pour rappeler les numéros composés précédemment 1 ne de raccourci , vous pouvez facilement mettre en service la fonction . • Vous pouvez aussi la mettre en - JVC KW AVX810 | Instructions - Page 199
de six numéros de téléphone. 1 Choisissez le numéro de téléphone que vous souhaitez prérégler à partir de , , ou . 1 Appuyez sur [ ] sur le panneau tactile ou MENU sur le panneau du moniteur. 2 Appuyez sur [Bluetooth]. 3 Appuyez sur [Dial Menu], puis - JVC KW AVX810 | Instructions - Page 200
utiliser les touches suivantes sur la télécommande pour les opérations audio Bluetooth. Lance la lecture/pause. Saut vers l'arrière/saut Bluetooth: Si vous souhaitez recevoir plus d'informations sur le système Bluetooth, consultez le site web de JVC suivant: - JVC KW AVX810 | Instructions - Page 201
Écoute du changeur de CD Il est recommandé d'utiliser un changeur de CD JVC compatible MP3 avec votre autoradio. • Vous pouvez uniquement reproduire des CD (CD-DA) et des disques MP3. Ex.: lors de la lecture d'un disque MP3 - JVC KW AVX810 | Instructions - Page 202
Reproduit aléatoirement toutes les plages des disques en place * En appuyant sur l'icône de raccourci , vous pouvez aussi mettre en ou hors service la répétition de plage. Vous pouvez utiliser les touches suivantes sur la télécommande pour commander le changeur de CD. Choisit un disque. Choisit un - JVC KW AVX810 | Instructions - Page 203
l'appareil. • Interface de radio satellite SIRIUS JVC, KS-SRA100, pour écouter la radio satellite SIRIUS. • Adaptateur JVC Smart Digital, XMDJVC100, pour écouter la numéro vert SIRIUS au 1888-539-SIRIUS (7474). "Subscription Updated Press Any Key to Continue" (Inscription mise à jour. Appuyez sur - JVC KW AVX810 | Instructions - Page 204
Accord d'un canal souhaité Mode sonore (☞ page 55) Indicateur de réception de signal No de préréglage Bande No de canal SAT SR1 1 01 C A T Category Name Channel Name LEVEL 3:45 PM Song Title Artist Name Composer Name CATEGORY CATEGORY BAND Pour le SIRIUS FRANÇAIS Pour la radio SIRIUS - JVC KW AVX810 | Instructions - Page 205
Mémorisation des canaux Vous pouvez prérégler six canaux pour chaque bande. Ex.: Mémorisation d'un canal sur le numéro de préréglage 4 Sélection d'un canal préréglé Sur la télécommande: 1 1 Accordez la station que vous souhaitez prérégler. FRANÇAIS SAT SR1 23 C A T Music Club Channel Name - JVC KW AVX810 | Instructions - Page 206
stations HD Radio offrent aussi plus d'un canal de programmes. Ce service est appelé muliplex. • Pour en savoir plus sur les stations com . Clignote d'abord puis reste allumé quand une émission audio numérique est accordée. ☞ page 47 Force du signal ☞ ci-dessous Bande No - JVC KW AVX810 | Instructions - Page 207
stations avec un signal suffisamment fort Fonctionne uniquement pour les bandes FM. Une fois que vous avez mis en service cette fonction (choisissez ), elle reste toujours en service lors de la recherche des stations FM. 1 CHANNEL • Vous pouvez aussi utiliser MENU sur le panneau du moniteur - JVC KW AVX810 | Instructions - Page 208
d'interface pour iPod-KS- ☞ "Lors de la connexion avec PD100 (non fourni) l'adaptateur d'interface" à la page 51. Pour regarder une séquence video Câble USB Audio et Vidéo pour iPod-KS-U20K (non fourni) ☞ "Lors de la connexion avec le câble USB" ci-dessous. • Assurez-vous que est - JVC KW AVX810 | Instructions - Page 209
Sélection d'une plage/séquence vidéo à partir de 1 • Vous pouvez aussi utiliser MENU sur le panneau du moniteur. 2 Exit *1 Appuyez sur cette touche pour passer aux pages précédentes/suivantes de la liste *2 Vous pouvez aussi choisír le mode de rechercher et les plages/séquences vidéo - JVC KW AVX810 | Instructions - Page 210
du moniteur. 2 Exit Changement de la vitesse de lecture des livres audio Vous pouvez choisir la vitesse de lecture du fichier sonore "Audiobook" , vous pouvez aussi mettre en ou hors service la répétition de plage. *2 Vous pouvez aussi mettre en service dans le menu - JVC KW AVX810 | Instructions - Page 211
Lors de la connexion avec l'adaptateur d'interface No de plage/Durée de lecture Mode sonore (☞ page 55) Mode de lecture (☞ page 50) FRANÇAIS [4 ¢] [SEARCH] [3 / 8] Appuyez: Choisit des plages Maintenez pressée: Recherche vers l'arrière/vers l'avant Affiche le menu du lecteur Lance la lecture/ - JVC KW AVX810 | Instructions - Page 212
Utilisation d'autres appareils extérieurs AV-INPUT Vous pouvez connecter un appareil extérieur aux prises LINE IN/VIDEO IN. Mode sonore (☞ page 55) Titre affecté (☞ page 56) FRANÇAIS ~ Appuyez sur [SOURCE], puis appuyez sur [AV-IN]. (☞ page 11) • Vous pouvez aussi utiliser SOURCE sur le panneau du - JVC KW AVX810 | Instructions - Page 213
navigation. Préparation: Assurez-vous que est choisi pour . (☞ page 61) Pour commuter sur l'écran de navigation ) lors de l'affichage de l'écran de navigation • Les touches de commande affichées sur que l'écran de navigation est affiché). Quand est choisi pour - JVC KW AVX810 | Instructions - Page 214
FRANÇAIS EXT-INPUT Vous pouvez connecter un appareil extérieur aux prises du changeur de CD à l'arrière de l'appareil en utilisant l'adaptateur d'entrée de ligne-KS-U57 (non fourni) ou l'adaptateur d'entrée auxiliaire-KS-U58 (non fourni). Mode sonore (☞ page 55) Titre affecté (☞ page 56) Pré - JVC KW AVX810 | Instructions - Page 215
Égalisation du son ~ • Vous pouvez aussi utiliser MENU sur le Ÿ panneau du moniteur. En appuyant sur l'icône de raccourci , vous pouvez facilement changer le mode sonore. • Pour les valeurs préréglées de chaque mode sonore, ☞ page 73. Mémorisation de vos propres ajustements Vous pouvez mémoriser - JVC KW AVX810 | Instructions - Page 216
Affectation de titres aux sources FRANÇAIS @ ; / Vous pouvez affecter des titres comme suit. Stations FM/AM* 16 caractères maximum-30 stations maximum. AV-IN EXT-IN 16 caractères maximum * Vous ne pouvez pas affecter de titre aux stations HD Radio. ~ Choisissez la source. (☞ page 11) • Pour - JVC KW AVX810 | Instructions - Page 217
Auto 6 Auto 7 Exit Setup AV Input Camera Input External Input Audio&Video Off iPod External • Vous pouvez aussi utiliser MENU sur le Back Exit Off iPod (Off) Audio&video Audio Navigation Exit Setup AV Input Camera Input External Input Navigation Off iPod External Back Exit 57 RÉ - JVC KW AVX810 | Instructions - Page 218
soit le réglage. ☞ [19] Off: Annulation. On: Met en service le gradateur. Auto: Assombrit le moniteur quand vous allumez les feux de la CONTROL est requise. (☞ Manuel d'installation/raccordement) *2 Ajustable uniquement quand la source est "DISC/SD/USB" (le support doit contenir des images ou des - JVC KW AVX810 | Instructions - Page 219
pour l'ajustement de l'horloge. Alaska, Pacific, Mountain, Central, Eastern, Atlantic, Newfoundland Mettez en service l'heure d'été si votre zone d'habitation y est soumise. Off: Annulation. On: Met en service l'heure d'été. Horloge *3 Ne peut pas être ajusté quand aucune image n'apparaît. *4 Apr - JVC KW AVX810 | Instructions - Page 220
: Reproduit les fichiers JPEG. Video: Reproduit les fichiers DivX/MPEG1/MPEG2. (Non disponible pour "SD") Audio&Video: Reproduit les fichiers audio et les fichiers DivX/MPEG1/ MPEG2. (Non disponible pour "SD") Cet appareil possède son propre code d'enregistrement. Une fois que vous avez reproduit un - JVC KW AVX810 | Instructions - Page 221
avec le Dolby Surround. Stereo: Normalement choisissez ce réglage Audio: Choisissez ce réglage quand un appareil audio tel qu'un lecteur audio portable est connecté. Navigation : Choisissez ce réglage quand un système de navigation est connecté. *2 Peut être choisi uniquement pour "DISC", "SD - JVC KW AVX810 | Instructions - Page 222
☞ [54] • Pour la connexion de l'adaptateur Bluetooth, de l'interface pour radio satellite et de l'adaptateur utilisation d'un téléphone cellulaire. Vous pouvez mettre hors service l'éclairage des touches SIGNAL est requise. Référez-vous au Manuel d'installation/raccordement. La vue arrière par la camé - JVC KW AVX810 | Instructions - Page 223
80Hz, 120Hz, 150Hz Vous pouvez changer le niveau de volume maximum de cet autoradio. Off: Met hors service l'amplificateur intégré. Low: VOL 00 à 30 (Choisissez ce réglage si la puissance maximum des ajustements séparément en fonction du format audio-Dolby Digital/DTS et des autres. 63 RÉGLAGES - JVC KW AVX810 | Instructions - Page 224
és. Sent: Les messages que vous avez envoyés. • Le nombre de messages dans chaque historique apparaît aussi. *5 Peut être choisi uniquement pour "Bluetooth PHONE" ou "Bluetooth AUDIO". Choisissez un appareil (ou "NEW DEVICE") avant d'utiliser le menu. *6 Uniquement pour l'appareil connecté pour - JVC KW AVX810 | Instructions - Page 225
" est choisi. *10 Si vous souhaitez recevoir plus d'informations sur le système Bluetooth, consultez le site web de JVC suivant: Lors de l'utilisation d'un appareil Bluetooth, référez-vous aussi aux instructions fournies avec l'appareil. 65 RÉGLAGES - JVC KW AVX810 | Instructions - Page 226
garder les disques propres Si le disque est sale, sa lecture risque d'être déformée. Si un disque est sale, essuyez-le avec un chiffon doux, en remettre un disque dans sa boîte, insérez-le délicatement sur le support central (avec la surface imprimée dirigée vers le haut). • Conservez les - JVC KW AVX810 | Instructions - Page 227
sont utilisés de façon interchangeable. • Cet appareil peut uniquement reproduire les fichiers CD audio (CD-DA) si différents types de fichier (MP3/WMA/WAV/AAC) sont . Lecture de DVD-VR • Pour les détails sur le format DVD-VR et la liste de lecture, référez-vous aux instructions fournies avec l' - JVC KW AVX810 | Instructions - Page 228
és par les caméscopes JVC Everio. Les fichiers MPEG2 avec pas basés sur Windows Media® Audio. - Fichiers au format WMA/AAC SD card Check the SD card" (Impossible de reproduire cette carte SD. Vérifiez la carte SD.) apparaît sur le moniteur. Remplacez la carte SD. Ne retirez ni n'insérez la carte SD - JVC KW AVX810 | Instructions - Page 229
USB ne puissent pas être connectés correctement ou que la connexion soit lâche. • Lors de la connexion d'un périphérique USB, référezvous aussi à ses instructions. • Connectez uniquement un périphérique USB à la fois à cet appareil. N'utilisez pas de nœud de raccordement USB. • Il se peut que cet - JVC KW AVX810 | Instructions - Page 230
"l'image de la pochette" (baseline JPEG), elle est affichée. Opérations Bluetooth Généralités • Pendant que vous conduisez, ne réalisez pas d'opérations les types de téléphone • Ces icônes indiquent le type de téléphone réglé sur l'appareil. : Téléphone cellulaire : Téléphone domestique : Bureau : - JVC KW AVX810 | Instructions - Page 231
à partir de iPod sont hors service. Réalisez toutes les opérations USB 2.0 ou du câble USB Audio et Vidéo. Avis: Lors de l' JVC suivant: - Pour la connexion USB: - Pour la connexion de l'adaptateur d'interface: - JVC KW AVX810 | Instructions - Page 232
à cette prise un amplificateur ou un décodeur compatible avec ces sources multicanaux, et réglez correctement. (☞ page 60) Disque reproduit Signaux de sortie DVD 48 kHz, 16/20/24 bits Linear PCM 48 kHz, 16 bits stéréo Linear PCM* 96 - JVC KW AVX810 | Instructions - Page 233
00 00 00 00 Codes de langue (pour la sélection de la langue des DVD/DivX) Code Langue AA Afar AB Abkhazien AF Afrikaans AM Amharique AR Arabe AS RW Kinyarwanda TO Tongan LV Latvian, Letton SA Sanskrit TR Turc MG Malagasy SD Sindhi TS Tsonga MI Maori MK Macédonien ML Malayalam MN Mongol MO - JVC KW AVX810 | Instructions - Page 234
Le terme "Dolby" et le sigle double D sont des marques commerciales de Dolby , Inc. • Le "DVD Logo" est une marque de commerce de DVD Format/Logo Licensing Corporation, Bluetooth sont la propriété de Bluetooth SIG, Inc. et toute utilisation de ces marques par Victor Company of Japan, Limited (JVC - JVC KW AVX810 | Instructions - Page 235
service. • Pour les opérations des appareils extérieurs, référez-vous aussi aux modes d'emploi fournis avec les adaptateurs utilisés pour les connexion (de même qu'aux instructions le panneau ne bouge pas. • "SD Loading Error" apparaît sur le moniteur. La carte SD n'est pas insérée complètement. Ins - JVC KW AVX810 | Instructions - Page 236
stationnement est en place. (☞ Manuel d'installation/raccordement) • Aucune image n'apparaît code error" apparaît sur l'écran quand vous insérez un DVD Vidéo. Le code de région n'est pas correct. (☞ page enregistrées sur le disque. • "Not Support" apparaît sur l'écran et la plage La plage ne peut - JVC KW AVX810 | Instructions - Page 237
sur la carte parfois interrompu. SD/périphérique USB. Copiez de nouveau les plages et essayez encore. • Le périphérique Bluetooth ne détecte pas Cet autoradio peut être connecté à un téléphone portable l'appareil. Bluetooth et à un lecteur audio Bluetooth en même temps. Pendant la - JVC KW AVX810 | Instructions - Page 238
l'écran. Il n'y a pas de texte d'information pour le canal choisi. • "UPDATING" apparaît sur l'écran et aucun son L'autoradio est en train de mettre à jour appareil est en train de changer les informations du canal et audio. Le texte d'information est temporairement indisponible. • "Reset08" - JVC KW AVX810 | Instructions - Page 239
47) Reconnectez cet appareil et le tuner HD Radio correctement, puis réinitialisez l'appareil. • Vérifiez la connexion. • Chargez de la batterie. Mettez hors service l'égaliseur sur cet appareil ou sur iPod. Vérifiez la connexion. Le casque d'écoute a été déconnecté pendant la lecture. Redémarrez la - JVC KW AVX810 | Instructions - Page 240
: Plage de commande de l'égaliseur: Niveau de Sortie Audio LINE OUT (FRONT REAR), SUBWOOFER: Standard de couleur: d'antenne VIDEO OUT Autres: Changeur de CD, OE REMOTE, DIGITAL OUT (optique) FM (avec l'intervalle des optique sans contact (laser semi-conducteur) DVD, fs=48 kHz/96 kHz: VCD/CD - JVC KW AVX810 | Instructions - Page 241
SD USB FRANÇAIS MONITEUR Système de fichiers compatible: FAT 32/ Températures de fonctionnement admissibles: 0°C à +40°C (32°F à 104°F) Dimensions (L × H × P): • Avec la plaque de garniture et le manchon attachés Taille d'installation (approx.): 182 mm × 111 mm × 160 mm (7-3/16 pouces × 4-3/8 - JVC KW AVX810 | Instructions - Page 242
Having TROUBLE with operation? Please reset your unit Refer to page of How to reset your unit Still having trouble?? USA ONLY Call 1-800-252-5722 http://www.jvc.com We can help you! EN, SP, FR © 2008 Victor Company of Japan, Limited 0108MNMMDWJEIN - JVC KW AVX810 | Instructions - Page 243
Instructions DVD RECEIVER WITH MONITOR KW-AVX810
-
 1
1 -
 2
2 -
 3
3 -
 4
4 -
 5
5 -
 6
6 -
 7
7 -
8
-
9
-
10
-
11
-
12
-
13
-
14
-
15
-
16
-
17
-
18
-
19
-
20
-
21
-
22
-
23
-
24
-
25
-
26
-
27
-
28
-
29
-
30
-
31
-
32
-
33
-
34
-
35
-
36
-
37
-
38
-
39
-
40
-
41
-
42
-
43
-
44
-
45
-
46
-
47
-
48
-
49
-
50
-
51
-
52
-
53
-
54
-
55
-
56
-
57
-
58
-
59
-
60
-
61
-
62
-
63
-
64
-
65
-
66
-
67
-
68
-
69
-
70
-
71
-
72
-
73
-
74
-
75
-
76
-
77
-
78
-
79
-
80
-
81
-
82
-
83
-
84
-
85
-
86
-
87
-
88
-
89
-
90
-
91
-
92
-
93
-
94
-
95
-
96
-
97
-
98
-
99
-
100
-
101
-
102
-
103
-
104
-
105
-
106
-
107
-
108
-
109
-
110
-
111
-
112
-
113
-
114
-
115
-
116
-
117
-
118
-
119
-
120
-
121
-
122
-
123
-
124
-
125
-
126
-
127
-
128
-
129
-
130
-
131
-
132
-
133
-
134
-
135
-
136
-
137
-
138
-
139
-
140
-
141
-
142
-
143
-
144
-
145
-
146
-
147
-
148
-
149
-
150
-
151
-
152
-
153
-
154
-
155
-
156
-
157
-
158
-
159
-
160
-
161
-
162
-
163
-
164
-
165
-
166
-
167
-
168
-
169
-
170
-
171
-
172
-
173
-
174
-
175
-
176
-
177
-
178
-
179
-
180
-
181
-
182
-
183
-
184
-
185
-
186
-
187
-
188
-
189
-
190
-
191
-
192
-
193
-
194
-
195
-
196
-
197
-
198
-
199
-
200
-
201
-
202
-
203
-
204
-
205
-
206
-
207
-
208
-
209
-
210
-
211
-
212
-
213
-
214
-
215
-
216
-
217
-
218
-
219
-
220
-
221
-
222
-
223
-
224
-
225
-
226
-
227
-
228
-
229
-
230
-
231
-
232
-
233
-
234
-
235
-
236
-
237
-
238
-
239
-
240
-
241
-
242
-
243
 |
 |

ENGLISH
ESPAÑOL
FRANÇAIS
For installation and connections, refer to the separate manual.
Para la instalación y las conexiones, refiérase al manual separado.
Pour l’installation et les raccordements, se référer au manuel séparé.
INSTRUCTIONS
MANUAL DE INSTRUCCIONES
MANUEL D’INSTRUCTIONS
For canceling the display demonstration, see page 10.
Para cancelar la demonstración en pantalla, consulte la página 10.
Pour annuler la démonstration des affichages, référez-vous à la page 10.
DVD RECEIVER WITH MONITOR
KW-AVX810
For customer Use:
Enter below the Model No.
and Serial No. which are
located on the top or bottom
of the cabinet. Retain this
information for future
reference.
Model No.
Serial No.
RECEPTOR DVD CON MONITOR
KW-AVX810
RÉCEPTEUR DVD ET MONITEUR
KW-AVX810
LVT1791-001A
[J]