JVC LT-32E478 Instructions - Page 25
The Onscreen Menu System
 |
UPC - 046838028946
View all JVC LT-32E478 manuals
Add to My Manuals
Save this manual to your list of manuals |
Page 25 highlights
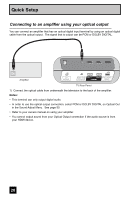
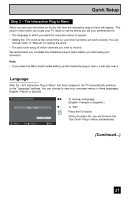
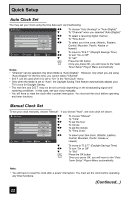
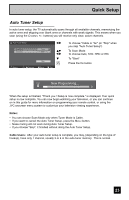
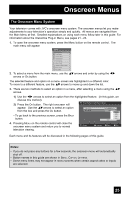
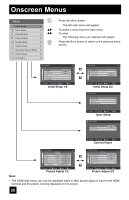
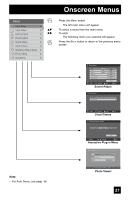
Onscreen Menus The Onscreen Menu System Your television comes with JVC's onscreen menu system. The onscreen menus let you make adjustments to your television's operation simply and quickly. All menus are navigated from the Main Menu at first. Detailed explanations on using each menu follow later in this guide. For information about the Interactive Plug-in Menu, see pages 21 - 23. 1. To open the onscreen menu system, press the MENU button on the remote control. The main menu will appear Menu Initial Setup - + Tuner Setup External Input Picture Adjust Sound Adjust Clock/Timers Interactive Plug-in Menu Photo Viewer Auto Demo 2. To select a menu from the main menu, use the π†arrows and enter by using the √® arrows or OK button. The selected feature and option on a menu screen are highlighted in a different color. To move to a different feature, use the π†arrows to move up and down the list. 3. There are two methods to select an option in a menu, after selecting a menu using the π† arrows. 1) Use the √® arrows to select an option from the highlighted feature. (In this guide, we discuss this method). 2) Press the OK button. The right onscreen will - + Tuner Setup > Auto Tuner Setup appear. Use the π†arrows to select an option from the box and press the OK button. Tuner Mode Scan Mode Cable Auto Auto • To go back to the previous screen, press the BACK button. Start STD HRC IRC 4. Pressing MENU on the remote control will close the onscreen menu system and return you to normal television viewing. Select OK Operate BACK Back MENU Exit Each menu and its features will be discussed in the following pages of this guide. Notes: • If you do not press any buttons for a few seconds, the onscreen menu will automatically shut off. • Button names in this guide are shown in SMALL CAPITAL LETTERS. • Some menu items may not appear in menu screens when certain aspect ratios or inputs are selected. 25
-
 1
1 -
2
-
3
-
4
-
5
-
6
-
7
-
8
-
9
-
10
-
11
-
12
-
13
-
14
-
15
-
16
-
17
-
18
-
19
-
 20
20 -
 21
21 -
 22
22 -
 23
23 -
 24
24 -
 25
25 -
 26
26 -
 27
27 -
 28
28 -
 29
29 -
 30
30 -
31
-
32
-
33
-
34
-
35
-
36
-
37
-
38
-
39
-
40
-
41
-
42
-
43
-
44
-
45
-
46
-
47
-
48
-
49
-
50
-
51
-
52
-
53
-
54
-
55
-
56
-
57
-
58
-
59
-
60
-
61
-
62
-
63
-
64
-
65
-
66
-
67
-
68
-
69
-
70
-
71
-
72
 |
 |