JVC MXDVA5 Instructions
JVC MXDVA5 - 3 DVD/CD Home Theater Mini System Manual
 |
UPC - 046838257124
View all JVC MXDVA5 manuals
Add to My Manuals
Save this manual to your list of manuals |
JVC MXDVA5 manual content summary:
- JVC MXDVA5 | Instructions - Page 1
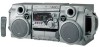
Consists of CA-MXDVA5 and SP-MXDVA5 SP-MXDVA5 CA-MXDVA5 SP-MXDVA5 STANDBY STANDBY/ON DISC CHANGE CD-R/RW PLAYBACK SOUND MODE SUBWOOFER LEVEL COMPACT DIGITAL VIDEO / PHONES CLOCK / TIMER DISPLAY SELECT REPEAT TUNING REC START CD /STOP REC START DUBBING TAPE A TAPE B INSTRUCTIONS For - JVC MXDVA5 | Instructions - Page 2
). NO USER SERVICEABLE PARTS INSIDE. REFER SERVICING TO QUALIFIED SERVICE PERSONNEL. The lightning important operating and maintenance (servicing) instructions in the literature accompanying the apparatus. • When discarding batteries, environmental problems must be considered and local rules or laws - JVC MXDVA5 | Instructions - Page 3
For Canada/pour le Canada CAUTION: TO PREVENT ELECTRIC SHOCK, MATCH WIDE BLADE OF PLUG TO WIDE SLOT, FULLY INSERT. ATTENTION: POUR EVITER LES CHOCS ELECTRIQUES, INTRODUIRE LA LAME LA PLUS LARGE DE LA FICHE DANS LA BORNE CORRESPONDANTE DE LA PRISE ET POUSSER JUSQUAU FOND. For Canada/pour le Canada - JVC MXDVA5 | Instructions - Page 4
JVC products. Before operating this unit, read this manual carefully and thoroughly to obtain the best possible performance from your unit, and retain this manual for future reference. About This Manual This manual the unit since there are no user serviceable parts inside. If anything goes wrong, - JVC MXDVA5 | Instructions - Page 5
CD Synchronized Recording 33 Using the Timers 34 Using Daily Timer 34 Using Recording Timer 35 Using Sleep Timer 36 Timer Priority 36 Maintenance 37 Troubleshooting 38 Glossary 39 Specifications 40 - 2 - - JVC MXDVA5 | Instructions - Page 6
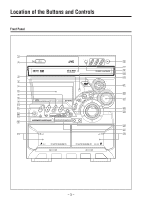
Location of the Buttons and Controls Become familiar with the buttons and controls on your unit. Front Panel 1 2 3 4 5 6 7 8 9 p q w e r t STANDBY STANDBY/ON DISC CHANGE CD-R/RW PLAYBACK SOUND MODE SUBWOOFER LEVEL COMPACT DIGITAL VIDEO PHONES CLOCK / TIMER DISPLAY SELECT REPEAT TUNING REC - JVC MXDVA5 | Instructions - Page 7
Display Window 1 2 Continued 3 45 6 7 8 9 See pages in the parentheses for details. Front Panel 1 Carrousel 2 STANDBY/ON button and STANDBY lamp (10, 35, 36) 3 7 (stop) button (15, 21, 23, 26, 32, 33) 4 SET button (10, 13, 34 - 36) 5 CANCEL/DEMO button (9, 10, 34 - 36) 6 Display window 7 - JVC MXDVA5 | Instructions - Page 8
/SLOW button (13, 22, 27) k FADE MUTING button (11) l SUBWOOFER LEVEL + / - buttons (11) / 3D SOUND button (12) How to open the front lid Press center part of the lid and pull down. When using the remote control, point it at the remote sensor on the front panel. - 5 - - JVC MXDVA5 | Instructions - Page 9
Getting Started Continued Unpacking After unpacking, check to be sure that you have all the following items. The number in the parentheses indicates the quantity of the pieces supplied. • AM loop antenna (1) • FM antenna (1) • Remote control (1) • Batteries (2) • Composite video cord (1) If any is - JVC MXDVA5 | Instructions - Page 10
of both FM and AM • Make sure the antenna conductors do not touch any other terminals and connecting cords. • Keep the antennas away from metallic parts of the unit, connecting cords, and the AC power cord. Speaker cord (blue/black) From right main speaker terminals Speaker cord (red/black) From - JVC MXDVA5 | Instructions - Page 11
Continued Connecting Other Equipment • DO NOT connect any equipment while the power is on. • DO NOT plug in any equipment until all connections are complete. To connect the TV Connect your TV and this unit using the composite video cord (supplied) or an S-video cord (not supplied). • After - JVC MXDVA5 | Instructions - Page 12
. It will start automatically again (if no operation is done for 2 minutes) until you cancel it by pressing CANCEL/DEMO. To start the display demonstration manually Press and hold CANCEL/DEMO again for more CANCEL /DEMO than 2 seconds. - 9 - - JVC MXDVA5 | Instructions - Page 13
Common Operations Turning On and Off the Power To turn on the unit, press STANDBY STANDBY/ON so that the STANDBY STANDBY/ON lamp goes off. • When the unit is turned on, the DVD VIDEO lamp on the unit lights up. Continued 3 Press ¢ or 4 to adjust PRESET the minute, then press SET. NEXT - JVC MXDVA5 | Instructions - Page 14
Adjusting the Volume Reinforcing the Bass Sound You can adjust the volume level only while the unit is turned on. Turn the VOLUME control clockwise to increase the volume or counterclockwise to decrease it. • The volume level can be adjusted in 32 steps (VOL MIN, VOL 1 - VOL 30, and VOL MAX). - JVC MXDVA5 | Instructions - Page 15
Selecting the Sound Modes This function only affects the playback sound, but does not affect your recording. You can select one of the 6 preset sound modes (3 surround modes and 3 SEA - Sound Effect Amplifier - modes). * Surround elements are added to the SEA elements to create a being-there - JVC MXDVA5 | Instructions - Page 16
Listening to FM and AM Broadcasts Tuning in a Station 1 Press FM/AM. The unit automatically turns on and tunes in the previously tuned station (either FM or AM). • Each time you press the button, the band alternates between FM and AM. 2 Start searching for stations. On the unit: Press and hold - JVC MXDVA5 | Instructions - Page 17
VCD discs, their actual operations may be different from what is explained in this manual. This is due to the disc programming and disc structure, but not a malfunction conditions.) • Before playing back CD-Rs or CD-RWs, read their instructions or cautions carefully. • Some CD-Rs or CD-RWs may not be - JVC MXDVA5 | Instructions - Page 18
Basic Disc Operations Loading Discs 1 Press 0. The unit automatically turns on and the carrousel comes out. 2 Place one or two discs correctly on the front slots of the carrousel, with its label side up. CORRECT INCORRECT • When using a CD single (8 cm), place it on the inner circle of the disc - JVC MXDVA5 | Instructions - Page 19
When playing back CDs and VCD without PBC function, all loaded discs can be played continuously When 3 discs are loaded on the disc trays, they are played in one of the following sequences. • When DVD1 is pressed : DVD1 ] DVD2 ] DVD3 (then stops) • When DVD2 is pressed : DVD2 ] DVD3 ] DVD1 (then - JVC MXDVA5 | Instructions - Page 20
DVD Playback Some DVDs contain several audio languages, subtitles, and multi-angle views. When you find the following marks on the DVD or its package, you can select these elements recorded on the DVD. Showing the On-Screen Bar You can show the following information on the TV screen while a disc - JVC MXDVA5 | Instructions - Page 21
Continued Selecting the Subtitles While playing a disc containing subtitles in different languages, you can select the subtitle to be displayed on the TV screen. • You can set your favorite subtitle language as the initial language shown on the TV screen. (See page 28.) On the remote control ONLY: - JVC MXDVA5 | Instructions - Page 22
Disc menu-driven playback is possible while playing back a DVD with menus. • When operating a disc using the disc menu, refer also to the instructions supplied with the disc. DVD discs generally have their own menus or title lists. A menu usually contains various information about the disc and - JVC MXDVA5 | Instructions - Page 23
Continued Searching for a Particular Point You can search for a particular portion while playing a disc- Variable Speed Forward/Reverse Search. • No sound comes out during Variable Speed Forward/ Reverse Search. 7 Variable Speed Forward Search To fast-forward the chapter, press ¡ during play. • - JVC MXDVA5 | Instructions - Page 24
Programming the Playing Order of the Chapters-Program Play You can arrange the chapter playback order before you start playing. You can program up to 20 steps. • Before making a program, make sure that the TV is turned on and the correct input is selected on the TV. On the remote control ONLY: 1 - JVC MXDVA5 | Instructions - Page 25
To modify the program You can modify the program while the PROGRAM MENU screen is shown on the TV screen. To erase a step: press Cursor ∞ (or 5) to select (highlight) an unwanted program step, then press CLEAR. To modify a step: press Cursor ∞ (or 5) to select (highlight) a program step you want to - JVC MXDVA5 | Instructions - Page 26
. • When "3" or "SELECT" is displayed on the TV screen, press DVD 6 to start playback. • When operating a disc using the disc menu, refer also to the instructions supplied with the disc. To go to the next menu Press NEXT. To return to the previous menu Press PREV. or RETURN. To cancel the - JVC MXDVA5 | Instructions - Page 27
Continued Moving to a Particular Portion Directly You can move to a particular portion in the track directly. On the remote control ONLY: 1 Press GO TO during play or pause. • Each time you press the button, the following indication appears on the TV screen. TIME TRACK TIME - - : - - Canceled TIME - JVC MXDVA5 | Instructions - Page 28
Repeating Playback 7 Repeat Play • Repeat play cannot be used on a VCD with the PBC function. To repeat playback, press REPEAT repeatedly REPEAT during play. • Each time you press the button, repeat mode changes as follows: REP. ONE REP. ALL REP. OFF • REP. ONE : Current track will be - JVC MXDVA5 | Instructions - Page 29
Continued Programming the Playing Order of the Tracks-Program Play You can arrange the track playback order before you start playing. You can program up to 20 steps. • Before making a program, make sure that the TV is turned on and the correct input is selected on the TV. On the remote control - JVC MXDVA5 | Instructions - Page 30
To check the programed contents You can check the programed contents by pressing PLAY MODE. The PROGRAM MENU screen appears on the TV screen. • If you press the button during play, the program play will stop. 2 Press STILL repeatedly to advance the picture frame by frame. • Each time you press the - JVC MXDVA5 | Instructions - Page 31
Setting up the DVD Operations Continued On the Setup menu, you can perform two important settings-language selection (LANGUAGE) and system setting (SYSTEM). • Setup menu can only be displayed while a disc is not playing. (The DVD player must be selected as the playback source.) • You can only use - JVC MXDVA5 | Instructions - Page 32
Setting the DVD Preference (System) You can set the DVD preference to match it to your usage and operating circumstances. On the system setting menu, you can set the following: VIDEO OUTPUT : You can select the video output jack on the rear to use. • YUV • S-VIDEO : Select when you connect your - JVC MXDVA5 | Instructions - Page 33
Setting the Parental Lock Using this function, you can restrict playback of DVD containing violent scenes and those not suitable for your family members. Nobody can play such a disc unless this function is canceled. ("PARENTAL LEVEL" appears on the display if you try to play back such a disc.) • - JVC MXDVA5 | Instructions - Page 34
back only type I tape. 1 Press EJECT (0) for the deck you want to use. EJECT EJECT For Deck B For Deck A 2 Put a cassette in with the exposed part of the tape down. When the tape plays to the end, the deck automatically stops if the Reverse Mode is canceled. (See "To play both - JVC MXDVA5 | Instructions - Page 35
. Pinch rollers Capstans 2 Put a recordable cassette in with the exposed part of the tape down. 3 Close the cassette holder gently. 4 Check the heads Turn off the unit, and use a head demagnetizer (available at electronics and audio shops). To record on both sides - Reverse Mode Press REVERSE - JVC MXDVA5 | Instructions - Page 36
Dubbing Tapes When dubbing on tapes, it is recommended to dub on the tapes of the same length and of the same quality as used for source tapes. On the unit ONLY: 1 Press TAPE 2 3, then 7. 2 Put the source cassette in deck A, and a recordable cassette into deck B. 3 Press DUBBING. ART DUBBING - JVC MXDVA5 | Instructions - Page 37
Using the Timers Continued There are three timers available - Daily Timer, Recording Timer, and Sleep Timer. 2 Press CLOCK/TIMER again. CLOCK / TIMER "ON TIME" appears for 2 seconds, then the Before using the timers, you need to set the clock built in the unit enters on-time setting mode. - JVC MXDVA5 | Instructions - Page 38
6 When you have selected PRESET Using Recording Timer NEXT "TUNER FM" or PREV. "TUNER AM" in step 5, With Recording Timer, you can make a tape of a radio select a preset station broadcast automatically. You can set the timer whether the number. unit is on or off. Press 4 or ¢ to select - JVC MXDVA5 | Instructions - Page 39
Continued 4 Set the on-time you want PRESET NEXT the unit to turn on. PREV. 1) Press 4 or ¢ to set the hour, then press SET. 2) Press 4 or ¢ to set the minute, then press SET. "OFF TIME" appears for 2 seconds, then SET the unit enters off-time setting mode. 5 Set the off-time you want - JVC MXDVA5 | Instructions - Page 40
Maintenance To get the best performance of the unit, keep your discs, tapes, and mechanism clean. Handling discs • Remove the disc from its case by holding it at the edge while pressing the center hole lightly. • Do not touch the shiny surface of the disc, or bend the disc. • Put the disc back in - JVC MXDVA5 | Instructions - Page 41
Troubleshooting If you are having a problem with your unit, check this list for a possible solution before calling for service. If you cannot solve the problem from the hints given here, or the unit has been physically damaged, call a qualified person, such as your dealer, for service. FM/AM DISC - JVC MXDVA5 | Instructions - Page 42
Glossary Dolby Digital This is a digital audio compression format that was developed by Dolby Laboratories. Dolby Digital encoding method (socalled discrete 5.1 channel digital audio format) records and compresses the left front channel, right front channel, center channel, left rear channel, right - JVC MXDVA5 | Instructions - Page 43
to change without notice. Amplifier section - CA-MXDVA5 Output Power SUBWOOFERS: MAIN SPEAKERS: 80 W 17 5/8 in.) 9.9 kg (21.9 lbs) Supplied accessories See page 6. Speaker section - SP-MXDVA5 Type: 3-way bass-reflex type Twin Hyper Power-Drive Subwoofer Speaker units: Subwoofer: 13.5 cm - JVC MXDVA5 | Instructions - Page 44
television yourself Caution To prevent electrical shock, do not open the cabinet. There are no user serviceable parts inside. Please refer to qualified service personnel for repairs. Accessories To purchase accessories for your JVC product, please call toll free:1 (800)882-2345 or on the web at www - JVC MXDVA5 | Instructions - Page 45
below. ("The Warranty Period") PARTS 1 YR LABOR 1 YR of explanation of the problem to the nearest JVC Factory Service Center, the name Manual, normal maintenance, video and audio head cleaning; 4. Damage that occurs in shipment, due to act of God, and cosmetic damage; 5. Signal reception problems - JVC MXDVA5 | Instructions - Page 46
VICTOR COMPANY OF JAPAN, LIMITED EN VJ C 0801KSMMDWSAM - JVC MXDVA5 | Instructions - Page 47
Composé du CA-MXDVA5 et SP-MXDVA5 SP-MXDVA5 CA-MXDVA5 SP-MXDVA5 STANDBY STANDBY/ON DISC CHANGE CD-R/RW PLAYBACK SOUND MODE SUBWOOFER LEVEL COMPACT DIGITAL VIDEO / PHONES CLOCK / TIMER DISPLAY SELECT REPEAT TUNING REC START CD /STOP REC START DUBBING TAPE A TAPE B INSTRUCTIONS MANUEL - JVC MXDVA5 | Instructions - Page 48
NOT REMOVE COVER (OR BACK). NO USER SERVICEABLE PARTS INSIDE. REFER SERVICING TO QUALIFIED SERVICE PERSONNEL. The lightning flash with arrowhead symbol, user to the presence of important operating and maintenance (servicing) instructions in the literature accompanying the appliance. For U.S.A. This - JVC MXDVA5 | Instructions - Page 49
English Français For Canada/pour le Canada CAUTION: TO PREVENT ELECTRIC SHOCK, MATCH WIDE BLADE OF PLUG TO WIDE SLOT, FULLY INSERT. ATTENTION: POUR EVITER LES CHOCS ELECTRIQUES, INTRODUIRE LA LAME LA PLUS LARGE DE LA FICHE DANS LA BORNE CORRESPONDANTE DE LA PRISE ET POUSSER JUSQUAU FOND. For - JVC MXDVA5 | Instructions - Page 50
JVC products. Before operating this unit, read this manual carefully and thoroughly to obtain the best possible performance from your unit, and retain this manual for future reference. About This Manual This manual the unit since there are no user serviceable parts inside. If anything goes wrong, - JVC MXDVA5 | Instructions - Page 51
CD Synchronized Recording 33 Using the Timers 34 Using Daily Timer 34 Using Recording Timer 35 Using Sleep Timer 36 Timer Priority 36 Maintenance 37 Troubleshooting 38 Glossary 39 Specifications 40 - 2 - - JVC MXDVA5 | Instructions - Page 52
English Location of the Buttons and Controls Become familiar with the buttons and controls on your unit. Front Panel 1 2 3 4 5 6 7 8 9 p q w e r t STANDBY STANDBY/ON DISC CHANGE CD-R/RW PLAYBACK SOUND MODE SUBWOOFER LEVEL COMPACT DIGITAL VIDEO PHONES CLOCK / TIMER DISPLAY SELECT REPEAT - JVC MXDVA5 | Instructions - Page 53
English Display Window 1 2 Continued 3 45 6 7 8 9 See pages in the parentheses for details. Front Panel 1 Carrousel 2 STANDBY/ON button and STANDBY lamp (10, 35, 36) 3 7 (stop) button (15, 21, 23, 26, 32, 33) 4 SET button (10, 13, 34 - 36) 5 CANCEL/DEMO button (9, 10, 34 - 36) 6 Display - JVC MXDVA5 | Instructions - Page 54
/SLOW button (13, 22, 27) k FADE MUTING button (11) l SUBWOOFER LEVEL + / - buttons (11) / 3D SOUND button (12) How to open the front lid Press center part of the lid and pull down. When using the remote control, point it at the remote sensor on the front panel. - 5 - - JVC MXDVA5 | Instructions - Page 55
English Getting Started Continued Unpacking After unpacking, check to be sure that you have all the following items. The number in the parentheses indicates the quantity of the pieces supplied. • AM loop antenna (1) • FM antenna (1) • Remote control (1) • Batteries (2) • Composite video cord (1) - JVC MXDVA5 | Instructions - Page 56
of both FM and AM • Make sure the antenna conductors do not touch any other terminals and connecting cords. • Keep the antennas away from metallic parts of the unit, connecting cords, and the AC power cord. Speaker cord (blue/black) From right main speaker terminals Speaker cord (red/black) From - JVC MXDVA5 | Instructions - Page 57
English Continued Connecting Other Equipment • DO NOT connect any equipment while the power is on. • DO NOT plug in any equipment until all connections are complete. To connect the TV Connect your TV and this unit using the composite video cord (supplied) or an S-video cord (not supplied). • After - JVC MXDVA5 | Instructions - Page 58
. It will start automatically again (if no operation is done for 2 minutes) until you cancel it by pressing CANCEL/DEMO. To start the display demonstration manually Press and hold CANCEL/DEMO again for more CANCEL /DEMO than 2 seconds. - 9 - - JVC MXDVA5 | Instructions - Page 59
English Common Operations Turning On and Off the Power To turn on the unit, press STANDBY STANDBY/ON so that the STANDBY STANDBY/ON lamp goes off. • When the unit is turned on, the DVD VIDEO lamp on the unit lights up. Continued 3 Press ¢ or 4 to adjust PRESET the minute, then press SET - JVC MXDVA5 | Instructions - Page 60
English Adjusting the Volume Reinforcing the Bass Sound You can adjust the volume level only while the unit is turned on. Turn the VOLUME control clockwise to increase the volume or counterclockwise to decrease it. • The volume level can be adjusted in 32 steps (VOL MIN, VOL 1 - VOL 30, and VOL - JVC MXDVA5 | Instructions - Page 61
English Selecting the Sound Modes This function only affects the playback sound, but does not affect your recording. You can select one of the 6 preset sound modes (3 surround modes and 3 SEA - Sound Effect Amplifier - modes). * Surround elements are added to the SEA elements to create a being- - JVC MXDVA5 | Instructions - Page 62
English Listening to FM and AM Broadcasts Tuning in a Station 1 Press FM/AM. The unit automatically turns on and tunes in the previously tuned station (either FM or AM). • Each time you press the button, the band alternates between FM and AM. 2 Start searching for stations. On the unit: Press - JVC MXDVA5 | Instructions - Page 63
VCD discs, their actual operations may be different from what is explained in this manual. This is due to the disc programming and disc structure, but not a malfunction conditions.) • Before playing back CD-Rs or CD-RWs, read their instructions or cautions carefully. • Some CD-Rs or CD-RWs may not be - JVC MXDVA5 | Instructions - Page 64
English Basic Disc Operations Loading Discs 1 Press 0. The unit automatically turns on and the carrousel comes out. 2 Place one or two discs correctly on the front slots of the carrousel, with its label side up. CORRECT INCORRECT • When using a CD single (8 cm), place it on the inner circle of - JVC MXDVA5 | Instructions - Page 65
English When playing back CDs and VCD without PBC function, all loaded discs can be played continuously When 3 discs are loaded on the disc trays, they are played in one of the following sequences. • When DVD1 is pressed : DVD1 ] DVD2 ] DVD3 (then stops) • When DVD2 is pressed : DVD2 ] DVD3 ] DVD1 - JVC MXDVA5 | Instructions - Page 66
English DVD Playback Some DVDs contain several audio languages, subtitles, and multi-angle views. When you find the following marks on the DVD or its package, you can select these elements recorded on the DVD. Showing the On-Screen Bar You can show the following information on the TV screen while - JVC MXDVA5 | Instructions - Page 67
English Continued Selecting the Subtitles While playing a disc containing subtitles in different languages, you can select the subtitle to be displayed on the TV screen. • You can set your favorite subtitle language as the initial language shown on the TV screen. (See page 28.) On the remote - JVC MXDVA5 | Instructions - Page 68
Disc menu-driven playback is possible while playing back a DVD with menus. • When operating a disc using the disc menu, refer also to the instructions supplied with the disc. DVD discs generally have their own menus or title lists. A menu usually contains various information about the disc and - JVC MXDVA5 | Instructions - Page 69
English Continued Searching for a Particular Point You can search for a particular portion while playing a disc- Variable Speed Forward/Reverse Search. • No sound comes out during Variable Speed Forward/ Reverse Search. 7 Variable Speed Forward Search To fast-forward the chapter, press ¡ during - JVC MXDVA5 | Instructions - Page 70
English Programming the Playing Order of the Chapters-Program Play You can arrange the chapter playback order before you start playing. You can program up to 20 steps. • Before making a program, make sure that the TV is turned on and the correct input is selected on the TV. On the remote control - JVC MXDVA5 | Instructions - Page 71
English To modify the program You can modify the program while the PROGRAM MENU screen is shown on the TV screen. To erase a step: press Cursor ∞ (or 5) to select (highlight) an unwanted program step, then press CLEAR. To modify a step: press Cursor ∞ (or 5) to select (highlight) a program step you - JVC MXDVA5 | Instructions - Page 72
. • When "3" or "SELECT" is displayed on the TV screen, press DVD 6 to start playback. • When operating a disc using the disc menu, refer also to the instructions supplied with the disc. To go to the next menu Press NEXT. To return to the previous menu Press PREV. or RETURN. To cancel the - JVC MXDVA5 | Instructions - Page 73
English Continued Moving to a Particular Portion Directly You can move to a particular portion in the track directly. On the remote control ONLY: 1 Press GO TO during play or pause. • Each time you press the button, the following indication appears on the TV screen. TIME TRACK TIME - - : - - - JVC MXDVA5 | Instructions - Page 74
English Repeating Playback 7 Repeat Play • Repeat play cannot be used on a VCD with the PBC function. To repeat playback, press REPEAT repeatedly REPEAT during play. • Each time you press the button, repeat mode changes as follows: REP. ONE REP. ALL REP. OFF • REP. ONE : Current track - JVC MXDVA5 | Instructions - Page 75
English Continued Programming the Playing Order of the Tracks-Program Play You can arrange the track playback order before you start playing. You can program up to 20 steps. • Before making a program, make sure that the TV is turned on and the correct input is selected on the TV. On the remote - JVC MXDVA5 | Instructions - Page 76
English To check the programed contents You can check the programed contents by pressing PLAY MODE. The PROGRAM MENU screen appears on the TV screen. • If you press the button during play, the program play will stop. 2 Press STILL repeatedly to advance the picture frame by frame. • Each time you - JVC MXDVA5 | Instructions - Page 77
English Setting up the DVD Operations Continued On the Setup menu, you can perform two important settings-language selection (LANGUAGE) and system setting (SYSTEM). • Setup menu can only be displayed while a disc is not playing. (The DVD player must be selected as the playback source.) • You can - JVC MXDVA5 | Instructions - Page 78
English Setting the DVD Preference (System) You can set the DVD preference to match it to your usage and operating circumstances. On the system setting menu, you can set the following: VIDEO OUTPUT : You can select the video output jack on the rear to use. • YUV • S-VIDEO : Select when you - JVC MXDVA5 | Instructions - Page 79
English Setting the Parental Lock Using this function, you can restrict playback of DVD containing violent scenes and those not suitable for your family members. Nobody can play such a disc unless this function is canceled. ("PARENTAL LEVEL" appears on the display if you try to play back such a - JVC MXDVA5 | Instructions - Page 80
back only type I tape. 1 Press EJECT (0) for the deck you want to use. EJECT EJECT For Deck B For Deck A 2 Put a cassette in with the exposed part of the tape down. When the tape plays to the end, the deck automatically stops if the Reverse Mode is canceled. (See "To play both - JVC MXDVA5 | Instructions - Page 81
. Pinch rollers Capstans 2 Put a recordable cassette in with the exposed part of the tape down. 3 Close the cassette holder gently. 4 Check the heads Turn off the unit, and use a head demagnetizer (available at electronics and audio shops). To record on both sides - Reverse Mode Press REVERSE - JVC MXDVA5 | Instructions - Page 82
English Dubbing Tapes When dubbing on tapes, it is recommended to dub on the tapes of the same length and of the same quality as used for source tapes. On the unit ONLY: 1 Press TAPE 2 3, then 7. 2 Put the source cassette in deck A, and a recordable cassette into deck B. 3 Press DUBBING. ART - JVC MXDVA5 | Instructions - Page 83
English Using the Timers Continued There are three timers available - Daily Timer, Recording Timer, and Sleep Timer. 2 Press CLOCK/TIMER again. CLOCK / TIMER "ON TIME" appears for 2 seconds, then the Before using the timers, you need to set the clock built in the unit enters on-time setting - JVC MXDVA5 | Instructions - Page 84
English 6 When you have selected PRESET Using Recording Timer NEXT "TUNER FM" or PREV. "TUNER AM" in step 5, With Recording Timer, you can make a tape of a radio select a preset station broadcast automatically. You can set the timer whether the number. unit is on or off. Press 4 or ¢ to - JVC MXDVA5 | Instructions - Page 85
English 4 Set the on-time you want PRESET NEXT the unit to turn on. PREV. 1) Press 4 or ¢ to set the hour, then press SET. 2) Press 4 or ¢ to set the minute, then press SET. "OFF TIME" appears for 2 seconds, then SET the unit enters off-time setting mode. 5 Set the off-time you want the - JVC MXDVA5 | Instructions - Page 86
English Maintenance To get the best performance of the unit, keep your discs, tapes, and mechanism clean. Handling discs • Remove the disc from its case by holding it at the edge while pressing the center hole lightly. • Do not touch the shiny surface of the disc, or bend the disc. • Put the disc - JVC MXDVA5 | Instructions - Page 87
English Troubleshooting If you are having a problem with your unit, check this list for a possible solution before calling for service. If you cannot solve the problem from the hints given here, or the unit has been physically damaged, call a qualified person, such as your dealer, for service. FM - JVC MXDVA5 | Instructions - Page 88
English Glossary Dolby Digital This is a digital audio compression format that was developed by Dolby Laboratories. Dolby Digital encoding method (socalled discrete 5.1 channel digital audio format) records and compresses the left front channel, right front channel, center channel, left rear - JVC MXDVA5 | Instructions - Page 89
to change without notice. Amplifier section - CA-MXDVA5 Output Power SUBWOOFERS: MAIN SPEAKERS: 80 W 5/8 in.) 9.9 kg (21.9 lbs) Supplied accessories See page 6. Speaker section - SP-MXDVA5 Type: 3-way bass-reflex type Twin Hyper Power-Drive Subwoofer Speaker units: Subwoofer: 13.5 cm - JVC MXDVA5 | Instructions - Page 90
VICTOR COMPANY OF JAPAN, LIMITED EN, FR VJ C 0901KSMMDWSAM
-
 1
1 -
 2
2 -
 3
3 -
 4
4 -
 5
5 -
 6
6 -
 7
7 -
8
-
9
-
10
-
11
-
12
-
13
-
14
-
15
-
16
-
17
-
18
-
19
-
20
-
21
-
22
-
23
-
24
-
25
-
26
-
27
-
28
-
29
-
30
-
31
-
32
-
33
-
34
-
35
-
36
-
37
-
38
-
39
-
40
-
41
-
42
-
43
-
44
-
45
-
46
-
47
-
48
-
49
-
50
-
51
-
52
-
53
-
54
-
55
-
56
-
57
-
58
-
59
-
60
-
61
-
62
-
63
-
64
-
65
-
66
-
67
-
68
-
69
-
70
-
71
-
72
-
73
-
74
-
75
-
76
-
77
-
78
-
79
-
80
-
81
-
82
-
83
-
84
-
85
-
86
-
87
-
88
-
89
-
90
 |
 |

COMPACT COMPONENT SYSTEM
MX-DVA5
—
Consists of CA-MXDVA5 and SP-MXDVA5
For Customer Use:
Enter below the Model No. and Serial
No. which are located either on the rear,
bottom or side of the cabinet. Retain this
information for future reference.
Model No.
Serial No.
LVT0701-001A
[J]
INSTRUCTIONS
SP-MXDVA5
SP-MXDVA5
CA-MXDVA5
CLOCK
/
TIMER
DISPLAY
PHONES
REPEAT
SELECT
REC START
/STOP
CD
REC START
DUBBING
TUNING
TAPE B
DISC
CHANGE
SOUND
MODE
SUBWOOFER
LEVEL
TAPE A
STANDBY/ON
STANDBY
CD-R/RW
PLAYBACK
/