JVC SR-V10U SR-V10U Instruction manual (1MB, PDF) - Page 15
Basic, Playback - tbc
 |
View all JVC SR-V10U manuals
Add to My Manuals
Save this manual to your list of manuals |
Page 15 highlights
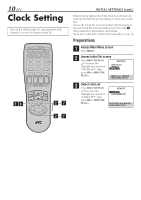
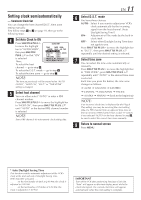
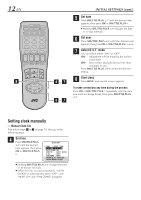
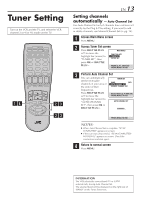
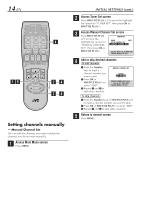
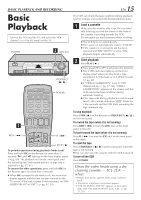
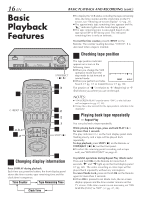
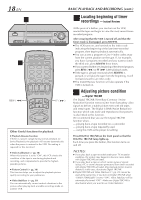
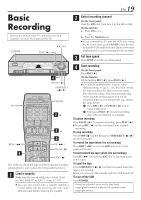
BASIC PLAYBACK AND RECORDING Basic Playback Turn on the VCR and the TV, and select the VCR channel 3 or 4 (or AV mode) on the TV. POWER 2 JOG dial POWER S VIDEO VIDEO (MONO)L-AUDIO-R REC LINK DIGITAL TBC/NR SP EP VCR A.DUB INSERT PLAY REW - FF + CH- /+ PUSH / TURN 24HR QUICK PROGRAM REC PAUSE STOP/EJECT STOP/EJECT ( 7 / 0 ) POWER 1 2 3 2 4 5 6 7 8 9 0 4 2 1 REW ( 1 ) FF ( ¡ ) 3 STOP ( 7 ) To prohibit operations during playback (Mode Lock) Press and hold OK on the Remote for more than 5 seconds. " " and " " light up on the front display panel (੬ pg. 60). The playback will not be interrupted until the recording end (unrecorded portion) or tape end is reached (੬ pg. 37, 41). To resume the other operations, press and hold OK on the Remote again for more than 5 seconds. ● When OK is pressed to set Mode Lock, the on-screen display appears and the time counter remains on the TV screen. If the time counter is not necessary, set "ON SCREEN (PLAY)" to "OFF" ( ੬ pg. 37, 39). EN 15 This VCR can check the tape condition during playback (and recording), and realizes the best possible pictures. 1 Load a cassette Make sure the window side is up, the rear label side is facing you and the arrow on the front of the cassette is pointing towards the VCR. Do not apply too much pressure when inserting. ● The VCR turns on automatically. ● The counter is automatically reset to "0:00:00". ● If the cassette's record safety tab has been removed and "REC SAFETY" is set to "ON", playback begins automatically. 2 Start playback Press PLAY ( 3 ). ● Tape speed (SP or EP) is automatically detected. ● The S-VHS indicator lights up on the front display panel when you play back a tape recorded in S-VHS mode or in S-VHS ET mode (੬ pg. 40) ● If "VIDEO CALIBRATION" is set to "ON" (default setting: ੬ pg. 37, 38), "VIDEO CALIBRATION" appears on the screen, and this VCR checks the tape condition during automatic tracking. ● If the tape ends during playback or fast-forward search, the cassette indication " " blinks for a few seconds and the VCR starts rewinding the tape automatically. To stop playback Press STOP ( 7 ) on the Remote or STOP/EJECT ( 7 / 0 ) on the front panel. To rewind the tape (when it is not running) Press REW ( 1 ) (or turn the JOG dial on the front panel to the left). To fast-forward the tape (when it is not running) Press FF ( ¡ ) (or turn the JOG dial on the front panel to the right). To eject the tape Press STOP/EJECT ( 7 / 0 ) on the front panel when the tape is not running. ● You can also eject the cassette with the VCR turned off. To turn off the VCR Press POWER. Clean the video heads using a dry cleaning cassette - TCL-2UX - when: • Rough, poor picture appears while a tape is played back. • The picture is unclear or no picture appears. • "USE CLEANING CASSETTE" appears on the screen (only with "ON SCREEN (PLAY)" set to "ON": ੬ pg. 37, 39.)
-
 1
1 -
2
-
3
-
4
-
5
-
6
-
7
-
8
-
9
-
 10
10 -
 11
11 -
 12
12 -
 13
13 -
 14
14 -
 15
15 -
 16
16 -
 17
17 -
 18
18 -
 19
19 -
 20
20 -
21
-
22
-
23
-
24
-
25
-
26
-
27
-
28
-
29
-
30
-
31
-
32
-
33
-
34
-
35
-
36
-
37
-
38
-
39
-
40
-
41
-
42
-
43
-
44
-
45
-
46
-
47
-
48
-
49
-
50
-
51
-
52
-
53
-
54
-
55
-
56
-
57
-
58
-
59
-
60
-
61
-
62
-
63
-
64
 |
 |
