JVC SR-V10U SR-V10U Instruction manual (1MB, PDF) - Page 47
Audio Dubbing
 |
View all JVC SR-V10U manuals
Add to My Manuals
Save this manual to your list of manuals |
Page 47 highlights
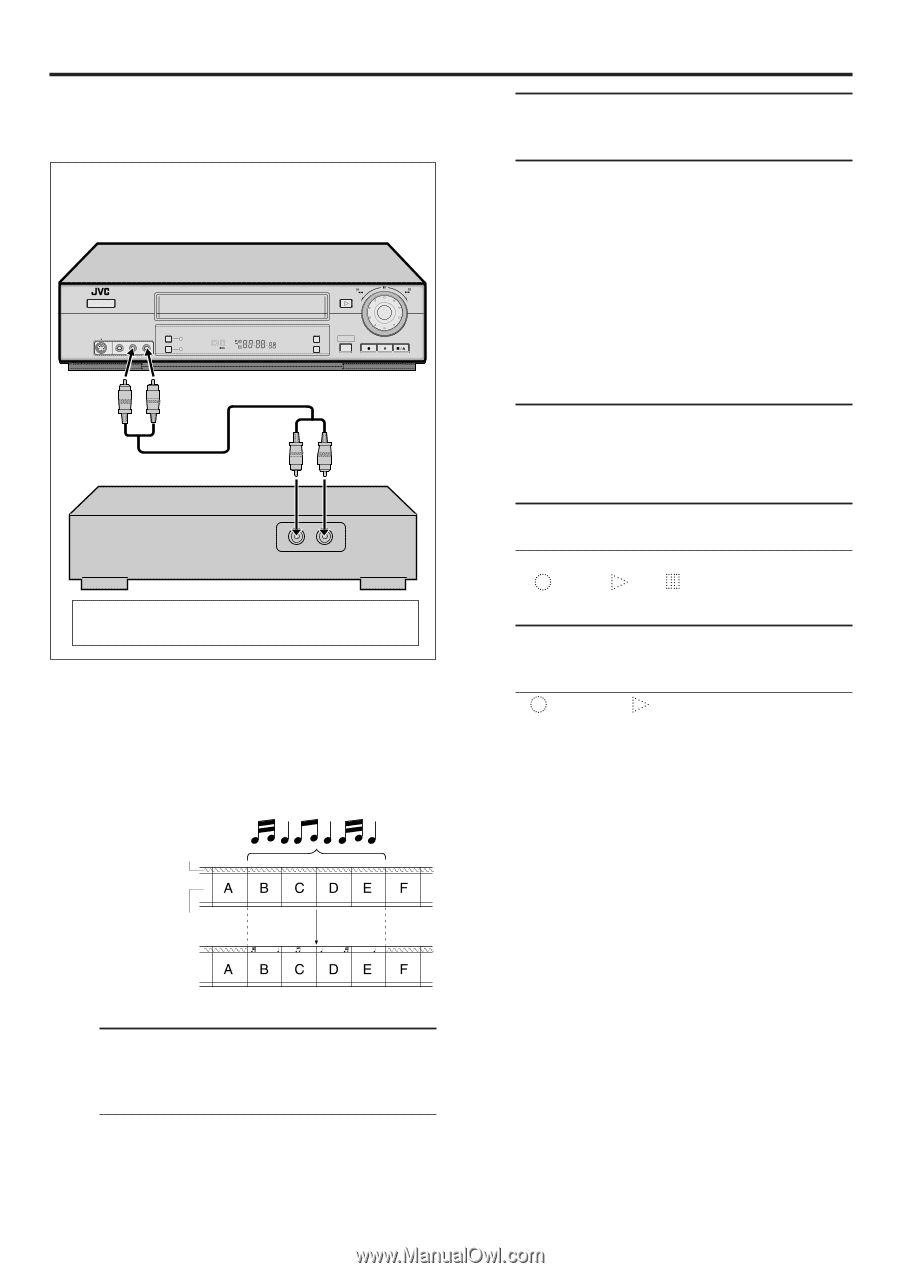
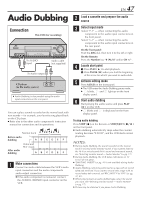
Audio Dubbing Connection This VCR (for recording) POWER S VIDEO VIDEO (MONO)L-AUDIO-R REC LINK DIGITAL TBC/NR SP EP VCR To AUDIO input A.DUB INSERT PLAY REW - FF + CH- /+ PUSH / TURN 24HR QUICK PROGRAM REC PAUSE STOP/EJECT Audio cable (not supplied) To Audio output CD player (as the audio source) ● Audio Dubbing is also possible using the audio input connectors on the rear panel. You can replace sounds recorded on the normal track with new sounds - for example, your favorite song played back on the CD player. ● Refer also to the other audio component's instruction manual for connection and its operations. Normal track Before audio dubbing After audio dubbing Video and Hi-Fi track 1 Make connections Connect an audio cable between the VCR's audio input connectors and the audio component's audio output connectors. ● If the audio component is monaural, connect the AUDIO L (MONO) input connector on the VCR. EN 47 2 Load a cassette and prepare the audio source 3 Select input mode Select "F-1" - when connecting the audio component to the audio input connectors on the front panel. Select "L-1" - when connecting the audio component to the audio input connectors on the rear panel. On the front panel: Push the JOG dial, then turn it to the left or right. On the Remote: Press the Number key "0 (AUX)" and/or CH +/-. 4 Locate start point 1 Press PLAY ( 3 ) to start playback. 2 Press PAUSE ( 8 ) when you find the beginning of the scene for which you want to audio-dub. 5 Activate editing mode Press A.DUB on the front panel. ● The VCR enters the Audio Dubbing pause mode. ● blinks, and light up on the front display panel. 6 Start audio dubbing Start playing the audio source and press PLAY ( 3 ) on this VCR. ● blinks and display panel. is displayed on the front To stop audio dubbing Press STOP ( 7 ) on the Remote or STOP/EJECT ( 7 / 0 ) on the front panel. ● Audio dubbing automatically stops when the counter reading becomes "0:00:00", and the VCR starts normal playback. NOTES: ● During Audio Dubbing, the sound recorded on the normal track is selected as the monitor sound. If you want to listen to the Hi-Fi or mixed sound (Hi-Fi sound and monaural sound), see "Selecting monitor sound - Audio Monitor" (੬ pg. 17). ● During Audio Dubbing, the VCR status indications on TV screen do not apear. ● "DAY/TIME INSERT" (੬ pg. 41) is not available during Audio Dubbing. ● Audio Dubbing cannot be performed on a tape with its record safety tab removed. If you want to record onto a tape with its record safety tab removed, set "REC SAFETY" to "OFF" (੬ pg. 37, 41). ● When playing back an audio-dubbed tape, select the sound you want. See "Selecting monitor sound - Audio Monitor" (੬ pg. 17). ● Picture may be distorted if you pause Audio Dubbing.
-
 1
1 -
2
-
3
-
4
-
5
-
6
-
7
-
8
-
9
-
10
-
11
-
12
-
13
-
14
-
15
-
16
-
17
-
18
-
19
-
20
-
21
-
22
-
23
-
24
-
25
-
26
-
27
-
28
-
29
-
30
-
31
-
32
-
33
-
34
-
35
-
36
-
37
-
38
-
39
-
40
-
41
-
 42
42 -
 43
43 -
 44
44 -
 45
45 -
 46
46 -
 47
47 -
 48
48 -
 49
49 -
 50
50 -
 51
51 -
 52
52 -
53
-
54
-
55
-
56
-
57
-
58
-
59
-
60
-
61
-
62
-
63
-
64
 |
 |