JVC SR-V10U SR-V10U Instruction manual (1MB, PDF) - Page 62
Remote
 |
View all JVC SR-V10U manuals
Add to My Manuals
Save this manual to your list of manuals |
Page 62 highlights
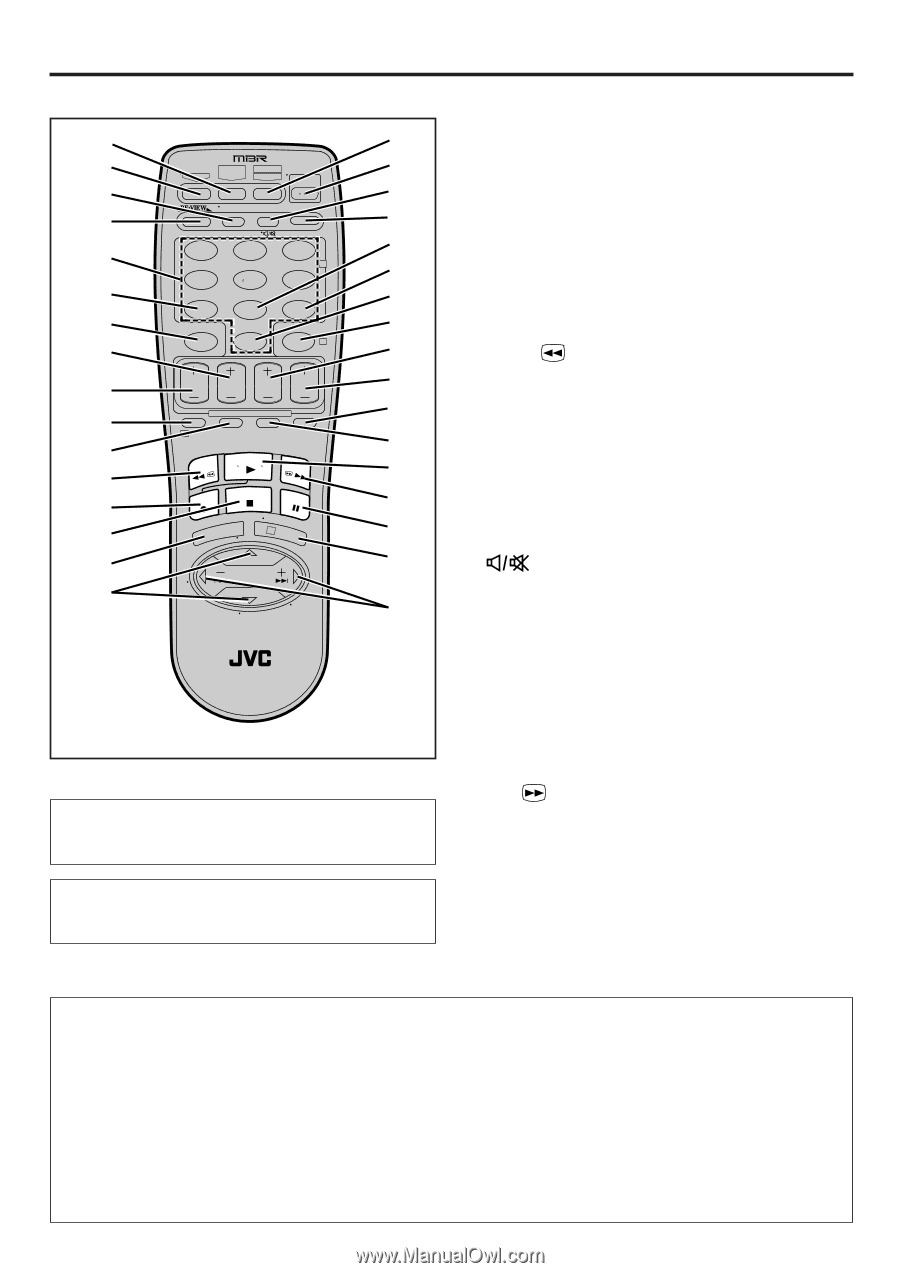
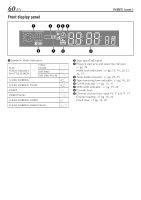
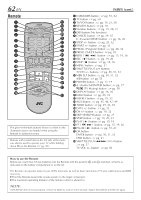
62 EN Remote 1 2 3 4 5 6 7 8 9 0 ! @ # $ % ^ CABLE/ MBR SET TV DBS A/B POWER TV/VCR A. MONITOR DISPLAY 1 4 DBS 7 C. RESET CANCEL 2 5 DAILY 8 AUX 0 3 2 6 WEEKLY 9 TIMER 4 START STOP DATE CH EXPRESS PROGRAMMING 1 PROG PROG CHECK SP/EP SKIP SEARCH PLAY REW FF REC STOP PAUSE MENU TV CH + ENTER/OSD 3 OK OL + TV VO SHUTTLE PLUS L- TV V TV CH - MULTI BRAND REMOTE CONTROL UNIT & * ( ) q w e r t y u i o p Q W E The glow-in-the-dark buttons shown in white on the illustration above are helpful when using the Remote in darkened rooms. Buttons with a small dot on the left side of the name can also be used to operate your TV while holding down TV on the Remote. (੬ pg. 50). INDEX (cont.) 1 CABLE/DBS button : ੬ pg. 51, 52 2 TV button: ੬ pg. 50 3 TV/VCR button : ੬ pg. 19, 21, 50 4 REVIEW button : ੬ pg. 18 5 Number buttons : ੬ pg. 19, 28, 31 6 DBS button (No function) 7 CANCEL button : ੬ pg. 29, 35 C. (Counter) RESET button : ੬ pg. 16, 20 8 STOP +/- button : ੬ pg. 29, 32 9 START +/- button : ੬ pg. 32 0 PROG. (Program) button : ੬ pg. 28, 32 ! PROG. CHECK button : ੬ pg. 35 @ REW ( 1 ) button : ੬ pg. 15, 19, 26 # REC ( ¶ ) button : ੬ pg. 19, 20 $ STOP ( 7 ) button : ੬ pg. 15, 16 % MENU button : ੬ pg. 37 ^ SHUTTLE PLUS %fi buttons TV CH +/- buttons : ੬ pg. 50, 51, 52 & MBR SET button : ੬ pg. 50, 51, 52 A/B button : ੬ pg. 53 * POWER button : ੬ pg. 17, 19 ( A. (Audio) MONITOR button : ੬ pg. 17 (TV Muting) button : ੬ pg. 50 ) DISPLAY button : ੬ pg. 16, 20 q DAILY button : ੬ pg. 29, 33 w WEEKLY button : ੬ pg. 29, 33 e AUX button : ੬ pg. 45, 46, 47, 49 r TIMER button : ੬ pg. 29, 33, 35 t DATE +/- button : ੬ pg. 32 y CH +/- button : ੬ pg. 19, 32 u SKIP SEARCH button : ੬ pg. 27 i SP/EP button : ੬ pg. 19, 29, 33 o PLAY ( 3 ) button: ੬ pg. 15, 19 p FF ( ¡ ) button: ੬ pg. 15, 19, 26 Q PAUSE ( 8 ) button: ੬ pg. 19, 27 W OK button ENTER button : ੬ pg. 50, 51, 52 OSD button : ੬ pg. 21 E SHUTTLE PLUS 4 ¢ (@ #) button : ੬ pg. 27 TV VOL +/- button : ੬ pg. 50 How to use the Remote Before use, insert two AA size batteries into the Remote with the polarity (ª and ·) matched correctly as indicated on the battery compartment or on the lid. The Remote can operate most of your VCR's functions, as well as basic functions of TV sets, cable boxes and DBS receivers. ● Point the Remote toward the remote sensor on the target component. ● The maximum operating distance of the remote control is about 8 m. NOTE: If the Remote does not work properly, remove its batteries, wait for a few seconds, replace the batteries and then try again.
-
 1
1 -
2
-
3
-
4
-
5
-
6
-
7
-
8
-
9
-
10
-
11
-
12
-
13
-
14
-
15
-
16
-
17
-
18
-
19
-
20
-
21
-
22
-
23
-
24
-
25
-
26
-
27
-
28
-
29
-
30
-
31
-
32
-
33
-
34
-
35
-
36
-
37
-
38
-
39
-
40
-
41
-
42
-
43
-
44
-
45
-
46
-
47
-
48
-
49
-
50
-
51
-
52
-
53
-
54
-
55
-
56
-
 57
57 -
 58
58 -
 59
59 -
 60
60 -
 61
61 -
 62
62 -
 63
63 -
 64
64
 |
 |