JVC TH-L1 Instructions
JVC TH-L1 - 5.0-CH Home Theater Speaker Sys Manual
 |
UPC - 046838029097
View all JVC TH-L1 manuals
Add to My Manuals
Save this manual to your list of manuals |
JVC TH-L1 manual content summary:
- JVC TH-L1 | Instructions - Page 1
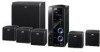
DIGITAL MEDIA SYSTEM TH-L1 Consists of AX-THL1, SP-THL1W, SP-THL1F, SP-THL1C and SP-THL1S INSTRUCTIONS For Customer Use: Enter below the Model No. and Serial No. which are located either on the rear, bottom or side of the cabinet. Retain - JVC TH-L1 | Instructions - Page 2
button in any position does not disconnect the mains line. • When the system is on standby, the STANDBY lamp lights red. • When the system is turned on, the STANDBY lamp goes off. The power can be remote controlled. ATTENTION-Touche Déconnectez la fiche secteur pour mettre l'appareil complètement - JVC TH-L1 | Instructions - Page 3
operate the equipment. CAUTION Excessive sound pressure from earphones or headphones can cause hearing loss. ATTENTION Une pression acoustique excessive des écouteurs ou du casque d'écoute peut entraîner une perte auditive. For Canada/pour le Canada THIS DIGITAL APPARATUS DOES NOT EXCEED THE CLASS - JVC TH-L1 | Instructions - Page 4
poser l'appareil sur une surface plate. Le dégagement minimum est indiqué ci-dessous: Front view/Face 15 cm (5-15/16") AX-THL1 Side view/Côté Wall or obstructions/Mur, ou obstruction AX-THL1 Wall or obstructions Mur, ou obstruction 15 cm (5-15/16") 15 cm (5-15/16") 15 cm (5-15/16") Front Avant - JVC TH-L1 | Instructions - Page 5
2 Notes on handling 2 Supplied accessories 2 About files 3 Playable file types for the USB MEMORY 3 Index of parts and controls 4 Front panel (center unit 4 Rear panel (center unit 5 Remote control 6 Connections 7 Connecting the speakers and subwoofer 7 Speaker layout 8 Connecting a TV - JVC TH-L1 | Instructions - Page 6
countries. • HDMI, the HDMI logo and High-Definition Multimedia Interface are trademarks or registered trademarks of HDMI licensing LLC. • HDCP is the abbreviation of "High-Bandwidth Digital Content Protection," and is the high-reliable copy control technology licensed by Digital Content Protection - JVC TH-L1 | Instructions - Page 7
different kinds of files are mixed, set the FILE TYPE setting in the PICTURE menu to the appropriate setting for the data to be read ("AUDIO", "STILL PICTURE" or "VIDEO"). (See page 30.) For MP3/WMA/WAV files • The system supports MP3/WMA files recorded at a bit rate of 32 - 320 kbps and a sampling - JVC TH-L1 | Instructions - Page 8
Index of parts and controls The numbers in the figures indicate the pages where the details of the parts are described. Front panel (center unit) Display window 28 27 17 19 26 18 22 12 12 12 12 13 13 17 4 16 16 16 17 16, 20, 22, 25 20, 23 22 20, 23 Remote sensor: 6 16 - JVC TH-L1 | Instructions - Page 9
Index of parts and controls Rear panel (center unit) 11 9, 10, 11 7 9, 10, 11 13 9, 10, 11 10 10, 11 5 - JVC TH-L1 | Instructions - Page 10
like. 24 15, 23 28 15, 20, 22, 25 15, 25 15 17 18, 25 17 14, 18 14, 17 Operating the system from the remote control Aim the remote control directly to the remote sensor of the center unit. • If you operate it from a diagonal position, the operating range (approx. 5 m (16 ft)) may be shorter - JVC TH-L1 | Instructions - Page 11
the speakers and subwoofer SP-THL1F Front speakers SP-THL1S Surround speakers Speaker cord speakers, do not pull the speaker cords; otherwise, the speakers may fall over, causing damage or injury. • Do not reproduce sounds at so high a volume that the sound is distorted; otherwise, the speakers - JVC TH-L1 | Instructions - Page 12
the best possible sound from this system, you need to place all the speakers except the subwoofer at the same distance from the listening position. Front left speaker Center speaker Front right speaker Subwoofer Surround left speaker Surround right speaker If your speakers cannot be placed - JVC TH-L1 | Instructions - Page 13
(VIDEO 1, VIDEO 2 and VIDEO 3) selected as the source. • Use an HDMI cable shorter than 5 m (15 ft). • When you are playing HDCP (High-Bandwidth Digital Content Protection) content, the sound and picture may not be transmitted to the speakers and TV for a few seconds at the beginning due to the - JVC TH-L1 | Instructions - Page 14
reproduced on this system. The signal is reproduced on the TV connected with HDMI MONITOR OUT terminal. • Use an HDMI cable shorter than 5 m (15 ft). • When you are playing HDCP (High-Bandwidth Digital Content Protection) content, the sound and picture may not be transmitted to the speakers and TV - JVC TH-L1 | Instructions - Page 15
reproduced on this system. The signal is reproduced on the TV connected with HDMI MONITOR OUT terminal. • Use an HDMI cable shorter than 5 m (15 ft). • When you are playing HDCP (High-Bandwidth Digital Content Protection) content, the sound and picture may not be transmitted to the speakers and TV - JVC TH-L1 | Instructions - Page 16
this system, the sound output through this system may be distorted. • When shipped from the factory, the source of "VIDEO 3" have been set for use with the VIDEO 3 AUDIO L/R audio terminal for the audio connection. If you connect the components with digital optical audio cord, change the audio input - JVC TH-L1 | Instructions - Page 17
such as a USB flash memory device, hard disk drive, multimedia card reader, digital camera, etc. to this system. • After connecting a USB mass storage class device to this system and selecting USB MEMORY as the source, the file control display appears on the TV screen. (See page 24.) Center unit - JVC TH-L1 | Instructions - Page 18
manuals supplied for the TV and DVD player. • To operate the equipment, aim the remote control directly at the remote sensor on the target equipment. The buttons described below are used on pages 14 to 15. Number buttons 3 Press number buttons (1 - 9, 0) to enter the manufacturer's code (2 digits - JVC TH-L1 | Instructions - Page 19
manufacturer's code (2 digits). Examples: For a MAGNAVOX DVD player: Press 0, then 5. For a PANASONIC DVD player: Press 1, then 0. * 01 is the initial setting. JVC 01 Stop playback. Select the audio language/ audio channel. Select the subtitle language. Enlarge the picture. NOTE • The operating - JVC TH-L1 | Instructions - Page 20
as available for. shows the file types the operation is The buttons described below are used on pages 16 to 18. Turning the system on/off On the remote control: Press AUDIO. On the center unit: Press . NOTE • A small amount of power is consumed even when the power is turned off. This is called - JVC TH-L1 | Instructions - Page 21
blast of sound may damage your hearing and/or blow out the speakers. On the remote control: Press AUDIO VOLUME +/-. On system automatically cancels the surround mode (see page 27) currently selected, deactivates the speakers, and activates the headphone mode. "HEAD PHONE" appears on the display - JVC TH-L1 | Instructions - Page 22
the target speaker indication on the display window. Each time you press the button, the indication of the speakers changes as follows: FRNT L (Front left speaker) Z FRNT R (Front right speaker) Z CENTER (Center speaker) Z SURR L (Surround left speaker) Z SURR R (Surround right speaker) Z SUBWFR - JVC TH-L1 | Instructions - Page 23
20) with "iPod" selected as source. NOTE • Sound distortion may occur when playing back audio sources with high recording levels. When distortion occurs, it is recommended to turn off the equalizer of the iPod. For information on operating the iPod, see the iPod instruction manual. *1 This button - JVC TH-L1 | Instructions - Page 24
Turn on the system. (see page 16) 3 Select "iPod" as the source. (see page 16) "iPod CONNECT" appears on the display. If an iPod is not connected firmly, "iPod NO CONNECT" appears. •The iPod indicator lights up on the display. 4 Start playing on the iPod. On the remote control: Press iPod 6. On the - JVC TH-L1 | Instructions - Page 25
appear on the TV screen. Number buttons • "NOW READING": Appears when the system is reading the file information. • "NO USB DEVICE": Appears when no Appears when unplayable USB mass storage class device is connected or no supported file is stored. CAUTION • Always set volume to the minimum level - JVC TH-L1 | Instructions - Page 26
class device (see page 13) while the system is turned off. 2 Turn on the system. (see page 16) 3 Select "USB MEMORY" as the source. (see page 16) 4 Start playback. On the remote control: Press USB MEMORY 6. On the center unit: Press iPod/USB MEMORY CONTROL ‹/8. The operations of the files in a USB - JVC TH-L1 | Instructions - Page 27
shown. To skip files one by one On the remote control: Press 4 or x. On the center unit: Press iPod/USB MEMORY CONTROL 4 or x. NOTE • You can also make this operations using the file control display. (See page 24.) • This feature may not work for some files. To select a file directly Press number - JVC TH-L1 | Instructions - Page 28
group Current track (file) Current track (file) / total track Total track (file) number (file) number on current group Playback status The file control display appears automatically during playback (for MP3/WMA/WAV only) or while stopped. 1 Press2/3/5/Y to select the desired group/track/file while - JVC TH-L1 | Instructions - Page 29
is stored. ("RESUME" appears on the display window.) • Turning off the power (see page 16) • Pressing 7 once • Changing the source (see page 16) To start playback from the stored position • Press USB MEMORY 6 on the remote control or iPod/ USB MEMORY CONTROL ‹/8 on the center unit. • Select "USB - JVC TH-L1 | Instructions - Page 30
button: Press REPEAT. Example: Repeat mode indicator See page 21 for button locations. Each time you press REPEAT, the Repeat mode changes. Display window 1 ALL No indication TV screen Meanings Repeats the current REPEAT TRACK track/files. Repeats the current REPEAT GROUP group. Repeats all - JVC TH-L1 | Instructions - Page 31
encoded with DTS Digital Surround ( or ). DTS Digital Surround (dts SURROUND) is another discrete multi-channel digital audio format available on CD and DVD software. • There are other encoding formats of multi-channel digital surround introduced by Digital Theater Systems, Inc., such as - JVC TH-L1 | Instructions - Page 32
that the corresponding speakers are reproducing the channels' sound. If the channels' sound decoded into 5.1 channel is reproduced, only " " lights. Selecting the surround mode The system is set up to automatically select the optimal surround mode for input signal from digital multichannel software - JVC TH-L1 | Instructions - Page 33
7While stopped 1 Press SET UP. 2 Follow the instructions that appear on the TV screen. Menu description : Language menu (LANGUAGE) 7 ON SCREEN LANGUAGE • Select the language shown on the TV screen when operating this system. : Picture menu (PICTURE) 7 MONITOR TYPE You can select the monitor type - JVC TH-L1 | Instructions - Page 34
Front right 0 ms : Audio menu (AUDIO) 7 D. RANGE COMPRESSION (Dynamic range compression) You can enjoy low level recorded sound clearly at night even at a low volume when listening to the sound with Dolby Digital. • AUTO Select this when you want to enjoy surround sound with its full dynamic range - JVC TH-L1 | Instructions - Page 35
GUIDE You can activate or deactivate the on-screen guide icons. (See page 23.) Setting the audio terminal You can set the analog or digital audio : Signal from AUDIO jacks comes out of the speakers (see page 10 to 12). • DIGITAL: Signal from DIGITAL IN terminal comes out of the speakers (see page 10 - JVC TH-L1 | Instructions - Page 36
directly. (See page 9.) Surround modes of "DOLBY DIGITAL" or "dts SURROUND" are not available to use. "ANALOG" is selected on the setting of the audio terminals. The external component is not connected with the digital audio cord (coaxial or optical) or HDMI cord. Select "DIGITAL" on the setting - JVC TH-L1 | Instructions - Page 37
. Audio section Analog Input VIDEO 1 IN, VIDEO 2 IN, VIDEO 3: 500 mV/50 k Ω Digital Input Sound Pressure Level: 77 dB/W·m Dimensions (W M H M D): 100 mm M 104 mm M 105 mm (3-15/16 inches M 4-1/8 inches M 4-3/16 inches) Mass: 0.42 kg (0.93 lbs) each Surround speakers (SP-THL1S) Type: Speaker - JVC TH-L1 | Instructions - Page 38
- JVC TH-L1 | Instructions - Page 39
- JVC TH-L1 | Instructions - Page 40
EN © 2007 Victor Company of Japan, Limited 0307JSKMDCJMM TH-L1 DIGITAL MEDIA SYSTEM
-
 1
1 -
 2
2 -
 3
3 -
 4
4 -
 5
5 -
 6
6 -
 7
7 -
8
-
9
-
10
-
11
-
12
-
13
-
14
-
15
-
16
-
17
-
18
-
19
-
20
-
21
-
22
-
23
-
24
-
25
-
26
-
27
-
28
-
29
-
30
-
31
-
32
-
33
-
34
-
35
-
36
-
37
-
38
-
39
-
40
 |
 |

GVT0206-001A
[J, C]
DIGITAL MEDIA SYSTEM
INSTRUCTIONS
TH-L1
Consists of AX-THL1, SP-THL1W,
SP-THL1F, SP-THL1C and SP-THL1S
For Customer Use:
Enter below the Model No. and Serial
No. which are located either on the rear,
bottom or side of the cabinet. Retain this
information for future reference.
Model No.
Serial No.