JVC TK-C9300UA Instruction Manual
JVC TK-C9300UA Manual
 |
View all JVC TK-C9300UA manuals
Add to My Manuals
Save this manual to your list of manuals |
JVC TK-C9300UA manual content summary:
- JVC TK-C9300UA | Instruction Manual - Page 1
COLOR VIDEO CAMERA TK-C9200U TK-C9200E(EX) TK-C9201EG(EX) TK-C9300U TK-C9300E(EX) TK-C9301EG(EX) INSTRUCTIONS For Customer Use: Enter below the Serial No. which is located on the body. Retain this information for future reference. Model No. TK-C9200U TK-C9300U Serial No. . LST0984-001B - JVC TK-C9300UA | Instruction Manual - Page 2
Introduction Contents Introduction Contents ...2 Features ...3 Operating Precautions 4 Connection/Installation Mounting the Lens 6 Connection ...7 Mounting the Camera 9 Setting/Adjustment Switch Settings 11 Adjusting the Back Focus 12 Fine-tuning the Focus 13 Adjusting the Auto White Balance - JVC TK-C9300UA | Instruction Manual - Page 3
instructions in this manual are for TK-C9200U/TK-C9200E(EX)/TK-C9201EG(EX)/ TK-C9300U/TK-C9300E(EX)/TK-C9301EG(EX). TK-C9200E(EX)/TK-C9201EG(EX)/TK-C9300E(EX)/TK Contents of this manual JVC KENWOOD Corporation holds the copyright to this manual. Any part or all of this manual may not be - JVC TK-C9300UA | Instruction Manual - Page 4
it to fog. For tough stains, wipe with a neutral detergent diluted with water, followed by wiping with a dry cloth. m Energy Conservation v When the camera is not in use for a long time, turn off the power for safety and energy conservation reasons. m Copyright Protection v With the exception of the - JVC TK-C9300UA | Instruction Manual - Page 5
any inconveniences or disturbances caused in the event of privacy invasion as a result of camera footages of this product. m Others v When using this camera with [AGC] set to "MID" or "HIGH", the sensitivity increases automatically for dark images and the screen may appear grainy, but this is not - JVC TK-C9300UA | Instruction Manual - Page 6
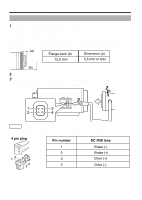
the Lens 1 Check the mounting method of the lens before mounting. This camera is compatible with CS-mount lens. To use a C-mount lens, a C-mount adapter is necessary. For details about the Cmount adapter, consult your JVC dealer. Never use a lens that exceeds the dimension (a) in the below figure - JVC TK-C9300UA | Instruction Manual - Page 7
INSTRUCTION MANUAL VIDEO OUT FOCUS ADJUST SET DC12V 1 2 AC24V MENU To the terminal of infrared illumination device etc. (TK-C9300U/TK-C9300E/ TK be high and a significant voltage drop will occur when the camera is at camera to the nearest JVC service center for inspection as the internal circuit may - JVC TK-C9300UA | Instruction Manual - Page 8
cable are correct. AC 220 V - AC 240 V (TK-C9201EG/TK-C9301EG) m When using this camera, install it near the socket so that power disconnection may be CLASS 2 ONLY (U TYPE) . ISOLATED POWER ONLY (E TYPE) SEE INSTRUCTION MANUAL VIDEO OUT FOCUS ADJUST SET AUX(IN) GND Please use a shielded cable - JVC TK-C9300UA | Instruction Manual - Page 9
before shipment but it can also be mounted on top of the camera. 1 Remove the camera-mounting bracket fastening screws (x2). The camera-mounting bracket is removed from the camera. 2 Mount the camera-mounting bracket on top of the camera. 3 Mount the camera onto a fixer, pan/tilt unit and the like - JVC TK-C9300UA | Instruction Manual - Page 10
to the length, strength, routing and material (insulation properties) of the fall prevention wire used. v Use the screw (M3 x 6 mm) on the back of the camera for the installation of the fall prevention wire. Do not use a screw that is longer than 6 mm as it may damage the internal parts. . 6mm - JVC TK-C9300UA | Instruction Manual - Page 11
ON SEE INSTRUCTION MANUAL VIDEO OUT D MONITOR TYPE FOCUS E MONITOR TYPE FOCUS ADJUST ADJUST CLASS 2 ONLY (U TYPE) F CLASS 2 ONLY (U TYPE) F ISOLATED POWER ONLY (E TYPE) SET ISOLATED POWER ONLY (E TYPE) AUX GND SET (TK-C9200U/TK-C9200E/TK-C9201EG) (TK-C9300U/TK-C9300E/TK-C9301EG - JVC TK-C9300UA | Instruction Manual - Page 12
focus fastening screw by turning it clockwise. With a Zoom Lens m If the image is out of focus when zooming (telephoto - wide angle), adjust the camera as follows. 1 Loosen the back focus fastening screw by turning it anti- clockwise with a + screwdriver. 2 Shoot some fine patterns on the subject or - JVC TK-C9300UA | Instruction Manual - Page 13
IRIS lens, use the Focus Adjust mode for easy focusing as the iris opens and depth of field becomes shallower. (Refer also to the instruction manual of the lens.) m Procedure 1 Press and hold the [J] button. The Focus Adjust mode is activated and "FOCUS ADJUST MODE" appears on the screen. Contours - JVC TK-C9300UA | Instruction Manual - Page 14
CLASS 2 ONLY (U TYPE) ISOLATED POWER ONLY (E TYPE) AUX GND SEE INSTRUCTION MANUAL VIDEO OUT FOCUS ADJUST SET WHITE BALANCE CONTROL E AWC SET R GAIN 160 illumination, then readjust the white balance. v AWC ERROR : HIGH LIGHT (Excessive illumination) Displayed when the light is too bright. - JVC TK-C9300UA | Instruction Manual - Page 15
f (32 g to 104 g) (Recommended) Mass : 280 g (TK-C9200U/TK-9200E/TK-C9300U/TK-C9300E) 470 g (TK-C9201EG/TK-C9301EG) Accessories : (TK-C9200U/TK-C9300U) WARRANTY CARD 1 INSTRUCTIONS 3 (TK-C9200E/TK-C9201EG/TK-C9300E/TK-C9301EG) INSTRUCTIONS 5 Dimension : mm (inch) (WHD) 55 (2-3/16) 61 - JVC TK-C9300UA | Instruction Manual - Page 16
LST0984-001B TK-C9200U/TK-C9200E(EX)/ TK-C9201EG(EX)/TK-C9300U/ TK-C9300E(EX)/TK-C9301EG(EX) COLOR VIDEO CAMERA Q2012 JVC KENWOOD Corporation
-
 1
1 -
 2
2 -
 3
3 -
 4
4 -
 5
5 -
 6
6 -
 7
7 -
8
-
9
-
10
-
11
-
12
-
13
-
14
-
15
-
16
 |
 |

COLOR VIDEO CAMERA
TK-C9200U
TK-C9200E(EX)
TK-C9201EG(EX)
TK-C9300U
TK-C9300E(EX)
TK-C9301EG(EX)
INSTRUCTIONS
.
For Customer Use:
Enter below the Serial No. which is located on the
body. Retain this information for future reference.
Model No.
TK-C9200U
Serial No.
TK-C9300U
LST0984-001B