JVC TM-1011GU Instruction Manual
JVC TM-1011GU - 10" Color Monitor Manual
 |
View all JVC TM-1011GU manuals
Add to My Manuals
Save this manual to your list of manuals |
JVC TM-1011GU manual content summary:
- JVC TM-1011GU | Instruction Manual - Page 1
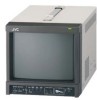
COLOR VIDEO MONITOR TM-1011G INSTRUCTIONS LCT1989-001A-H - JVC TM-1011GU | Instruction Manual - Page 2
Thank you for purchasing this JVC Color Video Monitor. Before using it, read and follow all instructions carefully to take full advantage of the monitor's capabilities. SAFETY PRECAUTIONS In order to prevent any fatal accidents caused by misoperation or mishandling of the monitor, be fully aware of - JVC TM-1011GU | Instruction Manual - Page 3
rated approved type, re-fit the fuse cover. (Consult your dealer or qualified service personnel.) How to replace the fuse Open the fuse compartment with a blade to Use MAIN MENU 10 How to Use SET-UP MENU 11 How to Use the External Control 14 Troubleshooting 16 Self-check Indications 17 - JVC TM-1011GU | Instruction Manual - Page 4
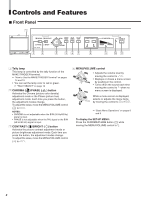
☞ "How to Use the MAKE/TRIGGER Terminal" on pages 14 and 15 • You can set the lamp color to red or green. ☞ "TALLY SELECT" on page 12 2 CHROMA ( )/PHASE ( ) button Activates the Chroma (picture color density) adjustment mode or the Phase (picture hue) adjustment mode. Each time you press the button - JVC TM-1011GU | Instruction Manual - Page 5
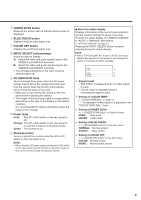
is displayed. 6 BLUE CHECK button Displays the blue video signal only. 7 COLOR OFF button Displays the luminance signal only. 8 INPUT SELECT buttons/lamps Select selection and the monitor settings for about 3 seconds. To show the status display, set "STATUS DISPLAY" to "AUTO" or "MANUAL" beforehand. - JVC TM-1011GU | Instruction Manual - Page 6
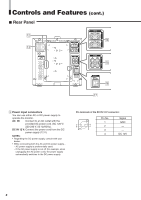
Controls and Features (cont.) 7 Rear Panel w r e t y u w Power input connectors You can use either AC or DC power supply to operate the monitor. AC IN: Connect to an AC outlet with the provided AC power cord. (AC 120 V/ 220-240 V, 50 Hz/60Hz). DC IN 12 V: Connect the - JVC TM-1011GU | Instruction Manual - Page 7
need to turn on the stand-by button on the front panel to turn on the monitor after turning on the AC power switch. r Composite signal input/output terminals (VIDEO A, /60 Hz). NOTES: • NTSC and PAL are switched in the "COLOR SYSTEM." ☞ "COLOR SYSTEM" on page 12 • The IN and OUT terminals are bridge - JVC TM-1011GU | Instruction Manual - Page 8
ratio. SET-UP MENU Items Functions FUNCTION SETTING Sets the control systems for the COLOR SYSTEM, colors of the tally lamp, and MAKE/TRIGGER terminal. • Can be also used to check the amount of time that the monitor has been used. PICTURE SUB ADJ. The standard value ("00") of the picture - JVC TM-1011GU | Instruction Manual - Page 9
7Displaying the Menu Screens To display MAIN MENU Push in the MENU/VOLUME control on the front panel. To display SET-UP MENU Push in the CHROMA/PHASE button while moving the MENU/VOLUME control to . NOTES: • To exit the menu, push in the MENU/VOLUME control several times. • The menu automatically - JVC TM-1011GU | Instruction Manual - Page 10
display" on page 9 7 LEVEL Adjusts the compensation value. The higher the number is, the larger the compensation value gets. • 00 O 10 7 CONTROL FREQ. Selects the frequency to compensate. HIGH: LOW: OFF: Compensates the high frequencies. Compensates the low frequencies. No compensation. ASPECT - JVC TM-1011GU | Instruction Manual - Page 11
How to Use SET-UP MENU 7SET-UP MENU Screens SET-UP MENU Move the MENU/ VOLUME control to . Setting Items ☞ page 13 Move the MENU/ VOLUME control to / to adjust an item. About " sub menu" and "reset," ☞ page 9 * To go back to the previous menu, press the MENU/VOLUME control. NOTE: • Some items - JVC TM-1011GU | Instruction Manual - Page 12
balance. NOTE: • Use the five items indicated with mark to make fine adjustments between the monitors. 7 COLOR TEMP. Selects the color temperature. HIGH: Sets the color temperature to 9300. LOW: Sets the color temperature to 6500. 7 BLUE DRIVE Adjusts the blue drive level. • MIN O 000 O MAX (in 127 - JVC TM-1011GU | Instruction Manual - Page 13
size vertically. 7 V. POSITION Adjusts the vertical screen position. • -10 O 00 O +10 -: Moves the screen down. +: Moves the screen up. DISTORTION . • AUTO/MANUAL/OFF ☞ "About the status display" on page 5 CONTROL LOCK Prohibits altering the monitor operations except turning the monitor on/off and - JVC TM-1011GU | Instruction Manual - Page 14
over operations using front panel buttons or menu functions of the monitor. • When using the make contact system, you cannot use Changes the input to INPUT A Changes the input to INPUT B Turns on/off COLOR OFF Changes ASPECT Controls the tally lamp Turns on/off the status display External control - JVC TM-1011GU | Instruction Manual - Page 15
Changes the input to INPUT B Turns on/off COLOR OFF Changes ASPECT Controls the tally lamp Selects the color of the tally lamp Turns on/off the status terminal (External control) to the 8th pin terminal (GND) so that the monitor can be controlled by the external control. 2. When selecting the "MAKE" - JVC TM-1011GU | Instruction Manual - Page 16
Troubleshooting Solutions to common problems related to your monitor are described here. If none of the solutions presented here solve the problem, unplug the monitor and consult a JVC-authorized dealer or service center for assistance. Problems . Perform "reset" in "COLOR TEMP./BAL." to set each - JVC TM-1011GU | Instruction Manual - Page 17
a long period, it may appear to be colored. This is due to the structure of the cathode troubleshooting easier. Whenever a problem occurs, a combination of "self-check indicators" (INPUT SELECT A/B and DC INDICATOR lamps) will flash and the monitor 10 seconds before turning it on again. If the - JVC TM-1011GU | Instruction Manual - Page 18
Requirements Power Consumption Dimensions Weight Accessory TM-1011G Color Video Monitor 10" measured diagonally Width: Height: Diagonal .2 lbs) AC power cord * Illustrations and pictures used in this manual have been exaggerated, abbreviated or compounded for explanatory purposes only. The - JVC TM-1011GU | Instruction Manual - Page 19
7 Dimensions Unit : mm (inch) Front View 222 (8 3/4") 183 (7 1/4")* Side View 1.5 (1/16") 338.3 (13 3/8") 307.8 (12 1/8") 140 (5 5/8")* 220 (8 3/4") 229 (9 1/8") 164 (6 1/2") 7 (3/8") 63.5 (2 1/2") 222 (8 3/4") 7 (3/8") Asterisks (*) are used to indicate front panel dimensions. 19 - JVC TM-1011GU | Instruction Manual - Page 20
© 2006 Victor Company of Japan, Limited 0306STH-MW-MT TM-1011G COLOR VIDEO MONITOR
-
 1
1 -
 2
2 -
 3
3 -
 4
4 -
 5
5 -
 6
6 -
 7
7 -
8
-
9
-
10
-
11
-
12
-
13
-
14
-
15
-
16
-
17
-
18
-
19
-
20
 |
 |

INSTRUCTIONS
TM-1011G
LCT1989-001A-H
COLOR VIDEO MONITOR