JVC TMH-150CGU Instruction Manual
JVC TMH-150CGU - 15IN CRT 750TVL 4:3 16:9 NTSC PAL METAL CABINET INPUT CARDS OPT Manual
 |
UPC - 046838010682
View all JVC TMH-150CGU manuals
Add to My Manuals
Save this manual to your list of manuals |
JVC TMH-150CGU manual content summary:
- JVC TMH-150CGU | Instruction Manual - Page 1
OL ITALIANO FRANÇAIS DEUTSCH ENGLISH COLOR VIDEO MONITOR BEDIENUNGSANLEITUNG : FARB-VIDEO-MONITOR MANUEL D'INSTRUCTIONS : MONITEUR VIDEO COULEUR MANUALE DI ISTRUZIONI : MONITOR VIDEO A COLORI INSTRUCCIONES : MONITOR DE VIDEO A COLOR TM-H150CG INSTRUCTIONS For Customer Use: Enter below the Serial - JVC TMH-150CGU | Instruction Manual - Page 2
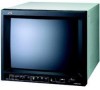
ENGLISH INSTRUCTIONS COLOR VIDEO MONITOR TM-H150CG Thank you for purchasing this JVC color video monitor. Before using it, read and follow all instructions carefully to take full advantage of the monitor's capabilities. - JVC TMH-150CGU | Instruction Manual - Page 3
servicing the monitor, consult qualified service personnel. Never try to service Changes or modification not approved by JVC could void the user's authority to device, pursuant to Part 15 of the FCC Rules. accordance with the instructions, may cause a Cathode Ray Tube (CRT) and other components that - JVC TMH-150CGU | Instruction Manual - Page 4
Consult your dealer or qualified service personnel.) How to replace problem does not occur as far as displaying normal video playback motion images. Ⅵ Supplementary Explanation = Information for monitor operation = This monitor uses a high precision CRT 15 Troubleshooting 16 Specifications 18 3 - JVC TMH-150CGU | Instruction Manual - Page 5
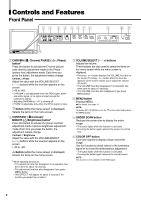
Controls and Features Front Panel 1 2 3 4 5678 9 pq w 1 CHROMA ( : Chroma)/PHASE ( : Phase) button* Press this button to activate the Chroma (picture color density) adjustment mode or the Phase (picture hue) adjustment mode. Each time you press the button, the adjustment modes change. Chroma" - JVC TMH-150CGU | Instruction Manual - Page 6
and the audio signal input to the AUDIO A terminal. B: Select the video signal input to the VIDEO B terminal and the audio signal input to the AUDIO B terminal. COMPO. LEVEL" again. q Stand-by button Turns on and off the monitor when the main power is on. NOTE: You can set the delay time between - JVC TMH-150CGU | Instruction Manual - Page 7
bridge-connected (auto termination). NOTE: Use the AUDIO A terminals for the corresponding audio signals. r VIDEO B terminal Input (IN) REMOTE (external control) terminal Terminals for controlling the monitor by an external control. \ For details, see page 15. ; Main power switch Turns on and off - JVC TMH-150CGU | Instruction Manual - Page 8
are bridge-connected (auto termination). 2 Connection terminal Attach to the connection terminal of the input card slot on the monitor. IN OUT VD IN OUT AUDIO IN OUT 3 4 3 Synchronized signal input/output terminals Input (IN) and output (OUT) terminals for the vertical, horizontal or - JVC TMH-150CGU | Instruction Manual - Page 9
. For details, refer to the instruction manual supplied with the input card. 3 Connection terminal Attach to the connection terminal of the input card slot on the monitor. 4 Audio signal output terminal Outputs the analog audio signal after decoding the EMBEDDED AUDIO signal. The input signal from - JVC TMH-150CGU | Instruction Manual - Page 10
from the input card slot on the rear panel of the monitor. REMOTE SLOT MAKE/ TRIGGER Slot cover 3 Insert the input card's circuit board of the input card. Refer to the instruction manual supplied with the input card and set the DIP switches beforehand. Guide rails Tab Input card (This illustration is - JVC TMH-150CGU | Instruction Manual - Page 11
input on the screen. Selects the method of the external control connected to the REMOTE terminal. Sets how to change the input when operating the monitor by the external control. 2) May not appear depending on the type of input signal. 3) Appears only when "REMOTE SYSTEM" is set to "MAKE." 10 - JVC TMH-150CGU | Instruction Manual - Page 12
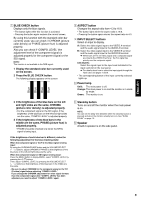
stand-by). 2 While holding down both the MENU button and the fi button, press the stand- by button to turn on the monitor. NOTE: Keep pressing both the MENU button and the fi button until " RESET" appears on the screen. " RESET" appears on - JVC TMH-150CGU | Instruction Manual - Page 13
: 20 COLOR TEMP. Selects the color temperature. • 9300 • 6500 LOWER Sets the delay time between when the stand-by button is pressed and when the monitor actually turns on. • STD.: Power turns on about 1 second after the stand-by button is pressed. • SLOW: Power turns on about 3 seconds after the - JVC TMH-150CGU | Instruction Manual - Page 14
ENGLISH How to Use SET-UP MENU PICTURE SUB ADJ. H. POSITION : 00 V. POSITION : 00 WHITE BALANCE CONTROL LOCK : OFF STATUS DISPLAY : ON REMOTE SYSTEM : MAKE INPUT REMOTE : A-D EXIT Function and display of the button varies depending on the selected item. Buttons Displays - JVC TMH-150CGU | Instruction Manual - Page 15
. • MAKE (make contact system) • TRG. (trigger system) INPUT REMOTE Sets how to change the input when operating the monitor by the external control. \ For details, see page 15. • A-D • A/B NOTE: "INPUT REMOTE" appears on the screen only when "REMOTE SYSTEM" is set to "MAKE." NOTE: You can turn off - JVC TMH-150CGU | Instruction Manual - Page 16
Not in use 10 ASPECT 11 UNDER SCAN 12 Not in use 13 Not in use 14 External control 15 GND Opening - Invalid Invalid Invalid Invalid - - Off - Off (4:3) Off - - Invalid Short-circuiting to the 15th pin terminal (GND) so that the monitor can be controlled by the external control. 2. When selecting - JVC TMH-150CGU | Instruction Manual - Page 17
Troubleshooting Solutions to common problems related to your monitor are described here. If none of the solutions presented here solve the problem, unplug the monitor and consult a JVC-authorized dealer or service center for assistance. Problems No power supply Points to be checked Is the power - JVC TMH-150CGU | Instruction Manual - Page 18
to enable control by the external control the monitor can be operated by the buttons on the 15 connected to the REMOTE terminal? front panel electricity on the CRT and is not harmful. • The monitor emits a strange sound when the room temperature changes suddenly. This is only a problem if an - JVC TMH-150CGU | Instruction Manual - Page 19
AUDIO A AUDIO B REMOTE Audio power output Built-in speaker Environmental conditions Power requirements Power consumption Dimensions Weight Accessory TM-H150CG Color video monitor PAL, NTSC (3.58) 39 cm (15 power cord • Illustrations used in this manual are for explanatory purposes only. The - JVC TMH-150CGU | Instruction Manual - Page 20
MHz) - - - - PAL - - - - Black-and-White (50 Hz/60 Hz) - - - - 480/60i (525i) ‡ ‡ ‡ ‡ 576/50i (625i) ‡ ‡ ‡ ‡ EMBEDDED AUDIO - - ‡ ‡ Analog audio ‡ ‡ - - \ For details about each input card, see pages 7 and 8. 7 Y/C (Mini DIN 4 pin) terminals Terminals on the rear - JVC TMH-150CGU | Instruction Manual - Page 21
VICTOR COMPANY OF JAPAN, LIMITED © 2004 VICTOR COMPANY OF JAPAN, LIMITED Printed in Thailand 0204MKH-MW-MT TM-H150CG COLOR VIDEO MONITOR
-
 1
1 -
 2
2 -
 3
3 -
 4
4 -
 5
5 -
 6
6 -
 7
7 -
8
-
9
-
10
-
11
-
12
-
13
-
14
-
15
-
16
-
17
-
18
-
19
-
20
-
21
 |
 |

BEDIENUNGSANLEITUNG : FARB-VIDEO-MONITOR
MANUEL D’INSTRUCTIONS : MONITEUR VIDEO COULEUR
MANUALE DI ISTRUZIONI : MONITOR VIDEO A COLORI
INSTRUCCIONES : MONITOR DE VIDEO A COLOR
INSTRUCTIONS
TM-H150CG
COLOR VIDEO MONITOR
ESPAÑOL
ITALIANO
FRANÇAIS
DEUTSCH
ENGLISH
LCT1564-001A-H
For Customer Use:
Enter below the Serial No. which is located on the rear of the cabinet.
Retain this information for future reference.
Pour l’usage du client:
Enter ci-dessous le numéro de série qui est situé sur l’arrière du coffret.
Conserver cette information pour une référence ultérieure.
Model No. :
Numéro de modèle :
Serial No. :
Numéro de série :