JVC VN-C2WU VN-C2WU Vnetworks Camera Instruction Manual (2073KB)
JVC VN-C2WU - V-networks Pan/tilt Camera Manual
 |
View all JVC VN-C2WU manuals
Add to My Manuals
Save this manual to your list of manuals |
JVC VN-C2WU manual content summary:
- JVC VN-C2WU | VN-C2WU Vnetworks Camera Instruction Manual (2073KB) - Page 1
V.NETWORKS VN-C2WU INSTRUCTIONS This instruction manual is printed on recycled paper. Thank you for purchasing the JVC VN-C2WU. To gain maximum benefit from this product, read this instruction manual carefully before use and retain it for future reference. The serial number is very important for - JVC VN-C2WU | VN-C2WU Vnetworks Camera Instruction Manual (2073KB) - Page 2
i - JVC VN-C2WU | VN-C2WU Vnetworks Camera Instruction Manual (2073KB) - Page 3
the VN-C2WU IP address 6 About the web pages mentioned in this 7 VN-C2WU/Web Pages 15 Top page ...15 Still image page 16 Live image page 16 Control page ...17 Setting page ...20 How to link the VN-C2WU images 24 Displaying still images 24 Displaying animated images 24 Troubleshooting ...26 - JVC VN-C2WU | VN-C2WU Vnetworks Camera Instruction Manual (2073KB) - Page 4
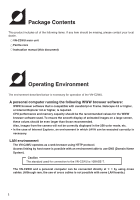
contact your local dealer. VN-C2WU main unit Ferrite core Instruction manual (this document) Operating Environment The environment described below is necessary for operation of the VN-C2WU. A personal computer running the following WWW browser software: WWW browser software that is compatible with - JVC VN-C2WU | VN-C2WU Vnetworks Camera Instruction Manual (2073KB) - Page 5
excessive dust, oil or gas. When this product is used with AGC on (camera setting: Auto), sensitivity will be increased automatically in dark places and the screen . When the color balance of this product is used with the camera setting at Auto, in some cases the recorded colors may differ slightly - JVC VN-C2WU | VN-C2WU Vnetworks Camera Instruction Manual (2073KB) - Page 6
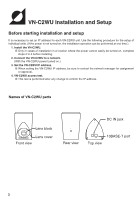
steps 2 to 4 before installing. 2. Connect the VN-C2WU to a network. (With the VN-C2WU power turned on.) 3. Set the VN-C2WU IP address. When setting the VN-C2WU IP address, be sure to contact the network manager for assignment or approval. 4. VN-C2WU access test. This test is performed after any - JVC VN-C2WU | VN-C2WU Vnetworks Camera Instruction Manual (2073KB) - Page 7
1. Installation Use the optional bracket for installation. Make the power and network connections after completion of the installation. Caution To prevent the unit from falling, mount only on areas with sufficient strength. VN-C2WU can be installed as shown in the diagram below, or inverted. Do - JVC VN-C2WU | VN-C2WU Vnetworks Camera Instruction Manual (2073KB) - Page 8
Ethernet, Fast Ethernet through Auto negotiation HUB). Turn on the power of only one VN-C2WU unit. When network connection is completed and the power is turned on, the VN-C2WU unit will be connected to the network at the following IP address. Factory set (Default) IP address : 192.168. 0. 2 To power - JVC VN-C2WU | VN-C2WU Vnetworks Camera Instruction Manual (2073KB) - Page 9
3. Setting the VN-C2WU IP address 3-1 Changing the IP address of the PC Display the network settings panel by selecting Settings from the Start button, then selecting Control Panel and Network, in that order. (1) Select the TCP/IP item, then click on Properties. (2) Before making a change, always - JVC VN-C2WU | VN-C2WU Vnetworks Camera Instruction Manual (2073KB) - Page 10
web pages mentioned in this instruction manual From the following page, all the screens expressed as VN-C2WU pgae are contained in VN-C2WU and displayed by the web page browse and display function of the WWW browser software. Therefore depending on WWW browser software and its settings, the formats - JVC VN-C2WU | VN-C2WU Vnetworks Camera Instruction Manual (2073KB) - Page 11
set IP address is specified, the WWW browser software will display the VN-C2WU top page.) http://192.168.0.2/ Caution In some cases, direct specification is not possible when a proxy server has been set for Internet access. In such cases, contact the network administrator and change the setting. WWW - JVC VN-C2WU | VN-C2WU Vnetworks Camera Instruction Manual (2073KB) - Page 12
Display of the VN-C2WU top page. VN-C2WU top page. Click on Settings. The Settings page is displayed. VN-C2WU Settings page. Scroll so that all of "Other Settings" can be seen. 9 - JVC VN-C2WU | VN-C2WU Vnetworks Camera Instruction Manual (2073KB) - Page 13
the "Other Settings" contents. VN-C2WU Settings page "Other settings" Other Settings [IP address] Change to an IP address assigned or approved by the network administrator. [Subnet mask] Like the IP address, the subnet mask is assigned or approved by the network administrator. [Default Gateway] Set - JVC VN-C2WU | VN-C2WU Vnetworks Camera Instruction Manual (2073KB) - Page 14
match the access levels. The pages that can be accessed at each of these levels are as shown below. (Refer to page 22 for the VN-C2WU web page configuration.) Password level Accessible page User level Still Image page and Live Image page. Operator level The above pages and (Pan/Tilt) control - JVC VN-C2WU | VN-C2WU Vnetworks Camera Instruction Manual (2073KB) - Page 15
will be changed. The Factory set (Default) IP address of 192.168.0.2 will become invalid, and the connection to the VN-C2WU will be no longer possible. When the WWW browser software is not operated for a certain time, a message indicating that connection is not possible will appear as a result of IP - JVC VN-C2WU | VN-C2WU Vnetworks Camera Instruction Manual (2073KB) - Page 16
then select Control Panel and Network, in that order. Next, restore to the original IP address and reboot the PC in accordance with the messages. 4. VN-C2WU connection test This test confirms whether or not each VN-C2WU web page can be displayed with the WWW browser software using the set IP address - JVC VN-C2WU | VN-C2WU Vnetworks Camera Instruction Manual (2073KB) - Page 17
Name and Password. Enter a password. It is not necessary to enter a user name. Click on OK. In order to assure quick display of the VN-C2WU web page from the WWW browser being used, register a browse location (URL : Uniform Resource Locator) is recommended. Use Bookmarks with Netscape or Favovites - JVC VN-C2WU | VN-C2WU Vnetworks Camera Instruction Manual (2073KB) - Page 18
page (spushconfig_e.html or javaconfig_e.html) Top page: http://*****index_e.html. (***** is the URL of the VN-C2WU.) The purpose of this page is to link to each of the VN-C2WU web pages. VN-C2WU top page Still image When browsing is started. Buttons to link each page. (use a singal click - JVC VN-C2WU | VN-C2WU Vnetworks Camera Instruction Manual (2073KB) - Page 19
http://*****/jave_e.html. (***** is the URL indicated by the VN-C2WU) This page is to display live images. The camera images are updated automatically and displayed as live images. Caution The Save as... function of the WWW browser software cannot be used with this page so do not attempt to - JVC VN-C2WU | VN-C2WU Vnetworks Camera Instruction Manual (2073KB) - Page 20
been loaded into the web browser. VN-C2WU control page Hyper link to other pages. Live image VN-C2WU data display area The current Pan/Tilt position is displayed. Warning messages for operations are also displayed. Operation menu The buttons related to camera Pan/Tilt operations are located here - JVC VN-C2WU | VN-C2WU Vnetworks Camera Instruction Manual (2073KB) - Page 21
control The current Pan/Tilt angle step is displayed here. Angles (integer value) can be changed by entering value and clicking on the Apply button. VN-C2WU control page The Pan/Tilt can be controlled with the 8 Pan/Tilt operation buttons. The amount of movement for each operation of Pan/Tilt is - JVC VN-C2WU | VN-C2WU Vnetworks Camera Instruction Manual (2073KB) - Page 22
Position memory movement The VN-C2WU is equipped with 10 position memories. VN-C2WU control page (position memory control) Position memory setting The contents of the currently set position memory are displayed. VN-C2WU control page (position memory setting) The current Pan/Tilt position can be set - JVC VN-C2WU | VN-C2WU Vnetworks Camera Instruction Manual (2073KB) - Page 23
: The URL will be changed automatically by the WWW browser software. Netscape http://*****/spushconfig_e.html Internet Explorer http://*****/javaconfig_e.html. (***** is the URL of the VN-C2WU) This page is to make the camera image related settings and connection (setup) related settings. (The - JVC VN-C2WU | VN-C2WU Vnetworks Camera Instruction Manual (2073KB) - Page 24
Camera Auto/Manual Settings VN-C2WU settings page (Auto/manual settings) Manual : Auto : "Quality" in "Image Quality Setting" such as Saturation and Color Balance can be manually set. "Quality" in "Image Quality Setting" can be automatically set. Select Auto or Manual depending on operational - JVC VN-C2WU | VN-C2WU Vnetworks Camera Instruction Manual (2073KB) - Page 25
the number of image frames sent from the VN-C2WU per second. (fps is the abbreviation for computer and WWW browser software, and on the network is relatively heavy), it is advisable to set a low value for the frame rate. Quality Image Sensor can be used when Camera Auto/Manual Setting is set to Manual - JVC VN-C2WU | VN-C2WU Vnetworks Camera Instruction Manual (2073KB) - Page 26
the setting value when light is insufficient.) Exposure Adjustment of the exposure time. (The smaller the setting value, the lighter the image.) [Other Settings] VN-C2WU settings page (Other Settings) Most of the items are set during installation and setup. Refer to page 10 for details. 23 - JVC VN-C2WU | VN-C2WU Vnetworks Camera Instruction Manual (2073KB) - Page 27
***** shows the URL indicated by the VN-C2WU. Displaying live images: Two methods can be used for live images: the Serverpush method and the Java method. It is necessary to use one of these methods in accordance with the WWW browser software compatability. Displaying with Serverpush Live images can - JVC VN-C2WU | VN-C2WU Vnetworks Camera Instruction Manual (2073KB) - Page 28
can be displayed with Java-compatible WWW browser software (Internet Explorer, etc.) by creating a web page with the contents described below. CodeBase=http APPLET> ***** indicates the VU-C2WU IP address. Caution The resolution, compression rate, etc - JVC VN-C2WU | VN-C2WU Vnetworks Camera Instruction Manual (2073KB) - Page 29
Troubleshooting Out of focus Use the following procedure to adjust the focus. 1. Set before loosening the lens block screws. 4. Display an VN-C2WU image with the WWW browser software. (Animated images can be displayed with the WWW browser software.) 5. Slowly rotate the lens block until the focus - JVC VN-C2WU | VN-C2WU Vnetworks Camera Instruction Manual (2073KB) - Page 30
The new VN-C2WU IP address has been forgotten. Unknown IP addresses are handled as recoveries or repairs. The use of True Color is recommended. • Adjusting the color balance Color balance can be changed using VN-C2WU Setting Page → Image Quality Menu → Color Balance. (Cont'd on the next page) 27 - JVC VN-C2WU | VN-C2WU Vnetworks Camera Instruction Manual (2073KB) - Page 31
The colors are unsatisfactory. • Try changing Camera Auto/Manual Setting on the VN-C2WU Setting Page from Auto to Manual and then back to Auto. When using a different light sources for recording (For example, when moving back and forth between outdoors under sunlight and indoors - JVC VN-C2WU | VN-C2WU Vnetworks Camera Instruction Manual (2073KB) - Page 32
Specifications LAN standard : IEEE 802. 3 standard Communication protocol : TCP/IP, HTTP Image sensor : 1/3 inch, 300,000 pixels CMOS image sensor Minimum focusing distance : 1.0 m Pan/Tilt angles : Pan : 100° Tilt : 80° Output image format : 640 X 480, 320 X 240, 160 X 120 pixels Power voltage : DC - JVC VN-C2WU | VN-C2WU Vnetworks Camera Instruction Manual (2073KB) - Page 33
VN-C2WU V.NETWORKS VICTOR COMPANY OF JAPAN, LIMITED COPYRIGHT © 2000 VICTOR COMPANY OF JAPAN, LTD. Printed in Japan SS961534-001
-
 1
1 -
 2
2 -
 3
3 -
 4
4 -
 5
5 -
 6
6 -
 7
7 -
8
-
9
-
10
-
11
-
12
-
13
-
14
-
15
-
16
-
17
-
18
-
19
-
20
-
21
-
22
-
23
-
24
-
25
-
26
-
27
-
28
-
29
-
30
-
31
-
32
-
33
 |
 |

VN-C2WU
V.NETWORKS
INSTRUCTIONS
SS961534-001
Thank you for purchasing the JVC VN-C2WU.
To gain maximum benefit from this product, read this
instruction manual carefully before use and retain it for future
reference.
The serial number is very important for maintaining quality of
your product. At the time of purchase, check to see that the
serial number is correctly printed on the top of the unit and
that the serial numbers on the unit and warranty match.
This instruction manual is printed on
recycled paper.
For Customer Use:
Enter below the Model No. and Serial
No. which are located on the rear of the
cabinet. Retain this information for future
reference.
Model No.
Serial No.