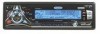
Jensen CDX6311 Instruction Manual
Jensen CDX6311 - Radio / CD Player Manual
 |
UPC - 043258302694
View all Jensen CDX6311 manuals
Add to My Manuals
Save this manual to your list of manuals |
Jensen CDX6311 manual content summary:
- Jensen CDX6311 | Instruction Manual - Page 1
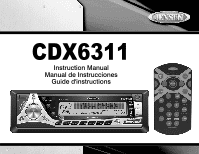
CDX6311 Instruction Manual Manual de Instrucciones Guide d'instructions - Jensen CDX6311 | Instruction Manual - Page 2
- Jensen CDX6311 | Instruction Manual - Page 3
CDX6311 TABLE OF CONTENTS Introduction 1 Preparation 2 Wiring ...3 Installation 4 Operation 6 Tuner Operation 9 XM® Radio Operation 10 CD Player Operation 11 CD Changer Operation 12 JPORT Operation 12 Remote Control 13 Care and Maintenance 13 Troubleshooting 14 Specifications 14 12- - Jensen CDX6311 | Instruction Manual - Page 4
CDX6311 ii - Jensen CDX6311 | Instruction Manual - Page 5
to RCA stereo outputs for easy connection to the radios Aux inputs JPORT READY (Sold Separately) • Controls all iPod's except "Shuffle" (audio only) • CD changer pass-thru input • Plug both the iPod and CD changer in at the same time (operates independently) • APPLE® approved iPod interface cable - Jensen CDX6311 | Instruction Manual - Page 6
install the radio. • Torx type, flathead and Philips screwdrivers • Wire cutters and strippers • Tools to remove existing radio (screwdriver, socket wrench set or other tools) • Electrical tape • Crimping tool • Volt meter/test light • Crimp connections • 18 gauge wire for power connections • 16-18 - Jensen CDX6311 | Instruction Manual - Page 7
CDX6311 WIRING Wiring with a Wiring Adapter (Purchased Separately) Connect Wires You can make all these connections without even being in the vehicle. 1. Splice or crimp wires. 2. Attach wiring adapter to the car wiring harness. Wiring Diagram / Color Codes 1. Power Antenna (dark blue wire) - - Jensen CDX6311 | Instruction Manual - Page 8
bend or slight "nick" to the outer cable sheath will cause signal degradation. The wiring diagram on page 3 will help you identify the proper connections. CDX6311 INSTALLATION This unit is designed for installation in cars, trucks and vans with an existing radio opening. In many cases, a special - Jensen CDX6311 | Instruction Manual - Page 9
supported with the strap to prevent damage to the dashboard from the weight of the radio or improper operation due to vibration. 10. Re-attach the front panel to the chassis and test radio operation by referring to the operating instructions for the unit. NOTE: For proper operation of the CD player - Jensen CDX6311 | Instruction Manual - Page 10
turn the unit off. Mode Press MODE (2) to select a different mode of operation, as indicated on the display panel. Available modes include tuner (F1, F2, F3, AM1, AM2), XM Radio, CDP and auxiliary (AUX). CD mode appears in the menu only if a CD is present in the CD player. Audio . CDX6311 Balance - Jensen CDX6311 | Instruction Manual - Page 11
clock display (CLK ON LCD) feature is activated, the clock and default greeting note will appear in the display when the radio is turned off but still connected to the ignition wire. "CLK ON LCD On" is the default display for this option. To select that the clock and greeting not be displayed - Jensen CDX6311 | Instruction Manual - Page 12
display feature is activated): "Radio Off", "Visit us at Jensen.com", "Enjoy Driving and Have carrying case to protect it from dirt and damage. CDX6311 Theft Deterrent LED A light-emitting diode (LED) is only be activated upon initial installation after all wiring is complete or if there is a - Jensen CDX6311 | Instruction Manual - Page 13
The CDX6311 comes seconds to enter manual tuning mode, then press the UP TUNING or DOWN TUNING buttons to move the radio frequency number up Stereo The unit will automatically pick up a stereo signal, when available. When in stereo mode, the "ST" icon (18) appears in the display. When no stereo - Jensen CDX6311 | Instruction Manual - Page 14
Radio, you must subscribe to the service using your radio's identification number. To display the radio ID, press the DOWN TUNING (| - Jensen CDX6311 | Instruction Manual - Page 15
random, shuffled order. Press RDM again to stop random play. Display CD Text Press AS/PS (21) to display any text encoded on the CD (song title, artist, etc.). CD Player Error Codes If a problem should develop while operating the CD player, an error code (ER-1, ER-2, etc.) may appear on the display - Jensen CDX6311 | Instruction Manual - Page 16
has been installed and properly connected, press the Reset button to initialize the installation. Refer to the owner's manual included with the CD changer for instructions on installing, loading and using the CD magazine. CD Changer Mode Press MODE (2) during radio or disc play to select operation - Jensen CDX6311 | Instruction Manual - Page 17
CDX6311. The remote control sensor is at the top left of the IX-BASS (18) button. CARE AND MAINTENANCE CD Player The following guidelines will help you extend the life of your CD player (Compact Disc Digital Audio) format "recorded / burned" onto a CD-R/RW. This unit does not support .MP3, .WMA, . - Jensen CDX6311 | Instruction Manual - Page 18
TROUBLESHOOTING Problem Does not operate (display does not light) No power to unit No speakers operate (display lights normally) Not all speakers operate Blows fuses CD skips too much Cause Corrective Action No power to yellow wire; Check connection with test light; no power to red wire check - Jensen CDX6311 | Instruction Manual - Page 19
) without charge for parts and repair labor. To obtain repair or replacement within the terms of this Warranty, please contact Jensen at the telephone number provided below. This Warranty does not extend to the elimination of car static or motor noise, to correction of antenna problems, to costs - Jensen CDX6311 | Instruction Manual - Page 20
CDX6311 16 - Jensen CDX6311 | Instruction Manual - Page 21
las entradas auxiliares de radios Listo Para JPORT (vendido por separado) • Controla todos los iPod excepto "Shuffle" (solamente audio) • Entrada a través de cambiador de CD • Enchufe ambos iPod y Cambiador de CD al mismo tiempo (opera independientemente) • Cable de interfaz iPod aprobado por APPLE - Jensen CDX6311 | Instruction Manual - Page 22
instalar el radio: • Llave torx, destornilladores plano y Philips • Cúter y peladores de cables • Herramientas para remover la radio existente (destornillador batería. 2. Quite Tornillos de Transporte 3. Quite el Radio de la Manga Levante el pestillo en ambos lados de la manga, quite la mitad del - Jensen CDX6311 | Instruction Manual - Page 23
La radio no funcionará si este cable no está conectado. 4. Accesorio/Ignición (cable roja) - Conectar al cable de la radio o al fusible de la radio. 10. Cables auxiliares de entrada (amarillo) 11. Antenna 12. Cable de Direca Conecta XM® 13. XM® Entrada Audio (RCA negro) 14. Cambiador de CD/Conector - Jensen CDX6311 | Instruction Manual - Page 24
un fusible incorrecto puede dañar la radio. El CDX6311 utiliza un fusible de 15 amperios ubicado bajo el conector de cables (Fusible ATO de 15 Amperios disparo instrumentos, bajo asiento, o en el tronco o la parte posterior del vehículo. Usted no monta el receptor directo de XM® cerca de temperaturas - Jensen CDX6311 | Instruction Manual - Page 25
CDX6311 6. Siga el diagrama de cableado detalladamente y asegúrese que todas las conexiones del arnés de cables estén seguras y aisladas con tuercas para cables extremo de la cinta perforada a una parte segura del tablero, ya sea arriba o abajo del radio, utilizando un tornillo y una tuerca hexagonal - Jensen CDX6311 | Instruction Manual - Page 26
un modo diferente de operación como se indica en la pantalla. Los modos disponibles incluyen radio, radio XM, CDP, y auxiliar. El modo CD solamente aparecerá en el menú si un CD ha sido introducido en el equipo previamente. Audio Mudo Presione mudo (3) por un momento para enmudecer el volumen del - Jensen CDX6311 | Instruction Manual - Page 27
CDX6311 NOTA: Paneles LCD pueden tardar más en iluminarse cuando esté expuesto a pantalla está activa, el reloj y el saludo predeterminado aparecerán en pantalla cuando el radio esté apagado pero aún conectado al cable de ignición. La opción predeterminada que aparecerá en pantalla es "CLK ON LCD On - Jensen CDX6311 | Instruction Manual - Page 28
Radio Off, Visit us at Jensen.com, Enjoy Driving and Have a Safe Trip." (Radio Apagada, Visítenos en Jensen de suciedad o daños.. CDX6311 Reinsertando el Panel Delantero Para colocar parte trasera del panel, esto puede causar una operación intermitente u otro mal funcionamiento. Posicione la parte - Jensen CDX6311 | Instruction Manual - Page 29
Manual Pulse el botón a templar para arriba o abajo (10 o 11) por más de 3 segundo para cambiar la frecuencia de la radio 21) por menos de 3 segundos. La radio hará una pausa de 5 segundos en cada detenga cuando haya encontrado la emisora deseada. Stereo La unidad tomará automáticamente una señ - Jensen CDX6311 | Instruction Manual - Page 30
CDX6311 OPERATION DE LA RADIO XM® Usted puede suscribir a la radio de XM® en www.xmradio.com, o llamando (800) 967-2346. Usted necesitará la identificación de la radio Pulse el botón AS/PS (21) por menos de 3 segundos. La radio hará una pausa de 5 seg- undos en cada emisora que encuentre para las - Jensen CDX6311 | Instruction Manual - Page 31
CDX6311 OPERACIÓN DEL REPRODUCTOR DE CD Inserte y Quite CDs Presione el botón de quite (22) y deje el panel delantero motorizado hacen pivotar-abajo para exhibir la ranura del CD. Inserte un lado de la etiqueta del CD para arriba. Después de insertar un CD .). No intente utilizar CD simples de 3" (8 - Jensen CDX6311 | Instruction Manual - Page 32
CD. Modo de Cambiador de CD Presione MODE (2) durante la ejecución de la radio o de un CD para seleccionar la operación de cambiador de CD CD regular. Refiérase a la sección de Operación del Equipo de CD de este manual si desea más detalles. CDX6311 iPod o un Cambiador de CD opcional. Lea el manual - Jensen CDX6311 | Instruction Manual - Page 33
CDX6311. El sensor del mando a distancia está en la izquierda superior del botón de IX-BASS (18). CUIDADO Y MANTENIMIENTO Cuidado del Equipo de CD reconoce solamente el formato de CDDA (audio de Digital del disco compacto) registrado sobre un CD-R/RW. Esta unidad no apoya el MP3, el WMA, el WAV, el - Jensen CDX6311 | Instruction Manual - Page 34
del altoparlante producen cortocircuitos en la conexión a tierra Asegoerese de que el cable no está pellizcado. Fusible incorrecto/fusible Instale el fusible do voltaje demasiado pequeño apropiado. El CD salta demasiado El montaje del receptor no Revise la correa de montaje y está sólido - Jensen CDX6311 | Instruction Manual - Page 35
CDX6311 GARANTIA LIMITADE DE 12 MESES AUDIOVOX CORPORATION (la Compañía) garantiza al comprador minorista original del presente producto que en el caso de que este producto o cualquiera de las partes Garantía, entre en contacto con por favor Jensen en el número de teléfono proporcionado abajo - Jensen CDX6311 | Instruction Manual - Page 36
CDX6311 32 - Jensen CDX6311 | Instruction Manual - Page 37
sorties stéréos RCA pour un branchement facile aux entrées auxiliaires de radios Prêt pour JPORT (vendu séparément) • Contrôle tous les iPodS sauf « Shuffle » (seulement audio) • Entrée passthru changeur CD • Brancher le iPod et le changeur CD en même temps (opère independamment) • Câble d'interface - Jensen CDX6311 | Instruction Manual - Page 38
installer la radio : • Type Torx des tournevis plat et Philips • Des coupeurs de fil et séparateurs d'épuisement • Outils pour enlever la radio existante (tournevis commencer. 2. Enlevez les écrous de transportation 3. Enlevez la radio de la manche Soulevez les loquets aux deux côtés de la manche pour - Jensen CDX6311 | Instruction Manual - Page 39
CDX6311 ) - Connectez au fil de la radio existante ou au fusible du radio. 5. Haut parleur d'avant à gauche Audio XM® (noir RCA) 14. Changeur CD/Connecteur JPORT - Utilisez cette prise femelle à 8 aiguilles pour brancher un changeur CD facultatif ou un JPORT (vendu séparément). *TERK XMDJEN100 cables - Jensen CDX6311 | Instruction Manual - Page 40
Fusibles Lors du remplacement d'un fusible, assurez-cous que le fusible de remplacement est du type et de la puissance appropriés. L'utilisation d'un fusible non approprié pourrait endommager la radio. Le CDX6311 est doté d'un fusible de 15 A, situé sous le connecteur du câblage (15 A à fusion - Jensen CDX6311 | Instruction Manual - Page 41
En cas de problèmes ou si vous avez besoin d'aide, prenez contact avec Support Technique au numéro 1-800-323-4815 de 8h 30 à 19h EST lundi à opération de la radio en vous référant aux instructions d'opération pour l'appareil. A NOTER : Pour le fonctionnement correct du changeur CD, le châssis doit - Jensen CDX6311 | Instruction Manual - Page 42
/plateau de montage à la sous-planche de bord suivant les instructions contenues dans la trousse d'installation. 3. Attachez la lanière de support à la radio et à la planche de bord suivant les instructions pour l'installation universelle. 4. Remplacez le panneau de la planche de bord. Installation - Jensen CDX6311 | Instruction Manual - Page 43
. Des modes disponibles peuvent comprendre la radio, radio XM, CD, et auxiliaire. La mode CD n'apparaîtra dans le menu que s'il y a un disque compact dans le lecteur de CD. Mise en sourdine Appuyez sur mise en sourdine (3) pour mettre le volume audio en sourdine. Sourdine sera apparaîtra sur - Jensen CDX6311 | Instruction Manual - Page 44
ôle volume pour régler l'interrupteur à résistance réglée à des réglages bas. CDX6311 Défilant XM Cette option détermine si ou non le texte affiché XM défile d'une d'un top sonore audible lorsque les boutons sont appuyés sur la face de la radio. « BEEP TONE On » est le réglage par défaut. Tournez - Jensen CDX6311 | Instruction Manual - Page 45
CDX6311 Lumière principale marche/arrêt Lorsque la lumière principale est allumée va défiler à travers les messages suivants si la fonction affichage horloge sélectionnable est activée : Radio Off, Visit us at Jensen.com, Enjoy Driving and Have a Safe Trip. Relâchement du panneau d'avant Le bouton du - Jensen CDX6311 | Instruction Manual - Page 46
chiffre préétabli apparaît à l'affichage. CDX6311 Rappel d'une station Sélectionnez une bande PS (21) pendant moins de trois secondes. La radio fait une pause de cinq secondes à chaque station lorsque vous avez atteint la station désirée. Stereo L'unité prendra automatiquement un signal stéréo, quand - Jensen CDX6311 | Instruction Manual - Page 47
apparaisse à l'affichage. Affichage du code de identification Avant de pouvoir écouter votre radio XM®, vous devez adhérer au service en utilisant votre numéro d'identification de votre radio. Pour afficher l'identification de la radio, appuyez sur le bouton DOWN TUNING (| - Jensen CDX6311 | Instruction Manual - Page 48
qui vient avec ce produit. CDX6311 Lecutre aléatoire (RDM) Appuyez sur le bouton RDM (15) pour écouter toutes les plages du CD, de façon aléatoire, ) pendant plus d'une seconde pour avancer ou reculer rapidement. La lecture de CD commence dés que vous relâchez le bouton. Balayage (SCN) Appuyez sur - Jensen CDX6311 | Instruction Manual - Page 49
Reset pour initialiser l'installation. Le JPORT peut être utilisé pour contrôler votre iPOD ou un changeur CD facultatif. Référez-vous au guide du propriétaire fourni avec le JPORT pour des instructions concernant l'opération des engins externes attachés à votre JPORT. Codes d'erreur de commutateur - Jensen CDX6311 | Instruction Manual - Page 50
bouton de IX-BASS (5). CDX6311 SOIN ET ENTRETIEN Soins pour la platine CD Les principes suivants vous permettront de prolonger la vie de votre platine CD. 1. Lors de nettoyage de Digital de disque compact). Elle ne soutient pas le MP3, le WMA, le WAV, l'OGG ou d'autres formats. Le format de - Jensen CDX6311 | Instruction Manual - Page 51
CDX6311 DÉPANNAGE Probléme Cause Mesure à Prendre L' type et de tance insuffisante puissance appropriés. Le CD saute contin- Récepteur pas fixé solide- Vérifiez l'installation et la bande uellement ment ou bande de fixation de fixation, puis solidifiez au mal fixée besoin. SPECIFICATIONS - Jensen CDX6311 | Instruction Manual - Page 52
lequel vous vivez. U.S.A : 1-800-323-4815 CANADA: Composez le 1-800-323-4815 connaitre l'adresse du poste de garantie de votre région. CDX6311 Audiovox Electronics Corporation Hauppauge, NY 11788 Technical Assistance: 1-800-323-4815 www.jensen.com © 2006 Audiovox Ver. 120905 Imprimé en Chine 48
-
 1
1 -
 2
2 -
 3
3 -
 4
4 -
 5
5 -
 6
6 -
 7
7 -
8
-
9
-
10
-
11
-
12
-
13
-
14
-
15
-
16
-
17
-
18
-
19
-
20
-
21
-
22
-
23
-
24
-
25
-
26
-
27
-
28
-
29
-
30
-
31
-
32
-
33
-
34
-
35
-
36
-
37
-
38
-
39
-
40
-
41
-
42
-
43
-
44
-
45
-
46
-
47
-
48
-
49
-
50
-
51
-
52
 |
 |
