Jensen VR187 Owners Manual - Page 17
LCD Operation continued, Remote Control, Operación LCD continuado, Control Remoto, Opération l'
 |
UPC - 681787014550
View all Jensen VR187 manuals
Add to My Manuals
Save this manual to your list of manuals |
Page 17 highlights
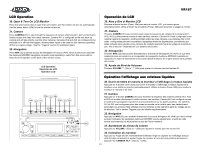
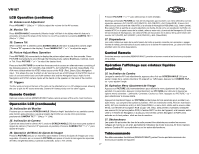
VR187 LCD Operation (continued) 33. Volume Level Adjustment Press VOLUME "-" (33a) or "+" (33b) to adjust the volume for the AV sources. 34. Monitor Tilt Press SCREEN ANGLE momentarily ("Monitor Angle" will flash in the diplay when this feature is activated), and adjust the angle of the monitor to one of five positions by pressing CAMERA TILT "-" (34a) or "+" (34b). 35. Camera Tilt When camera AV1 is selected, press SCREEN ANGLE (35) twice to adjust the camera angle ("Camera Tilt" appears in the display). Press CAMERA TILT "-" or "+" to adjust the angle . 36. Picture Adjust Menu Operation Press PICTURE (36) momentarily to display the picture adjust menu for five seconds. Press PICTURE momentarily to scroll through the following menu options Brightness, Contrast, Color or Tint. Press PICTURE "-" or "+" to select the desired level. Press and hold PICTURE for more than three seconds to access an alternate menu consisting of the following options: AV1 (On/Off), AV2 (ON/OFF), AV3 (ON/OFF) and AV4 (Video/RGB). The AV4 menu selects either the NTSC video source or the RGB ( Red ,Green, Blue) Navigation input . This allows the user to attach an AV source (such as a DVD player) to the NTSC input on back of unit and switch back and forth between this and the Navigation input. Audio for the Navigation and NTSC camera inputs will be heard on the speaker on the back of the monitor. 37. Triggers The four wires coming out the back of the radio can be attached to turn on /off voltage sources, allowing the user to pick the AV source externally. Camera AV1 takes priority over the other triggers. Remote Control Optional remote controls (REMSVR185KIT) allow remote access of the unit's main functions. Operación LCD (continuado) 34. Inclinación del Monitor Presione por un momento SCREEN ANGLE ("Monitor Angle" destellará en su pantalla cuando esta función esté activada), y ajuste el ángulo del monitor en una de cinco posiciones presionando CAMERA TILT "-" (34a) o "+" (34b). 35. Inclinación de Camera Cuando se selecciona la cámara AV1, presione SCREEN ANGLE (35) dos veces para ajustar el ángulo de cámara ("Camera Tilt" aparecerá en pantalla). Presione CAMERA TILT "-" o "+" para ajustar el ángulo. 36. Operación del Menú de Ajuste de Imagen Presione PICTURE (36) por un momento para mostrar el menú de ajuste de imagen por cinco segundos. Presione por un momento PICTURE para pasar a través de las siguientes opciones de menú: Brightness (Brillo), Contrast (Contraste), Color o Tint (Tinte). Presione PICTURE "-" o "+" para seleccionar el nivel deseado. Mantenga presionado PICTURE por más de tres segundos para acceder a un menú alternativo con las siguientes opciones: AV1 (On/Off), AV2 (ON/OFF), AV3 (ON/OFF) y AV4 (Video/RGB). El menú AV4 selecciona ya sea la fuente de video NTSC o la entrada de Navegación RGB (Red (rojo), Green (verde), Blue (azul)). Esto le permite al usuario adjuntarle una fuente AV (tal como un reproductor de DVD) a la entrada NTSC en la parte trasera de la unidad y alternar entre esto y la entrada de Navegación. El audio de las entradas de Navegación y de cámara NTSC se escucharán en el altavoz de la parte trasera del monitor: AV1 (On/Off), AV2 (ON/OFF), AV3 (ON/OFF) y AV4 (Video/RGB). 37. Disparadores Los cuatro cables que salen de la parte trasera del radio se pueden conectar para encender o apagar fuentes de voltaje, permitiéndole al usuario seleccionar la fuente AV externamente. La cámara AV1 tiene prioridad sobre los otros disparadores. Control Remoto Controles remotos opcionales (REMSVR185KIT) permiten el acceso remoto a las funciones principales de la unidad. Opération l'affichage aux cristaux liquides (continué) 35. Inclination de Caméra Lorsque la caméra AV1 est sélectionnée, appuyez deux fois sur SCREEN ANGLE (35) pour ajuster l'angle de la caméra (Caméra Tilt apparaît sur l'affichage). Appuyez sur CAMERA TILT ou + pour ajuster l'angle. 36. Opération Menu Ajustement de l'image Appuyez sur PICTURE (36) momentanément pour afficher le menu ajustement de l'image pendant cinq secondes. Appuyez momentanément sur PICTURE pour dérouler à travers les options menu suivantes : Luminosité, Contraste, Couleur ou Teint. Appuyez sur PICTURE - ou + pour sélectionner le niveau désiré. Appuyez et maintenez l'appui sur PICTURE pendant plus de trois secondes pour accéder à un autre menu qui comprend les options suivantes : AV1 (en marche/en arrêt), AV2 (en marche/en arrêt), AV3 (en marche/en arrêt), et AV4 (Vidéo/RGB). Le menu AV4 reflète soit la source vidéo NTSC, soit l'entrée de navigation RGB (rouge, vert, bleu). Cela permet à l'utilisateur d'attacher une source AV (tel qu'une platine DVD) à l'entrée NSTC au dos de l'appareil, et à basculer entrer celle-ci et l'entrée de Navigation. L'audio pour les entrées caméra Navigation et NSTC sera entendu sur le haut parleur situé au dos du moniteur. 37. Déclencheurs Les quatre fils qui sortent du dos de la radio peuvent être attachés pour mettre les sources voltages en marche ou en arrêt, permettant à l'utilisateur de choisir la source AV d'une manière externe. Caméra AV1 aura précédence sur les autres déclencheurs. Télécommande Des télécommandes facultatives (REMSVR185KIT) permet l'accès par télécommande des fonctions principales de l'appareil. 17
-
 1
1 -
2
-
3
-
4
-
5
-
6
-
7
-
8
-
9
-
10
-
11
-
 12
12 -
 13
13 -
 14
14 -
 15
15 -
 16
16 -
 17
17 -
 18
18 -
 19
19 -
 20
20 -
 21
21 -
 22
22 -
23
 |
 |