Kenmore 32184 Owners Manual - Page 24
Leakage, Checkpoints
 |
View all Kenmore 32184 manuals
Add to My Manuals
Save this manual to your list of manuals |
Page 24 highlights
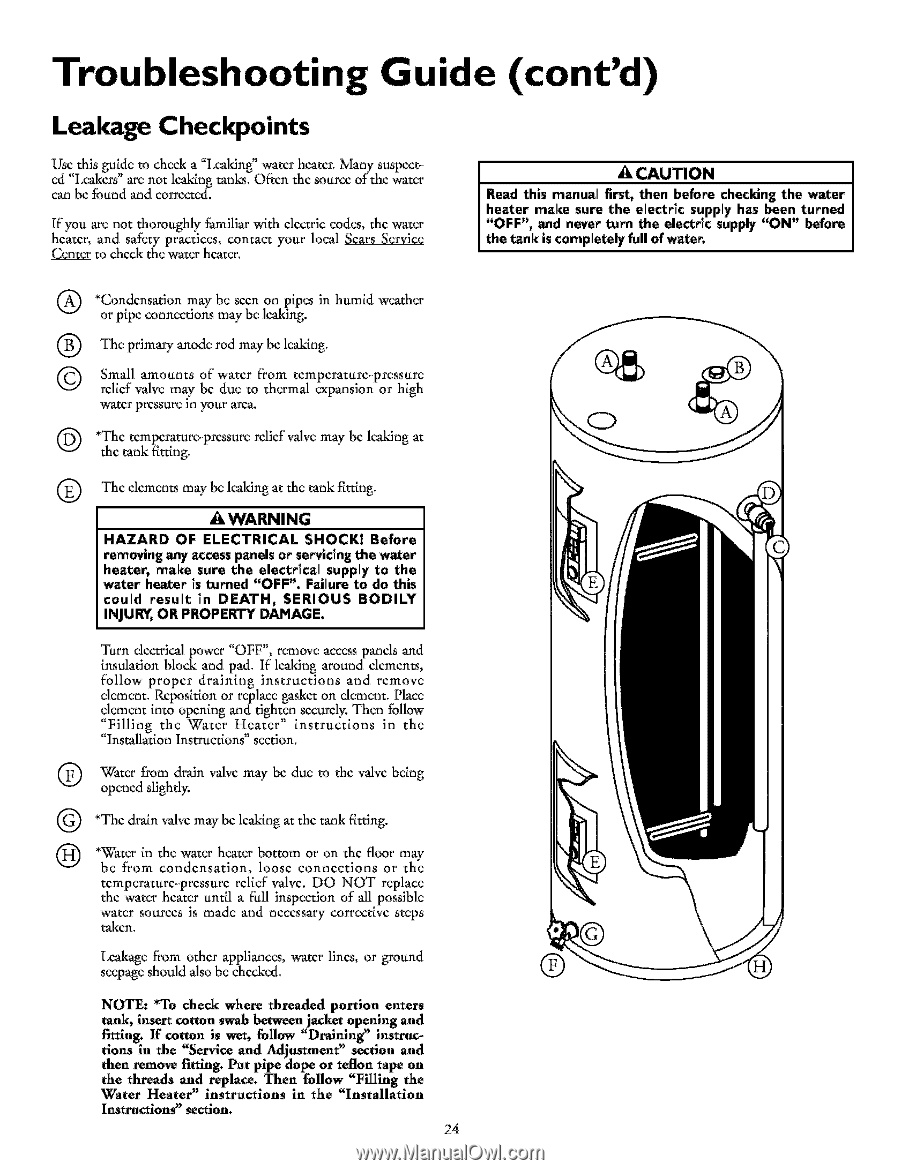
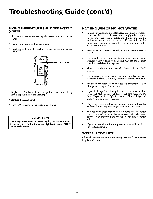
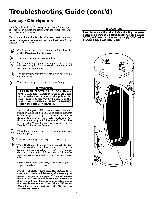
Troubleshooting Guide (cont'd) Leakage Checkpoints Usc this guide to check a q,eaking" watcr hcatcr. Many st_spcctcd "l,cakers" are not leaking tanks. Olden the source of the water can bc found and corrcctcd. lfyou are not thoroughly J:amiliar _4th clcctric codcs, thc watcr heater, and safety practices, contact your local Sears Service Center to check the water heater. CAUTION I I Read this manual tint, then before checking•the water I heater make sure the electric supply has been turned "OFF", and never turn the electric supply "ON" before the tank s completely full of waten ® *Condcnsation may bc sccn on pipcs in humid wcathcr or plpc connections may bc Icaking. ® Thc primary anodc rod may bc lcaklng. © Small amounts of water fi'om temperature-pressure rclicf valve may bc duc to thermal expansion or high watcr pressure m your arca. @ *Thc tcmpcraturc-prcssurc rclicf waivemay bc Icaking at the yank fi_ttlng. ® Thc clcmcnts may bc leaking at the tank fittlng, A WARNING HAZARD OF ELECTRICAL $HOCKI Before removing any accesspanelsor servidng the water heater, make sure the electrical supply to the water heater _sturned "OFF". Failure to do this could result _n DEATH_ SERIOUS BODILY INJUR_ OR PROPERTY DAMAGE. Turn dcctrical powcr "OFF", rcmovc acccss pancls and insolation block and pad. If lcaking around clcmcnts, I_bllow propcr draining instructions and rcmovc element. Rcposltlon or replace gaskct on element. Place element into opcnlng andtightcn scct_rcly.Then follow "Filling thc Watcr Hcatcr" instructions in thc "Insvallatlon Instructions" section, @ Water from drain waivemay bc duc to thc vdvc being opcncd slightly. @ *Thc drain valvc may bc lcaklng at thc tank fi'Ltting. @ *Water in the water heater bottom or on thc floor may bc from condcnsation, loosc conncctions or the tcmpcraturc-prcssurc rcllcf valvc. DO NOT replace the water heater until a flail inspection of ,all possible water sourccs is made and ncccssary corrcctlvc steps takcn, bcakagc from othcr applianccs, watcrlincs, or ground seepage should also bc chcckcd, ® NOTE: *To check where threaded portion enters tank, insert cotton swab betwcenjacket opening and firtlng÷ If cotton is wet_ follow "Draining' ins¢_ctions in the "Service and Adjostmen£ _ section and then remove fitting. Pat pipe dope or _¢flon _ape on the _hreads and replace. Then follow "Filling the Water Heater" instractions in the "Installation Ins*Ja_ctlon¢' section. 24
-
 1
1 -
2
-
3
-
4
-
5
-
6
-
7
-
8
-
9
-
10
-
11
-
12
-
13
-
14
-
15
-
16
-
17
-
18
-
 19
19 -
 20
20 -
 21
21 -
 22
22 -
 23
23 -
 24
24 -
 25
25 -
 26
26 -
 27
27 -
 28
28 -
 29
29 -
30
-
31
-
32
 |
 |