Kenmore 4123 Installation Instructions
Kenmore 4123 - Elite 30 in. Electric Cooktop Manual
 |
View all Kenmore 4123 manuals
Add to My Manuals
Save this manual to your list of manuals |
Kenmore 4123 manual content summary:
- Kenmore 4123 | Installation Instructions - Page 1
USE. READ AND SAVE THESE iNSTRUCTiONS FOR FUTURE REFERENCE. FOR YOUR SAFETY: Do not store or use gasoline or other flammable vapors and liquids in the vicinity of this or any other appliance. Cooktop Dimensions iMPORTANT INSTALLATION-INFORMATION All electric cooktops run off a single phase, three - Kenmore 4123 | Installation Instructions - Page 2
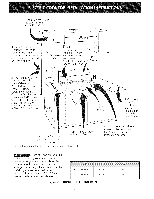
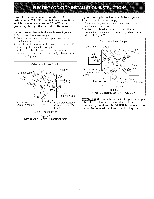
of Junction Box Letters on this figure refer to chart on front page except for J & K. It is not recommended to use drawer underneath cooktop. Empty space is needed for installation purpose. _To eliminate the risk of burns or fire by reaching over heated surfaces, cabinet storage space located - Kenmore 4123 | Installation Instructions - Page 3
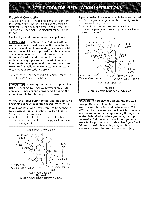
appliance, so it can be moved if servicing is ever necessary. 4. A suitable strain relief must be provided to attach the flexible armored cable to the junction box. Unpacking Instructions _The electrical power to the cooktop ) , Leave corner supports on cooktop until completion of Electrical - Kenmore 4123 | Installation Instructions - Page 4
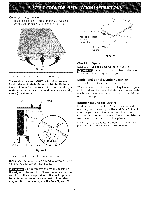
-Junction Box Ground Wire / "_-J_ (Bare or Green Wire) U.L.-Listed Conduit Connector (or CSA listed) Cable from appliance Figure 4 3-WIRE GROUNDED JUNCTION BOX If your cooktop has a 4-wire cable to be connected to a 3-wire grounded junction box (see figure 5): 1. Disconnect the power supply - Kenmore 4123 | Installation Instructions - Page 5
, or where local codes DO NOT permit grounding through the neutral (white) wire: If your cooktop has a 3-wire cable (see figure 6): 1. Disconnect the power supply. 2. Separate the green (or bare copper) and white appliance cable wires. 3. Cap the white wire from the power supply cable if a 3-wire - Kenmore 4123 | Installation Instructions - Page 6
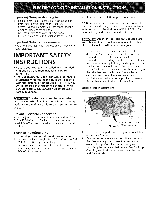
cooktop. Before You Call for Service Read the Before You Call for Service Checklist and operating instructions in your Use and Care Guide. It may save you time and expense. The list includes common occurrences that are not the result of defective workmanship or materials in this appliance. Refer - Kenmore 4123 | Installation Instructions - Page 7
cm) min. para una superficie protegida. Dimensiones del Recortado de la Estufa ......r. C 4" el x 8" (10.2 centimetros x 20.3 centimetros) apertura en la parte posterior derecha para encaminar el cable armado si un panel est,1presente M0del030" M0del036" i Figura 1 303A(78.1) 363A(93.3) 21h - Kenmore 4123 | Installation Instructions - Page 8
de 0.020 ". 4- A 18" (45.7 cm) k min. distancia recomendada entre el borde trasero del corte y el compartimiento de combustible mas cercano sobre la parte superior del armario 10" (25.4 cm) F G 12" (30.5 cm) J min. desde el borde del torte hasta el compartimiento de combustible (ambos lados - Kenmore 4123 | Installation Instructions - Page 9
- 01tima edici6n en los Estados Unidos, o el C6digo EI6ctrico Canadiense CSA Standard C22,1, Part I en Canada, La alimentad6n el6ctrica a la estufa deberia apagarse mientras se hacen las antes de utilizar. Ve a la parte sobre Limpieza y Mantenimiento este Manual del usuario. de la Cubierta en 9 - Kenmore 4123 | Installation Instructions - Page 10
Conexi6n Electrica Conecte el cable blindado flexible que se extiende clesde la superficie del artefacto hasta la caja de empalmes utilizando una grapa de alivio de tensi6n adecuada en el punto en que el cable blindado entra en la caja de empalmes. Realizar luego la conexi6n el@ctricade la siguiente - Kenmore 4123 | Installation Instructions - Page 11
Si la cocina se usa en una instalacion nueva de ramal de circuito (1996 NEC), en una casa rodante, en un vehiculo para recreacion o si los codigos locales NO permiten hacer la conexion a tierra a traves del cable neutral (blanco): Si su cocina tiene un cable de 3 hilos (ver figura 6): 1. Desconecte - Kenmore 4123 | Installation Instructions - Page 12
ANSI/ NFPA No. 70--ultima edici6n, o con la Norma CSA C22.1, C6digo Electrico Canadiense, Parte 1 (Figura 9). Estufa uperficie del amario Revisi6n de operaci6n Consulte el Manual del Usuario para las instrucciones de funcionamiento. No toque elcristaloloselementosdelaestufa. Puede que est_n Io
-
 1
1 -
 2
2 -
 3
3 -
 4
4 -
 5
5 -
 6
6 -
 7
7 -
8
-
9
-
10
-
11
-
12
 |
 |
iNSTALLATiON
AND
SERVICE MUST
BE
PERFORMED
BY A
QUALiFiED
iNSTALLER.
iMPORTANT:
SAVE FOR
LOCAL
ELECTRICAL iNSPECTOR'S
USE.
READ
AND
SAVE
THESE
iNSTRUCTiONS
FOR FUTURE REFERENCE.
FOR YOUR SAFETY: Do not store
or use gasoline
or other
flammable
vapors
and liquids
in
the vicinity
of this or any other
appliance.
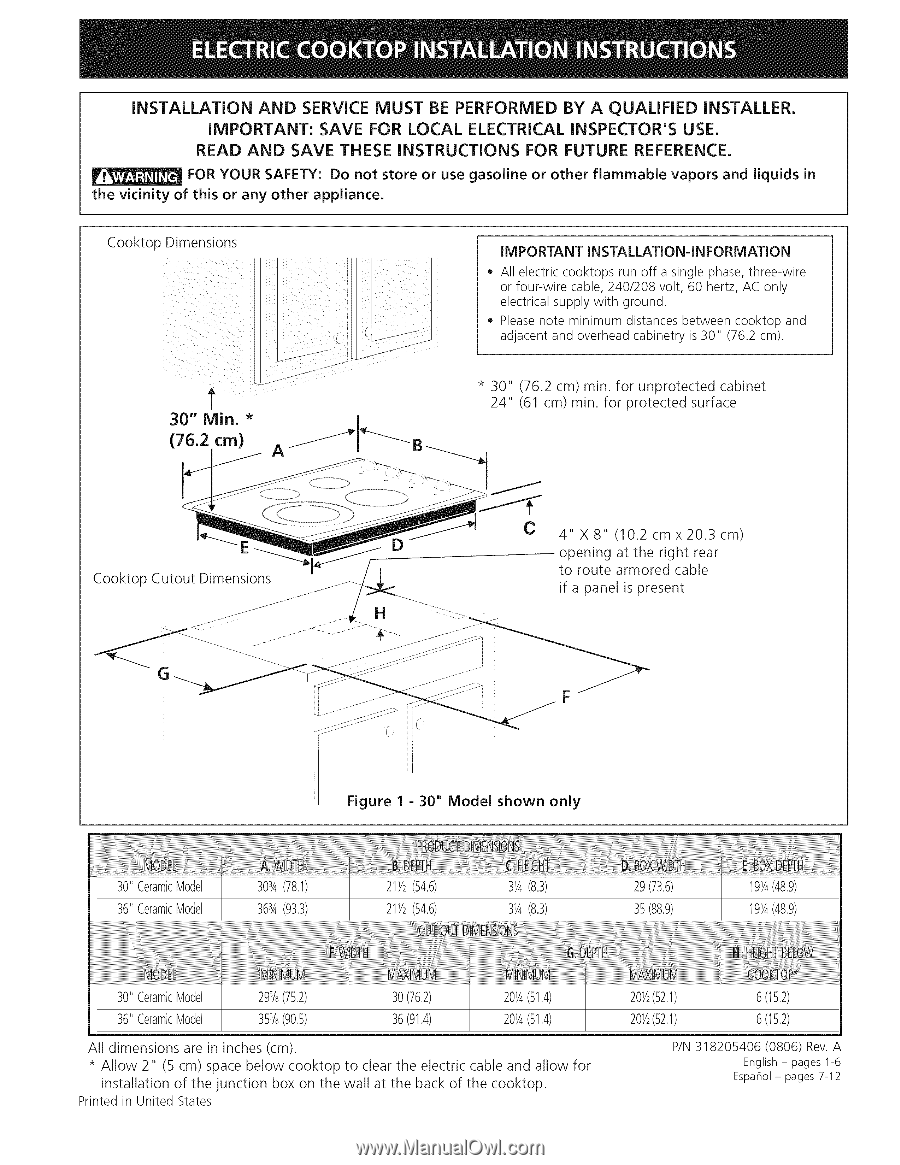
Cooktop Dimensions
iMPORTANT INSTALLATION-INFORMATION
All electric cooktops
run off a single phase, three-wire
or four-wire
cable, 240/208
volt, 60 hertz, AC only
electrical supply with
ground.
Please note minimum
distances between cooktop
and
adjacent and overhead cabinetry is 30"
(76.2 cm).
* 30"
(76.2 cm) min. for unprotected
cabinet
24"
(61 cm) min. for protected surface
Cooktop Cutout Dimensions
G
C
4"
X 8" (10.2 cm x 20.3 cm)
opening
at the right rear
to route armored
cable
if a panel is present
Figure
I - 30"
Model
shown
only
30"Ceramic
Model
36"Ceramic
Model
M
:ii
!ii i!i!i'!i'!i'i! ii!i!iill
303A
(78.1)
21Y2
(54.6)
3¼ (8.3)
29(73:6)
363A
(93,3)
21Y2
(54.6)
3¼ (8,3)
35(88,9)
DTH
_
19¼(48.9)
19¼(48.9)
30"Ceramic
Model
29%(75.2)
30(76.2)
20¼(51.4)
20Y2
(52.1)
6(15.2)
36"Ceramic
Model
35%(90,5)
36(914)
20¼(51,4)
20Y2
(52,1)
6(152)
All dimensions are in inches (cm).
* Allow
2" (5 cm) space below cooktop to clear the electric cable and allow for
installation of the junction
box on the wall at the back of the cooktop.
Printedin United States
P/N 318205406
(0806)
Rev. A
English - pages 1-6
Espahol - pages 7-12